Re: New TTT - The Boxcar - New Sliding Bed

General Discussion about almost anything Teardrop or camping related

Postby Catoosa Grani » Wed Jan 16, 2008 12:38 pm

Bruce, thanks for the pic., yes it is pretty good. I really like the looks of your new trailer. I am anxious to see how the inside is laid out.

LOOKIN GOOD!
Betty
ImageImage
User avatar
Catoosa Grani
Gold Donating Member
 
Posts: 1333
Images: 86
Joined: Tue Jan 30, 2007 8:45 pm
Location: Catoosa, OK.

Postby Mike C. » Wed Jan 16, 2008 1:27 pm

Bruce,

Looks really good. :thumbsup: Can't wait to see it done. 8)
Uncle M ( Mike )
User avatar
Mike C.
our Uncle M
 
Posts: 4140
Joined: Mon Jun 18, 2007 10:13 pm
Location: Southwest, MO

Postby bdosborn » Mon Jan 21, 2008 10:40 pm

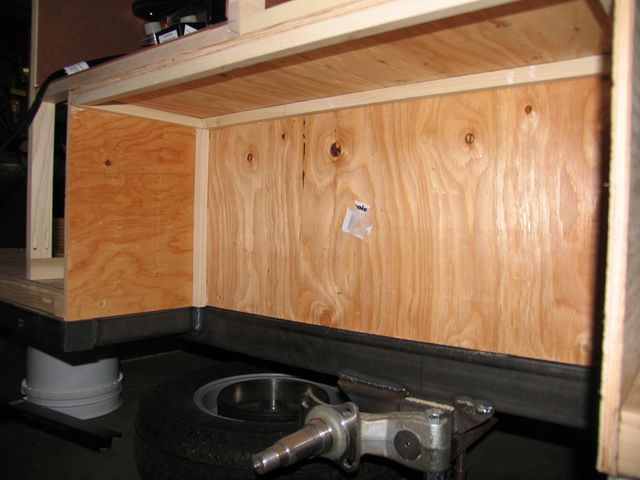
I made some more progress this weekend - I finished the wheel wells. Boy, the decision to use 14" wheels comes back to haunt me with a 12" high wheel well. I wanted tires with enough weight capacity to carry everything safely at highway speeds, I just didn't realize how much interior room it would take. Oh well. I used leftover CDX since its pretty common for a blowout to trash the wheel well. Everything will be replaceable.
Image
Image

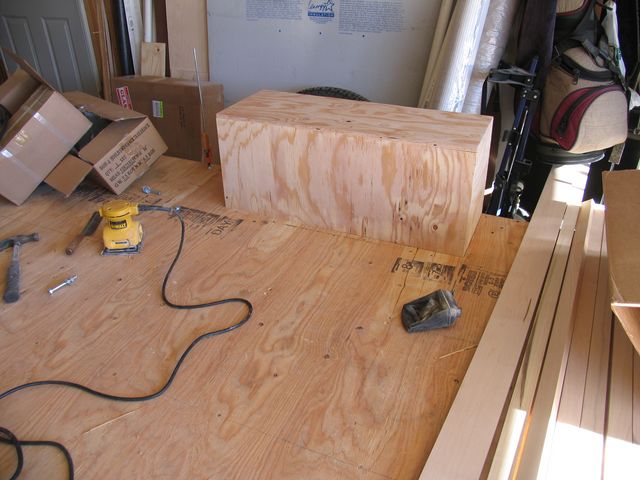
Now I'm starting on the inside cabinets (before I make the walls!). First cabinet will hold the fridge and stove. It took me forever to figure out all the measurements to make it all fit.

Image
Image
Image

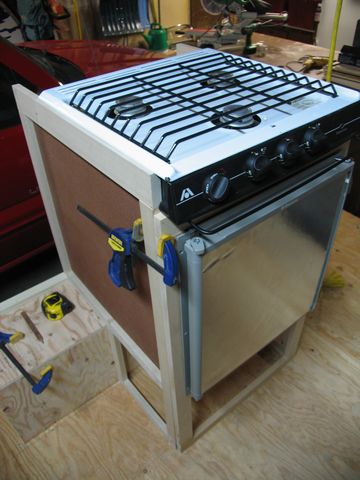
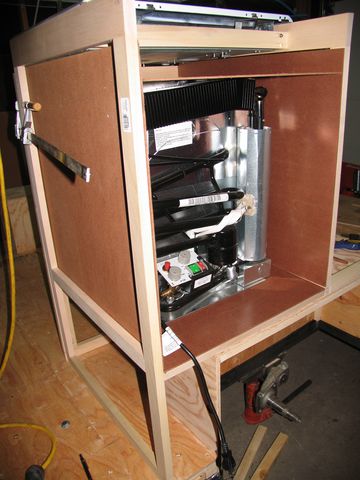
There's still a lot of work left with insulating and finishing but it fits pretty good so far. I need to make the fridge compartment airtight so we don't suffocate when its on propane. I also made it too deep so I need to take about 2" off the depth. Its held together with pocket screws, which makes it easy to tweak things until you get it right.

Bruce
2009 6.5'X11' TTT - Boxcar
All it takes is a speck of faith and a few kilowatts of sweat and grace.
Image
Boxcar Build
aVANger Build
User avatar
bdosborn
Donating Member
 
Posts: 5494
Images: 772
Joined: Wed May 05, 2004 11:10 pm
Location: CO, Littleton
Top

Postby Elumia » Tue Jan 22, 2008 9:30 pm

I am curious as to why you framed the steel frame with wood and the then ply on top of that framing. What is the advantage of doing that over putting the ply directly on the steel chassis?

Mark
User avatar
Elumia
500 Club
 
Posts: 641
Images: 15
Joined: Tue Jan 17, 2006 2:02 am
Location: Napa, CA
Top

Postby lvrdrm » Wed Jan 23, 2008 12:16 am

born, are you insulating that floor? If not, did putting a wood frame help minimize the amount of drilling to the actual steel frame. How many "fastners" did you actually use to attach the floor? I couldn't tell but did you have gussets welded on the steel frame? Also wondering why you didn't prep/seal your frame before adding your wood floor, might be a little more difficult now. maybe I missed something :?
lvrdrm
Teardrop Inspector
 
Posts: 21
Images: 13
Joined: Mon Mar 26, 2007 7:51 pm
Top

Postby bdosborn » Wed Jan 23, 2008 8:39 pm

Elumia wrote:I am curious as to why you framed the steel frame with wood and the then ply on top of that framing. What is the advantage of doing that over putting the ply directly on the steel chassis?

Mark


Mark,
This is going to be a standy and 1/2" ply will not span more than about 16" without bending *a lot* with me standing on it. My wife and I will both be standing in about the same spot (at the stove) so it needs extra bracing. I tried spanning 18" without any bracing and it was pretty crackly when I walked on it. I could have braced everything with metal but the wood is tons lighter. I wouldn't have braced it so much if it was a tear; the weight would have been spread out a lot more.
Bruce
2009 6.5'X11' TTT - Boxcar
All it takes is a speck of faith and a few kilowatts of sweat and grace.
Image
Boxcar Build
aVANger Build
User avatar
bdosborn
Donating Member
 
Posts: 5494
Images: 772
Joined: Wed May 05, 2004 11:10 pm
Location: CO, Littleton
Top

Postby bdosborn » Wed Jan 23, 2008 8:47 pm

lvrdrm wrote:born, are you insulating that floor? If not, did putting a wood frame help minimize the amount of drilling to the actual steel frame. How many "fastners" did you actually use to attach the floor? I couldn't tell but did you have gussets welded on the steel frame? Also wondering why you didn't prep/seal your frame before adding your wood floor, might be a little more difficult now. maybe I missed something :?


- Yeah I'm going to insulate the floor. I'm just going to screw insulation to the underside and leave the insulation exposed.
- I didn't drill into the frame, I used gussets (about 8 a side) to bolt to. I was going to use 4 gussets a side but realized I'd put the first four in the wrong spot. :?
- The floor is temporarily bolted to the frame so I could glue the decking down. I wanted to make sure all my bolt holes lined up while the glue was drying. I'll unbolt it and flip it over to prep and seal the floor.

Bruce
2009 6.5'X11' TTT - Boxcar
All it takes is a speck of faith and a few kilowatts of sweat and grace.
Image
Boxcar Build
aVANger Build
User avatar
bdosborn
Donating Member
 
Posts: 5494
Images: 772
Joined: Wed May 05, 2004 11:10 pm
Location: CO, Littleton
Top

Postby bdosborn » Sun Jan 27, 2008 8:17 pm

Worked on the bed platform today:
Image
Image
Image

Maple with baltic birch plywood inserts. It hardly weighs anything but its very strong. On to the cabinet for the sink next.

Bruce
2009 6.5'X11' TTT - Boxcar
All it takes is a speck of faith and a few kilowatts of sweat and grace.
Image
Boxcar Build
aVANger Build
User avatar
bdosborn
Donating Member
 
Posts: 5494
Images: 772
Joined: Wed May 05, 2004 11:10 pm
Location: CO, Littleton
Top

Postby doug hodder » Sun Jan 27, 2008 8:23 pm

Bruce...I really like that paneled look!!! I can't wait to see this baby at the IRG 2.0. Looks like you have all the nice "accessories" to go with it!! Nice job!!! :thumbsup: :thumbsup: Doug
doug hodder
*Snoop Dougie Doug
 
Posts: 12625
Images: 562
Joined: Tue Dec 14, 2004 11:20 pm
Top

Postby bdosborn » Sun Feb 03, 2008 4:19 pm

I made the sink cabinet this weekend:

Image
Image
Image

I also added the paneling to the side of the refrigerator cabinet and the front of the fridge. It's getting so you can see how everything will layout. I've got the shower pan sitting where it will go. I'll work on the wardrobe cabinet next. It will go across from the shower.

Bruce
2009 6.5'X11' TTT - Boxcar
All it takes is a speck of faith and a few kilowatts of sweat and grace.
Image
Boxcar Build
aVANger Build
User avatar
bdosborn
Donating Member
 
Posts: 5494
Images: 772
Joined: Wed May 05, 2004 11:10 pm
Location: CO, Littleton
Top

Postby bdosborn » Wed Feb 13, 2008 12:52 am

I had a drawer making party this weekend.
Image
Image
Image

1/2" baltic birch plywood for the sides and 1/4" baltic birch for the bottoms. I used the HF dovetail making jig for half blind dovetails. It takes forever to get the jig setup right but it works pretty good once you do. I needed a new dovetail bit but the one I got was too small so I used an old one. It chipped the ends off the pins on the front of the drawers but thats okay because no one will ever see those. I'll start installing the drawers then move on to cabinet doors.
Bruce
2009 6.5'X11' TTT - Boxcar
All it takes is a speck of faith and a few kilowatts of sweat and grace.
Image
Boxcar Build
aVANger Build
User avatar
bdosborn
Donating Member
 
Posts: 5494
Images: 772
Joined: Wed May 05, 2004 11:10 pm
Location: CO, Littleton
Top

Postby Miriam C. » Wed Feb 13, 2008 9:42 am

:beautiful: :woohoo: :clapping hands:
I'd say you will be very comfortable in this one. So much detail already :applause: :thumbsup:

Image
“Forgiveness means giving up all hope for a better past.â€
User avatar
Miriam C.
our Aunti M
 
Posts: 19675
Images: 148
Joined: Wed Feb 15, 2006 3:14 pm
Location: Southwest MO
Top

Postby Steve Frederick » Wed Feb 13, 2008 9:44 pm

Nice design, great progress!
I like the cabinet build! :thumbsup: :thumbsup:
Blessings, Steve
Adirondacks, Upstate New York
Building Journals
The Shop Manual's 8-years old!! Thank's everyone!
New! 'Rondack Lodge Plans!Order Here!
Image
User avatar
Steve Frederick
Custom Teardrop Builder
 
Posts: 1984
Images: 29
Joined: Thu Apr 15, 2004 5:02 pm
Location: Upstate New York, Adirondacks (Great Sacandaga Lake)
Top

Postby bdosborn » Wed Feb 13, 2008 10:52 pm

Miriam,
Building the interior before the walls makes it sooooo much easier. I can walk around on the floor and figure out where I can fit everything.

Steve,

Thanks, as you can see I'm using your favorite tool: a ROUTER! I've got your build manual and plan to use a variation of your wall building technique when I get to that point.

Bruce
2009 6.5'X11' TTT - Boxcar
All it takes is a speck of faith and a few kilowatts of sweat and grace.
Image
Boxcar Build
aVANger Build
User avatar
bdosborn
Donating Member
 
Posts: 5494
Images: 772
Joined: Wed May 05, 2004 11:10 pm
Location: CO, Littleton
Top

Postby bdosborn » Tue Feb 19, 2008 12:16 am

This weekend I got most of the cabinet doors built and the drawers mounted. Its starting to look pretty cool but I sure do have a lot of sanding to do. :R

Image
Image
Image

The door frames are oak with baltic birch inserts. I've got some of Doug Hodder's aniline dye I need to start experimenting with to see what color looks good but I won't do any finishing for a bit. I've got more to build!!!

Bruce
2009 6.5'X11' TTT - Boxcar
All it takes is a speck of faith and a few kilowatts of sweat and grace.
Image
Boxcar Build
aVANger Build
User avatar
bdosborn
Donating Member
 
Posts: 5494
Images: 772
Joined: Wed May 05, 2004 11:10 pm
Location: CO, Littleton
Top

PreviousNext

Return to General Discussion

Who is online

Users browsing this forum: No registered users and 23 guests