Sanity Check: Wall Thickness

General Discussion about almost anything Teardrop or camping related

Sanity Check: Wall Thickness

Postby RBB » Fri Jul 28, 2023 2:47 pm

Hello All, First post to the forum! Wow there is a lot of information here!

I am in the process of building my own Travel Trailer... bit larger than tear drop.

I made a pilgrimage to Botrangers over the 4th of July weekend and stocked up on Windows and doors!
(6 windows, Emergency Egress window, and door for under $400 USD!)
windows2.PNG
windows2.PNG (972.5 KiB) Viewed 540 times


Here is where I am looking for some advice... when I measure the windows to determine the WALL thickness they were designed for, I measure 1 3/8" from outer frame to inner frame with trim ring.
windows1.PNG
windows1.PNG (838.66 KiB) Viewed 540 times

(Looks deceiving, but trust me, when the trim ring is sitting metal on metal, the distance is 1 3/8".

Does this mean I should be planning on 1.25" thick walls? (Leaving room for tape/seals?)

I can find all kinds of info on Rough Openings Length and Width, but depth seems more ambiguous...
I want to design my walls to match the windows, not spec the windows based on existing wall thickness...

Sanity Check Please!? :?
User avatar
RBB
Teardrop Builder
 
Posts: 49
Joined: Sat Feb 11, 2023 7:31 pm

Re: Sanity Check: Wall Thickness

Postby DJ Davis » Sat Jul 29, 2023 10:59 am

RBB,

From what you describe, your wall thickness should be a minimum of 1.25". But then you didn't mention the material you plan to use to reach your desired wall thickness. Are you looking at 3/4" foam w/1/8" luan on each side or 3/4" plywood w/luan on each side? Planning on skinning w/aluminum or PMF? Yes, sealant tape/putty beads might possibly take up some of that "odd" .25", but if you're going for 1" walls and are still concerned about that 0.25", then I suggest you frame the opening with some 1/4" lath strips inside the cabin. Simple and effective plus adds some extra strength around the window opening.

As for the sanity...I'm kinda short on that, but I hope my input helps. ;)
DJ

They say "What doesn't kill you makes you stronger." I've noted that if it doesn't kill you, it waits patiently for another opportunity.
DJ Davis
Teardrop Master
 
Posts: 116
Images: 0
Joined: Sat Sep 21, 2019 3:11 am
Location: San Antonio, TX

Re: Sanity Check: Wall Thickness

Postby tony.latham » Sat Jul 29, 2023 6:44 pm

Here's my solution:

Image

Tony
User avatar
tony.latham
Gold Donating Member
 
Posts: 6900
Images: 17
Joined: Mon Jul 08, 2013 4:03 pm
Location: Middle of Idaho on the edge of nowhere
Top

Re: Sanity Check: Wall Thickness

Postby MickinOz » Sun Jul 30, 2023 1:30 pm

I did the same as Tony. I had doors suited to 34mm thick walls. My walls were 17mm plywood, so I cut a couple of 17mm "collars" glued and screwed them to the walls, and trimmed to the cut-out with the trimmer bit on the router.
MickinOz
1000 Club
1000 Club
 
Posts: 1255
Images: 3
Joined: Mon Feb 04, 2019 3:54 pm
Location: Somewhere, in 379,725 square miles of South Australia
Top

Re: Sanity Check: Wall Thickness

Postby Squigie » Mon Jul 31, 2023 2:49 am

Trim rings don't need to sandwich the whole window or door, they just need to secure the frame and hide the rough hole.

I don't have a better photo, since I have not been able to build my body yet. But I have already modified these trim rings to handle any wall thickness. They were designed for something like 1.5-2.75"; but I intend to build 1.25" walls (possibly thicker now, with redesign). So I got rid of the overlap and made them slip over the outer edge of the body. Actual trim ring, not a compromised sandwich half that stands off weirdly because it was installed in an application outside of that which was intended.
(Green arrow / left side are rain gutters. Red arrow / right side are trim rings, all the way against the outer flange.)
IMG_20230731_012543811.jpg
IMG_20230731_012543811.jpg (117.5 KiB) Viewed 396 times


I like actual trim rings, not things made to have a hard stop in a specific application but have to be adapted or shimmed to work in any other. :shrug:

--

I should probably update my "build thread" on why my trailer has been delayed, but haven't yet. It involves medical issues, followed by covid, followed by materials shortages, followed by near-death hospital issues, and more. And, because so much time has passed that I had to rob a couple parts to keep another trailer on the road, there have been design changes during additional difficult periods, that I have not finalized another design. But, at the end of the day, I just haven't built it, even though I have 85% of the materials on hand, including parts already modified and ready to install.
User avatar
Squigie
The 300 Club
 
Posts: 403
Joined: Sun Aug 04, 2019 7:52 am
Location: Southeastern ID
Top

Re: Sanity Check: Wall Thickness

Postby philpom » Tue Aug 01, 2023 5:33 pm

My walls are 3/4" ply covered with PMF. I used trim inside around the rough opening to get the appropriate thickness, it adds strength and I think it adds a nice detail to the inside. The screws can be of variable length so you should have some wiggle room with the thickness, a little too thick is better than too thin.

Image
philpom
Teardrop Master
 
Posts: 179
Images: 100
Joined: Sun Jun 21, 2020 4:53 am
Top

Re: Sanity Check: Wall Thickness

Postby RBB » Thu Aug 03, 2023 10:12 pm

@Squigie
Thanks for the feedback... I was wondering if I "had" to sandwich and have metal on metal for the trim rings... sounds like that is an "optional" step!

I made some "test" walls today to see exactly how these windows would mount up.

I built two different wall sections. One was 1.25" thick, the other was 2" thick.
wall thickness side example.PNG
Side Profiles
wall thickness side example.PNG (956.33 KiB) Viewed 319 times


wall thickness examples.JPG
View from "inside" looking out.
wall thickness examples.JPG (64.45 KiB) Viewed 319 times


The trim ring flipped over and mounted for the 2" wall seemed to lie correctly against the wall with no gaps (red arrow), and the metal piece that "clips" the trim ring together was hidden (blue arrow)!

From what I can tell, the trim rings would work for either thickness... they "fit" better with 1.25", but the LOOK better with 2".
Window tests cropped.JPG
Outside Looking In
Window tests cropped.JPG (48.74 KiB) Viewed 319 times


So, based on these tests, looks like I will be aiming for 2" wall thickness! Plenty of room for insulation!

Fun side note:
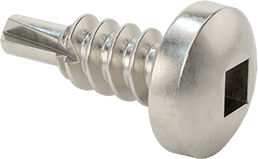
Here are the screws that are used to hold the trim ring to the windows:
https://www.mcmaster.com/90203A310/
Image
User avatar
RBB
Teardrop Builder
 
Posts: 49
Joined: Sat Feb 11, 2023 7:31 pm
Top

Re: Sanity Check: Wall Thickness

Postby DezPrado » Sun Aug 27, 2023 4:11 am

Fun side note:
Here are the screws that are used to hold the trim ring to the windows:
https://www.mcmaster.com/90203A310/
Image


Just be aware, the information provided in the link advises these screws not to be used for aluminum. :thinking: Not sure the technical reasons why, but one supposes they are the experts in their field........
DezPrado
Teardrop Master
 
Posts: 137
Images: 8
Joined: Thu Sep 20, 2007 2:46 am
Location: Blenheim New Zealand
Top

Re: Sanity Check: Wall Thickness

Postby Squigie » Mon Aug 28, 2023 10:05 am

Galvanic corrosion.
Aluminum and stainless can have a galvanic reaction - and even faster if there is an electrolyte present.

The aluminum will crumble around the fastener, unless isolated.
Insulating washers/bushings, undamaged paint coatings, or passivating treatments can help prevent the reaction.


I used stainless screws on a galvanized roof vent, into an aluminum roof, earlier in the year. Each hole was filled with sealant, and each screw was coated in the same, before installation.
Not the right way to do it. But by the time a couple screws eat the roof enough to lose their grip, that trailer will be scrap. I live in the desert. That roof only sees rainwater a dozen times a year and is covered the rest of the time. When I sell it, that sale will be to its last owner, most likely.
User avatar
Squigie
The 300 Club
 
Posts: 403
Joined: Sun Aug 04, 2019 7:52 am
Location: Southeastern ID
Top

Re: Sanity Check: Wall Thickness

Postby RBB » Mon Aug 28, 2023 2:50 pm

WHOA!!!
Good Catch @DezPrado & @Squigie!

I was so caught up in the fact that I had finally found a screw that wasn't Shiny Chrome that I overlooked the very clear statement that they are NOT for Aluminum!
Back to the drawing board I suppose...

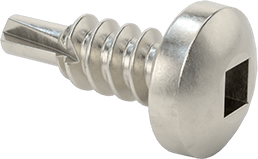
So THESE are the right ones:
https://www.mcmaster.com/90203A614/
Image
Which figures...

The wrong ones were $10.34 per pack of 100. (~$0.10 each)
The RIGHT ones are $23.57 per pack of 25. (~$0.94 each!)
And I need 80pc!

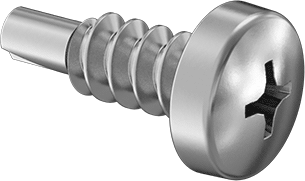
The CHEAP option...
https://www.mcmaster.com/94060A194/
Image
$6.97 per pack of 100. (~$0.07 each)
But they are Phillips vs Square head. Liked the Square head look better (and that is what came with the windows).

:x
User avatar
RBB
Teardrop Builder
 
Posts: 49
Joined: Sat Feb 11, 2023 7:31 pm
Top

Re: Sanity Check: Wall Thickness

Postby Tom&Shelly » Mon Aug 28, 2023 6:45 pm

FWIW, when a Phillips head screw starts to strip, there's usually plenty of meat left in the other direction to get it out. When square heads strip, they often just leave a circular hole, and some words I learned from my Dad who had been an enlisted man in the Navy. :shock:

Tom
172912 170466 173366
Tom&Shelly
Palladium Donating Member
 
Posts: 2203
Images: 1961
Joined: Tue Sep 05, 2017 3:27 pm
Location: Upstate New York/New Mexico
Top


Return to General Discussion

Who is online

Users browsing this forum: 23Sojourney45 and 48 guests