Page 1 of 6
Wall attachment options...illustrated!!!

Posted:
Wed Oct 10, 2007 3:22 pmby DougGirling
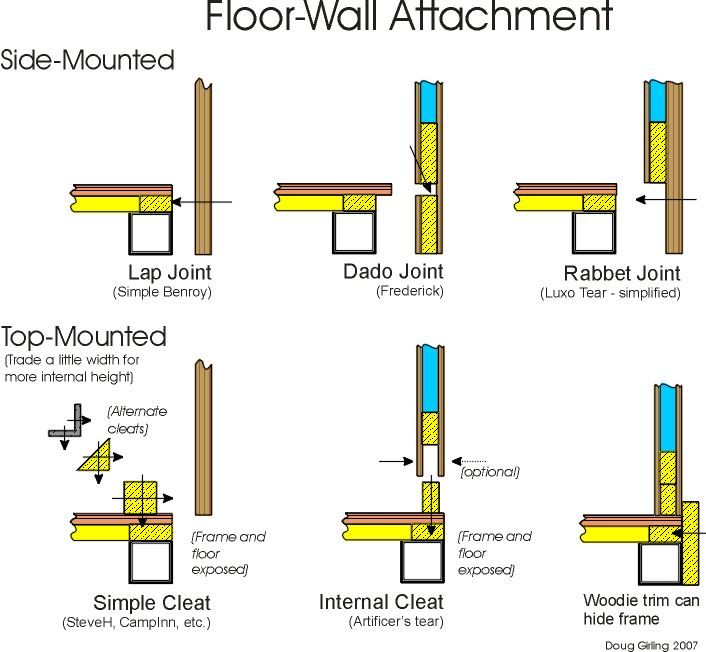
I thought I'd share a schematic of the various methods I've encountered on this forum for attaching walls to the teardrop. They're all shown as exploded subassemblies (floor/frame and wall). The floor/frame is drawn with the representative floor of 1/2" ply over 1"x?" lumber on top of the frame (insulation and tar omitted for clarity), as used in the Generic Benroy. The different configurations are shown with the solid or sandwich walls used in the original postings. With suitable handwaving, one can substitute solid or sandwich walls to taste.
Thanks to all of you who have shared your ideas on this forum - it's a great resource!
Posted:
Wed Oct 10, 2007 5:01 pmby Classic Finn
Greetings there DougGirling
Thanks for posting that... it can help many of the newbies and oldies alike.. Informative for sure..
Thanks for putting that up..

Classic Finn

Posted:
Wed Oct 10, 2007 11:44 pmby Esteban
Your illustrations are very helpful.
I think on the Dado Joint (Frederick) the lower inside skin, the one below the dado next to the frame, is eliminated. Also you'd screw through the floor at an angle to attach the sides...not through the inside plywood skin. The beauty of his method, especially for a woodie, is that the inside and outside walls can be pre-finished and no screws are visible when it's done.
Posted:
Fri Oct 19, 2007 3:55 pmby DougGirling
Steve,
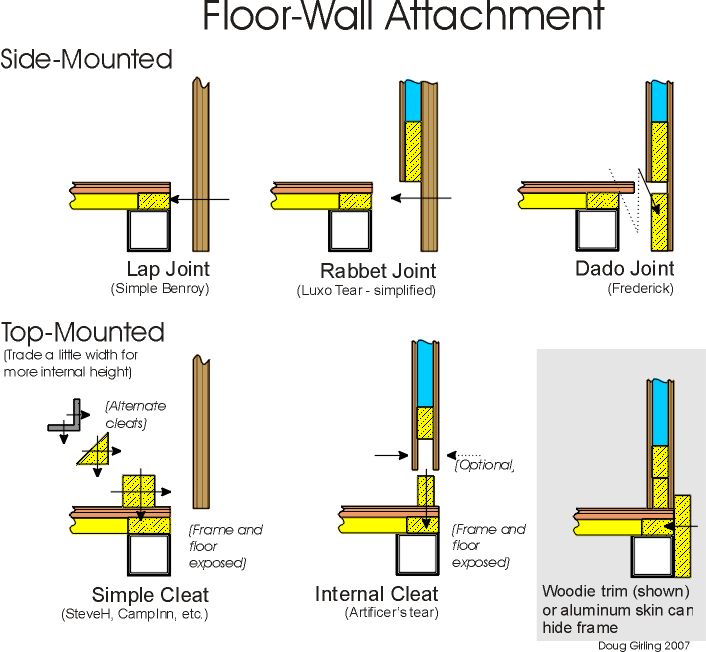
You're correct. (Goes to show one shouldn't post just before going to bed.) I've updated the drawing below.
Doug
Posted:
Mon Oct 29, 2007 11:09 amby jimqpublic
Several builders have screwed right through the sidewall into plywood floor endgrain. 5/8" or 3/4" plywood sides should be able to handle 3/16" dado to strengthen this up a lot.
If you don't fully frame the floor but still want the sidewalls to hang below the frame using metal angle inside seems a good solution, especially with a good adhesive and plenty of screws. (MadJack?)
I appreciate the teardrop builders all going for stout construction, but the mainstream RV industry gets by with a lot less. Their big boxes are subjected to a lot more stress and strain than a teardrop and don't fail structurally that often.
Posted:
Sat Aug 02, 2008 11:59 pmby WarPony
Here is how we did our Widget "wall-to-floor" attachment. It's kind of a cross between an internal cleat and a rabbet joint but I threw in a biscuit to help out. In my mind, I figure all the surface area will make for a stronger joint ............
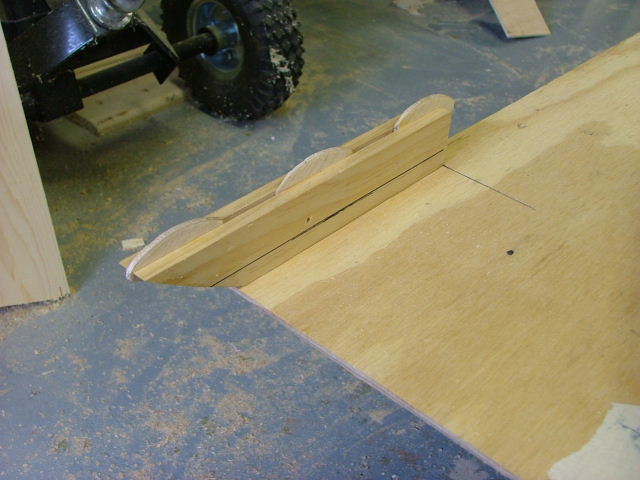
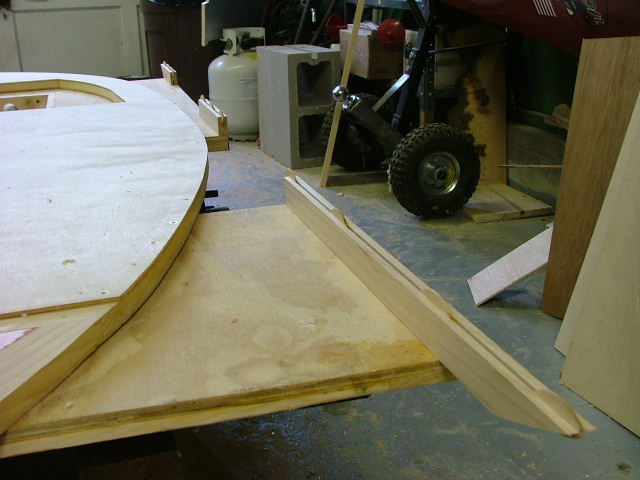
Jeff
wall to floor joint
Posted:
Mon Sep 21, 2009 7:28 pmby cappy208
That is an awesome graphic!
Why have I not seen the joint simply the performed with the outside skin, outside plywood, 3/4" frames, and interior skin all together as a unit, and screw through all four to the frame?
I know weight when in production would be an issue, but a sandwich construction would seem to be much easier, and you would gain the extra 2 1/2" on the inside availability of space.
Posted:
Mon Sep 21, 2009 8:16 pmby Carter
How about one if you use a 2x2 angle frame with a 2x2 (1 1/2 x 1 1/2) frame and ply deck dropped in it. side walls to the outside of the frame.
Jim

Posted:
Sun Mar 07, 2010 9:19 pmby Grid Runner Adventures
what methods for attaching walls are you guys using for 6ft wide campers when the trailer itself is 4ft wide
Posted:
Sun Sep 26, 2010 4:43 pmby Hikerjohnd
What about using pocket screws to attach the walls?
Posted:
Sat Oct 16, 2010 4:48 pmby cracker39
I just ran across this sticky and thought I'd put in my dos centavos. On the Squidget, I used a method similar to the simple cleat above. Except that I attached the cleat to the wall, not the floor. When the wall was set on the floor, the side came down beside the floor edge and the cleat sat on the floor where it was attached to the floor with glue and screws.
On the PT, I plan to add another "cleat". Only, I call these 3/4" x 1" high cleats connector strips. One will be attached to the full length of the wall, 1 3/4" from the bottom edge of the plywood skin. The other will be attached to the floor with glue and screws put in from the bottom up into the connector strip before the floor is attached to the chassis (left figure). When the side is set in place, the two strips are joined with screws and glue. The side skin is attached with glue and screws to both the floor connector strip and to the floor itself (right figure). The Squidget cabin was secure with just one strip. The PT will have more holding power to keep the walls attached to the floor. Pocket screws could be used to jon the two strips, but only after the side skin is screwed to the floor connector strip.

Posted:
Sat Nov 06, 2010 12:00 pmby eaglesdare
Grid Runner Adventures wrote:what methods for attaching walls are you guys using for 6ft wide campers when the trailer itself is 4ft wide
any illustrations for this?
Re: Wall attachment options...illustrated!!!
Posted:
Fri Apr 06, 2012 5:25 pmby lancew
just curious as to why the walls are not applied such as a home or a RV ? bottom plate and top plate ?
i soon hope to building my first teardrop. Benroy model. HOPEFULLY !!!?
Re: Wall attachment options...illustrated!!!
Posted:
Fri Apr 06, 2012 10:35 pmby Corwin C
lancew wrote:just curious as to why the walls are not applied such as a home or a RV ? bottom plate and top plate ?
i soon hope to building my first teardrop. Benroy model. HOPEFULLY !!!?
There are many ways to do this ... top and bottom plates are a definite option.
Re: Wall attachment options...illustrated!!!
Posted:
Tue Jul 03, 2012 7:13 pmby markhusbands
Is there an accepted method to get a little more width out of a typical HF 4x8 by extending the floor a little beyond the frame and setting the walls on top of that? It seems like you could get away with a few inches on each side, especially if you made a sandwiched floor. I have a design in mind with width a bit closer to 55-60", an elevated bed platform over partial wheel wells and then a narrow fender flare instead of a full exterior fender.