Frame to Floor to Walls

Anything to do with mechanical, construction etc

Frame to Floor to Walls

Postby crazycyclist » Tue Dec 02, 2008 2:49 am

I'm building my own frame looking at how the frame will attache to the floor and the floor to the walls. It's gong to be an off-road TD so everything will sit on top of the frame in-case it get's drug. What tips to you have for attaching them all together and keeping them watertight?
Mel
Orlando, FL
www.melwade.com/teardrop
“The illiterate of the 21st century will not be those who cannot read and write, but those who cannot learn, unlearn, and relearn.” -Alvin Toffler
User avatar
crazycyclist
Teardrop Advisor
 
Posts: 66
Images: 24
Joined: Mon Jul 21, 2008 7:37 pm
Location: Orlando, FL

Postby aggie79 » Thu Dec 04, 2008 11:41 am

This outback teardrop site has some useful info:

http://www.outbackteardrop.com/

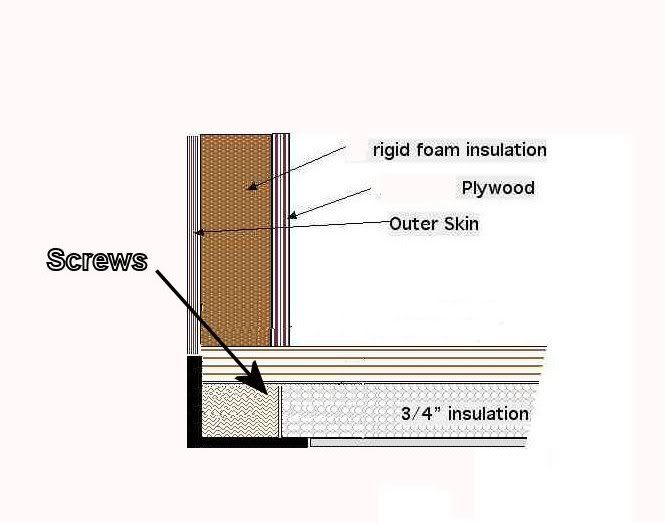
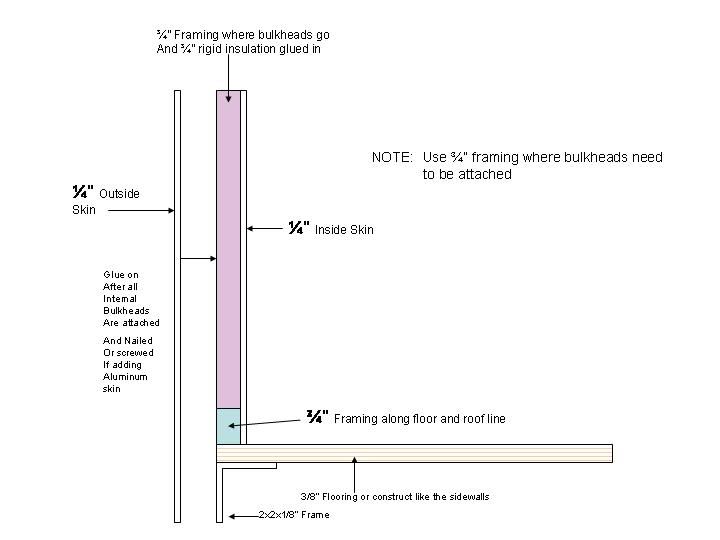
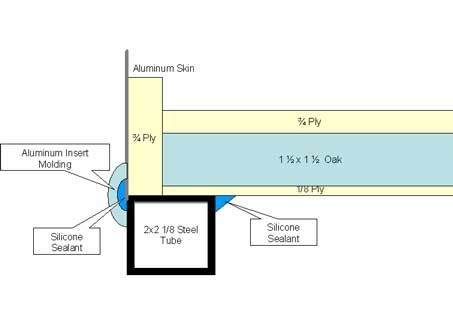
Here is a detail from the site that shows how they attached their floor to the frame.

Image
Tom (& Linda)
For build info on our former Silver Beatle teardrop:
Build Thread

93503
User avatar
aggie79
Super Duper Lifetime Member
 
Posts: 5405
Images: 686
Joined: Tue Aug 07, 2007 5:42 pm
Location: Watauga, Texas

Postby crazycyclist » Thu Dec 04, 2008 4:08 pm

Thanks. That looks pretty elaborate and hefty... I the aluminum strap on the bottom confusing as to how it attaches and how strong it would be to hold the floor.
Mel
Orlando, FL
www.melwade.com/teardrop
“The illiterate of the 21st century will not be those who cannot read and write, but those who cannot learn, unlearn, and relearn.” -Alvin Toffler
User avatar
crazycyclist
Teardrop Advisor
 
Posts: 66
Images: 24
Joined: Mon Jul 21, 2008 7:37 pm
Location: Orlando, FL
Top

Postby aggie79 » Fri Dec 05, 2008 9:10 am

crazycyclist wrote:Thanks. That looks pretty elaborate and hefty... I the aluminum strap on the bottom confusing as to how it attaches and how strong it would be to hold the floor.


The way they built that teardrop, it will never come apart. Actually, on their site, they "framed" the floor but did not put the plywood on until the rest of the teardrop was complete. The floor frame is through-bolted to angle iron tabs welded to the frame.

I don't plan on offroading my teardrop and will be using these:
http://www.redneck-trailer.com/2006/K/K12-K13.pdf
My sidewalls will overhang the frame. I'll drill through the floor directly into the square tube frame and then drive these screws in. I plan to put them about 12" on center.
Tom (& Linda)
For build info on our former Silver Beatle teardrop:
Build Thread

93503
User avatar
aggie79
Super Duper Lifetime Member
 
Posts: 5405
Images: 686
Joined: Tue Aug 07, 2007 5:42 pm
Location: Watauga, Texas
Top

Postby Arne » Fri Dec 05, 2008 9:30 am

That diagram is unnecessarily complex in my opinion.

Build the floor, glue and screw a cleat on top of the floor edge. Build the walls with a matching slot. glue the whole thing together, using a brad nailer to hold it together till the glue dries.

You have 3 walls (2 sides and front), or at least 8+8+4= 20 feet of attached surface, both inside and outside. The outside wall goes to the bottom of the floor, the inside to the bottom of the key(cleat)/top of floor.

You would have to drop it off a cliff to break it.

If you want, go to the link on the bottom of this note, HOME PAGE, the scroll towards bottom and look for paragraphs entitled "wall key" and "2nd wall, open". The wall key is glued and screwed to the floor. The following pic shows the beginning of the slot left in the wall so it will go over the key.

If you keep scrolling down, there are additional pics that show the wall in place.
www.freewebs.com/aero-1
---
.
I hope I never get too old to play (Arne, Sept 11, 2010)
.
User avatar
Arne
Mr. Subject Line
 
Posts: 5383
Images: 96
Joined: Fri Aug 13, 2004 12:25 pm
Location: Middletown, CT
Top

Postby planovet » Fri Dec 05, 2008 9:55 am

Here is how I'm doing mine. I figure with enough epoxy glue and screws that I will be ok.

Image

Here are some other ideas I found while researching this very question. Good luck!

Image

Image

Image
ImageMark (& Cindi)
Visit our website: Little Swiss Teardrop

I was wondering why the water balloon was getting bigger... and then it hit me.

ImageImageImageImage
User avatar
planovet
The Cat Man
 
Posts: 5583
Images: 3
Joined: Tue Nov 27, 2007 4:48 pm
Location: Plano, Texas
Top

Postby aggie79 » Fri Dec 05, 2008 3:07 pm

Arne wrote:That diagram is unnecessarily complex in my opinion.


I agree.

I will be fastening the deck to frame using these self-tapping stainless steel decking screws. Process - lay deck on frame, align, pre-drill holes, and fasten.

Image

Here is one source for these: http://www.mcfeelys.com/product/1224-F41/12-14-x-2-12-Flat-Head-410-Stainless-Trailer-Decking-Screws.
Tom (& Linda)
For build info on our former Silver Beatle teardrop:
Build Thread

93503
User avatar
aggie79
Super Duper Lifetime Member
 
Posts: 5405
Images: 686
Joined: Tue Aug 07, 2007 5:42 pm
Location: Watauga, Texas
Top

Sticky - Wall attachemnet options...illustrated!!!

Postby Esteban » Fri Dec 05, 2008 4:41 pm

There's a sticky Wall attachment options...illustrated!!! in the Teardrop Construction Tips and Techniques showing a half dozen methods for attaching the wall to the floor.

Perhaps this discussion could be moved and added to it.
Steve - SLO, CA
Esteban
Donating Member
 
Posts: 1684
Images: 15
Joined: Fri Jul 28, 2006 4:39 pm
Location: California, San Luis Obispo
Top

Postby crazycyclist » Fri Dec 05, 2008 5:32 pm

Thanks for all the ideas! :applause:

After reviewing these plans and consulting greekspeedoman and the jPod, here's what I'm looking at doing. Any ideas and suggestions are welcome.

Image
Last edited by crazycyclist on Sat Dec 06, 2008 1:00 am, edited 1 time in total.
Mel
Orlando, FL
www.melwade.com/teardrop
“The illiterate of the 21st century will not be those who cannot read and write, but those who cannot learn, unlearn, and relearn.” -Alvin Toffler
User avatar
crazycyclist
Teardrop Advisor
 
Posts: 66
Images: 24
Joined: Mon Jul 21, 2008 7:37 pm
Location: Orlando, FL
Top

Postby planovet » Fri Dec 05, 2008 6:19 pm

Looks like the bottom edge of your exterior ply is exposed that way. Make sure it is sealed really, really well. Or just put the whole thing even with the edge of the 2x2 steel and cover the edge/seam with some trim.
ImageMark (& Cindi)
Visit our website: Little Swiss Teardrop

I was wondering why the water balloon was getting bigger... and then it hit me.

ImageImageImageImage
User avatar
planovet
The Cat Man
 
Posts: 5583
Images: 3
Joined: Tue Nov 27, 2007 4:48 pm
Location: Plano, Texas
Top

Postby 2bits » Sat Dec 06, 2008 12:44 am

My first thought is that it looks like you are considering 1/4" plywood with nothing underneath besides the insulation. I'm not a huge guy, but I wouldn't go less than 1/2" for the floor, that's what I am using and it is fine. 1/4" is not going to be very strong in general and especially considering the off road factor too.

Also the screw seems like it might make a better joint going left to right rather than right to left since you've got trim going over it anyway.

I used a carriage bolt that went through my floor and through both walls of the 2x2 frame. I used lock nuts and I will check em, not sure if that is a terrible idea or not. (The wood on the side just overhangs the side of the frame, the bolt goes through the frame.)

Image
Thomas

Image
User avatar
2bits
2bit Member
 
Posts: 5130
Images: 8
Joined: Thu Dec 27, 2007 6:04 pm
Location: Lake Tawakoni, TX
Top

Postby Esteban » Sat Dec 06, 2008 2:48 am

I used 3/8" plywood for the top layer of the floor, over a 3/4" wood frame and insulation, with a 3/16" luan plywood bottom. It's plenty strong. The inner wood floor frame looks like a ladder. There are wood cross supports on approx. 2 foot centers that line up above each of the 2" x 2" steel angle cross pieces for floor rigidity and so there's solid wood wherever the floor is bolted to the trailer frame.

I question whether using 1/8" plywood for the outside walls is rigid and strong enough, particularly for off road use. I used 1/4" plywood outside, over a 3/4" wall frame and 3/4" insulation, with 1/8" inside plywood. It's very rigid. I've fiberglassed the sides and will fiberglass the roof and hatch when I get to building them.

Don't know how strong an off road trailer frame needs to be. For mine I used 2" x 2" x 1/8" tubing for the outside frame. It has 2" x 2" x 1/8" L shaped inner cross members on (approx.) 2 foot centers. Except at the corners, where there are corner gussets, the floor is bolted to these cross members. There are no holes or penetrations into the 2" x 2" tubing hoping that will deter them from rusting. I countersunk the bolt heads into the floor and filled the holes in the floor with epoxy.
Steve - SLO, CA
Esteban
Donating Member
 
Posts: 1684
Images: 15
Joined: Fri Jul 28, 2006 4:39 pm
Location: California, San Luis Obispo
Top

Postby crazycyclist » Sat Dec 06, 2008 7:47 pm

Thanks for all the tips, questions, and suggestions.

I'm not skinning the bottom as I want it to be able to dry out if it get's wet. With an offroad trailer, crossing a creek is not out of the question. The plan is to seal the bottom with several layers of undercoating before installing the insulation.

I too do not want holes in my 2x2 steel frame thus the option of the tabs. I may actually bolt through the corner braces. I'm planning on 2x2 for the outside from and tongue with c-channel cross members every 2 feet. I'm also planning on a 2x2 receiver at the back for a bicycle rack. I may put some 1 1/4 receiver at the side by the galley for optional extensions such as tables, etc.

I'm planning on sealing the joint surfaces with epoxy. I may bring them in as well. Still thinking on that one. Thanks for pointing it out.

I've heard of problems with screws working their way out and damaging the skin - thus the idea of screwing from the inside.

Here's a rough sketch of my trailer plans. I just dropped an axle in "about there". I'll get that more accurate later.

Image
Mel
Orlando, FL
www.melwade.com/teardrop
“The illiterate of the 21st century will not be those who cannot read and write, but those who cannot learn, unlearn, and relearn.” -Alvin Toffler
User avatar
crazycyclist
Teardrop Advisor
 
Posts: 66
Images: 24
Joined: Mon Jul 21, 2008 7:37 pm
Location: Orlando, FL
Top

Postby 2bits » Sun Dec 07, 2008 10:45 pm

Your frame looks plenty tough! I have heard from my friend who is a trailer builder that the farther back the a frame for the tongue goes back to the axle, the more stable it will be, that might be important with an off road trailer.

The angle mounting strips are a good idea, alot of different vehicles use them. I wanted to keep construction as simple as possible and I drilled very small drain holes on each of the four corners to release any water entry, or condensation buildup.
Thomas

Image
User avatar
2bits
2bit Member
 
Posts: 5130
Images: 8
Joined: Thu Dec 27, 2007 6:04 pm
Location: Lake Tawakoni, TX
Top

Postby crazycyclist » Mon Dec 08, 2008 1:12 pm

I've noticed choices of poplar or oak for the frame. Just wondering about the advantages/disadvantages of that over pressure treated or ground contact pine. I know about the gas release issues on inside wood but for the base frame it shouldn't make a lot of difference.
Mel
Orlando, FL
www.melwade.com/teardrop
“The illiterate of the 21st century will not be those who cannot read and write, but those who cannot learn, unlearn, and relearn.” -Alvin Toffler
User avatar
crazycyclist
Teardrop Advisor
 
Posts: 66
Images: 24
Joined: Mon Jul 21, 2008 7:37 pm
Location: Orlando, FL
Top

Next

Return to Teardrop Construction Tips & Techniques

Who is online

Users browsing this forum: No registered users and 35 guests