Wiring up the Harbor Freight Trailer

Anything electric, AC or DC

Wiring up the Harbor Freight Trailer

Postby Franco Novo » Sun Jul 12, 2015 9:19 pm

While pretty basic, this may be helpful to some.
I'm a newbie at trailer building, but i've done a lot of tinkering with wiring.

First, well, this isn't about wiring, but I did paint the parts of the frame that will show black.
Not a big fan of HF red.
Sand lightly, wipe clean...I use ACE spray enamel rattle can style.
I've restored a bunch of vintage bicycles, and I've found it goes on better, lasts longer than Rustoleum...
Franco Novo

134008
User avatar
Franco Novo
Teardrop Advisor
 
Posts: 51
Images: 48
Joined: Fri Jul 03, 2015 4:31 am

Testing the Ground

Postby Franco Novo » Sun Jul 12, 2015 9:25 pm

I happened to have a spare car battery laying around, it was getting weak, but great for testing
At this point, I just want to test the grounding
So, I hook up the car 4 plug connector to the battery...just the brown and white (ground wire)
Now, I can test the ground before going crazy on the wiring

133998
User avatar
Franco Novo
Teardrop Advisor
 
Posts: 51
Images: 48
Joined: Fri Jul 03, 2015 4:31 am

Attach the ground wire

Postby Franco Novo » Sun Jul 12, 2015 9:35 pm

First, pick a place on the frame...and use a wire attachment on your drill, or just some coarse sandpaper and get down to shiny metal.
You can use a little crimp connector with a plastic sleeve and a round eyelet of you wish
I don't trust them...or maybe I just suck at crimping, but they always eventually work loose
So, I just drilled a hole, found a little bolt with a couple of those pointy star washers, wrapped the ground around under the washer and tightened it up

133999
User avatar
Franco Novo
Teardrop Advisor
 
Posts: 51
Images: 48
Joined: Fri Jul 03, 2015 4:31 am
Top

Re: Wiring up the Harbor Freight Trailer

Postby Franco Novo » Sun Jul 12, 2015 9:45 pm

The wiring 'kit' includes a few crimp on splicers, and some metal clips that mount on the frame

134000

The metal clips mount like this.....but be aware that they still seem a little flaky , they have little 'teeth' to grip to the frame...
but even though I wanked on them with pliers, the one I did mount, you can wiggle right off...so, not going to use these

134001

Ah, there we go, I prefer to drill a small hole in the frame and snug up wiring with plastic wire ties that I had laying around.


134002
User avatar
Franco Novo
Teardrop Advisor
 
Posts: 51
Images: 48
Joined: Fri Jul 03, 2015 4:31 am
Top

testing the ground

Postby Franco Novo » Sun Jul 12, 2015 9:52 pm

Next, I went all the way to the back of the trailer, as far as the wiring goes, and hooked up my homemade test light, just one of the side running lights.
hooked the brown wire to the brown wire, and touched the ground wire that I had hanging from the test lamp to a bolt at the rear...even without sanding anything...it lit up just fine.

134003
User avatar
Franco Novo
Teardrop Advisor
 
Posts: 51
Images: 48
Joined: Fri Jul 03, 2015 4:31 am
Top

Let's test one of the tail lights

Postby Franco Novo » Sun Jul 12, 2015 9:57 pm

Same principle here.. attached the brown running light wire to the brown wire from the tail light
Then just bolted the tail light to the bracket. Again, it lit right up, and I didn't even sand any paint off for a better and longer lasting connection
Just checking at this point...I'll take the tail light off so I don't smash it all up when I start building the floor and walls.

134004
User avatar
Franco Novo
Teardrop Advisor
 
Posts: 51
Images: 48
Joined: Fri Jul 03, 2015 4:31 am
Top

Side running light.

Postby Franco Novo » Sun Jul 12, 2015 10:12 pm

Ok, this was a little weird, First, the manual tells you to remove the lens to install, but....there is absolutely no need to do that.
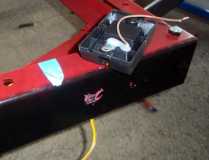
near the front of the trailer are three holes, One large center hole, two smaller holes along side.
The manual says 'Put the brown wire through the big hole, and attach running light with two self tapping screws in the light kit'

Well, as you can see, there is a plastic plate on the back of the running light which is just as high as the rim
There is no way to push the wire through the center hole and tighten the light down, because the wire doesn't come from the center of the light
It sits on the back plate, and that creates a rocking motion ..hard to 'tighten' the lamp up this way.
on one side mount hole there is a metal flange for ground. again, sand the paint to get good connection.
Don't go wild here or your sanding will extend way beyond your marker light. I just used a 1/4" chisel to scrape away just where the metal flange will touch.


134005
User avatar
Franco Novo
Teardrop Advisor
 
Posts: 51
Images: 48
Joined: Fri Jul 03, 2015 4:31 am
Top

side running light installed

Postby Franco Novo » Sun Jul 12, 2015 10:21 pm

OK, the self tapping screws in the kit are way too small for the mounting holes provided
Also, I just ran the wire from the running light underneath...there are small u shaped cutouts on the top and bottom of the running light
Then used a couple of small bolts and washers from the spare parts can to fasten it down

No crimp connectors.....I just cut the brown wire & wire nut the wires together, and then fastened them at that point with a plastic tie.
Grounding seems fine...nice and bright running light.

I'll probably add more as I go along here.....hope this helps to get you started on wiring it up
It's really not that big a deal...just remember that if something isn't fitting right, there's always a way around it...as long as you have your spare parts can of little nuts bolts washers and screws with you.
:)
Franco

Image
User avatar
Franco Novo
Teardrop Advisor
 
Posts: 51
Images: 48
Joined: Fri Jul 03, 2015 4:31 am
Top

Re: Wiring up the Harbor Freight Trailer

Postby GuitarPhotog » Mon Jul 13, 2015 12:04 am

Be aware that your wire nut connectors are not weatherproof and the connector and the wire may corrode when exposed to the weather leading to intermittent connection problems. Use a bit of dielectric grease to help prevent corrosion, and check all wire nutted connections frequently.

I much prefer properly crimped connectors, but there are places where serviceability demands an easily openable connection.

<Chas>
:beer:
GuitarPhotog
Silver Donating Member
 
Posts: 1779
Images: 55
Joined: Tue Feb 08, 2011 12:52 pm
Location: Grants Pass Oregon
Top

Re: Wiring up the Harbor Freight Trailer

Postby Dale M. » Mon Jul 13, 2015 8:58 am

If you have trouble with crimp type connectors, there is probably two or three things going on... One may be wrong size connector for wire size... Two, wrong crimping tool, throw away the $5 auto parts store manglers and get ratchet type crimpers with replaceable/exchangeable crimp dies... Three as mentioned above use dielectric grease in connection, to prevent moisture and oxygen intrusion that causes corrosion... Been doing crimp connections for last 50 years ( 38 of them in communications industry) and with proper tools they should stand up as long as the rest of components in wiring system..... And yes quality of connector is important, get good quality connectors from reputable dealer (electrical supply} try to avoid 10 for $1.59 at FLAPS....

Poor style crimpers...
Image

Better Crimpers...
Image

Better source for crimp style connectors...
http://www.delcity.net/store/Terminals/
http://www.waytekwire.com/products/1422 ... onnectors/

And on your HF frame since it a bolted frame its terrible as a ground conductor as you need to prep each frame joint (bare metal to bare metal) for good ground bond.... So running a ground to each fixture is probably a must.... IF you have a welded steel frame using frame for ground conductor is less if a issue....

Dale
Lives his life vicariously through his own self.

Any statement made by me are strictly my own opinion.
You are free to ignore anything I say if you do not agree.

Image
User avatar
Dale M.
2000 Club
2000 Club
 
Posts: 2693
Images: 18
Joined: Thu Jun 09, 2005 8:50 pm
Location: Just a tiny bit west of Yosemite National Park
Top

Re: Wiring up the Harbor Freight Trailer

Postby Franco Novo » Mon Jul 13, 2015 4:12 pm

Thanks for the replies and tips you guys... :thumbsup:
I will get that grease, something I haven't thought of before.

and, I have that top tool in your pics, but I've never used it for crimping, so I'm sure that's my , ummm...problem with crimping. lol
I usually just use pliers and probably just flatten the connection, but not really securing it.
which part do you use for crimping. ?
User avatar
Franco Novo
Teardrop Advisor
 
Posts: 51
Images: 48
Joined: Fri Jul 03, 2015 4:31 am
Top

Re: Wiring up the Harbor Freight Trailer

Postby pchast » Mon Jul 13, 2015 9:57 pm

I'd recommend using marine style connectors too. The heat
shrink covering is filled with a sealing, glue like substance. :thinking:
pchast
Platinum Donating Member
 
Posts: 2026
Images: 97
Joined: Mon Jan 28, 2013 5:47 pm
Location: Athens, NY
Top

Wiring up the Harbor Freight Trailer

Postby GerryS » Tue Jul 14, 2015 4:17 am

Dale M's comment about throwing away the cheap crimper is so right on!

I bought a proper stripper and crimper last fall for another project, and am totally blown away by the quality of the crimp. They actually are holding. Every time I've used a butt connector with the elcheapo pincher style, I used 3 connectors to get the least objectionable crimp. The good crimper gets it right the first time, every time.

Spend the few bucks....it's a once in a long time, perhaps lifetime investment. You won't be sorry.

Same for the stripper. That is probably less critical, Irwin makes a self adjusting stripper that does a darned die job as well...

http://www.amazon.com/Tools-VISE-GRIP-S ... n+stripper
User avatar
GerryS
1000 Club
1000 Club
 
Posts: 1178
Joined: Wed Apr 21, 2010 9:19 pm
Location: Central Indiana
Top

Re: Wiring up the Harbor Freight Trailer

Postby Dale M. » Tue Jul 14, 2015 8:14 am

Franco Novo wrote:Thanks for the replies and tips you guys... :thumbsup:
I will get that grease, something I haven't thought of before.

and, I have that top tool in your pics, but I've never used it for crimping, so I'm sure that's my , ummm...problem with crimping. lol
I usually just use pliers and probably just flatten the connection, but not really securing it.
which part do you use for crimping.?


Flattening connectors with a pliers or hammer is done only in case of a emergency and there is no other option, and needs to be "fixed" proper as soon as replacement connector and proper tool are available...

Generally the tool has indents or beveled areas between pivot and tip of tool for crimping....Some have crimp are between pivot and handle and have wire cutters between pivot and tip of tool....Depends on manufacturer....Some try to act as a wire stripper (round holes between pivot and handles) and some also try to be small bolt/screw cutter....

Dale
Lives his life vicariously through his own self.

Any statement made by me are strictly my own opinion.
You are free to ignore anything I say if you do not agree.

Image
User avatar
Dale M.
2000 Club
2000 Club
 
Posts: 2693
Images: 18
Joined: Thu Jun 09, 2005 8:50 pm
Location: Just a tiny bit west of Yosemite National Park
Top


Return to Electrical Secrets

Who is online

Users browsing this forum: No registered users and 36 guests