Finally Started- 6x10 conversion (Ready for first trip)

Converting Cargo Trailers into TTTs

Adding 12V outlets to a thin wall

Postby pmowers » Sun Jul 22, 2012 9:28 am

The problem: Since I have a 45 A 12 VDC converter, it only made sense to have 12 V available to power things like a livewell and a Coleman Cooler, items we normally keep outside of the trailer. The problem is that there is only about 1 inch between the trailer skin and the inside wall, this distance is too short to hold a typical 12 V outlet. The shallow box has flanges which go on the outside of the trailer skin and the back of the box is flush with the back of the plywood interior.95720
The solution:95725
I took a 12V splitter, a pair of 1/4 inch mono plug and jack set. I separated the connectors and connected them to 95716the plugs by wiring the tips as positive and the mounting flange and barrel of the connector as negative. 95721. Originally, I was going to use a blank outlet cover and drill holes in it, but fitting the waterproof cover to the plate wouldn't allow for a good seal. Being an archivist (sounds much better than pack-rat), I scrounged up a old 5 1/4 floppy box. After tracing the cover and cutting out with a box cutter, I had a plate that would work, and was color coded!
I wired each jack individually, using 12 ga wire to the converter and fused for 10A, I know, kinda overkill, but if I need to, all I should have to do is change to a bigger fuse, to go up to 20 A.

I used standard weatherproof outlet covers, and a lot of silicone to install the outlets on the driver's side of the trailer near the 120 VAC outlets and shore inlet. So far, no leaks, no shorts, no problems.
Last edited by pmowers on Sat Jul 28, 2012 10:24 pm, edited 4 times in total.
Growing old is mandatory, growing up is optional.

Build log:http://www.tnttt.com/viewtopic.php?f=42&t=51193
User avatar
pmowers
Donating Member
 
Posts: 287
Images: 43
Joined: Wed Sep 14, 2011 2:44 pm

Air Conditioner mods started

Postby pmowers » Sun Jul 22, 2012 10:03 am

Start of the a/c modification, based on the design used by Shadow Catcher http://www.tnttt.com/viewtopic.php?f=30&t=44561&hilit=Hacking+a and work by d30gaijin http://www.tnttt.com/viewtopic.php?f=42&t=38095&start=585#p947900.

I started by taking off the covers of a GE 5,000 btu unit that a friend gave me. After cleaning out the dauber nests and detritus that always gets sucked into a unit, I pulled the baffle on the cooling side to get better access to clean the blower. Putting it back in, I was suddenly struck by the design of the airflow. Air is pulled into the front, through the cooling coils then blown straight up to the cover of the unit where it turns 90 degrees then exits through the front louvers.95722

My thought was, if it is already going straight up, why not put a dryer dock/hose attachment on the top of the case? There appears to be plenty of room to cut a hole and mount the hose connnector after dropping a 4" deckplate into the hole to see.95723
I cut a scrap of FRP (fiberglass reinforced panel), drilled a couple of holes to mount it, silicone sealed to the edge of the baffle and clamped in place.
95724.
While waiting for the silicone to cure, I turned my attention to the front cover. The louvers had to go,they just snapped out but the front of the unit was curved-not what I was hoping for. I got out my harbor freight oscillating saw and carefully cut through the edges of the molded slots on the front and got a nice rectangular flat surface. I can even keep using the removable air filter. I just need to find a suitable cake pan to fit the opening, cut the holes and put everything back together.
If push comes to shove, I can just make the front box out of some aluminum flashing. I am currently leaning toward using an oval opening into the return, just because it would reduce the depth of the unit.
Growing old is mandatory, growing up is optional.

Build log:http://www.tnttt.com/viewtopic.php?f=42&t=51193
User avatar
pmowers
Donating Member
 
Posts: 287
Images: 43
Joined: Wed Sep 14, 2011 2:44 pm

Now have 1/2 AC and the pantry

Postby pmowers » Sat Jul 28, 2012 3:38 pm

Well, Since the heat index has dropped into the low 100s, I have managed to get some more done on the as yet unnamed trailer. I went to the BORG to get some parts (one can never have too many parts) and a 4.5 inch hole saw. Holey cow, those are expensive, plus the arbor. :shock: That explains why my shop is ala Harbor Freight. I figured out that it was going to cost about $11 a hole. I would have used my HF set, except I can't remember where I put the arbor. :( 
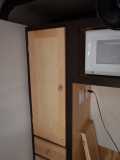
So I dug out the weird hole saw that has the 2 adjustable blades. Chucked it in the 1/2 drill and attacked the air conditioner cover. A dryer dock, a little silicone sealant, a couple of screws and the majority of the conversion of the ac unit is done. Just had to try it out, I still have to do the cake pan/return air modification yet. 96106
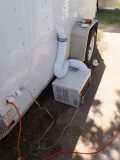
. I think that fewer things are scarier than cutting holes in the skin of your trailer, but they are now in, and Shadow Catcher's idea of deck plates worked beautifully.96107
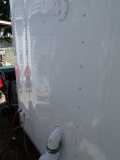
. I still have to get the diffusers mounted over the inside holes.
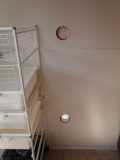
96101.

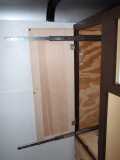
On to the next headache, the pull-out pantry. The cabinet over the converter was built so that the converter would just fit inside, between the rails. 96110
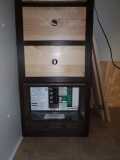
This meant that the upper cabinet was about 12 1/2 inches wide, 35 inches tall and 20 inches deep.Shelves would be deep and narrow, and hard to see anything in the back. I decided to put in a pull-out pantry to hold boxes and canned goods. I was going to build a set of 10 inch deep shelves, attached to a plywood board, which was mounted on a set of heavy-duty full extension glides.

I had mounted the full extension rails for the pantry 96108 and then my two co-workers and I had an argument- I said let's build the shelves out of 1/2 inch ply, Me said that wasted too much space and was too heavy, and Myself said, do you really want to have stuff falling all over because the shelves were too deep, and besides, if you load them all up, the guides might bend.-whatever...

Another trip to the BORG, and as I was walking through the shelving aisle, we all cried, "That's it!", and came home with renewed enthusiasm, inspiration and two 4 shelf wire units. Instead of 1 pull-out, I would have 2, and the combination would be lighter than a single unit with shelves.96103
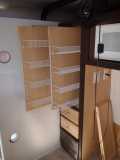
. The PRO-100 glides have a stop at the back that prevents the units from sliding open when traveling and they are nicely hidden behind the cabinet door.96109 In order to make sure that there was enough room to mount the middle set of glides, I mounted the back shelves up about 3 inches higher than the other unit. 96104
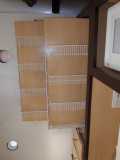
I think that this is going to be the perfect spot to put the long boxes of parchment paper and heavy duty aluminum foil. Now I just need to get working on the center cabinet/counter top and finish up painting and other odds and ends.
Growing old is mandatory, growing up is optional.

Build log:http://www.tnttt.com/viewtopic.php?f=42&t=51193
User avatar
pmowers
Donating Member
 
Posts: 287
Images: 43
Joined: Wed Sep 14, 2011 2:44 pm
Top

Re: Finally Done???- 6x10 conversion (Update 8/11)

Postby pmowers » Sun Aug 12, 2012 2:47 am

Last week, I finally built the carcass for the center cabinet, but it was too hot to do anything else. This week saw the completion of most of the interior. I used louvered dryer vents to finish off the openings for the a/c unit, and also mounted the third rail for the IKEA adjustable shelves. 96731. When I was not able to find the exact size of cabinet door that I needed to fit the cabinet space, I decided to use the doors that I had, and open up an opportunity for the future. The opportunity is that thin strip of laminate backing a 2 7/8 inch wide space between rails on the left side of the cabinet. 96730 The space is exactly the width of a standard outlet cover, so I can do one or more of the following:
Add additional outlets to the front of the cabinet, drill 3 1/2 inch holes and put in a holder for wine bottles, make 1 or 2 pull-outs for holding cutting boards and/or a magnetic knife bar. Does anyone have any other suggestions? :thinking:

I also did my first attempt at building a countertop with laminate- pretty ugly but functional. If I have a long enough strip, I will probably chisel off the front and replace it. One of the members suggested using 3M Super 90 spray contact adhesive and it was a much more pleasant and cleaner experience than previous uses of contact cement. It also gave me chance to try out the trim router that has been sitting in the back of a drawer forever.96729. Lessons learned included practice on something that is not going to show so much, put the side trim on before the front, and watch where you have the bearing riding on the flush cut bit. :x

I had originally purchased a set of halogen "puck" lights to mount under the microwave, but after running them for a little while to see how hot they would get, I decided not to use them. I instead mounted a 3 headed adjustable LED light fixture which runs on AAA batteries, and has 2 brightness levels. As I have not yet "bit the bullet" and purchased a deep-cycle battery (not sure where I am going to install it), It is always good to have another source of light.

When I had first started the trailer, I had decided that I was going to use 1 or more of the sliding basket units from IKEA. They are inexpensive, light, and come as either wire baskets or as 7-11 gallon plastic tubs which can use a lid for a tote and stacking. Here you can see 96728 where I mounted a frame with a combination of baskets in the center cabinet. My thinking is to use them to store food supplies in the house stacked in a corner, and just slide the baskets in the frames and go. The towel on the wall is actually on a fold-out drying rack that fits into the IKEA frames. You can see it in the extended position in the first photo of this post.

I still have some things left to do such as finish the air return on the a/c mod, decide what I am going to do with the ceiling beside insulate it, install the awning rail on one/both/one side and rear of the trailer, minor painting (inside of CT doors), install some hardware (door bolts, hooks, etc.) but it is pretty functional, and I spent most of the evening pulling out the equipment that I had removed from my old trailer and stowing it away. I am sure that there are a lot of things that I did not think of, but they are a lot fewer due to the incredible work and suggestions that others have so generously shared on this site. Thanks guys! :wine: :beer: :applause:
Growing old is mandatory, growing up is optional.

Build log:http://www.tnttt.com/viewtopic.php?f=42&t=51193
User avatar
pmowers
Donating Member
 
Posts: 287
Images: 43
Joined: Wed Sep 14, 2011 2:44 pm
Top

Re: Finally Started- 6x10 conversion (Update 8/11)

Postby bigbendhiker » Sun Aug 12, 2012 8:05 am

Congratulations on your work. The front cabinet area looks awesome. Your 2-tone color scheme with the light and dark contrasts came out really well. :applause: :thumbsup:

You also managed to get a lot of storage in there. Looking forward to seeing your ceiling finish work.
Scott
User avatar
bigbendhiker
Teardrop Master
 
Posts: 117
Images: 28
Joined: Fri Mar 30, 2012 7:03 pm
Location: Rowlett, TX
Top

Re: Finally Started- 6x10 conversion (Update 8/11)

Postby roadinspector » Sun Aug 12, 2012 5:32 pm

Really like your pull out storage using the glides. Lots of storage and easy to get to. I will have to remember those when I get to that phase of my build.
pmowers wrote: I am sure that there are a lot of things that I did not think of, but they are a lot fewer due to the incredible work and suggestions that others have so generously shared on this site. Thanks guys! :wine: :beer: :applause:

I agree THANKS GUYS!! (Include yourself in that pmower!!)

Earnest
Dadgum it! I cut that board 5 times and it's still too short!
2001 quad-cab Dodge Cummins 3/4 ton camper special, 16x7x7 CT work in progress toyhauler, 01 HD Ultra Classic, 98 HD Heritage Softail, 88 HD 1200 Sportster. viewtopic.php?f=42&t=51510
User avatar
roadinspector
500 Club
 
Posts: 599
Images: 127
Joined: Wed Mar 24, 2010 10:33 pm
Location: Texas
Top

Re: Finally Started- 6x10 conversion (Update 8/11)

Postby pmowers » Sun Aug 12, 2012 6:32 pm

Thanks, Earnest. I had been thinking about the pull-out pantry for a very long time, and was originally going to put it in my previous trailer. I figure that I got 12 feet of easily accessible shelf space in that 1x3 ft cabinet. I was originally planning on pull-out drawers on the cabinet over the refrig, but decided to put the shelves in temporarily, I can always change them out later. When I remodeled my kitchen at home, we had pull-outs installed in all of the base cabinets, rather than having to get down on our hands and knees to find/retrieve pans/dishes.

Pat
Growing old is mandatory, growing up is optional.

Build log:http://www.tnttt.com/viewtopic.php?f=42&t=51193
User avatar
pmowers
Donating Member
 
Posts: 287
Images: 43
Joined: Wed Sep 14, 2011 2:44 pm
Top

Re: Finally Started- 6x10 conversion (Ready for first trip)

Postby pmowers » Thu Sep 27, 2012 1:16 pm

Well, since the last update, I have coated the roof with Henry's 687, which has given me a 29 degree drop on the ceiling temperature, welded the nuts onto the stabilizer jacks so they can be used, tried a couple of things for the return air cover on the a/c. Spare carrier has been installed on the tongue and tire mounted.

Although not originally planned, I have installed a vent cover so that I can keep out the rain but leave the vent open for air. I still need to add some other vents to get a proper airflow through the trailer. Also installed was an awning channel over the side door. I just got a 10 ft. Dometic A&E Cabana that was originally made for an R-Pod off of e-bay, for 1/4 of the RV store price. I will post pictures when I get it set up.

The stuff from the old trailer has been stored away, and I still have a couple of empty drawers, and lonely looking shelves. The pantry has been stocked, and seems to be handling the weight of the canned goods without a problem. I evidently have a lot more storage space than I did before, at least I hope that is the reason, and not that I did not put all the stuff in the trailer.

This weekend will be the test- the start of a week-long fishing trip on the Cumberland River. I will try and take pictures to post when I get back, as well as a critique of what works and what doesn't.If it is true that you learn from your mistakes, I must be a freaking genius, we'll find out.
Growing old is mandatory, growing up is optional.

Build log:http://www.tnttt.com/viewtopic.php?f=42&t=51193
User avatar
pmowers
Donating Member
 
Posts: 287
Images: 43
Joined: Wed Sep 14, 2011 2:44 pm
Top

Re: Finally Started- 6x10 conversion (Ready for first trip)

Postby revorunner » Thu Sep 27, 2012 6:35 pm

Looking forward to the pics and what worked and what did not review. :) P.S. Good luck on your fishing trip. :thumbsup:
User avatar
revorunner
Teardrop Advisor
 
Posts: 55
Joined: Tue May 22, 2012 9:03 pm
Location: BC Canada
Top

Re: Finally Started- 6x10 conversion (Ready for first trip)

Postby roadinspector » Thu Sep 27, 2012 8:45 pm

Enjoy your trip!! Relax and don't sweat it when you find something you want to change. Note it and go back to fishing. We are leaving in the morning to go to Lake Ouachita for 9 days. I am not as far along as yours but it will be a cozy out of the weather sleeping and a place to hide if it rains. Looking forward to pics of the trip when you get back.

Earnest
Dadgum it! I cut that board 5 times and it's still too short!
2001 quad-cab Dodge Cummins 3/4 ton camper special, 16x7x7 CT work in progress toyhauler, 01 HD Ultra Classic, 98 HD Heritage Softail, 88 HD 1200 Sportster. viewtopic.php?f=42&t=51510
User avatar
roadinspector
500 Club
 
Posts: 599
Images: 127
Joined: Wed Mar 24, 2010 10:33 pm
Location: Texas
Top

Re: Finally Started- 6x10 conversion (Ready for first trip)

Postby pmowers » Mon Oct 08, 2012 1:05 pm

Well, the trip was for the most part a success, other than the 6 or more inches of rain during the week. I will upload some pictures later.

Couple of things that I underestimated, but most can be fixed with some minor hardware mounting:

The will of supplies to run around the trailer with abandon while you are driving.
The number of wall hooks that I really needed versus the number that I had.
How much space a big cot really takes up.
How miserable the combination of a hard dolly wheel and and a rained-on gravel surface are when moving a trailer into place.
The need for an RV door latch on the side door- This was the biggest irritation that I had. We were constantly flipping the bar over to keep the door shut.
How well the folding towel rack would work out.
Need for additonal 120v outlets on inside and outside.

Things that I overestimated:
Strength of the door latches against a willful loaded unit on rollers.
Available space inside the trailer at night.

Things that worked as I designed:

Pantry- It was amazing how much I could get into the 8 shelves of the pantry. The full load of canned goods did not seem to bother the shelving or the mounts. Things were in plain sight and easy to find. The only addition will be a pair of pins to hold the units in place during travel.
Refrigerator- Unplugged from Saturday morning, until 4pm Sunday night, the refrigerator did not get above 42 degrees, which is pretty good for a dorm refrig.

I contemplated going in one of several different directions for an outside canopy or room. I finally settled on a Dometic A&E Cabana that was originally made as an accessory for R-Pods, I bought mine on ebay for about $150. The 10 ft cabana slid into the 9 ft. awning rail the I had installed and the welt overhung the sides by about 10 inches on each end. The cabana itself is floorless, but has heavy vinyl flaps that go on the outside to keep the water running away from the sides.
The cabana looks like a Quonset hut on the end, 2 sides have doors, and it went from the box to completely set up in less than 10 minutes on the first try. Everyone loved it. Other than when the rains flooded the campsite with 3 inches of standing water, everything inside the cabana stayed nice and dry. The side door easily opened and closed under the cabana as the cabana was about 8 ft tall at the entrance and 7 ft at the trailer.

Things I am contemplating:

Brackets over the passenger side fender to hold a counter or table-top for cooking/working under the cabana.
Reconfiguring shelving on driver side of trailer, possibly moving shelves toward middle.
Ceiling options.
On-demand propane water heater such as ez-temp 110. I have been planning a much better kitchen layout with hot/cold running water- campground, not boondocking.
Growing old is mandatory, growing up is optional.

Build log:http://www.tnttt.com/viewtopic.php?f=42&t=51193
User avatar
pmowers
Donating Member
 
Posts: 287
Images: 43
Joined: Wed Sep 14, 2011 2:44 pm
Top

Re: Finally Started- 6x10 conversion (Ready for first trip)

Postby revorunner » Mon Oct 08, 2012 8:11 pm

Hi pmowers, thanks for the update from your trip. Sorry to hear about all the rain you encountered. Rain really sucks while camping :thumbdown: Looking forward to your pics. :thumbsup:
User avatar
revorunner
Teardrop Advisor
 
Posts: 55
Joined: Tue May 22, 2012 9:03 pm
Location: BC Canada
Top

Re: Finally Started- 6x10 conversion (Ready for first trip)

Postby roadinspector » Tue Oct 09, 2012 9:58 pm

Very good pmower! Shake down runs are great for figuring things out. My prob is when I build anything I suffer from a serious disease known as improvementitis. I have a hard time leaving something alone and not "making it better". I was wondering about the Dometic A&E Cabana. I have looked at them and have about decided that is the route I want to go especially since I saw the price on Ebay. Ebay is a wonderful world!!

Earnest
Dadgum it! I cut that board 5 times and it's still too short!
2001 quad-cab Dodge Cummins 3/4 ton camper special, 16x7x7 CT work in progress toyhauler, 01 HD Ultra Classic, 98 HD Heritage Softail, 88 HD 1200 Sportster. viewtopic.php?f=42&t=51510
User avatar
roadinspector
500 Club
 
Posts: 599
Images: 127
Joined: Wed Mar 24, 2010 10:33 pm
Location: Texas
Top

Re: Finally Started- 6x10 conversion (Back from first trip)

Postby pmowers » Tue Oct 16, 2012 8:21 pm

As promised, here are a few pictures of my "as yet unnamed" trailer and cabana/side tent. Sizing was a little weird, I ordered the 10 ft version, and it overhung my 9 ft rail by about a foot on either side, but this did not appear to interfere with the functioning. You can see the excess in the side view.98891 For a little perspective, the trailer is a 6x10 and the awning rail was a little under 7 ft from the ground.

Set-up is pretty straight forward. open the box, take the awning, poles and hardware out of the bag and get to work.
First step, toss instructions back in the box, then slide the heavy duty awning welt down the track. This did work better with 2 people, one to feed, the other to pull.

Unfold long thin shock-corded pole and thread through the sleeve for the front hoop of the awning. They thoughtfully put a fastex buckle at the end of the strap so after inserting the pole, all you needed to do was snap the buckle in place and the front was done.98890

Third step was to insert the 3 poles into position on the inside. There are clips which attached to the hoop and a ball & socket joint on the trailer side to snap the poles into. 98892
A stretch of the pole, squeeze of the locking handle and we are done. It probably took less than 10 minutes start to finish.

The front is strapped down (not roped) to the ground with a fastex buckle at one end98900, to attach to the cabana. After about 6 inches of rain, the inside of the cabana is among the driest places around, outside of the trailers.

The front splits into 2 doors, attached at the center, and can be individually opened. The front(of the trailer) side has a center door, and the rear side can be opened all of the way, or just the screens.

The only hinky thing about the setup was the snaps which were to be mounted to the trailer to hold the sides snug, and did not really work well.

A nice touch was a screen that would go on another rail and close off the base of the trailer from creepy crawlies and the occasional bird who shot through from under the trailer.

My son decided that he wanted to sleep outside so he stayed under the cabana. I think a lot of if was to hear the stream below the site, and the wind blowing through the trees, rather than the middle-eastern sand rattlling off of the canvas.

Pat
Growing old is mandatory, growing up is optional.

Build log:http://www.tnttt.com/viewtopic.php?f=42&t=51193
User avatar
pmowers
Donating Member
 
Posts: 287
Images: 43
Joined: Wed Sep 14, 2011 2:44 pm
Top

Re: Finally Started- 6x10 conversion (Ready for first trip)

Postby revorunner » Tue Oct 16, 2012 8:57 pm

Thanks for the pics pmowers. That cabana looks really sweet. :thumbsup:
User avatar
revorunner
Teardrop Advisor
 
Posts: 55
Joined: Tue May 22, 2012 9:03 pm
Location: BC Canada
Top

PreviousNext

Return to Cargo Trailer Conversions

Who is online

Users browsing this forum: No registered users and 27 guests