dustboy's 6 x 12 conversion

Converting Cargo Trailers into TTTs

Re: dustboy's 6 x 12 conversion

Postby A Plus MM » Mon Mar 25, 2013 3:21 pm

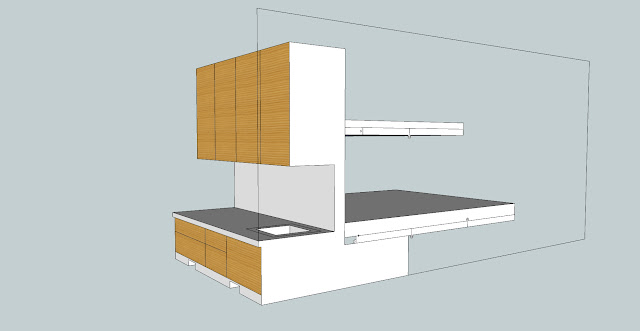
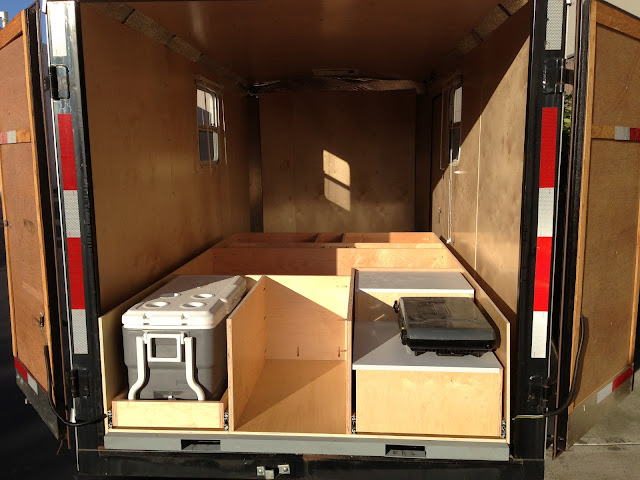
dustboy wrote:Got started on the sketchup model. There will be some room under the seat, so maybe that's as far forward as I can get the water tank. Got a 21 gallon Valterra tank ordered today, so that's only 175 lbs.

Image

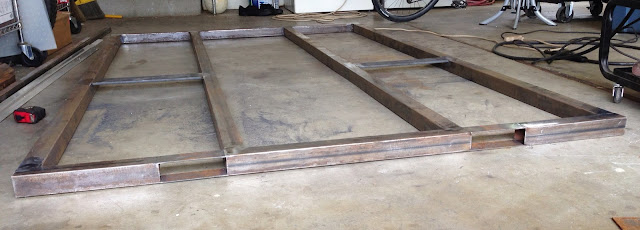
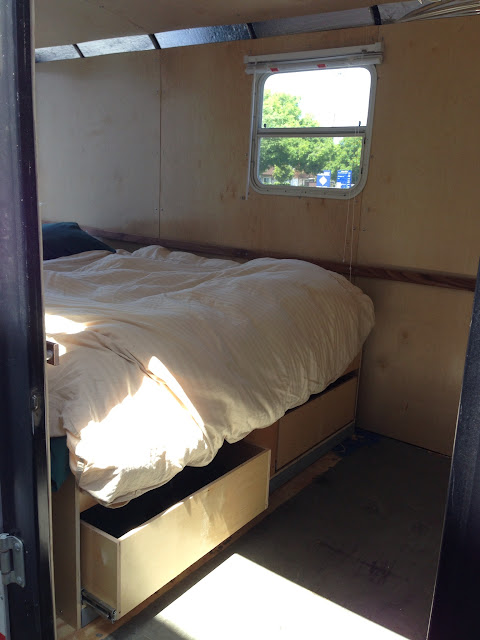
The wall will be framed in steel to provide a strong backbone for the unit. The beds will rest on rails attached to the trailer walls.


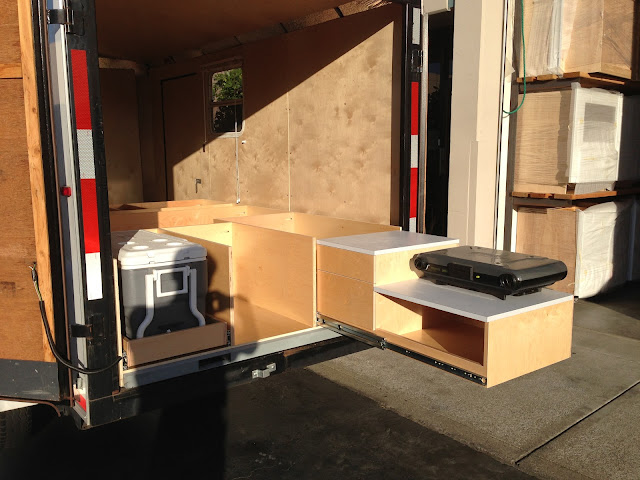
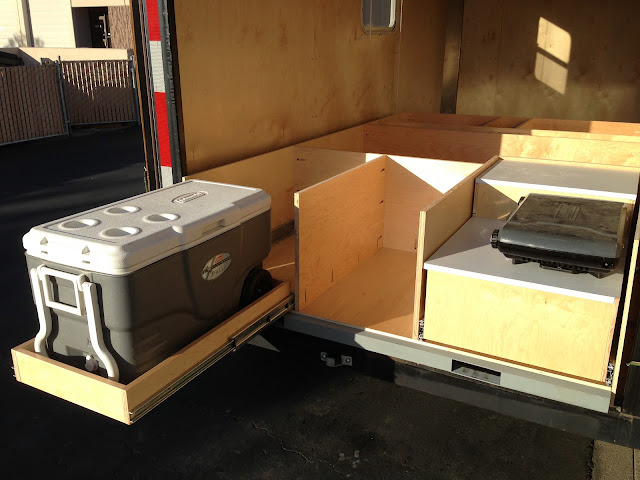
I just wanted to say that I love this concept! I think the CT conversion crowd has gotten into the mindset that the galley has to be accessible from the interior only and forget that it can be done the same way the TearDrop crowd does it. I am really impressed with the modular concept that could be removed/moved to a different trailer. I do agree that the weight could be a problem but I think somebody smarter than me could figure it out, maybe if it was on a track or rail system it could be slid forward for travel and back to the back for camping? I could see a stand being built to remove/store/move it instead of a forklift. Impressive!
A Plus MM
Teardrop Builder
 
Posts: 38
Images: 7
Joined: Sun Sep 02, 2012 1:04 pm

Re: dustboy's 6 x 12 conversion

Postby dustboy » Mon Mar 25, 2013 10:44 pm

A Plus MM wrote:maybe if it was on a track or rail system it could be slid forward for travel and back to the back for camping? I could see a stand being built to remove/store/move it instead of a forklift. Impressive!


Thanks A Plus! That's a good idea, you could put it on casters and lock it down in either position. Having loaded this trailer a few times now, I don't think the weight distribution will be as much an issue as I assumed. I will generally be traveling with bicycles and other gear loaded in the front anyway.

You could definitely build a clever rolling dolly that would allow you to move the unit easily.

The sticky brake issue has reared its head again. I had thought it was a done deal after I replaced the wheel cylinder, but now I'm dragging that one tire again. The mechanic over at the local trailer supply (a good shop) didn't have any new ideas. I'm getting close to tossing the whole backing plate and brake drum, and starting over.
dustboy
Teardrop Master
 
Posts: 279
Images: 10
Joined: Fri Jan 11, 2013 5:27 pm

Re: dustboy's 6 x 12 conversion

Postby A Plus MM » Tue Mar 26, 2013 11:49 am

dustboy wrote:The sticky brake issue has reared its head again. I had thought it was a done deal after I replaced the wheel cylinder, but now I'm dragging that one tire again. The mechanic over at the local trailer supply (a good shop) didn't have any new ideas. I'm getting close to tossing the whole backing plate and brake drum, and starting over.


I would suggest backing the adjustment for this brake off and readjust. OR, is the other brake getting power? If not then the one brake may be trying to do the job by itself and the controller needs adjusted.
A Plus MM
Teardrop Builder
 
Posts: 38
Images: 7
Joined: Sun Sep 02, 2012 1:04 pm
Top

Re: dustboy's 6 x 12 conversion

Postby hankaye » Tue Mar 26, 2013 12:12 pm

dustboy, Howdy;

One fast way to see if the magnets are working (getting power),
is to grab a compass (swinging needle type), and hold it near the brake
in question while someone activates the brakes... needle should point
like a goodbird dog right at it !

hank
Striving for a less complicated life since 1949 ...
Every day I beat my own previous record for number of consecutive days I've stayed alive.
hankaye
2000 Club
2000 Club
 
Posts: 2567
Images: 1
Joined: Thu Dec 06, 2012 5:35 pm
Location: S.W. New Mexico
Top

Re: dustboy's 6 x 12 conversion

Postby dustboy » Thu Mar 28, 2013 4:58 pm

hankaye wrote:dustboy, Howdy;

One fast way to see if the magnets are working (getting power),
is to grab a compass (swinging needle type), and hold it near the brake
in question while someone activates the brakes... needle should point
like a goodbird dog right at it !

hank


That's a clever idea, but these are hydraulic surge brakes. The real question is why it doesn't release again, it has been suggested that the return springs are shot, but they seem plenty springy to me.

On a better note: PROGRESS! :thumbsup:

Here's the frame for the slide-in unit. Note the openings for the forklift blades. The rest of the unit will be 1/2" baltic birch. Stay tuned.

Image
dustboy
Teardrop Master
 
Posts: 279
Images: 10
Joined: Fri Jan 11, 2013 5:27 pm
Top

Re: dustboy's 6 x 12 conversion

Postby MountainBound » Thu Mar 28, 2013 5:08 pm

Can't wait to see more progress!
MountainBound
Teardrop Inspector
 
Posts: 13
Joined: Sat Mar 16, 2013 10:36 am
Top

Re: dustboy's 6 x 12 conversion

Postby dustboy » Thu Apr 11, 2013 10:26 am

Starting to get the interior finished out!

I used 1/4" prefinished birch ply for the walls and ceiling.

Image

Here's an old trick to hold the ceiling panels in place while you fasten them. Drywallers call it a "deadman". It will definitely complain less than your spouse.

Image

I used stainless self-tappers that I got from my local fastener shop. You can see that I chamfered the edges of the ply with a router to create a V-groove. This way, when the edges don't flush perfectly (they never will) you don't have an ugly edge sticking out.

Image

Here's the side door paneled. I used a slam latch that I had laying around. Since it didn't have a handle for the inside, I welded on a piece of bike chain that works as a pull and a latch release. You gotta have some "chi-chis" that make it your own, right?
You can also see the lightswitch for the overhead lights just inside the door.

Image

Fantastic Fan installs very cleanly. Nice product and worth the extra $$.

Image

That's the latest. I need to trim the corners, lay some floor, and install lights, and some rub rails on the walls for hauling. Then on to the slide-in bed unit!
dustboy
Teardrop Master
 
Posts: 279
Images: 10
Joined: Fri Jan 11, 2013 5:27 pm
Top

Re: dustboy's 6 x 12 conversion

Postby dustboy » Tue Apr 16, 2013 1:04 pm

Here's the layout of the platform. The galley is to the left. At right there are the two trays that will be under a flap that is covered by the mattress. Under those are two drawers.

Now I'm looking at that big empty space in the middle. Storage space is good right?!! But what is space if it's hard to get to--I would have to move the mattress and lift a flap to get to it. It would be a nice spot for firewood, camp chairs, dry food, guitar, etc.

Guess I can't make an access door in the side of the trailer, it would be right in the middle of the wheels!

Image
dustboy
Teardrop Master
 
Posts: 279
Images: 10
Joined: Fri Jan 11, 2013 5:27 pm
Top

Re: dustboy's 6 x 12 conversion

Postby hankaye » Tue Apr 16, 2013 2:10 pm

dustboy, Howdy;

The space unde the bed in my RV (home), has a gas shock on each side to help
lift it up and hold it in place, the space is a huge storage area for me.
I keep the awkward bulky items in there. Just a thought.
Looks like you are doin' a great job there, keep on havin' fun ...

hank
Striving for a less complicated life since 1949 ...
Every day I beat my own previous record for number of consecutive days I've stayed alive.
hankaye
2000 Club
2000 Club
 
Posts: 2567
Images: 1
Joined: Thu Dec 06, 2012 5:35 pm
Location: S.W. New Mexico
Top

Re: dustboy's 6 x 12 conversion

Postby dustboy » Wed Apr 17, 2013 10:09 am

Now for the fun stuff!

Next the countertop goes on, sink will situate over the center opening.
Image

Got the pullout galley built. Smoky stove/grill will be as far from the living space as possible, so the camper doesn't end up smelling like bacon. Hard to see but it has two drawers at the left.

Stove will use the little 1lb propane bottles for now, I'm going to cut the hard regulator tube and splice in some hose so the bottle can sit below on the shelf. Need to drill some finger-pull holes in the drawer fronts.
Image

Pullout for the cooler is all set too.

All the slide hardware is Accuride 500-lb slides. Even at my wholesale price, these things are the most expensive part of the build. But boy are they smooth, and they will probably outlast the trailer.
Image
dustboy
Teardrop Master
 
Posts: 279
Images: 10
Joined: Fri Jan 11, 2013 5:27 pm
Top

Re: dustboy's 6 x 12 conversion

Postby hankaye » Wed Apr 17, 2013 11:22 pm

dustboy, Howdy;

Slick lookin' unit you're puttin' togather.
Don't forget to give Clark praise for a job well done.

hank
Striving for a less complicated life since 1949 ...
Every day I beat my own previous record for number of consecutive days I've stayed alive.
hankaye
2000 Club
2000 Club
 
Posts: 2567
Images: 1
Joined: Thu Dec 06, 2012 5:35 pm
Location: S.W. New Mexico
Top

Re: dustboy's 6 x 12 conversion

Postby dustboy » Tue Apr 30, 2013 11:33 pm

Well, I got the rig all put together with minutes to spare, on a Friday before we left on a family camping trip for the weekend. I flew through about 8 hours of work in less than 4, and that was all while keeping my 2-year-old from picking up the sharp tools. Oh yeah, and the day before I replaced the entire brake system (no more skid marks) with a new electric system with a Primus controller in the TV. We were on the road at 4:30 and I had also done all the packing. WHEW!

Sink is in place and plumbed, battery was temporarily located under the bed.

All in all the trip went very well. Pics to follow soon-ish.
dustboy
Teardrop Master
 
Posts: 279
Images: 10
Joined: Fri Jan 11, 2013 5:27 pm
Top

Re: dustboy's 6 x 12 conversion

Postby Rainier70 » Wed May 01, 2013 11:56 am

Sweet slide outs.

I'm looking forward to how your test run goes. Enjoy!
User avatar
Rainier70
1000 Club
1000 Club
 
Posts: 1083
Images: 244
Joined: Wed Jan 30, 2013 4:35 am
Location: Southeast Idaho
Top

Re: dustboy's 6 x 12 conversion

Postby A Plus MM » Sat May 04, 2013 10:43 am

I know you are already have your build nearly done but I saw this and thought about your project. These would be great in a CTC!

https://sphotos-a.xx.fbcdn.net/hphotos-ash3/528338_471715872901643_604263011_n.jpg
A Plus MM
Teardrop Builder
 
Posts: 38
Images: 7
Joined: Sun Sep 02, 2012 1:04 pm
Top

Re: dustboy's 6 x 12 conversion

Postby dustboy » Tue May 14, 2013 2:21 pm

Finally got a chance to take some pix. Here's the galley, more or less complete. Cooler is missing from the slide out at left. Will be adding a door under the sink.

You can see the blue drain hose, it's kind of a pain to roll up every time you close the back doors, so I need to find a way to route it through the floor.
Image

At the front, with drawers for our clothes.
Image

The front flap door under the mattress, more storage, and the center compartment is for dirty clothes. In a small space like this, everything has to have a place!
Image

I have some latches to add to the drawers so they don't slide during travel. Lots of details now to work on, summer is here and we are going to be doing a lot of camping!
dustboy
Teardrop Master
 
Posts: 279
Images: 10
Joined: Fri Jan 11, 2013 5:27 pm
Top

PreviousNext

Return to Cargo Trailer Conversions

Who is online

Users browsing this forum: No registered users and 3 guests