2013 Mirage XPO 6x12- Mt Air Express

Converting Cargo Trailers into TTTs

Re: 2013 Mirage XPO 6x12- Mt Air Express

Postby rebar » Sat May 04, 2019 8:27 pm

Thanks for all the additional information Cindy. I still have a vision of no curb, sunken pan and grate but well see.
97 12 valve 4x4 5 speed
rebar
Teardrop Master
 
Posts: 189
Joined: Mon May 22, 2017 4:35 pm
Location: Iowa City

Re: 2013 Mirage XPO 6x12- Mt Air Express

Postby Rainier70 » Thu Jun 06, 2019 3:42 pm

Since we have been having so much cloudy weather that interferes with our solar battery setup , I decided to increase our solar from 200 watts to 400. That should give us enough amp hours on cloudy days or in areas with partial shade to still recharge the batteries as well as take care of our modest immediate uses. The only problem has been finding a couple of days of good warm sun to do the work in.

I used 3m VHB tape to put the original two panels on with, and I am using it to mount the new ones also. From previous experimenting (panel removal from old CT) and research I found that getting the old mounts off requires either extreme (below 0) cold or high heat. Finally we got a day with some heat to it, and I got one of the panels off. It took a lot of prying and some cutting, but the mounts came up one by one.

The original mount had two panels down the middle .

Image

To put 4 panels on the roof I wanted to move the first two so that the four could be in two pairs down the middle of the roof. The roof on our CT has a pronounce curve to it so the outside edges are up higher than our first installation. The panels butting together also posed some issues. I put the first panel down with one edge on the center line with it raised about a 1/4 of an inch off the roof. With the panel level (I hope)the outside edge is a little more than 2.5 inches off the roof.

I used Simpson Strong Tie angles for the middle and front brackets and 3X7 inch tie plates for the outside brackets. The tie plates were bent in a vice to the correct angle. I used an angle finder to measure that.

Image

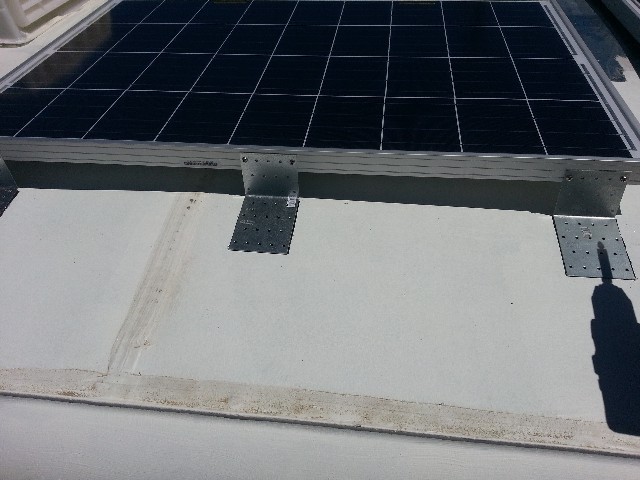
In order to get to the middle brackets if I ever need to or to remove a panel, I used hinges to mount the second panel to the first one. To make it easier I mounted the hinges and drilled the holes before either panel was put in place. Then it was simple to just screw them together and finish the other mounts.

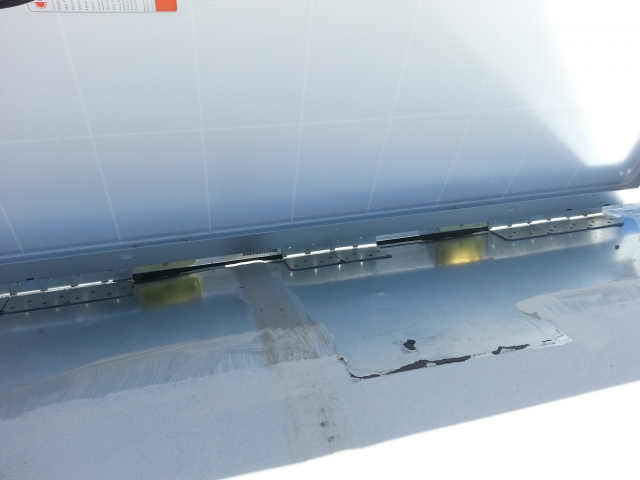
This next picture is one of the middle support brackets and a reflection of the hinges. The black goo on the roof is some leftover VHB tape from where the original supports were.

On a side note you can see where the silver roof is bare metal that didn't get painted with Henry's Solar Reflective Paint. I am a true believer in Henry's! That bare metal was untouchable while the painted areas were almost cool to the touch.

Image

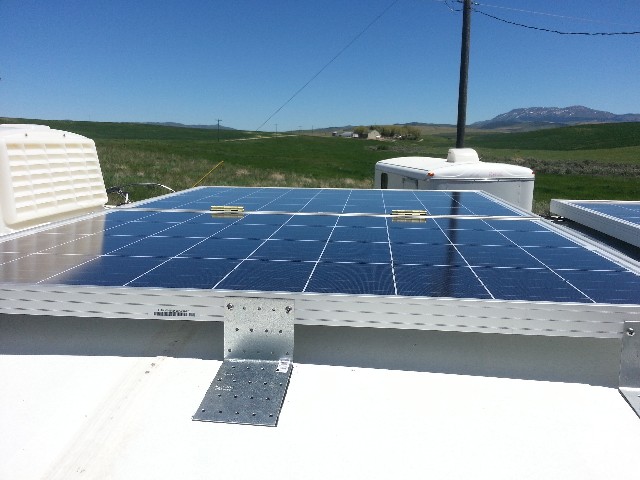
And a picture of the first two panels in place. You can see that the rear panel hasn't been moved yet. Bad weather is back, and finishing the back two panels will have to wait for another shot of good sun to do the work in.

Image
User avatar
Rainier70
1000 Club
1000 Club
 
Posts: 1083
Images: 244
Joined: Wed Jan 30, 2013 4:35 am
Location: Southeast Idaho

Re: 2013 Mirage XPO 6x12- Mt Air Express

Postby Rainier70 » Wed Jun 12, 2019 5:16 pm

Between storms we got a couple more good days of sun, and so we mounted the last two solar panels with 3M vhb tape. That gives us 400 watts. Our roof is curved so all of the mounts are bent to the angle of the roof.

Image

We also upgraded to a 40 amp Renogy Solar Controller with a Blue Tooth module, and we added a breaker with a quick disconnect on the right side wall.
Here it is with the shelf out. The 220 amp hr golf cart batteries are in a drawer mounted on slides.

Image

Here it is with the shelf in. It has plenty of breathing room and is easy to read in this position between the two areas. The shelf is made to be easy in and out for extra wiring and fuse access. I haven't got all of the wires zip tied and tidied up yet. There is enough extra wire to allow for the batteries being pulled out, or the controller pulled up.

Image
User avatar
Rainier70
1000 Club
1000 Club
 
Posts: 1083
Images: 244
Joined: Wed Jan 30, 2013 4:35 am
Location: Southeast Idaho
Top

Re: 2013 Mirage XPO 6x12- Mt Air Express

Postby hankaye » Wed Jun 12, 2019 7:16 pm

Rainier70, Howdy;

Looks great, ... as usual for you. :thumbsup: :thumbsup:

hank
Striving for a less complicated life since 1949 ...
Every day I beat my own previous record for number of consecutive days I've stayed alive.
hankaye
2000 Club
2000 Club
 
Posts: 2567
Images: 1
Joined: Thu Dec 06, 2012 5:35 pm
Location: S.W. New Mexico
Top

Re: 2013 Mirage XPO 6x12- Mt Air Express

Postby Rainier70 » Wed Jun 12, 2019 7:45 pm

Thanks, Hank! I appreciate the kind words, and I hope that documenting what we have done is helpful to lots of others. I know I sure enjoy seeing what others have done.

We debated for quite awhile on how we wanted to put 4 panels on a rounded roof. One of the many hats my husband wears is a welding hood, so it would have been relatively easy to have put them on a rack anchored to the side walls, but we thought that we might have less wind resistance with them closer to the roof. I hope so anyway.
User avatar
Rainier70
1000 Club
1000 Club
 
Posts: 1083
Images: 244
Joined: Wed Jan 30, 2013 4:35 am
Location: Southeast Idaho
Top

Re: 2013 Mirage XPO 6x12- Mt Air Express

Postby Rainier70 » Fri Jun 14, 2019 10:03 am

I finally got the floor insulated. Fire season came quickly in June last year, and I didn't get time to insulate the underside before I camped for 4 months in the high country. My feet froze even with foam floor pieces and rugs. So I am excited to have it done for this year.

I do recommend that taking care of the underside is done as soon as possible. I certainly paid for not doing it last year. First I had to clean a ton of mud, mag (road salt), and even cow manure (country roads) off the rails and underside. I pressure washed it three times and had to wash it with a rag and soapy water to get the final mag film off. What a pain! :shock: But I didn't want to have any salts or dirt under the insulation.

Then I had to treat the rust areas where gravel had chipped the paint on the rails. After taking care of the rust, I sprayed the rails with undercoating and sealed all of the bottom floor seams. At last it was ready to put the insulation in. I used glue and screws with fender washers to hold the insulation up, along with some spray foam in the gaps, sides, and seams. Then it was painted over with some old paint to add a little protection to the foam.

I am glad to be out from under! :?

Image

:roll: Yep. It already has some mag/mud streaks on my new paint job.
User avatar
Rainier70
1000 Club
1000 Club
 
Posts: 1083
Images: 244
Joined: Wed Jan 30, 2013 4:35 am
Location: Southeast Idaho
Top

Re: 2013 Mirage XPO 6x12- Mt Air Express

Postby Rainier70 » Sat Jun 15, 2019 6:55 pm

We put an older style used "slam lock" on the door. We decided to not use an RV lock because of how much support material is removed from the door to accommodate the inset latch. The cargo trailer doors are thinner than RV doors, so the main door support can be just about cut in two when putting the RV style latch in unless you reinforce it.

The latch we used only entailed putting a one inch hole through the door. It holds the door nice and tight. I do have the keys for it, but since I still use my cargo bar, they are not a real necessity when locking up from the outside.

Image


Image
User avatar
Rainier70
1000 Club
1000 Club
 
Posts: 1083
Images: 244
Joined: Wed Jan 30, 2013 4:35 am
Location: Southeast Idaho
Top

Re: 2013 Mirage XPO 6x12- Mt Air Express

Postby onehoser » Sat Jun 15, 2019 7:55 pm

Rainier70 wrote:We put an older style used "slam lock" on the door. We decided to not use an RV lock because of how much support material is removed from the door to accommodate the inset latch. The cargo trailer doors are thinner than RV doors, so the main door support can be just about cut in two when putting the RV style latch in unless you reinforce it.

The latch we used only entailed putting a one inch hole through the door. It holds the door nice and tight. I do have the keys for it, but since I still use my cargo bar, they are not a real necessity when locking up from the outside.

Image


Image


any more details of the latch you installed? i was going to install an rv latch but i'm thinking twice
I am the wisest man alive, for i know one thing, and that is that i know nothing. (socrates)
User avatar
onehoser
The 300 Club
 
Posts: 369
Joined: Sun May 15, 2016 10:41 am
Location: selkirk ontario
Top

Re: 2013 Mirage XPO 6x12- Mt Air Express

Postby pchast » Sat Jun 15, 2019 8:22 pm

Do you have a method of making sure you are not locked in.
:thinking:
Its been suggested in the past to add a way to lock the bar
in the open position.
pchast
Platinum Donating Member
 
Posts: 2026
Images: 97
Joined: Mon Jan 28, 2013 5:47 pm
Location: Athens, NY
Top

Re: 2013 Mirage XPO 6x12- Mt Air Express

Postby Rainier70 » Sun Jun 16, 2019 8:38 am

There are a number of methods for blocking the bar on the outside from being locked. I have seen some that drill a hole in handle and lock the handle to the bar. Some people just put a lock back on the hasp so that the bar can't be placed in it. Without the hasp holding it the bar can be pushed to the side. That would work with a regular lock, but not a puck lock where the bar could be wedged behind it.

On my first 6X12 CT I put a ring in the wall to lock the bar back against the wall with a long shank lock. Image

On this 7X16 CT I mounted a second hasp on the wall to lock the bar in. That way I can use my same puck lock on it. It's easy to just take the lock off the door, move the bar into the second hasp and put the lock back on.

Image
User avatar
Rainier70
1000 Club
1000 Club
 
Posts: 1083
Images: 244
Joined: Wed Jan 30, 2013 4:35 am
Location: Southeast Idaho
Top

Re: 2013 Mirage XPO 6x12- Mt Air Express

Postby Rainier70 » Sun Jun 16, 2019 8:47 am

onehoser wrote:
any more details of the latch you installed? i was going to install an rv latch but i'm thinking twice


The secondhand doorlock that I used, I got from a generous member of this forum, but they can be bought by looking up teardrop trailer parts. Here is a link to one supplier:
https://www.teardroptrailerparts.com/do ... -kits.html And from their pictures you can see the parts and basically how they work. Mine locks on the inside with a lever and outside with a key.
User avatar
Rainier70
1000 Club
1000 Club
 
Posts: 1083
Images: 244
Joined: Wed Jan 30, 2013 4:35 am
Location: Southeast Idaho
Top

Re: 2013 Mirage XPO 6x12- Mt Air Express

Postby onehoser » Sun Jun 16, 2019 9:09 am

Rainier70 wrote:
onehoser wrote:
any more details of the latch you installed? i was going to install an rv latch but i'm thinking twice


The secondhand doorlock that I used, I got from a generous member of this forum, but they can be bought by looking up teardrop trailer parts. Here is a link to one supplier:
https://www.teardroptrailerparts.com/do ... -kits.html And from their pictures you can see the parts and basically how they work. Mine locks on the inside with a lever and outside with a key.


thanks for the info. i think i like this style..
Attachments
image.jpeg
image.jpeg (34.27 KiB) Viewed 3851 times
I am the wisest man alive, for i know one thing, and that is that i know nothing. (socrates)
User avatar
onehoser
The 300 Club
 
Posts: 369
Joined: Sun May 15, 2016 10:41 am
Location: selkirk ontario
Top

Re: 2013 Mirage XPO 6x12- Mt Air Express

Postby Rainier70 » Mon Jun 17, 2019 8:42 pm

One thing I forgot to mention is that since my solar panels are set up in a parallel configuration I added inline fuses to each panel. There are nice MC4 inline fuse holders available that conveniently clip right in the connection between the panel and my y branch connector. MtDon also mentioned them when I had questioned pros and cons of parallel or series connections, otherwise I would have forgotten about them until sometime in the middle of the night when I would have remembered and been cussing. :o :shock:

They are easy to forget and never seem to be mentioned with installations.

I used some similar to this:

Image
User avatar
Rainier70
1000 Club
1000 Club
 
Posts: 1083
Images: 244
Joined: Wed Jan 30, 2013 4:35 am
Location: Southeast Idaho
Top

Re: 2013 Mirage XPO 6x12- Mt Air Express

Postby Rainier70 » Tue Jun 25, 2019 3:48 pm

I’ve been out camping a couple of times in the last month, and I am happy to report that upping my solar panel wattage to 400 watts has helped considerably in the stormy weather we have been having. The combined panels now contribute enough amps, even in very low light, to both charge the batteries and run whatever I need, no matter what the weather. It was nice to see 5+amps coming in at 8:30 am in the rain.

Camping in below normal temps, as a low out of Canada swept through, was a great test of the under floor insulation. The morning lows outside were in the 25 deg F range, but inside was comfortably in the 50 to 60 degree range. My feet really felt the difference.

I’ve been getting a bit more of my to-do list done. On my solar setup, I replaced the inline blade fuse that was on my solar line to the charge controller, with a better inline 30 amp DC breaker.

Image

The blade fuses are problematic with higher amp loads. They don’t always make a good connection and can cause too much resistance which can lead to line drop or over- heating at higher amps.

I also got all of the wiring on the solar panels and connections through the roof encased in wire loom and zip-tied or 3m taped into place. The loom should help with both uv and any abrasion from vibration or wind movement.

Inside the CT I got the flooring done except for the tile that will go under the stove. I put foam interlocking flooring tiles from a big box store down. I love walking on them. They are very comfortable on bare feet. The puzzle edges are more pronounce at first, but as they are walked on they even out and become less noticeable. Since they are foam they can be damaged by dragging heavy stuff across them or by dropping things. I do have extras, but I think that with care I will get many years service out of these.

Image

Image


The sink is inset, and I got some of the cabinet doors done too.

Image

I put magnetic child locks on the doors to the cabinets with shelves.

Image

They are easy to lock for traveling, but can be left unlocked for when I am camped. As long as I don’t forget to lock them before I pull out. :oops:
User avatar
Rainier70
1000 Club
1000 Club
 
Posts: 1083
Images: 244
Joined: Wed Jan 30, 2013 4:35 am
Location: Southeast Idaho
Top

Re: 2013 Mirage XPO 6x12- Mt Air Express

Postby Rainier70 » Tue Jun 25, 2019 6:57 pm

Other small jobs done: I got the holes drilled into the bed platform to provide air under the foam mattress, and put in tie downs in for some of the under the bed storage. I also did a bunch of painting and staining, and about a million more small jobs.

I put a hole about every 6 to 8 inches.
Image


I hung the mosquito net for the back doors.
Image

I was going to trim the excess on the sides, but I don’t think I will yet. The extra on the sides makes an effective bug seal without having to put up a lot of Velcro tabs up, so far anyway. The net hangs behind my dust sheet.

Image

It takes about a minute to drop the dust sheet and open the doors. The only reason it takes that long is because I am careful to keep the dusty side of the sheet to the outside and knock most of the dust off first.

And with the dust cover up:
Image

Wow. Two trips across the bed to mess with the curtain really annihilated the cover I have on it to protect from sawdust while working. :shock: :lol:


I have found using a dust sheet across the back when traveling has been really helpful for keeping things clean. No matter how well the doors seal, on our rough and horribly dusty back roads the doors will flex and admit dust in clouds. Lots of it. Plus when I open the back doors there is a pile of dirt on top of the seal just waiting to jump in and attack! :roll:

The smooth panels on the sides of the seats and under the bed area are mounted with magnetic catches. Sometimes it is just nice to pull the side off for a quick grab instead of opening the top. I would have hinged them, but I didn’t have room for hinge swing on some of them. I don’t access through the sides very often anyway.

The access panel is propped up against the side to show the magnetic catches.

Image
User avatar
Rainier70
1000 Club
1000 Club
 
Posts: 1083
Images: 244
Joined: Wed Jan 30, 2013 4:35 am
Location: Southeast Idaho
Top

PreviousNext

Return to Cargo Trailer Conversions

Who is online

Users browsing this forum: No registered users and 9 guests