Purchased a renogy package including 4x100 rigid panels, mppt, 2 - 100 lipeo4 batteries..and all wiring etc..still need to buy some breakers and fuses...So question....
Has anyone installed solar on their CT. Did you drill directly into the roof beams inside or use a metal frame on the outside and mount the panels to the frame. Obviously the frame must be mounted to the trailer but perhaps less screws than mounting the panels directly to the roof crossmembers. I have 4.... 100 watt panels I'm mounting on my 6x12. Any pics would be great..lastly, I'd think there would a fair bit of lift when travelling at highway sppeds. I worry about the wind tearing the panels free while driving. Thoughts on putting a deflector in front of the front most panels to deflect the wind over the panels.Thanks for any feedback..Cheers Al in Calgary
Teardrops n Tiny Travel Trailersor t n ttt for short (tnttt.com) |
well I purchased my solar package
7 posts
• Page 1 of 1
well I purchased my solar package
![]() by yycwrangler » Sun Mar 03, 2024 4:43 pm
by yycwrangler » Sun Mar 03, 2024 4:43 pm
- yycwrangler
- Teardrop Master
- Posts: 140
- Joined: Mon Jul 27, 2015 3:44 pm
Re: well I purchased my solar package
![]() by Grummy » Mon Mar 04, 2024 12:15 am
by Grummy » Mon Mar 04, 2024 12:15 am
I too have a 6x12 with (4) 100 watt panels. I have a pair in front of the center roof vent as well as a pair behind. Keep in mind that you will add about 30lbs per pair to the weight of the trailer just with the panels.
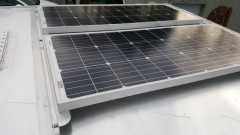
It is/was way to risky to drill thru the roof of the trailer for a whole lot of reasons. One is that the roof is really thin.. don't ever expect to hold much of anything just to that thin aluminum. If you drilled thru it into a beam, you would ave to shim with something solid between the outer skin and the beam because usually, there is a substantial gap between the two. We see a lot of trailers that have a scrap of 6mm ply between the beams and the skin in order to provide a little bit of roof curvature for rail run off. It all seems like a guaranty for water breach.
I opted to mount two panels first to 1/16" x 1" x 1" aluminum angle as seen in the photo above, then attach the panels on this angle to one that runs fully across the roof, where each end is riveted into the side wall upper tubes. The image does not show it, but while this full width angle is also only 1/16" angle (but 1-1/2" x 1-1/2"), it is captured by an additional plate of aluminum acting like a square washer.
The 1-1/16" aluminum can easily be formed to any roof curvature by expanding or shrinking the upright most edge (metalworking or bodywork guys understand this). And, for added structural strength and depending on your roof (mine is a flat top), you can use 3M highbond tape between the angle and the roof.
The method above allows for a gap between the roof and the panels without being too high up catching wind. It also allows you to make the panels removable or even tilt-able if desired.
Wires are brought in via typical RV roof glands like in the link below, however, where the glands are mounted, the aluminum holes in the roof are flanged upwards so that even if the caulking is jeopardized, water will not just run in because of the flange.
There is one more picture of this in my Album, but not any better at showing the ends unfortunately....
https://www.amazon.com/Waterproof-Restm ... 154&sr=8-3
- Grummy
- Teardrop Master
- Posts: 169
- Images: 104
- Joined: Wed Jul 20, 2005 8:51 pm