A Stainless Steel Dutch Oven

Ask questions about or share pics of your latest find...

A Stainless Steel Dutch Oven

Postby Prem » Mon Apr 19, 2010 2:52 pm

A 3.5 qt. Stainless Steel Camp Dutch oven

Image

Got the SS thick bottom pot for $1 at the swap meet. The lid is a heavy baking pan that I found at the Goodwill for $1.69. The aluminum handle and #6 SS bolts, washers and cap nuts I already had. (The lid also fits my 12 quart SS thick-bottom stock pot if I want to use it with charcoal briquettes above and below to make a big batch of soup faster. ) :? :twisted: ;)
Image
Image
Marking the holes to drill for the handle was a bit tricky, but it looks like I got the handle in the center.

Image

Prem
My goal...

_____________________________________________
...is to live in a trailer.
User avatar
Prem
Gold Donating Member
 
Posts: 3222
Images: 144
Joined: Thu Aug 21, 2008 11:25 am
Location: State of Jefferson (Oregon side)

Postby Rock » Tue Apr 20, 2010 8:00 am

Very cool but keep in mind that SS is a crappy conductor of heat compared to CI. I'm sure it will work great but you need to experiment a little with the coals.

Eric
Rock
Teardrop Master
 
Posts: 273
Images: 48
Joined: Tue Oct 14, 2008 10:38 am
Location: Fremont, OH

Postby Prem » Tue Apr 20, 2010 11:04 am

Yeah, but there's a disk of aluminum in the bottom clad with thin SS on both sides on this pot. It heats faster than my 12" inch cast iron Dutch oven.

That baking pan lid is heavy for a pan, but light for a lid. I think I will cut a circle of aluminum diamond plate for an insert on top (flush and under the handle) so that it adds more mass and a protective, replaceable layer of metal between the coals and the pan surface. :twisted:

Lots of fun.

Prem

P.S. Nice teardrop you built Eric! :thumbsup: Polyester or epoxy resin over the glass?
My goal...

_____________________________________________
...is to live in a trailer.
User avatar
Prem
Gold Donating Member
 
Posts: 3222
Images: 144
Joined: Thu Aug 21, 2008 11:25 am
Location: State of Jefferson (Oregon side)
Top

Postby Rock » Tue Apr 20, 2010 2:57 pm

In that case that might be the ultimate DO. Yeah - a 3/8" piece of aluminum inside that lid will make the heat radiate down nice and even. Looking good.

Eric
Rock
Teardrop Master
 
Posts: 273
Images: 48
Joined: Tue Oct 14, 2008 10:38 am
Location: Fremont, OH
Top

Postby Prem » Tue Apr 20, 2010 7:14 pm

Good call! 3/8" is about the thickness of the bottom of the pot with the aluminum disk in it.

I'm going to the scrap metal place tomorrow. I'm gonna get smooth 3/8ths instead of diamond plate.

Must find a very fine tooth, metal-cutting jigsaw blade (or two or three) for this job. The diameter of the inside of the lid is a shade under 9 inches, so that's 27 inches of cutting the circle.
My goal...

_____________________________________________
...is to live in a trailer.
User avatar
Prem
Gold Donating Member
 
Posts: 3222
Images: 144
Joined: Thu Aug 21, 2008 11:25 am
Location: State of Jefferson (Oregon side)
Top

Cutting aluminum

Postby eamarquardt » Tue Apr 20, 2010 7:34 pm

I have found the trick to cutting aluminum is keeping it as cool as possible. When it heats up it gums up and sticks to the blade filling in the teeth. When this happens, your effort is doomed untill you pick the al out of the teeth of your blade. If you have someone spray water on it with "windex" sprayer while you cut, you will have better results. I often run the garden hose over the sheet (I have a lifetime supply of 1/8 sheet that I am slowly using up) right where I'm cutting and that works great (you gotta trust your double insulated tool and GFI if you wanna do this and you can't get over zealous with the water flow).

Good luck.

Cheers,

Gus
The opinions in this post are my own. My comments are directed to those that might like an alternative approach to those already espoused.There is the right way,the wrong way,the USMC way, your way, my way, and the highway.
"I'm impatient with stupidity. My people have learned to live without it." Klaatu-"The Day the Earth Stood Still"
"You can't handle the truth!"-Jack Nicholson "A Few Good Men"
"Some people spend an entire lifetime wondering if they made a difference in the world. The Marines don't have that problem"-Ronald Reagan
User avatar
eamarquardt
Silver Donating Member
 
Posts: 3179
Images: 150
Joined: Sat Nov 11, 2006 11:00 pm
Location: Simi Valley, State of Euphoria (Ca)
Top

Re: Cutting aluminum

Postby Kevin A » Tue Apr 20, 2010 7:37 pm

eamarquardt wrote:I have found the trick to cutting aluminum is keeping it as cool as possible. When it heats up it gums up and sticks to the blade filling in the teeth. When this happens, your effort is doomed untill you pick the al out of the teeth of your blade. If you have someone spray water on it with "windex" sprayer while you cut, you will have better results. I often run the garden hose over the sheet (I have a lifetime supply of 1/8 sheet that I am slowly using up) right where I'm cutting and that works great (you gotta trust your double insulated tool and GFI if you wanna do this and you can't get over zealous with the water flow).

Good luck.

Cheers,

Gus
Either that or use a battery powered jig saw. Better yet, air powered.
"Follow me, I'm right behind you"

ImageImage
User avatar
Kevin A
The other guy
 
Posts: 3222
Images: 289
Joined: Mon Jan 17, 2005 1:16 am
Location: California, Eureka
Top

Postby Rock » Wed Apr 21, 2010 4:37 am

Hey Prem - missed your question on my tear. I used System 3 throughout, with Silvertip Laminating resin for all coating and glassing. Just getting around to sanding it right now for a topcoat of a linked polyurethane.

Yeah - without industrial tools that will cut slow. Just gotta take ur time.

Eric
Rock
Teardrop Master
 
Posts: 273
Images: 48
Joined: Tue Oct 14, 2008 10:38 am
Location: Fremont, OH
Top

Postby Prem » Tue Apr 27, 2010 6:40 pm

Eric,

That's the way to do it right. You da man.


Prem :thumbsup:
My goal...

_____________________________________________
...is to live in a trailer.
User avatar
Prem
Gold Donating Member
 
Posts: 3222
Images: 144
Joined: Thu Aug 21, 2008 11:25 am
Location: State of Jefferson (Oregon side)
Top

Postby Prem » Tue Apr 27, 2010 6:49 pm

:thumbdown: I really don't like cutting aluminum with a blade, so I went looking for *something* else. I figured thin SS would never burn through, but I have never had any SS sheet that was thin enough to cut with hand sheers. Today I found the perfect solution at the Goodwill for a buck. It was a Korean SS frying pan, thin but with a copper bottom. I figured it was right at the limit of thickness to cut with my big, accurate metal sheers. Sure enough, it worked! :D

Image
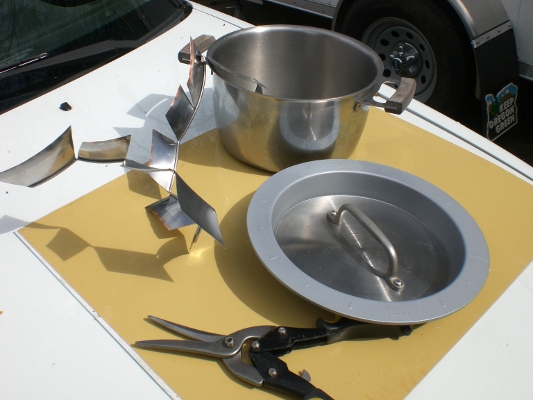
The scrap to the left is the sections of the side of the fry pan that got cut away.

Image
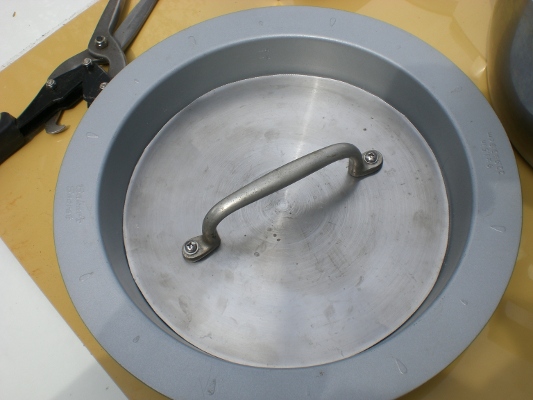
The perfect fit left just a little of the up flip of the original fry pan interior. That makes it even better for use with hot charcoal. The other plus is that when I drilled it and put the handle back in the center of the lid, the insert sucked right down flush all the way around. :)

Sometimes things go right.

Total cost: $3.69 (And about $10 in gasoline. lol.)

Prem
My goal...

_____________________________________________
...is to live in a trailer.
User avatar
Prem
Gold Donating Member
 
Posts: 3222
Images: 144
Joined: Thu Aug 21, 2008 11:25 am
Location: State of Jefferson (Oregon side)
Top

Postby Mark72 » Tue Apr 27, 2010 9:25 pm

So its time for pics of it in action right?

Mark
ImageImage
User avatar
Mark72
Donating Member
 
Posts: 998
Images: 127
Joined: Sun Dec 10, 2006 5:35 pm
Location: Indiana-Fredericksburg
Top

Postby Prem » Tue Apr 27, 2010 10:18 pm

That will have to wait for the weekend at the 17th Dam Gathering. It's pouring rain on and off all day thru Thursday here.
My goal...

_____________________________________________
...is to live in a trailer.
User avatar
Prem
Gold Donating Member
 
Posts: 3222
Images: 144
Joined: Thu Aug 21, 2008 11:25 am
Location: State of Jefferson (Oregon side)
Top

Postby Prem » Sun May 30, 2010 9:40 pm

Mark72 wrote:So its time for pics of it in action right?


Coconut-Raspberry-Chipotle-Ground-Turkey and Turkey Sausage Stew with Potatoes, Carrots, Celery, Cilantro, Onions and Garlic

Image

Image

Image

Image

Turned out *REALLY* tasty and nothing burned on.

(Next dish I cook in it I will increase the quantity by 3 or 4 times.)
My goal...

_____________________________________________
...is to live in a trailer.
User avatar
Prem
Gold Donating Member
 
Posts: 3222
Images: 144
Joined: Thu Aug 21, 2008 11:25 am
Location: State of Jefferson (Oregon side)
Top

Postby Mark72 » Mon May 31, 2010 8:25 pm

:thumbsup:
ImageImage
User avatar
Mark72
Donating Member
 
Posts: 998
Images: 127
Joined: Sun Dec 10, 2006 5:35 pm
Location: Indiana-Fredericksburg
Top


Return to Cast Iron

Who is online

Users browsing this forum: No registered users and 24 guests