Modified Grasshopper, more diamond plate

Design & Construction of anything that's not a teardrop e.g. Grasshoppers or Sunspots

Postby MKE_Tear » Tue Aug 17, 2010 7:38 am

Cliffmeister2000 wrote:The real strength comes from the skin on the frame, creating a torsion box. The frame does not have to be very strong.


That's what I kept telling my wife, but...I added a few more pieces than I had originally thought and I gotta say, honestly, I'm glad I did it. Plus, this way I know she'll get in it with me. :lol:

(The extra spars in the front are only bec. I have a window to go there, and I want to take out any potential sag. We'll see if that window goes in this year or not.)
User avatar
MKE_Tear
Teardrop Master
 
Posts: 130
Images: 243
Joined: Sat May 08, 2010 6:28 pm
Location: Milwaukee, WI

pink stuff went up

Postby MKE_Tear » Tue Aug 17, 2010 10:07 pm

Well, the weather finally broke here (we've had the a/c on for nearly two months, unusually humid conditions), so I took the day off and installed the insulation. With pink dust everywhere, here are the end results:


Image


Image


Image


Still figuring out what to do around the doors.
User avatar
MKE_Tear
Teardrop Master
 
Posts: 130
Images: 243
Joined: Sat May 08, 2010 6:28 pm
Location: Milwaukee, WI

Postby MKE_Tear » Wed Aug 18, 2010 8:54 am

I filled in the gaps (where I cut the insulation too small) with that "foam in a can" stuff. Here are the "blisters" I woke up to this a.m.


Image


Image


Image


Image


Make sure you follow the directions: WEAR GLOVES. It will be a nightmare (GUARANTEED!!!). Fortunately, I was at a natural ending point for the day.
User avatar
MKE_Tear
Teardrop Master
 
Posts: 130
Images: 243
Joined: Sat May 08, 2010 6:28 pm
Location: Milwaukee, WI
Top

Postby absolutsnwbrdr » Fri Aug 20, 2010 12:02 pm

haha looks like the same result I got when I used that stuff to seal up a gap in the front of my trailer. Works well though! Just had to shave the excess off, and I was good to go!
Zach
Coming Soon...
Image Image
User avatar
absolutsnwbrdr
Donating Member
 
Posts: 2657
Images: 412
Joined: Mon Jan 25, 2010 6:10 pm
Location: Hanover, PA
Top

Postby MKE_Tear » Fri Aug 20, 2010 5:33 pm

absolutsnwbrdr wrote:haha looks like the same result I got when I used that stuff to seal up a gap in the front of my trailer. Works well though! Just had to shave the excess off, and I was good to go!


You got that right -- the stuff works great!!

The aluthane arrived yesterday. I won't be able to do it this weekend but I'm hoping that my progress will allow me to do it next weekend. Anyway, I'll give the update on that when I can.

I forgot to mention that when using the power sprayer, my first one gave up the ghost on Sunday at 5:30 p.m. Fortunately, the box store was open and I was able to get another. Here was the first casualty of war. Mosquitoes have been HORRIBLE this summer:


Image
User avatar
MKE_Tear
Teardrop Master
 
Posts: 130
Images: 243
Joined: Sat May 08, 2010 6:28 pm
Location: Milwaukee, WI
Top

Postby MKE_Tear » Sat Aug 21, 2010 9:22 pm

Today one of the inside walls went up...


Image


Image


Image


The "finish carpentry" will come later.
User avatar
MKE_Tear
Teardrop Master
 
Posts: 130
Images: 243
Joined: Sat May 08, 2010 6:28 pm
Location: Milwaukee, WI
Top

skinning

Postby MKE_Tear » Mon Aug 23, 2010 9:00 pm

I got the other inside wall up and started the skinning project...


Image


I then cut the front window hole, and, of course, had to test the window. :D This is where I got a little trigger happy with the camera. But in a word: Wow! I'm so happy with the progress.


Image

Image

Image

Image


Next up: the trimming bit to take off that extra inch or so width on either side.
User avatar
MKE_Tear
Teardrop Master
 
Posts: 130
Images: 243
Joined: Sat May 08, 2010 6:28 pm
Location: Milwaukee, WI
Top

Postby MKE_Tear » Thu Aug 26, 2010 6:47 pm

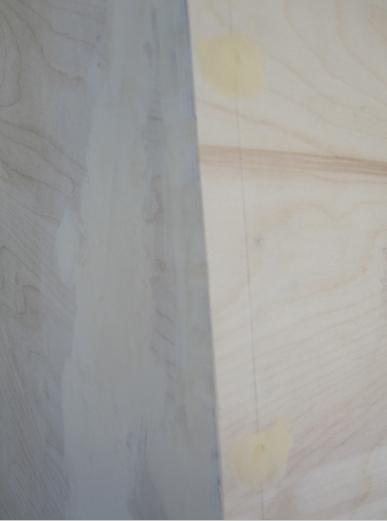
The flush cutting bit worked very well:

Image

I've done next to nothing with a router (before this project) and yet I have been very pleased with my results (from stretching the plywood to trimming the sheeting).

I identified additional progress in that I had to dump my 8 gallon shop vac. I've already filled it with sawdust. When using the flush cutting bit it seemed like I was not just making it snow but that I was in the middle of a blizzard.

I read somewhere that someone said it is more difficult to make a trailer/camper with angles (like the Grasshopper style) than the more typical teardrop design which requires bending the plywood. Well, I'm starting to think there is some serious truth to that statement.

For skinning MY grasshopper, it appears that each section (or angle) takes one full day: measuring the size of the plywood, cutting it, getting the angle(s) right so it matches up with the previous sheet and then the next sheet, priming the inside (min. 2 coats) and letting it dry, glueing/screwing, using the flush cutting bit on the overhang, wood filler on the the now "flushly cut" areas, and lastly, measure, cut & glue the insulation. And it could be even longer if you have a window or vent hole to cut out.

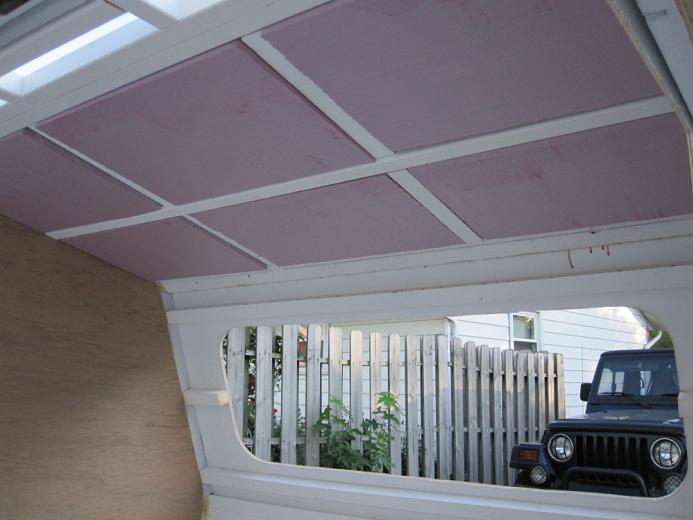
(Now I realize I could deal with the insulation later, doing the entire inside at once (like an efficient assembly line), instead of setting up the sawhorses and laying out the insulation each time (but that's only a five minute deal) but I like knowing that all I have remaining to do is skin/sandwich board the inside.)


So, now that I've got my second (skinning/sheeting) section done...

Image

Image

Image

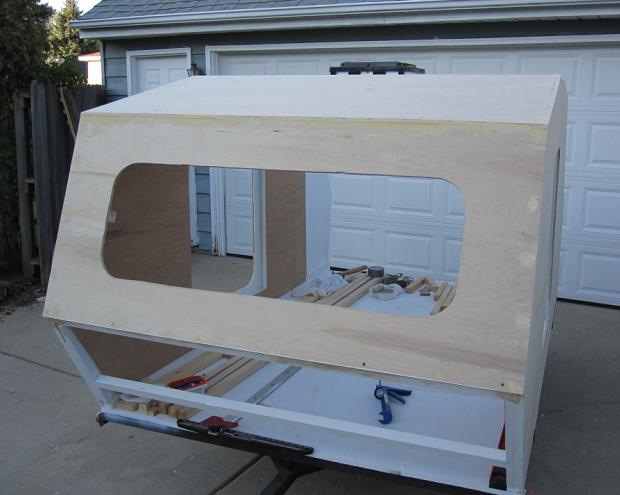
...it looks like it will take me two more days to do the two remaining roof sections. I can't wait to get done bec. I want to get to sealing it up with the aluthane. I've decided to seal it (the bulk of the camper) before I work on the hatch. Anyways, even before sealing (and after skinning), I have plenty to do: build & insulate the dividing wall, panel the inside, and finish the front. Gotz a lot to do!

My next section should be fun -- I have to cut out the hole for the vent. :thumbsup:
User avatar
MKE_Tear
Teardrop Master
 
Posts: 130
Images: 243
Joined: Sat May 08, 2010 6:28 pm
Location: Milwaukee, WI
Top

Postby MKE_Tear » Tue Aug 31, 2010 9:51 pm

Well, progress can be seen by the sawhorse I cut through...

Image


Afterwards, I managed to get the rest of the roof done. Thanks to another teardrop build (The Desert Dawg -- http://www.asolidfoundation.com/ ) I got the idea of how to cut out the vent hole exactly to size with the flush cutting bit. Half-way through I needed to get a new trim bit. I thought they would have gotten more life. Oh well.

Here are the pictures of the construction, at least trying to keep the cleanup to a minimum:


Image


and after the jig saw

Image


and the final product:


Image


Now, I just need to trim off the overhang (on the last sheet) and fill the gap between the last two sheets (the angles don't always match up perfectly).

I've decided to rearrange the order of what I am going to do next, based on a possibly different interior design with respect to the doors & walls, so next up: fix any other boo boos and get ready to seal it with the aluthane.


EDIT:
Figure I should show more of the vent photos...

Before I got the second flush cutting bit it got a bit hot and/or I pressed too hard

Image

Image

Image
Last edited by MKE_Tear on Sat Sep 04, 2010 3:30 pm, edited 1 time in total.
User avatar
MKE_Tear
Teardrop Master
 
Posts: 130
Images: 243
Joined: Sat May 08, 2010 6:28 pm
Location: Milwaukee, WI
Top

Postby Shadow Catcher » Wed Sep 01, 2010 8:27 am

Great build, we found a grasshopper design to be one of the most campable and least claustrophobic. Yours looks well thought out and well constructed.
User avatar
Shadow Catcher
Donating Member
 
Posts: 5993
Images: 234
Joined: Sat Apr 11, 2009 8:26 pm
Location: Metamora, OH
Top

Grasshopper

Postby john curtis » Wed Sep 01, 2010 4:10 pm

Grate job and love all the pics.
John
User avatar
john curtis
Teardrop Master
 
Posts: 175
Images: 141
Joined: Mon May 19, 2008 12:52 am
Location: Edmonton Ab. Canada
Top

Re: Grasshopper

Postby MKE_Tear » Wed Sep 01, 2010 8:27 pm

john curtis wrote:Grate job and love all the pics.
John


Thanks, John!


Shadow Catcher wrote:Great build, we found a grasshopper design to be one of the most campable and least claustrophobic. Yours looks well thought out and well constructed.


Thanks!

I generally like "smaller" things but having a smaller, enclosed bedroom (on wheels) that you can't stand in is the one thing I couldn't have. It sounds weird to say, but I'm not claustrophobic, except when I sleep. So I went with a five foot wide trailer, large enough for a queen size mattress, and will have minimal cabinetry inside. Actually, I think it will just be a shelf (large enough to handle two carry-on size bags -- that'll be enough for our camping needs).

I can often over think things, so I did put some time in the design, which in turn delayed me a month or so before making those first few cuts on the plywood. (But I just wanted to make sure I had the right design.) As the summer progressed, I added the idea of insulating the inside and sealing it with more than just primer and house paint, so that has added a bit of additional time, too, but I'm glad that I'm doing all of that. (I'd rather take the extra time & money now, rather than having all of my efforts be (potentially) destroyed by water, which could lead to mold, etc.)

The one thing I didn't figure out, and I'm okay with it (esp. bec. it was never in the original design), is not having electricity. It would be nice to have an a/c unit in there, should the occasion arise, but that might be something I add/retro-fit next year. Even though now is the time to do it (before everything gets finished on the inside), this time of the year I won't be needing it as much. The most important thing, however, is that the clock is ticking (before the weather changes) and I'd like to have this done by the end of the month.

As for what got done today: trimmed off the overhang on that last sheet and sealed up the seam with silicone. Not much, but something. It sure is getting darker earlier.
User avatar
MKE_Tear
Teardrop Master
 
Posts: 130
Images: 243
Joined: Sat May 08, 2010 6:28 pm
Location: Milwaukee, WI
Top

Postby MKE_Tear » Sat Sep 04, 2010 3:56 pm

Well, today was Aluthane Day. Here are the last "naked wood" shots:

Image

Image

Image

Image

Image

Image


Now, to the aluthane. The stuff came super-packed/wrapped. Inside of a cardboard box, with styrofoam worms, wrapped in a thick plastic bag that was zip-tied shut and clips on the lid.

Image


You'll see it looks pretty nasty unstirred:

Image

Image

Image


And spend the 79 cents to get one of those pouring things for the can. The stuff is extremely runny/oily/liquidy and if it gets into the lip of the top of the can, will permanently seal the lid with the can. Plus it's just easier to pour.

Image


And to keep it from drying out, I used the only thing that works: Holiday Plastic Wrap. :lol:

Image
User avatar
MKE_Tear
Teardrop Master
 
Posts: 130
Images: 243
Joined: Sat May 08, 2010 6:28 pm
Location: Milwaukee, WI
Top

Postby MKE_Tear » Sat Sep 04, 2010 4:08 pm

After the first coat:

Image

Image

Image

Image

Image

Image

Image
User avatar
MKE_Tear
Teardrop Master
 
Posts: 130
Images: 243
Joined: Sat May 08, 2010 6:28 pm
Location: Milwaukee, WI
Top

Postby MKE_Tear » Sat Sep 04, 2010 4:15 pm

And three hours later, with the second coat:

Image

Image

Image
User avatar
MKE_Tear
Teardrop Master
 
Posts: 130
Images: 243
Joined: Sat May 08, 2010 6:28 pm
Location: Milwaukee, WI
Top

PreviousNext

Return to Non-traditional Designs

Who is online

Users browsing this forum: No registered users and 17 guests