Modified Grasshopper, more diamond plate

Design & Construction of anything that's not a teardrop e.g. Grasshoppers or Sunspots

Postby GPW » Sat Sep 04, 2010 4:27 pm

Looks Nice !!!! :thumbsup:
There’s no place like Foam !
User avatar
GPW
Gold Donating Member
 
Posts: 14911
Images: 546
Joined: Thu Feb 09, 2006 7:58 pm
Location: New Orleans

Postby parnold » Sat Sep 04, 2010 6:20 pm

Did it seem to be absorbed by the wood, or did it just lay on top?

I'm anxious to hear what you think of how the aluminum laid down too, is it nice and uniform?
User avatar
parnold
Donating Member
 
Posts: 2344
Images: 302
Joined: Mon Feb 08, 2010 4:49 pm
Location: Northwest New Jersey

Postby MKE_Tear » Sat Sep 04, 2010 8:16 pm

GPW wrote:Looks Nice !!!! :thumbsup:


Thanks!


parnold wrote:Did it seem to be absorbed by the wood, or did it just lay on top?

I'm anxious to hear what you think of how the aluminum laid down too, is it nice and uniform?


I think it just laid on top. It went down very easily, nice & uniform, but adhered more like a paint rather than being soaked into the wood or absorbed like a sponge would do. It gave off a smell that reminded me of the combination of plastic, Testors glue and enamel paint when building models as a kid. :lol:

The first coat went down in about an hour, and was only (maybe?) 1/4 of the can. The second coat took around 45 minutes and that took me down to a little more than halfway, more than enough for the hatch and the remaining piece in the front.

They say to use a phenolic core roller, whatever that means (I didn't spend much time looking that up online and the guys (plural) @ the box store were no help), but I made sure I used one specifically made for varnishes & urethanes, rather than the ones made for all types of paint.
User avatar
MKE_Tear
Teardrop Master
 
Posts: 130
Images: 243
Joined: Sat May 08, 2010 6:28 pm
Location: Milwaukee, WI
Top

Postby myoung » Mon Sep 06, 2010 10:52 am

I really like the look of Aluthane. I want a similar look for my TTT, so I'll paint with it too. Are you expecting to use it on the inside as well?
Mike Young
build thread: viewtopic.php?t=40459
User avatar
myoung
500 Club
 
Posts: 644
Images: 250
Joined: Sat Aug 07, 2010 11:21 am
Location: Nipomo, CA
Top

Postby MKE_Tear » Mon Sep 06, 2010 11:06 am

myoung wrote:I really like the look of Aluthane. I want a similar look for my TTT, so I'll paint with it too. Are you expecting to use it on the inside as well?


No.

I put two coats of primer down (on the backside/inside of the plywood), and followed it up by insulation and a sheet of Luan. I'm going to hope I'm sealed up enough. (I should say there is plenty of it leftover so I could if I wanted to.)

It does have a nice, brilliant sheen to it, definitely worthy of leaving the color itself. Just make sure any filler, etc. is sanded PERFECTLY FLAT. I think some of it does absorb into the wood (so slightly changing a previous statement/message) as each coat is very thin.

All the best!
User avatar
MKE_Tear
Teardrop Master
 
Posts: 130
Images: 243
Joined: Sat May 08, 2010 6:28 pm
Location: Milwaukee, WI
Top

Postby steve smoot » Mon Sep 06, 2010 3:15 pm

You are doing a great job, sure wish mine was that far along...keep up the good work, and thanks for posting all the pictures and for explaining the process too... :thumbsup:

I was leaning towards FRP exterior, but this Aluthane is looking very interesting. FRP will cost me a bit over $200 counting the adhesive. And, this does not count aluminum angles for all the corners, etc.

What exactly are you planing for the edges where one plane meets another
I am not a complete idiot, some parts are missing...
User avatar
steve smoot
Lifetime member
 
Posts: 1355
Images: 62
Joined: Thu Sep 17, 2009 5:42 pm
Location: Boone NC
Top

Postby MKE_Tear » Tue Sep 07, 2010 8:04 pm

steve smoot wrote:You are doing a great job, sure wish mine was that far along...keep up the good work, and thanks for posting all the pictures and for explaining the process too... :thumbsup:

I was leaning towards FRP exterior, but this Aluthane is looking very interesting. FRP will cost me a bit over $200 counting the adhesive. And, this does not count aluminum angles for all the corners, etc.

What exactly are you planing for the edges where one plane meets another


Thanks -- very much appreciated!!

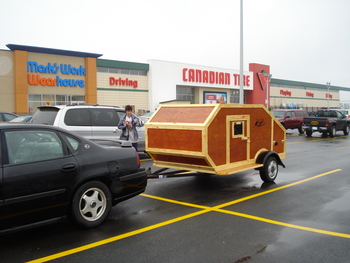
It seems like building this trailer has taken most of my focus as of late but it's fun. For the most part, I'm out of the phases where every step forward meant three to seven steps backwards: I would figure out things that I hadn't thought of, how to make it better, what else needed to be done to pull off my idea(s), etc. :? It sure has been a learning process.

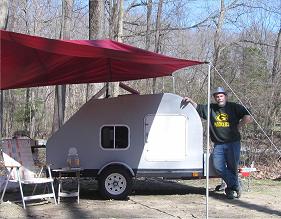
There are several reasons why I opted for aluthane:

1) Cost. With shipping it was approx. $100.

2) Simpler process. No mixing of components w/i a time period before things dry out, just roll it on.

3) Dry time. I had the 2nd coat on in 3-4 hours -- which meant I was done in one day.

Admittedly, I have no experience using aluthane, nor do I know anyone with experience, so I am taking a chance here...but I'm happy to be the guinea pig.

As for what am I going to do with the edges, I'm not quite sure. I've thought about doing some aluminum angle or even wood like in some of the Woodies or Weekender shots that can be found here (which are gorgeous), like:
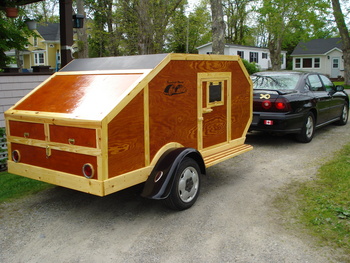

Image

Image

from this album:

http://tnttt.com/album_ ... er_id=6039


but in the end I'm a little unsure... because, and I hope I can explain this well, but for instance if I put wood on the edges going down from the roof, have I now created a lake or an area where water cannot just roll off? Will it be trapped on the roof?
User avatar
MKE_Tear
Teardrop Master
 
Posts: 130
Images: 243
Joined: Sat May 08, 2010 6:28 pm
Location: Milwaukee, WI
Top

Trim with Diamond Tread Plate...

Postby myoung » Tue Sep 07, 2010 10:33 pm

For the corners, I plan to use 1.5 x 1.5-inch diamond tread plate which is available in 4 to 8 foot lengths. I've sketched out the design and like the rugged industrial look for angular trailers like yours and mine. It should be an excellent complement to the aluminum-colored exterior finish.
Mike Young
build thread: viewtopic.php?t=40459
User avatar
myoung
500 Club
 
Posts: 644
Images: 250
Joined: Sat Aug 07, 2010 11:21 am
Location: Nipomo, CA
Top

Postby MKE_Tear » Tue Sep 14, 2010 12:24 pm

Well, I had to take a couple of steps backwards. I got the paint on, three coats to get everything even, and I then later didn't like it.

So then came a coat of primer and two coats of the paint I'm going with. It's slightly lighter than the color of the aluthane, but not as shiny. I'm still trying to maintain a relatively industrial look. I'll later put in some stripes, streaks or swirls but that might be next year.

Here's after the paint job:

Image

Image'


And with the passenger side door in (and with the front window just resting there/testing the fit, now that I have 6 coats of product on top of the two coats of aluthane):

Image

Image


In having the slight setback, I learned something VERY IMPORTANT about the Little Guy style doors. They are designed so that the hinge is towards the front, like the hinge on a car door (it gives you more room to get into, and in case the thing blows open while you're going down the freeway the wind won't blow the thing off), but here's the thing:

MY STICKERS (telling me passenger side up & driver side up) WERE BACKWARDS -- THEY WERE ON THE WRONG DOORS (or wrong sides of the doors)!!

After I put the passenger side in the first time, and even though the sticker said I had it in properly, it was wrong bec. I realized that the weep holes were on the top, not good for draining water.

So, no matter what the stickers say, look for the weep holes and/or the proper placement of the hinge.
User avatar
MKE_Tear
Teardrop Master
 
Posts: 130
Images: 243
Joined: Sat May 08, 2010 6:28 pm
Location: Milwaukee, WI
Top

Postby MKE_Tear » Tue Sep 14, 2010 12:47 pm

On the inside I wasn't sure how I was going to frame out the Little Guy Door, with respect to my inside walls (my original design didn't have insulation or sandwich walls). I just had a piece of luan over the pink stuff:

Image

Notice the placement of the door, ESPECIALLY where the hinge and door handle are located.


So I decided to frame out the open area with 2x2s and then fill in with the foam in a can stuff, and follow it up by laying a sheet of birch plywood over the top, to give it a nicer and stronger inside finish (not spongy like the luan).


Image


Image


Image


Giving me this, with the PROPERLY installed door:

Image


I'll later finish it up with some trim. I was able to get the hole to the right size by test hanging the plywood and tracing the opening from the outside onto the back side of the plywood. Hope that makes sense!

I should point out that I called the manufacturer and he said it didn't really matter which way the doors are in, I guess there is a vendor that specifically mounts them the other way (which orients the open screen towards the top of the door), but I would prefer to have the weep holes at the bottom.
User avatar
MKE_Tear
Teardrop Master
 
Posts: 130
Images: 243
Joined: Sat May 08, 2010 6:28 pm
Location: Milwaukee, WI
Top

Postby absolutsnwbrdr » Tue Sep 14, 2010 2:03 pm

Now that you mention that, I think my stickers might have been backwards as well. I ended up with the screen part towards the bottom of the opening, with the hinge towards the front of the trailer, as you show in the last pic.
Zach
Coming Soon...
Image Image
User avatar
absolutsnwbrdr
Donating Member
 
Posts: 2657
Images: 412
Joined: Mon Jan 25, 2010 6:10 pm
Location: Hanover, PA
Top

Postby MKE_Tear » Fri Sep 17, 2010 10:35 pm

Port side door and inside are in...

Image

Image

Image


I've gotta be somewhere near the halfway point.
User avatar
MKE_Tear
Teardrop Master
 
Posts: 130
Images: 243
Joined: Sat May 08, 2010 6:28 pm
Location: Milwaukee, WI
Top

Postby MKE_Tear » Sat Sep 25, 2010 5:13 pm

So the front window finally went in, permanently.

Before I even cut the plywood for the sides/walls, I purchased a window off eBay (from either a camper or probably a pickup truck) that I decided was going in the front. It didn't have a clamp ring but having dropped a sunroof into a car before I thought I could figure it out.

If you remember from an earilier shot there was quite a bit of framing in the front -- an extra set of spars -- that's bec. I wanted to make sure I could support the window and/or keep the front panel of plywood from warping (due to the weight of the window).

Image

Now, after all the test fits, I'm finally at the stage of building the ring/frame that will hold it in on the inside.

Basically, I traced the size of the original window hole, enlarged it by 3/4" and cut it out of 1/2" plywood three times, then gluing them together to make the "oval" 1 1/2 inch depth of my inside sandwich walls. Maybe these photos will help make some sense.


Image

Image

Image

Image

Image

Image

Image

Image

Image


After the inside framing is sandwiched/done and that front panel is insulated, the goal is to then drill holes into the frame and screw it in (with decorative black head screws) using RTV silicone as the adhesive.


And, after measuring where all the screw holes go, here's the finished product:

Image

Image

Image


If you look close enough you'll see my guide/pencil line and maybe some remnant adhesive that needs to be wiped/rubbed off (when dried).

As my wife says, "It's got two doors & a window."
Last edited by MKE_Tear on Sun Sep 26, 2010 6:36 pm, edited 2 times in total.
User avatar
MKE_Tear
Teardrop Master
 
Posts: 130
Images: 243
Joined: Sat May 08, 2010 6:28 pm
Location: Milwaukee, WI
Top

Postby MKE_Tear » Sat Sep 25, 2010 6:38 pm

Inside paneling is going in...


Image


Molding will go around the edges to finish/trim things off.


I know I won't meet my self-imposed deadline of the end of Sep. but oh well. Daylight hours are just getting shorter and shorter. That's what I'm going with. :lol:

Not to mention football season. :thumbsup:
User avatar
MKE_Tear
Teardrop Master
 
Posts: 130
Images: 243
Joined: Sat May 08, 2010 6:28 pm
Location: Milwaukee, WI
Top

Postby Cliffmeister2000 » Sat Sep 25, 2010 6:45 pm

MKE_Tear wrote:Inside paneling is going in...


Image


Molding will go around the edges to finish/trim things off.


It's looking very nice!


MKE_Tear wrote:Daylight hours are just getting shorter and shorter. That's what I'm going with. :lol:

Not to mention football season. :thumbsup:


Go UCLA! :D
God Bless

Cliff

♥God. ♥People.
1 John 4:9-11

My Teardrop build pictures
User avatar
Cliffmeister2000
Titanium Donating Member
 
Posts: 3622
Images: 157
Joined: Thu Jul 26, 2007 10:18 pm
Location: Phoenix, AZ
Top

PreviousNext

Return to Non-traditional Designs

Who is online

Users browsing this forum: No registered users and 8 guests