Joe's Teardrop Build

...ask your questions in the appropriate forums BUT document your build here...preferably in a single thread...dates for updates, are appreciated....

Re: Joe's Teardrop Build

Postby JoeGrz » Mon Sep 27, 2021 8:18 pm

Thanks Ralph for the idea of the line and sinker for my paper towel problem. It appears to be a simple solution that can be nicely dressed up for a more aesthetic appearance.
I too have latches similar to Tony’s. It never occurred to me that the oils or parts in the latch could be gumming up with the cold. I guess it didn’t strike me as being that cold. I will give it a try and see how it does when it cools off here.

Capebuild wrote: I can see that maybe there needs to be a catch basin below it, as it seems the run off from it can cause a muddy situation right where your'e cooking. At least that's what I'm thinking.
:roll:

Thank you John. I do need a basin under the water bottle but not because it leaks. From best I can tell, it hasn’t leaked bouncing along from place to place. The mess under there is from my rinsing my dishes. I rinsed the plates, bowls, etc into the skillet but once I got to cleaning the skillet, there was no place to run the water to other than on the ground. I need to work on my cleaning process. Rinsing out of the water bottle uses too much water in my opinion. Tony described a three spray bottle method that I will probably investigate. I may also get a collapsible sink to use as a basin for general clean up.
JoeGrz
Teardrop Master
 
Posts: 107
Joined: Thu May 28, 2020 4:24 am
Location: Panhandle of Texas

Re: Joe's Teardrop Build

Postby Capebuild » Tue Sep 28, 2021 4:41 am

Capebuild wrote:hank you John. I do need a basin under the water bottle but not because it leaks. From best I can tell, it hasn’t leaked bouncing along from place to place. The mess under there is from my rinsing my dishes.


Yes.... that is what I had meant. Not because the water jug leaks...... just having a catch basin to catch any water that hits the ground during the water being dispensed.
"Success can be defined as moving from failure to failure without loss of enthusiasm".... Churchill

Visit my Teardrop build here: viewtopic.php?f=50&t=73779
User avatar
Capebuild
Donating Member
 
Posts: 754
Images: 129
Joined: Sun Jan 31, 2021 6:50 am
Location: Massachusetts

Re: Joe's Teardrop Build

Postby tony.latham » Tue Sep 28, 2021 8:14 am

just having a catch basin to catch any water that hits the ground during the water being dispensed.


If it looks like it will be a problem –-and it seldom is-- I'll stick a dog bowl under it. The pooches appreciate it.

Tony
User avatar
tony.latham
Gold Donating Member
 
Posts: 6899
Images: 17
Joined: Mon Jul 08, 2013 4:03 pm
Location: Middle of Idaho on the edge of nowhere
Top

Re: Joe's Teardrop Build

Postby JoeGrz » Mon Dec 13, 2021 10:23 pm

I have been out of pocket for a while due to family issues and a busy work schedule but the weather gave me a break last week and I was able to run down to the canyon for a night of camping. The morning low was forecast for the low 50s or upper 40s depending on where you looked. This trip was another test run to try different things and hopefully refine the camping experience next year. First thing we learned is that the cast iron skillet does not ride in the drawer under the stove. We had used an old aluminum nonstick on the other trips with no issues. The weight of the bouncing iron this time exceeded the strength of the lip holding the drawer bottom in place and the bottom partially fell out. Sometime when the weather warms up again, I need to go out and rebuild my drawer. This drawer was made of the Home Depot birch. I will make the replacement out of either solid wood or the Baltic birch. Both of those should be stronger and I don't think I will be putting the skillet in drawer but in the space beside the water bottle.

I got to try Western Traveler's idea for keeping the paper towels from unrolling. I used a wooden ball and some lead fishing weights and tied a monkey fist with some cord I had laying around.
20211114_142746 Small.jpg
20211114_142746 Small.jpg (44.79 KiB) Viewed 525 times
So that I can remove the ball if it starts to bounce around, I used one of the Nite-Ize S-clips hooked on an eye
20211114_142800 Small.jpg
20211114_142800 Small.jpg (41.29 KiB) Viewed 525 times
Thanks for the idea Ralph. It worked well even in the gusts

The other idea that I got to try was Capebuild's collapsible basin idea under the water bottle. Since we haven't had rain in a while, there was lots of dirt and it did keep the campsite from turning into a mud hole. Thanks John. Since it was rinse water from the dishes the dog didn't get to drink from it.

The third refinement to the camping experience was a window prop. One of the posts I read in the past had someone looking for a way to prop their window open on the manufactured doors to vent the condensation. I had condensation on my windows in September and it never occurred to me to open the windows, only the roof vent. Now I know. The problem is the window latches only in the open or closed position. Nothing in the middle. My solution was to put a small cut off from my spars under the ledge I lift to open the window. Here's what it looked like.
20211211_132727 Small.jpg
20211211_132727 Small.jpg (47.89 KiB) Viewed 525 times
I was going to post this as a follow on to his post/question but I can't remember who asked when or where. I hope whoever asked the question stumbles on this post. Anyhow, I don't know if it prevented the condensation or not. It held the window open just fine but I don't know if the condensation was vented or the windows didn't get cold enough to condense moisture.

The final test for this trip was to see how the dog would like it. He had not been out like this before so it was a new experience for him. It was also the first time he shared a bed with us. I was told he could not sleep in the car. He did fine though a little apprehensive until bed time. Once in the trailer, he went right to sleep and everything was great until the morning. Once I started moving, I was promptly told breakfast was late and he needed to relieve himself. With that being the only complaint, I now have a third traveling companion.
JoeGrz
Teardrop Master
 
Posts: 107
Joined: Thu May 28, 2020 4:24 am
Location: Panhandle of Texas
Top

Re: Joe's Teardrop Build

Postby western traveler » Tue Dec 14, 2021 9:35 pm

Nice monkey fist Joe!
You can probably shorten the main line a 1/3 if it bothers you how it hangs. Glad it worked for you.

As to the window prop for the opening I figured it out while on my trip one night when I needed less than completely open. Still wondering what took me so long to figure it out. I’ve been using a dental floss case since. Just the right amount of opening and stays put. It was the first thing I found to use in the middle of the night :laughter:
western traveler
Donating Member
 
Posts: 396
Images: 264
Joined: Wed Dec 28, 2016 6:59 am
Location: The Front Montana
Top

Re: Joe's Teardrop Build

Postby JoeGrz » Wed Jun 08, 2022 8:56 pm

It has been a while since I have posted an update. After a day at work, I have a hard time going into the back room to type on the computer. This winter, I made two additions to the teardrop. I added the diamond plate to the front of the cabin. I purchased diamond plate last summer but the person at the metal shop didn't know what was available. I ended up with 1/8th diamond plate. What I didn't realize is that the cabin curved a the top of the diamond plate and the 1/8th didn't bend. I was going to take it to a shop to put a roll in it but in the end was able to get a thinner sheet. The thinner sheet followed the curve so now I have the diamond plate protecting the front of the trailer.
The other addition is a tongue box. I picked up one of the larger ones because I wanted to place a 5 gallon bucket inside for trash until I can get to a place to unload it. I really wish I had put the box on in the beginning since it has been real handy for the trailer accessories freeing up the back of the Cherokee.
In March, I took a trip to the Ouachita Mountains and drove across east to west. Here is a picture of my campsite on the lake
Ouachita small.jpg
Ouachita small.jpg (57.99 KiB) Viewed 401 times

We had a great trip and the trailer held up well in the rain and water crossings. Or so I thought. After I got home and cleaned the mud off the trailer, I found the top finish of the hatch separating at the side wall. Here is a picture of the split of the Monstaliner.
IMG_0020 small.jpg
IMG_0020 small.jpg (64.63 KiB) Viewed 401 times

This split has continued up a little distance and I have another further up the hatch. I think this is water that got in to the wood. Looking at it, I think the water entered at the bottom of the hatch ends
IMG_0019 small.jpg
IMG_0019 small.jpg (61.7 KiB) Viewed 401 times

As I said, there was more separation of the Monstaliner as time went on. I think my problem is two fold. First, the obvious, I needed to do a better job sealing the bottom of the hatch. If I had done a better job of sealing, number two may not have mattered. My second thought as to what went wrong is that the glue did not go to edge and squeeze out. After time, it looks like the sheets started separating. The glue would have prevented the layers from separating and only some swelling would have occured.

What did I do about this? I looked for what was readily available and decided that JB Weld Clearweld would suit my needs. It also came with a nozzle that mixed the epoxy as I squeezed it out. I built up a layer of epoxy on the bottom of the hatch. Hopefully, the epoxy went into the crevices and will hold the bottom together as well as keep water out. The cracks in the finish presented another problem. I wanted to repair the finish and paint it. I found that regular JB Weld is sandable and paintable. I put a bit of the JB Weld in each finish crack. It appears that it held up well. The next step is to sand and paint the repair. If my memory is correct, Monstaliner has paint for trim. I am hoping to get some to match the my Smurfadelic exterior.

We ran up to Colorado this past weekend and camped in Silverton, Black Canyon National Park, and south of Gunnison in the middle of nowhere. Everything looks like it held up well.

I have spent 10 nights in 6 trips and still cannot think of anything that I would change in the design of this teardrop. I have yet to come back and say that I need to do anything other than oil the door hinges. The only thing I question incorporating are the brakes. I found that I have no connection for a brake controller so I have not seen what the brakes would do for me or how they make travel better or safer. I have been over a few mountain passes and up and down mountain roads and haven't thought that I needed the brakes. On a side note, I have found a controller that sits between the vehicle trailer connector and the trailer's wire. Except for what it costs, I am thinking of getting one to see if the brakes will make a difference.
JoeGrz
Teardrop Master
 
Posts: 107
Joined: Thu May 28, 2020 4:24 am
Location: Panhandle of Texas
Top

Re: Joe's Teardrop Build

Postby orourkmw » Fri Jun 24, 2022 5:08 pm

Joe:
Thanks for sharing the pics. I'll definitely watch my gluing and sealing. I'm glad you have a good path forward on the repair.

We must have been in Leadville (in our truck camper) about the time you were in Silverton or so. Since I have started on my teardrop journey, I keep my eyes peeled on the road for home-built teardrops. On this last trip, we drove all the way from Louisiana, to New Mexico, and up to Colorado, and home, and only saw two. And those were both really ragged square-drops...I think it is unlikely the owners show their pics on this forum... :whistle:
Mike
User avatar
orourkmw
Teardrop Master
 
Posts: 108
Images: 69
Joined: Tue Jan 25, 2022 12:55 pm
Location: Port Allen, Louisiana
Top

Re: Joe's Teardrop Build

Postby JoeGrz » Tue Aug 09, 2022 8:58 pm

Last month I took a quick trip to the Cuchara, CO area. This was the disaster that always sits around the corner. To start our conversation, here is the good.
IMG_0060Small.jpg
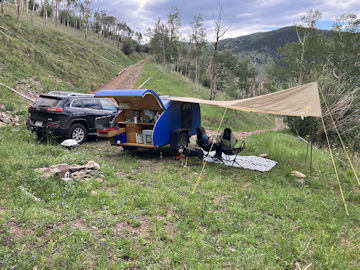
IMG_0060Small.jpg (94.35 KiB) Viewed 315 times

Rather then spend the twenty some odd dollars a night to stay in the campground, we opted to go up the mountain a bit. The road was very rough so I pulled off at one of the switchbacks. The site was pleasant and the sound of the stream below was relaxing. I put up the tarp since it was supposed to rain. It is a Slumberjack Roadhouse tarp that was designed to hook to the wheels and provide coverage out the back of a SUV. Since I rarely sit behind teardrop but off to the side, I cut a piece of EMT into three sections and when I got to site, put the sections together with couplings, attached the vehicle side of the tarp to the conduit and tied it off to the wheel and the frame at the front of the tear. It worked well, but I think it would have worked better if I had a roof rack to attach it to. That's the good.

Now for the calamities. First, I was looking in the mirror and noticed my fender shaking more than usual. At the rest area, I checked it and noticed the weld attaching the bracket had cracked. I didn't think it was going to be a problem but I was wrong. The fender came off just before I got to the road that I went up to camp. Here is a picture that we took when we got home.
Missing Fender Small.jpg
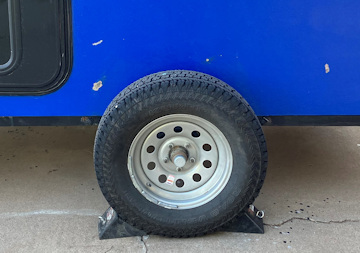
Missing Fender Small.jpg (51.51 KiB) Viewed 315 times
Having never welded before building the trailer, I shouldn't be surprised that a weld failed. If it is the only one that fails, I will still consider my welding successful.
The next issue that we had was the site was so sloped that we could not get the trailer level front to back or left to right. Since the back was higher despite a 4x4 and 2" flat rock under the tongue jack, we slept with our heads at the foot of the bed by the bulkhead. To sleep under the covers, we pulled the sheets up and found they were wet. We found that the water had leaked from the water container and passed under the bulkhead. I came home and, doing some research, found John's, Capebuild's, post on "leaking water jug spout." He showed where he found his spout leaked and I figured that's where mine was leaking. I have received a similar hose bibb valve and will at some point put it together. Further thinking about my leak problems, I wonder if the problem stems from the fact that I fill the water container at 3,600 ft and park at 9 or 10,000 ft. The difference in pressure between the inside of the container and the atmosphere forces the water out through the spout where John shows the leak. Hopefully the valve will keep the water in the container and not on the floor of the trailer. Just in case though, I caulked the floor/bulkhead seam as well.
The final thing that hit was leaving the site. The road was so rough that the bolt on the positive battery terminal came undone. The battery cable came lose and, I guess, shorted out the battery monitor. The monitor has now been replaced. In the future, I need to check the tightness of those bolts before I take off each time
I have all the parts necessary to put a fender back on the trailer. Hopefully, I will get this corrected by the end of the month so that I can head out one or two more times before winter sets in.

One more thing.
orourkmw wrote:Since I have started on my teardrop journey, I keep my eyes peeled on the road for home-built teardrops. On this last trip, we drove all the way from Louisiana, to New Mexico, and up to Colorado, and home, and only saw two. And those were both really ragged square-drops...I think it is unlikely the owners show their pics on this forum...

I just took a trip to Colorado last week and noticed the number of large trailers and fifth wheels. I got to thinking what happened to the smaller trailers. Even the small trailers have slideouts. I only saw a couple popups. Teardrops really surprised me. I saw two on the way up. One between Amarillo and Colorado Springs and one between the Springs and Fort Collins. The surprising thing is that since I only saw the first one from behind, it looked like the same tear. Coming home from Ft Collins to Amarillo, I saw 3 and one of those was really rough. Now for the big surprise. Driving between Laramie, Wy and Ft Collins, about an hour's drive, I saw 3. Did I see a migration to Walk the Winds?

That's what I have for now.
JoeGrz
Teardrop Master
 
Posts: 107
Joined: Thu May 28, 2020 4:24 am
Location: Panhandle of Texas
Top

Re: Joe's Teardrop Build

Postby orourkmw » Wed Aug 10, 2022 4:39 pm

Joe: Sorry for your misadventures! I’m glad everything can be fixed without too much expense, but I know it’s disappointing to have stuff like that happen on early trips. A friend of mine who is an experienced welder is going to help me weld my trailer in October, because I was fretting that I wouldn’t have the confidence to subject my welds to the rough roads like those you were on. Good job keeping a positive attitude!
Mike
User avatar
orourkmw
Teardrop Master
 
Posts: 108
Images: 69
Joined: Tue Jan 25, 2022 12:55 pm
Location: Port Allen, Louisiana
Top

Re: Joe's Teardrop Build

Postby KCStudly » Mon Aug 15, 2022 12:34 pm

Good that you were able to shrug off those small anomalies and still come out :D .

On the subject of fender brackets and other such weldments, when there is a good deal of leverage and high likelihood of vibration you can expect the welds to fail pretty quickly. This isn't necessarily due to poor welds, but rather is usually related to unfavorable geometry.

It is especially important to weld both sides of an attachment point; the wider stance of two welds helps prevent a single weld from bending repeatedly (not saying you did this, but if you didn't...). When the weight of a fender is mounted far away from its attachment point on a relatively slender bracket, lots of vibration cycles can quickly accumulate and fatigue the welds (the old bend the wire so many times that it breaks scenario).

When it is not possible to extend the fender mounts further under the frame and pick up another point of attachment, beef up the section that the bracket is made of, or make triangle brackets that can do double duty as running board steps, you might want to include at least a couple of attachment points up on the side wall.

I know people get concerned about adding potential leak points and/or damage that might occur during a blowout or side swipe, but the wider, triangulated mounting point can eliminate vibration and thus weld failure, and is also more likely to survive other forms of damage.
KC
My Build: The Poet Creek Express Hybrid Foamie

Poet Creek Or Bust
Engineering the TLAR way - "That Looks About Right"
TnTTT ORIGINAL 200A LANTERN CLUB = "The 200A Gang"
Green Lantern Corpsmen
User avatar
KCStudly
Donating Member
 
Posts: 9611
Images: 8169
Joined: Mon Feb 06, 2012 10:18 pm
Location: Southeastern CT, USA
Top

Re: Joe's Teardrop Build

Postby JoeGrz » Mon Sep 05, 2022 7:39 pm

This weekend I started the fender replacement. I welded the brackets, Bolted them on using the existing holes, and notched the fender. I could not remember exactly what I had done as far as attachments. Fortunately, I recorded the fastener sizes and how I put it all together in the write up the first time around
Fender small.jpg
Fender small.jpg (42.37 KiB) Viewed 201 times

Here is the repair in its current state. The next step is to drill the fender in three places on each side to bolt the fender to the bracket. To do that, I will need to pull the wheel off so that I can gain access. Unfortunately, I ran out of day today.
Changes that are incorporated or are going to be incorporated are the lengthening of the bracket. Originally, the bracket was 9-1/2 inches. The brackets have been increased to 10-1/2 inches to get a better spread on the screws. The other difference will be that I am going to screw the bracket end down instead of welding it down as I did originally. Too much wood, too close to where I would be welding.

The other thing I am thinking through is KC's comment concerning vibration. His recommendation is to add bracing to the bracket. Unfortunately, my skills are not sufficient to allow me to fabricate the attachments necessary for something like that. I am working through the possibility of attaching the top of the fender to the cabin. What I have in mind is to drill a hole in the fender, then, drill a hole through the cabin wall :frightened:. Inside the cabin, thread a carriage bolt through the wall, through a washer, then through a pipe spacer/sleeve, through another washer, through the fender, a third washer and secure it all with a nut. I figure the spacer will allow me to tighten everything down without too much deformation as well as keep everything lined up. this will need to happen in two or four places. I'm hoping that the additional restraint will reduce the vibration as well as stress on the brackets. This restraint should be fairly easy to install on the opposite side to keep that one from failing as well. Also, there is Smufadelic paint on the way to cover the dark spots on the side of the cabin from the finish repairs

I have three nights and six full days to get this finished, painted and ready to go. I plan on heading out for a long weekend next Thursday. Nothing like a deadline to motivate me!

On a side note, the teardrop is a year old :P last week. It has truly been a fun toy and I can't think of anything that I would change. Well, maybe a fender attachment.
JoeGrz
Teardrop Master
 
Posts: 107
Joined: Thu May 28, 2020 4:24 am
Location: Panhandle of Texas
Top

Re: Joe's Teardrop Build

Postby KCStudly » Fri Sep 09, 2022 12:24 pm

That sounds like a good plan from where I sit. Even just one of the extra bolts with pipe spacer at the top center would be way better than none. If possible, size the pipe spacer length to include a washer between it and your finished wall, and another at the point where the pipe would contact the inner edge of the fender (weld the washers on either end of the pipe if possible). This will help keep the pipe from turning into a cookie cutter. Keep it from wallowing into the wall and loosening the carriage bolt.
KC
My Build: The Poet Creek Express Hybrid Foamie

Poet Creek Or Bust
Engineering the TLAR way - "That Looks About Right"
TnTTT ORIGINAL 200A LANTERN CLUB = "The 200A Gang"
Green Lantern Corpsmen
User avatar
KCStudly
Donating Member
 
Posts: 9611
Images: 8169
Joined: Mon Feb 06, 2012 10:18 pm
Location: Southeastern CT, USA
Top

Previous

Return to Build Journals

Who is online

Users browsing this forum: Buddy-and-Missus and 10 guests