Thanks a lot for the tips Swoody. I tried paint thinner last night, which didn't work very well. Acetone is making pretty quick work of it after scraping everything thoroughly.
Unfortunately, part of this bad batch got used to finish out the back of the roof as well. The 'drop has been out in the sun today to help assist scraping and curing. This area didn't firm up anymore, so I had to pull it off as well, including the third brake light block. As long as no additional surprises arise, everything should be cleaned up by the end of the day today. Just hoping there aren't any tiny random spots elsewhere that I can't find.
The hatch sanded out well, so I'm confident that the epoxy that was mixed properly, cured properly.
Needless to say, the pumps are going in the trash can and I'm opting for either a scale or measured cups from here on out. The medium viscosity hardener takes so long to pump that it gets way too easy to get distracted in the middle of a cup. This will definitely be one of those "chuckle about it around the campfire" stories someday.
Teardrops n Tiny Travel Trailersor t n ttt for short (tnttt.com) |
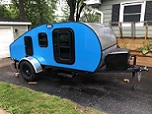
G&M's 'Drop
Re: G&M's 'Drop
![]() by GarthB » Fri Jul 09, 2021 9:59 am
by GarthB » Fri Jul 09, 2021 9:59 am
Build Journal: http://www.tnttt.com/viewtopic.php?f=50&t=73734
- GarthB
- Teardrop Master
- Posts: 141
- Images: 212
- Joined: Wed Mar 31, 2021 4:28 am
- Location: Northern Michigan
Re: G&M's 'Drop
![]() by western traveler » Fri Jul 09, 2021 2:39 pm
by western traveler » Fri Jul 09, 2021 2:39 pm
Garth sorry to hear. I had one of those “was that one pump or two” moments when hot coating the underside of my floor. I set it aside and it cooked off in a hurry. Painless of course.
I appreciate you sharing this mishap with us. It is a great reminder for me and others.
Yes, there will come the day you look back and smile at this bump in the road. Like when out enjoying your build.
Swoody is a great guy to have around as are a number of other members.
I appreciate you sharing this mishap with us. It is a great reminder for me and others.
Yes, there will come the day you look back and smile at this bump in the road. Like when out enjoying your build.
Swoody is a great guy to have around as are a number of other members.
Build journal viewtopic.php?f=50&t=73777
- western traveler
- Donating Member
- Posts: 396
- Images: 264
- Joined: Wed Dec 28, 2016 6:59 am
- Location: The Front Montana