Building The Atma Travelear Teardrop

...ask your questions in the appropriate forums BUT document your build here...preferably in a single thread...dates for updates, are appreciated....

Postby DMcCam » Wed Apr 27, 2011 9:46 am

Thanks Rudy for the kudos!!!

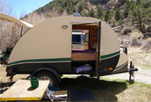
Hey Johnny, your Silver Nugget is looking amazing too!! :applause: Hopefully we'll be able to camp very soon this summer!

Cheers,

Dave
User avatar
DMcCam
Gold Donating Member
 
Posts: 883
Joined: Wed Jan 06, 2010 8:30 pm
Location: Reno, Nevada

Postby Synthesis » Wed Apr 27, 2011 3:12 pm

Very impressive.

I have access to CNC machines, but nothing able to handle sheet sized material. Color me green with Envy for your trailer project.

I am watching this thread closely. :)
User avatar
Synthesis
Teardrop Master
 
Posts: 105
Joined: Mon Apr 25, 2011 1:32 pm
Location: Menomonie, WI

Postby DMcCam » Thu Apr 28, 2011 12:03 am

Hi Synthesis and thank you. CNC machines large enough to handle 4'x10' sheets are pretty pricey indeed. Tom's company makes high-end custom cabinets so he needed to cut large sheets. I believe he can cut 20' at a time.

My plan 'B' was to pocket joint 5' sections after cutting if I couldn't find a suitable source.

Cheers,

Dave
User avatar
DMcCam
Gold Donating Member
 
Posts: 883
Joined: Wed Jan 06, 2010 8:30 pm
Location: Reno, Nevada
Top

Postby desertmoose » Thu Apr 28, 2011 10:49 am

Dave:

Where did you buy your plywood? It looks like quality stuff.

I picked up the ply for mine at the Lowes at McCarren and Kietzke in Reno. It was made in the US, not chinese ply, but still has enough twist/ warp in it that I'm not looking forward to fighting it. I did consider taking it back, but haven't found anything better.

Been watching your build. looking forward to seeing it finished.

Sam
User avatar
desertmoose
The 300 Club
 
Posts: 419
Images: 98
Joined: Fri Aug 27, 2010 12:20 pm
Top

Postby Dusty82 » Sat Apr 30, 2011 8:03 am

I dunno where Dave got his plywood, but I get a lot of my lumber and plywood here:

http://www.mastercrafthardwood.com/

They're in Sparks off of Greg St. There's not much to the website - basically a "We're here and this is our phone number" kind of thing. They carry a lot of species of both solid stock and plywood, and will happily order anything they don't have in stock. The major downer with them, however, is that they're not open on weekends.

I gotta tell you Dave, that profile looks fantastic! I wish I had access to a CNC setup like that. I'll admit that your build thread got me looking into building a CNC router. Several folks have built small CNC machines and learned to use them, then used the small machine to cut out the parts to make larger machines that'll handle sheet goods. Then all the motors and electronics come off the small machine and get installed on the big machine. It's not in the cards right now, but I think I could do it. Add another task to my dream list...
TV: 2004 Jeep Liberty Sport

Currently stuck in a tent.
User avatar
Dusty82
The 300 Club
 
Posts: 313
Joined: Thu Jan 28, 2010 8:15 pm
Location: Southern Oregon
Top

Postby DMcCam » Sun May 01, 2011 12:11 am

Hi Sam, Tom purchased it through his professional contacts so I have no idea where he got the stuff. It's some sort of 3/4" sign board I think as it has waterproof paper on both sides. Tom recommended Capital Plywood off Timber Way. They have the 4'x10' stuff too.

Hi Dusty, Thanks for another lead on suppliers around here! I'm glad you like my profile. It's really cool when you design something and then make it real. The cost of a CNC like Tom's is way outside my dreaming pocketbook, I hope yours comes true though.

Cheers,

Dave
User avatar
DMcCam
Gold Donating Member
 
Posts: 883
Joined: Wed Jan 06, 2010 8:30 pm
Location: Reno, Nevada
Top

Postby DMcCam » Mon May 02, 2011 9:55 am

Another good weekend of work on the Travelear! While the walls are open we thought it would be a good time to get the wall insulation fitted.

Image
I used the walls as a template to trace the shapes onto the insulation. Using a scroll saw, we cut each piece for a very tight fit.

Image
No need for any additional fillers here. My lady Lisa had some fun cutting quite a few of these with the scroll saw.

Image
Here's the passenger side wall all fitted up.

Image
We did the bits in the doors too.

Image
One interior 1/8" birch skin all laminated up. We decided to remove the insulation at this stage to get a tight fit for the skin.

Cheers,

Dave
Last edited by DMcCam on Tue Mar 06, 2012 4:38 pm, edited 2 times in total.
User avatar
DMcCam
Gold Donating Member
 
Posts: 883
Joined: Wed Jan 06, 2010 8:30 pm
Location: Reno, Nevada
Top

Postby Cliffmeister2000 » Mon May 02, 2011 10:05 am

Dave, I went back and looked, but couldn't find the answer (although I'm sure it's there)...

The walls of your tear appear to be 3/4" ply, but the inside ply looks like Masonite or MDF? Is that accurate?

Why did you choose this type ply?

Just curious.
God Bless

Cliff

♥God. ♥People.
1 John 4:9-11

My Teardrop build pictures
User avatar
Cliffmeister2000
Titanium Donating Member
 
Posts: 3622
Images: 157
Joined: Thu Jul 26, 2007 10:18 pm
Location: Phoenix, AZ
Top

Postby DMcCam » Mon May 02, 2011 10:15 am

Hi Cliff, I believe it's called 'sign board'. It's a type of water proof 3/4" plywood with some sort of brown paper on both sides that sign companies use for exterior applications. The stuff is very flat, very hard and comes in 4'x10' sheets.

Cheers,

Dave
User avatar
DMcCam
Gold Donating Member
 
Posts: 883
Joined: Wed Jan 06, 2010 8:30 pm
Location: Reno, Nevada
Top

Postby aggie79 » Mon May 02, 2011 10:47 am

Dave,

The insulated walls look very professional. (Are you still cleaning up little white beads?) I've got a feeling that the walls will be up in no time.

There have been some questions as to what material your sidewalls are. I believe it is MDO - medium density overlay. MDO is commonly used for sign construction because of its smooth surface (or surfaces - it can be ordered with the overlay on one side or two sides), its weather-resistance, and its availability in large sheet sizes (4' x 10' and 5' x 10'). Another good thing about MDO is that it comes in actual 3/4" thickness rather than nominal thicknesses. (I used MDO for my plywood framing too.)

Hope I didn't derail your fine build thread. Keep up the good work!

Take care,
Tom
Tom (& Linda)
For build info on our former Silver Beatle teardrop:
Build Thread

93503
User avatar
aggie79
Super Duper Lifetime Member
 
Posts: 5405
Images: 686
Joined: Tue Aug 07, 2007 5:42 pm
Location: Watauga, Texas
Top

Postby DMcCam » Mon May 02, 2011 11:25 am

Hi there Tom, because of the scroll saw we didn't have any real mess to deal with accept covering us that is. :D We're going to stand the walls without the exterior skins just like you did. Should have them up in a day or so... :lol:

Thanks for clearing up the plywood question too. Normally I'd know exactly what I bought but I was suffering from TDB (tear drop blindness) at seeing the CNC work.

All the best,

Dave
User avatar
DMcCam
Gold Donating Member
 
Posts: 883
Joined: Wed Jan 06, 2010 8:30 pm
Location: Reno, Nevada
Top

Postby nevadatear » Mon May 02, 2011 6:37 pm

oh my god you have sawdust! You may have to drag it up to Ice house so we can at least see what you get done. Looking great, Dave and Lisa.
Debbie (with Randy looking over my shoulder)
Our build thread: http://www.tnttt.com/viewtopic.php?t=41295&highlight=monstero
2009 Homebuilt woody, Kenskill inspired 5 wide
ImageImage
User avatar
nevadatear
Silver Donating Member
 
Posts: 2374
Images: 171
Joined: Mon Nov 10, 2008 2:37 pm
Location: No. Nevada
Top

Postby DMcCam » Mon May 02, 2011 8:46 pm

Hi Debbie and Randy, Yep we're on the hunt now! Got a few more things done today.

Image
The passenger wall looks like everything stuck. It's not installed yet just held in place for a picture.

Image
Our windows came in too, I think they'll do just fine if I can figure out how to attach them.

Best,

Dave
Last edited by DMcCam on Tue Mar 06, 2012 4:40 pm, edited 1 time in total.
User avatar
DMcCam
Gold Donating Member
 
Posts: 883
Joined: Wed Jan 06, 2010 8:30 pm
Location: Reno, Nevada
Top

Postby nevadatear » Mon May 02, 2011 10:09 pm

Those look like windows like we got from Grant. They go in really easily, I actually did the windows! (debbie). If I remember correctly you screw into the channel of the retaining ring.

can you stand the excitement of actually building?
Debbie (with Randy looking over my shoulder)
Our build thread: http://www.tnttt.com/viewtopic.php?t=41295&highlight=monstero
2009 Homebuilt woody, Kenskill inspired 5 wide
ImageImage
User avatar
nevadatear
Silver Donating Member
 
Posts: 2374
Images: 171
Joined: Mon Nov 10, 2008 2:37 pm
Location: No. Nevada
Top

Postby DMcCam » Mon May 02, 2011 10:45 pm

Hi Debbie, they're probably the same type but they didn't include the screws for the channel and the clamp ring is for a 1 1/2" wall. :( If I can't find a replacement for the ring, I'll have to make a spacer I guess.

It's so exciting actually building especially since I have time right now to work almost daily. We're going to glue up the drivers side tomorrow and maybe skin the doors. :o
User avatar
DMcCam
Gold Donating Member
 
Posts: 883
Joined: Wed Jan 06, 2010 8:30 pm
Location: Reno, Nevada
Top

PreviousNext

Return to Build Journals

Who is online

Users browsing this forum: No registered users and 6 guests