The Schnoodle Shack - Final Update - Goodbye My Friend

...ask your questions in the appropriate forums BUT document your build here...preferably in a single thread...dates for updates, are appreciated....

3/10/11...post number 2...workshop

Postby Jim Edgerly » Thu Mar 10, 2011 1:25 pm

Every now and then I get envious of people who have large workshops and large work areas. And then I try to put things in perspective. I may be cramped, but apparently I have "enough" room because the Shack is getting built. I have included a couple pictures of the area that I am building the Shack in, and a couple of my workshop. My workshop is 25 feet long, and 8 feet 3 inches wide...just barely enough room to spin an 8 foot piece of lumber around to get it into the radial arm saw. And in the other piece of the basement, where I am assembling the Shack, I have put the floor on wheels so I can move it around depending which side of the Shack I want to work on.

I guess the moral of the story is that teardrops are not only small on the road, but they are well suited to a small basement as well.

My basement where teardrop is being assembled

Image

Left side of the Shack
Image

Right side of the Shack
Image

East end of workshop (that's the clothes cabinet standing on end)
Image

West end of workshop
Image
Last edited by Jim Edgerly on Thu Mar 10, 2011 2:04 pm, edited 1 time in total.
*When doing anything, if there exists no possibility of failure, then any feeling of success is diminished.
**The glass is neither half full nor half empty...it is simply twice as big as it needs to be.
***If at first you don't succeed, redefine success.
****When I die, I want to die like my grandfather, who died peacefully in his sleep. Not screaming like all the passengers in his car.
User avatar
Jim Edgerly
The 300 Club
 
Posts: 312
Images: 142
Joined: Thu Sep 30, 2010 7:23 am
Location: Leominster, MA

3/10/11...post number 3 ...doors installed

Postby Jim Edgerly » Thu Mar 10, 2011 1:55 pm

The doors...anybody that has made homemade doors from scratch knows what those two words mean. No matter how hard I tried they are not both identical, but since they are on opposite sides of the Shack by the time you look at one then go to the other side they look close enough that you can't tell the difference apart. But, like every other wood worker of any kind, YOU know where the errors are even if nobody else can see them. It may not be exactly what you envisioned when you started, but luckily nobody else can "see your vision" to see where they deviate and where you compromised for the sake of just getting it finally done. I haven't put the weatherstripping on yet, or the inside trim work to hide the shims, but for the most part the hard part is done.

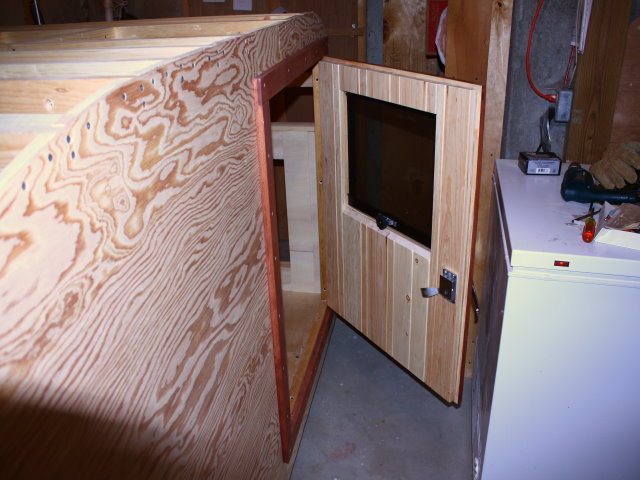
I am going for the "barn board" look on the inside of the doors to match the overhead clothes cabinet doors down the end. How's that for an expression..."down the end". The inside of a teardrop is barely over six feet long, and the overhead clothes cabinets come up some...so how far is "down the end" really...maybe a foot and a half away? If they were any closer they would be touching!

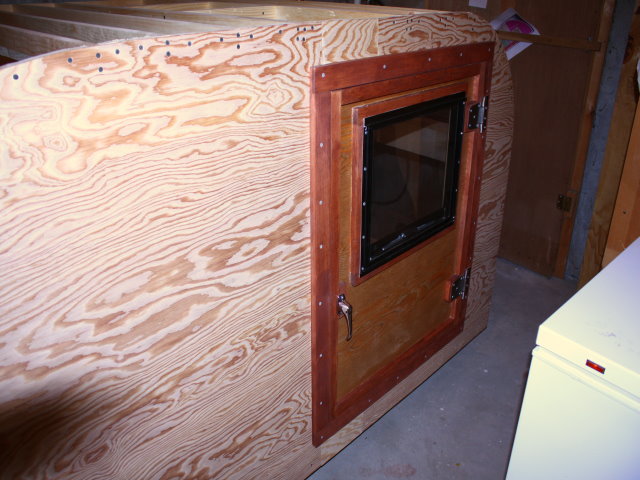
I used stainless steel hinges I picked up at Home Depot. They came with something like 3/4 inch stainless screws, which I promptly replaced with 1 3/4 inch #10 screws to anchor firmly into the barn board and frame. I just can't picture going down the road at 65mph and loosing a door because the screws popped out. The doors are heavier than one would think to look at them...but then again they are solid wood so one would expect them to not be light.

I still need to put some sort of safety chain on the door to keep them from swinging all the way open. That would be really bad news for me if the window were cranked out and a gust of wind caught the door and slammed it all the way open. Not only would it shatter the window, but would most likely do some damage to the side of the Shack. So many details to try to remember.


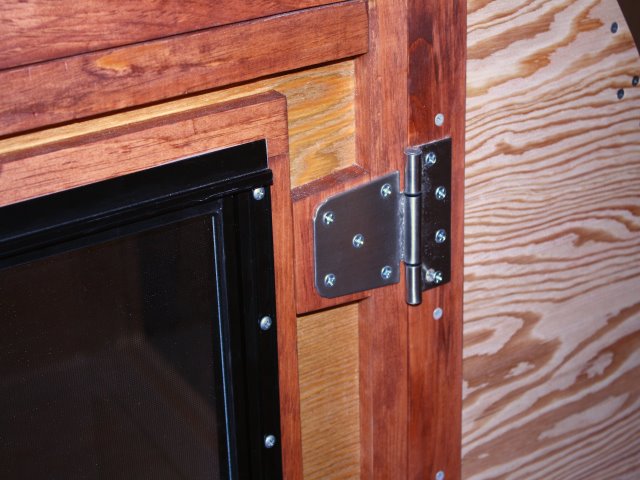
Stainless Steel Hinges
Image

Outside of door
Image

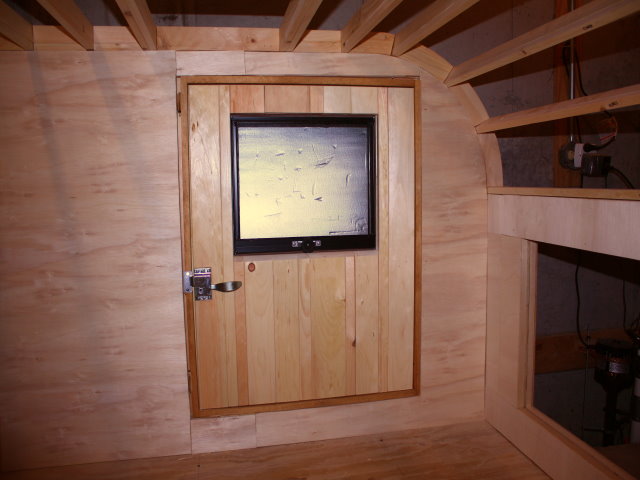
Inside of door (opened to the max my space will currently allow)
Image

Inside the Shack (minus trim)
Image
*When doing anything, if there exists no possibility of failure, then any feeling of success is diminished.
**The glass is neither half full nor half empty...it is simply twice as big as it needs to be.
***If at first you don't succeed, redefine success.
****When I die, I want to die like my grandfather, who died peacefully in his sleep. Not screaming like all the passengers in his car.
User avatar
Jim Edgerly
The 300 Club
 
Posts: 312
Images: 142
Joined: Thu Sep 30, 2010 7:23 am
Location: Leominster, MA

Postby Facemeltingly Epic » Thu Mar 10, 2011 3:51 pm

I know what you mean about the doors! I haven't installed mine yet, but I already know the opening on the curb side is 1/2" wider than that on the street side. Still, it's close enough that nobody will notice if I keep quiet about it.
Scot

My build journal: http://www.tnttt.com/viewtopic.php?t=42585

Not enough photos there? Try here:
http://www.facebook.com/media/set/?set= ... c3e73ca184

Or here:
http://www.facebook.com/media/set/?set= ... cf567dd7b7

"Politicians are like diapers. They should be changed often, and for the same reason." - Mark Twain
User avatar
Facemeltingly Epic
Teardrop Master
 
Posts: 143
Joined: Sun Jul 11, 2010 8:27 pm
Location: San Jose, CA
Top

Bump out and fans

Postby Jim Edgerly » Tue Mar 15, 2011 2:23 pm

For a change of pace I decided to work on the front end of the Shack this week. I made the "bump out" and dry fit it to the front. I will skin the sides and front with marine grade plywood after I reassemble the Shack on the trailer in the driveway. I call it a "bump out" for lack of knowing the proper term. It is just a clothes storage area 48 inches wide, 32 inches tall, and 12 inches deep, accessible behind sliding doors in the front of the cabin. If somebody would let me know the proper term I will use it in the future.

While I was at it I placed the fan unit in place. Each side above the pillows I have two low volume fans, and a high volume fan. The low fans to remove any claustrophobic stale air, and a high volume fan for when it's really hot inside. The ceiling vent will also have a fan to remove hot air from the cabin.

As always, pictures show much better than words.

Image
Image
Image
*When doing anything, if there exists no possibility of failure, then any feeling of success is diminished.
**The glass is neither half full nor half empty...it is simply twice as big as it needs to be.
***If at first you don't succeed, redefine success.
****When I die, I want to die like my grandfather, who died peacefully in his sleep. Not screaming like all the passengers in his car.
User avatar
Jim Edgerly
The 300 Club
 
Posts: 312
Images: 142
Joined: Thu Sep 30, 2010 7:23 am
Location: Leominster, MA
Top

Postby Woodbutcher » Tue Mar 15, 2011 7:30 pm

WOW, your doing a great job. Can't wait to see it finished. :applause:
User avatar
Woodbutcher
Platinum Donating Member
 
Posts: 4187
Images: 45
Joined: Fri Mar 10, 2006 10:01 pm
Location: Chicago Suburbs
Top

Postby S. Heisley » Tue Mar 15, 2011 9:33 pm

I like your fan ideas and the "bump-out". It's kind of like a repurposed built-in tongue box.....Another good idea! :thumbsup:
User avatar
S. Heisley
Super Lifetime Member
 
Posts: 8774
Images: 495
Joined: Mon Sep 17, 2007 10:02 am
Location: No. California
Top

Postby GuyllFyre » Thu Mar 17, 2011 3:07 pm

Looking very nice.
While I could build one in my basement, there would be no way to get it out as I don't have a door large enough to accommodate. I certainly hope you do. :)
Things I have for sale on craigslist:
http://albany.craigslist.org/search/?ar ... catAbb=sss

Things I have for sale on eBay:
http://www.ebay.com/sch/merchant/seansmith
User avatar
GuyllFyre
Donating Member
 
Posts: 209
Joined: Fri May 21, 2010 9:35 pm
Location: Scotia, NY
Top

Postby Jim Edgerly » Thu Mar 17, 2011 4:14 pm

GuyllFyre: Ever watch NCIS where Gibbs is building a boat in his basement, without a door big enough to get it out? That is my case...Gibbs and I are two peas in a pod! My Shack is 5 feet wide, and a little over 8 feet long...and my cellar bulkhead is about 4 feet wide, maybe a little less.

BUT, I am building it in a modular fashion. My largest pieces are the sides which are 4 feet wide and about 8 feet 8 inches long. The full sheets of plywood got down there fine. Everything else is smaller. The floor is 5 feet wide and 8 feet 8 inches long, but it is only screwed together at this point. I will take it apart and reassemble on my deck with glue, then move it to the trailer. The sides come out whole (minus the doors), as does the galley cabinets, clothes cabinet, bump out, fan bar, and the hatch. The 14 or so spars and the front piece that the bump out attaches to will comes out in pieces and hold everything together once reassembled on the trailer bed. The doors go back on at that point.

It says in the "fine print" that everything will fit back together fine. I'll let you know later!

And by the way, I really appreciate EVERYBODY who has posted comments on my build, and ALL those who are following it even without posting. It's nice to know I am not in this alone!!!
*When doing anything, if there exists no possibility of failure, then any feeling of success is diminished.
**The glass is neither half full nor half empty...it is simply twice as big as it needs to be.
***If at first you don't succeed, redefine success.
****When I die, I want to die like my grandfather, who died peacefully in his sleep. Not screaming like all the passengers in his car.
User avatar
Jim Edgerly
The 300 Club
 
Posts: 312
Images: 142
Joined: Thu Sep 30, 2010 7:23 am
Location: Leominster, MA
Top

Power/trim/pantry cabs/galley light

Postby Jim Edgerly » Mon Mar 28, 2011 4:20 pm

It's been two weeks since my last post so I better show some kind of progress. So a bunch of misc updates this time, with pictures of course. I installed the my power panel for my power coming in from park power. On the left is a switch that shuts off park power to my 12 volt converter should there ever be a problem with the 12 volt. The light beside the switch indicates that I have park power coming in. The power outlet to the right of that is just a feed off the GFCI circuit to the right of that outlet. On the far right is my 12 volt cig accessory outlet, and above that is my 12 volt fuse.

Image

I finally got around to making and installing the inside door trim. Not much else to say about that.

Image

I also installed the galley overhead light. I had to make a little wedge to mount it on so that the light would shine more towards the galley instead of straight down on the ground where hopefully my supper is not sitting. This will allow seeing inside the cooler after dark also.

Image

Image
And finally is the pantry. I have an unusual set up here. Because of struts and really tight fitting overhead bins I could not put traditional doors because the struts would not allow them to open all the way to remove the bins. I spun my wheels for a while trying to decide what to do. I decided to go with one vertical door...I know...looks a little strange. The top will fold up and attach to the galley hatch to keep it open. I purchased a couple lid supports to support it in the open position, then thought better of it. Should my wife or I (more likely my wife) decide to close the hatch without closing the open pantry door there could (probably would) be major damage to the hatch and the pantry doors. However, if I use the hatch to keep the door open, such as with a bungee cord attached between the hatch/door then closing the hatch will also allow the panty door to come down (thank you gravity)...and no damage will result to either. I figure in a rush it's going to happen (rain, mosquitos, just plain tired) so why not plan for it to prevent the damage. The top comes up first, then the bottom folds down. I wasted entirely too much time trying to decide how to keep the doors closed before going to Home Depot and finding these little roller/closer type thingies (how's that for a technical description...never guess I used to be an engineer before retiring). These little clips slip over two rollers, and are adjustable for tension. Three on the top and three on the bottom and the doors fit nice and snug.


Image
Image
Image

I guess that's it for now. May take a few days off next week to see some of the nice spring sunshine finally starting to come our way.
*When doing anything, if there exists no possibility of failure, then any feeling of success is diminished.
**The glass is neither half full nor half empty...it is simply twice as big as it needs to be.
***If at first you don't succeed, redefine success.
****When I die, I want to die like my grandfather, who died peacefully in his sleep. Not screaming like all the passengers in his car.
User avatar
Jim Edgerly
The 300 Club
 
Posts: 312
Images: 142
Joined: Thu Sep 30, 2010 7:23 am
Location: Leominster, MA
Top

wired the cabin control panel today

Postby Jim Edgerly » Thu Mar 31, 2011 5:36 pm

I wired the cabin control panel today (and yesterday). I apparently underestimated the amount of room it would take to wire all those switches/timer/meter. I just referenced my Jan. 22nd posting and I wrote "My power center measures 6.5 x 10.5, and my wife said it reminders her of how the astronauts must have felt, since it will be only arms reach directly above our heads when we are lying down, and it's a lot crammed into a very small space..."
Image

I learned today just how crowded it really is. It's technically sound, but it ain't pretty. I only have two more wires to run in (hot for the vent fan and the overhead light) and it will be complete. The cigarette lighter outlet is for a small 12V ceramic car heater. Remember, I warned you it wasn't pretty. The good news is that from inside the cabin looking up you can't see any of the wires behine the panel.


Image
*When doing anything, if there exists no possibility of failure, then any feeling of success is diminished.
**The glass is neither half full nor half empty...it is simply twice as big as it needs to be.
***If at first you don't succeed, redefine success.
****When I die, I want to die like my grandfather, who died peacefully in his sleep. Not screaming like all the passengers in his car.
User avatar
Jim Edgerly
The 300 Club
 
Posts: 312
Images: 142
Joined: Thu Sep 30, 2010 7:23 am
Location: Leominster, MA
Top

Postby Miriam C. » Thu Mar 31, 2011 10:56 pm

:thumbsup: :applause: Great job on the electrical and the build. Can't wait for the real put together... :twisted:
“Forgiveness means giving up all hope for a better past.â€
User avatar
Miriam C.
our Aunti M
 
Posts: 19675
Images: 148
Joined: Wed Feb 15, 2006 3:14 pm
Location: Southwest MO
Top

Postby bdosborn » Fri Apr 01, 2011 8:40 pm

Wiring in a small space is such a PITA, I went through the same thing with my trailer. Hope you've got some fuses in there somewhere...

Bruce
2009 6.5'X11' TTT - Boxcar
All it takes is a speck of faith and a few kilowatts of sweat and grace.
Image
Boxcar Build
aVANger Build
User avatar
bdosborn
Donating Member
 
Posts: 5506
Images: 777
Joined: Wed May 05, 2004 11:10 pm
Location: CO, Littleton
Top

Postby YuGun » Sat Apr 02, 2011 10:45 am

Wow it look very good and it is very impresssed me, Good change of your build..

:applause: :applause: :applause:
User avatar
YuGun
The 300 Club
 
Posts: 445
Joined: Sun Apr 11, 2010 1:25 pm
Location: Turkey
Top

Aluminum arrived today

Postby Jim Edgerly » Mon Apr 11, 2011 1:05 pm

Well, I finally ordered the aluminum for my roof the other day from metalsupermarkets.com and it arrived via UPS this morning. My aluminum order came to $327 including taxes and shipping, and I thought that was not such a bad deal...until my shipment arrived. The expectation was that for that price the material would arrive in undamaged and in usable as-is condition. From the pictures below you can see that UPS spent extra time bashing the pudding out of my package. They then pulled the old dump and run routine, again. I was home and I never heard them dump it on my front steps, they must have been really quiet and fast. I would have had some choice words for them if I saw them deliver it this way. I'm really getting tired of every package I have delivered from UPS is all bashed up and ripped apart. I also like the way they leave them out in the rain on me. I could see the edges on 3 out of the 5 sheets of aluminum where damaged without even opening the package (because the package was ripped open on both sides from rough handling). I figured I could hammer the damaged edges relatively smooth, so I opened the package. OK, here is disappointment #2 for the day. All 5 pieces of aluminum have significant scratches in them...on both sides! It looks like somebody threw in a handful of metal chips between each sheet and then slid the sheets around on top of each other before wrapping the package up for shipment. Shipping package had to be destroyed (the rest of the way) to get the stuff out to check it. Obviously, this damage was caused before shipment.

Looks like I will be spending lots of time smoothing out and buffing out this aluminum, and I know before I start I will not be able to get out all the scratches. I knew it would eventually get scratched up and worn, but it is disappointing to see it all scratched up before it's maiden voyage. I will do a search to find out the best way to get out these scratches.

So, my ratings:

metalsupermarkets.com :x :thumbdown:

UPS :x :thumbdown:

I think you can guess I would not recommend either of these companies if at all possible!!!

Image
Image
Image
*When doing anything, if there exists no possibility of failure, then any feeling of success is diminished.
**The glass is neither half full nor half empty...it is simply twice as big as it needs to be.
***If at first you don't succeed, redefine success.
****When I die, I want to die like my grandfather, who died peacefully in his sleep. Not screaming like all the passengers in his car.
User avatar
Jim Edgerly
The 300 Club
 
Posts: 312
Images: 142
Joined: Thu Sep 30, 2010 7:23 am
Location: Leominster, MA
Top

Postby Dusty82 » Mon Apr 11, 2011 2:18 pm

My wife worked shipping and receiving for a gov't agency, and this kind of thing happened on occasion. I showed her your post, and her first words were to call UPS and file a claim. Keep those pictures as proof of the condition upon delivery. She couldn't tell me how much compensation you'd get, but that you'd most likely get some compensation for the damage they did in the delivery process.

About 4 years ago UPS delivered some computers and parts to her building one Friday and just dropped them next to a loading dock outside and split. The boxes weren't discovered until the following Monday, and it had snowed over the weekend. UPS paid dearly for that mistake - to the tune of about $6000.

File a damage claim with UPS - they can't fix a problem if they don't know they have one.
TV: 2004 Jeep Liberty Sport

Currently stuck in a tent.
User avatar
Dusty82
The 300 Club
 
Posts: 313
Joined: Thu Jan 28, 2010 8:15 pm
Location: Southern Oregon
Top

PreviousNext

Return to Build Journals

Who is online

Users browsing this forum: No registered users and 15 guests