Truck Canopy Trailer - Updates... Solar Panel, Jack, etc.

...ask your questions in the appropriate forums BUT document your build here...preferably in a single thread...dates for updates, are appreciated....

Postby ohbugger » Wed Aug 31, 2011 3:24 am

StandUpGuy wrote:Sorry I posted before I saw you had advanced in your build. Man you are moving along!


No worries! Once the platform was done I put the canopy on it and propped up the back with a few 2' 2x4s to try out that other profile. The inside seemed small, and I just didn't like it.
Thanks, I didn't think I was going fast, but everyone is so encouraging around here! I can't wait to get it done and take it camping with friends and the wife!
- Erik -
User avatar
ohbugger
Teardrop Master
 
Posts: 132
Joined: Wed Aug 17, 2011 3:51 pm
Location: Burien, WA

Postby ohbugger » Wed Aug 31, 2011 3:31 am

wa_flyfisher wrote:Yeah, no A/C needed here!
What are you using to attach the canopy to the trailer with?


Hmmm, not sure I've totally figured that one out yet. Any suggestions?

All the way down the interior sides of the canopy there is an aluminum channel about 2" wide. This would normally rest on the sidewalls of the truck and be clamped on. I think I will use a bunch of self tapping screws with washers. Or maybe pre drill some holes and use 4-5 lag bolts on each side? I think that would secure it!
- Erik -
User avatar
ohbugger
Teardrop Master
 
Posts: 132
Joined: Wed Aug 17, 2011 3:51 pm
Location: Burien, WA

Postby ohbugger » Wed Aug 31, 2011 3:38 am

Danny wrote:
ohbugger wrote:Tonight I'll router the corners and pick up supplies to use GPW's 75% Mineral Spirits / 25% Polyurethane Waterproofing Mix.
I'll see how that comes together and think about the fabric/glue/paint coating once I get everything sealed up!
GPW's 75% Mineral Spirits / 25% Polyurethane Waterproofing Mix..This is a new one for me... Tell me more about it..Thanks Danny


Last night I spent hours here reading everyone's wood sealing suggestions. CPES is one, epoxy is another, as is painted canvas and so on. GPW is a user here on the board and several times he suggested other people use 75% Mineral Spirits / 25% Polyurethane as he has used it for years to seal wood. Norm/Mezmo asked me how I was planning on sealing the trailer which kicked this all off. I spent all night tonight rolling the whole trailer with the thinned polyurethane, it's not too bad, but not nearly as fun as cutting and assembling wood. Next I will mix another batch and just brush it on all the open ended wood.
- Erik -
User avatar
ohbugger
Teardrop Master
 
Posts: 132
Joined: Wed Aug 17, 2011 3:51 pm
Location: Burien, WA
Top

RE: Attaching Canopy to new Trailer body

Postby mezmo » Wed Aug 31, 2011 6:03 am

Hi ohbugger,

Another suggestion:

To attach the canopy to the new trailer body I would use @ 1/4in
galvanized bolts of the appropriate length with a fender washer under
the hex-head next to the @2in aluminum with another fender washer
on the bottom of the wooden top piece of the trailer body you're
bolting through, and a 'normal' washer under that, then a lock washer,
and then the 1/4in nut - double nut it if you want to be 'sure' or use one
of those special nuts [can't think of its name at the moment.] that won't
back off. The fender washers spread the clamping force of the bolt over
a larger area, The galvanized is to help avoid corrosion in contact with the
aluminum base plate of the truck cap/canopy. I'd do one about every
foot or 8in. Just drill a hole with a 1/4in drill-bit as perpendicularly as
possible for a good true attachment [if there aren't already holes you
can use] and bolt away. Lag bolts can be pulled out, especially if
unnoticed rot forms. It'd be next to impossible to pull out a bolt using
a 1in or 1&1/2in diameter fender washer top and bottom with using
good/tight lock washers and nut(s). This is a critical junction of two
dissimilar materials so I'd go all out to make it as solid as I could.

Also, how are you going to gasket/seal this almost full perimeter mating of
the top and trailer body? The butyl rubber tape used for installing vents
and widows etc.? Another possibility might be the caulk they use for
gutters nowadays.

Also, [Isn't that a word that can make you cringe? Ha!] Do you think it'd
be a good idea to get the trailer body [the bottom you built] all sealed,
primed, painted, fabric embedded - all that done/finalized, before you
install the top/cap/canopy onto the trailer bottom, and then do the final
paint job on both the 'united' top/cap/canopy and bottom? Since you
are concerned with the plywood ends really being sealed, wrapping the
fabric over the top -especially if you use the glue version - of the wood
member you'll be [hopefully] bolting through should give an extra bit
for that.

Just my approach for your consideration.

Cheers,
Norm/mezmo
If you have a house - you have a hobby.
User avatar
mezmo
1000 Club
1000 Club
 
Posts: 1817
Images: 194
Joined: Fri Jan 01, 2010 4:11 am
Location: Columbia, SC
Top

Postby wa_flyfisher » Wed Aug 31, 2011 12:28 pm

Yeah, I would bolt it on with fender washers and Lock nuts.
Also get that canopy foam tape or some other type of weather strip to seal between the canopy and frame.
wa_flyfisher
Teardrop Master
 
Posts: 140
Images: 4
Joined: Tue Feb 01, 2005 11:26 am
Location: Washington, Edmonds
Top

Postby ohbugger » Wed Aug 31, 2011 2:42 pm

The canopy and the base are already separated again. The pictures of them together was just to get an idea of the fit and to see the whole assembly. I put the first coat of sealer on last night and will do the second coat tonight, 3rd coat? I am planning on getting the 2 pieces all finished up separately, then attaching the finished products.
- Erik -
User avatar
ohbugger
Teardrop Master
 
Posts: 132
Joined: Wed Aug 17, 2011 3:51 pm
Location: Burien, WA
Top

RE: an AU take on it

Postby mezmo » Sun Sep 04, 2011 1:02 am

Hi ohbugger,

Just came across this on AU [Australia] ebay. Some one there had
the same idea.

http://www.ebay.com.au/itm/CAMPER-TRAIL ... 0752594121

Just a confirmation/encouragement FYI.

Cheers,
Norm/mezmo
If you have a house - you have a hobby.
User avatar
mezmo
1000 Club
1000 Club
 
Posts: 1817
Images: 194
Joined: Fri Jan 01, 2010 4:11 am
Location: Columbia, SC
Top

Re: RE: an AU take on it

Postby ohbugger » Mon Sep 05, 2011 7:58 pm

mezmo wrote:Hi ohbugger,

Just came across this on AU [Australia] ebay. Some one there had
the same idea.

http://www.ebay.com.au/itm/CAMPER-TRAIL ... 0752594121

Just a confirmation/encouragement FYI.

Cheers,
Norm/mezmo


Wow, that looks fantastic! Very interesting how they put the canopy on backward, sealed it up and then just built a brand new door/rear. Also, that's pretty slick because it would stiffen the entire rear as a result of that wall. The seller also noted that with the hole in the floor the trailer is almost a "standy." Thanks for the heads up. I'll have to save the pictures for ideas since the ebay posting will disappear.

Here's the pics from the posting:
Image
Image
Image
Image
Image
Image
- Erik -
User avatar
ohbugger
Teardrop Master
 
Posts: 132
Joined: Wed Aug 17, 2011 3:51 pm
Location: Burien, WA
Top

Postby wa_flyfisher » Tue Sep 06, 2011 12:14 pm

That's a top off of an 80s Toyota 4Runner.
wa_flyfisher
Teardrop Master
 
Posts: 140
Images: 4
Joined: Tue Feb 01, 2005 11:26 am
Location: Washington, Edmonds
Top

Postby ohbugger » Thu Sep 08, 2011 2:06 am

Moving along on the trailer!
I was doing the thinned out polyurethane for waterproofing, don't know if it made a difference. In the end I decided to do the paint/canvas covering on the trailer. I am no good at bodywork and filling all the screw and nail holes and gaps seemed over my head. I decided that just as the thick vinyl flooring hid any imperfections in the plywood a good thick canvas with paint would make the exterior pretty sharp looking!
Anyway, here's the pictures:

I got a full roll of "outdoor cotton duck" fabric from the fabric store, normally $110 for 10 yards x 60 inches, but 50% off plus a coupon got it down to $44!
Image
The fabric is a light gray, I draped it so the fold in the center went along the top rail.
Image
I painted with Kilz Oil Based Primer
Image
Kilz Oil-based primer is nasty stuff, but I wanted the nastiest waterproof coating I could get without spending a ton. I suppose the Latex-based Kilz would have worked very well also.
The technique I worked out toward the end was applying the paint real thick on the wood, smoothing the fabric over the wood with my hand, then painting the paint REAL thick over the fabric and finally rolling with a dry-ish roller to even everything out. If you don't get a lot of paint underneath the fabric it won't stick. Ideally the fabric is heavy and soaked with paint.
Image
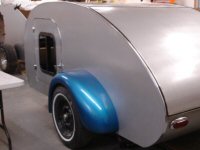
Looks pretty darn good, I'll see what it looks like dry, then decide whether to sand, paint more primer, or something else. Also I like this picture showing the radius I put on with my new 1/2" router round over bit.
I'm hoping that the fabric tightens up and sticks to the wood real nice. Part of the deciding factor was seeing Mike's test videos on applying fabric to foam and wood with different adhesives and seeing how well the fabric stuck to wood with paint. Hopefully I get the same results. He was using latex and I used oil-based, but I would imagine both would adhere well. Also the oil-based primer seemed marketed to resist mildew and moisture even better than the water-based latex. (However, the fumes make me wish I got the latex!)
- Erik -
User avatar
ohbugger
Teardrop Master
 
Posts: 132
Joined: Wed Aug 17, 2011 3:51 pm
Location: Burien, WA
Top

Postby wa_flyfisher » Thu Sep 08, 2011 10:16 am

It was nice enough last night, I hope you had the garage door open for a while!
wa_flyfisher
Teardrop Master
 
Posts: 140
Images: 4
Joined: Tue Feb 01, 2005 11:26 am
Location: Washington, Edmonds
Top

Postby ohbugger » Thu Sep 08, 2011 10:28 am

wa_flyfisher wrote:It was nice enough last night, I hope you had the garage door open for a while!


Oh yeah, all the garage doors and windows were open the whole time! I hope this weather sticks around for a good long time! We earned it this summer. I can't handle the fall rain yet, the beautiful weather we've been having lately is about all that has kept me from losing it.
- Erik -
User avatar
ohbugger
Teardrop Master
 
Posts: 132
Joined: Wed Aug 17, 2011 3:51 pm
Location: Burien, WA
Top

Postby aggie79 » Thu Sep 08, 2011 11:09 am

ohbugger,

I'm really liking how the paint and canvas exteriors are looking. I've been following the builds on the Foamies section and have seen how the projects on there look with this method. You did a really nice job on yours!

BTW - what's your first name?

Have you decided an exterior color for the canvas yet?

Take care,
Tom
Tom (& Linda)
For build info on our former Silver Beatle teardrop:
Build Thread

93503
User avatar
aggie79
Super Duper Lifetime Member
 
Posts: 5405
Images: 686
Joined: Tue Aug 07, 2007 5:42 pm
Location: Watauga, Texas
Top

Postby ohbugger » Thu Sep 08, 2011 11:52 am

aggie79 wrote:ohbugger,

I'm really liking how the paint and canvas exteriors are looking. I've been following the builds on the Foamies section and have seen how the projects on there look with this method. You did a really nice job on yours!

BTW - what's your first name?

Have you decided an exterior color for the canvas yet?

Take care,
Tom


Thanks Tom,
It's Erik, I updated my signature so I'm not a stranger 'round these parts.
I think I speak for everyone on this board, that everything we do is often being done for the first time. We are potentially solving problems that there is no manual for.
With the fabric I wanted to avoid seams at all costs. Purely for the aesthetic value. You can see that I got a wrinkle on the front of my trailer from the fabric being bunched up. There's a few other minor wrinkles from the same thing. Hopefully they sand out. In retrospect, I should have cut out the fabric first (I had 24" walls plus wrapping over the top and bottom edge so maybe 30") but I was wrestling with 60" of fabric. After I cut the fabric I could have rolled it up, started at one end and worked my way around. Painting a foot of the wood, a foot of the back of the fabric, lay it down, and do the next foot. That would have really gotten a good seal. Oh well, next time, and hopefully first time for anyone who can read this.
Oh also, with the thick cotton duck cloth, I used up an nearly an entire gallon of paint to do 44 square feet. The back of the can said it covers 300 square feet, I'd say with this method, it's about 45-50 square feet!
- Erik -
User avatar
ohbugger
Teardrop Master
 
Posts: 132
Joined: Wed Aug 17, 2011 3:51 pm
Location: Burien, WA
Top

Postby ohbugger » Thu Sep 08, 2011 12:04 pm

Another tip I just thought of. With the amount of paint you will impregnate the cloth with, the color of the fabric doesn't matter. I wanted white fabric, but the store didn't have enough of the white so I used the light gray. Looking back, the gray was very helpful in determining which areas needed more paint. A darker color may have worked even better to indicate where more paint was needed.
- Erik -
User avatar
ohbugger
Teardrop Master
 
Posts: 132
Joined: Wed Aug 17, 2011 3:51 pm
Location: Burien, WA
Top

PreviousNext

Return to Build Journals

Who is online

Users browsing this forum: No registered users and 13 guests