G&M's 'Drop

...ask your questions in the appropriate forums BUT document your build here...preferably in a single thread...dates for updates, are appreciated....

Re: G&M's 'Drop

Postby noseoil » Sun May 30, 2021 8:25 am

Looks like it's going to be a roller soon. I'm enjoying your approach to building & attention to detail, nice planning & execution. Good job on the assembly & setup!
Build log: viewtopic.php?f=50&t=60248
The time you spend planning is more important than the time you spend building.........

137905
User avatar
noseoil
1000 Club
1000 Club
 
Posts: 1820
Images: 669
Joined: Sun Apr 27, 2014 8:46 am
Location: Raton, New Mexico, living the good life!

Re: G&M's 'Drop

Postby GarthB » Sun May 30, 2021 5:25 pm

noseoil wrote:Looks like it's going to be a roller soon. I'm enjoying your approach to building & attention to detail, nice planning & execution. Good job on the assembly & setup!


Thanks, Noseoil! With how well things went, I'm worried that a trip to the "moaning chair" is looming. Keeping my guard up and reminding myself to measure 17 times, cut once.
GarthB
Teardrop Master
 
Posts: 141
Images: 212
Joined: Wed Mar 31, 2021 4:28 am
Location: Northern Michigan

Re: G&M's 'Drop

Postby GarthB » Sun May 30, 2021 5:52 pm

Steady progress today. Started out by getting the aluminum angles cut and drilled for countertop brackets. Once those were mounted to the walls, I cut the countertop/lower shelf out of 1/2" birch. I cut to the length that I desired for the shelves and counter and the width was based on the interior width of the cabin. I was wondering what the best way to cut the narrower galley portion might be as I was making my initial cuts. My mind gravitated toward the router, so I laid a straight board on top of the counter along penciled cut lines and used it as a guide with a flush trim bit to narrow it down to size.

Image

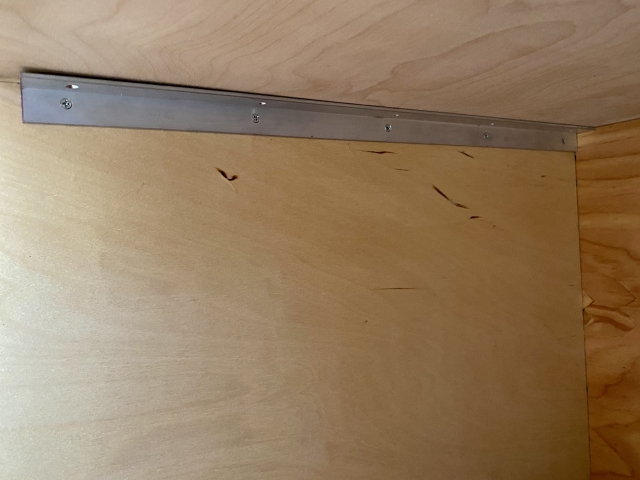
The counter will be screwed to the brackets from underneath once finish has been applied.

Next, I cut the upper bulkhead. This went fairly quickly since I had a cut off from the lower bulkhead that was tall enough. I cut it down to the proper height and beveled the top edge to match the roof line. It still needs a little finesse work, which I will likely address when I go to glue and screw it. Pocket holes were added on the cabin side.

Image
Image
Image

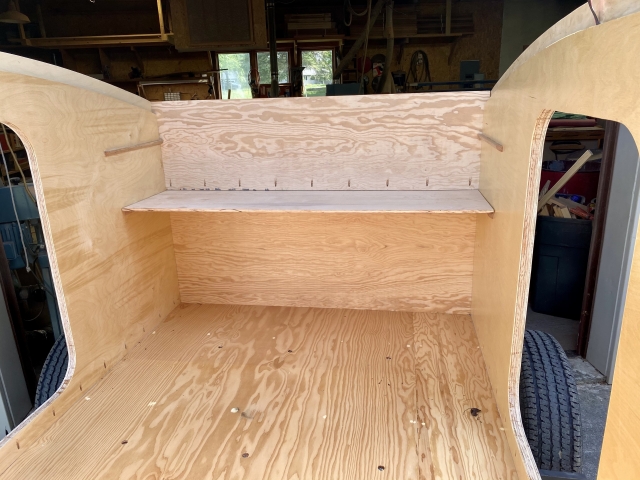
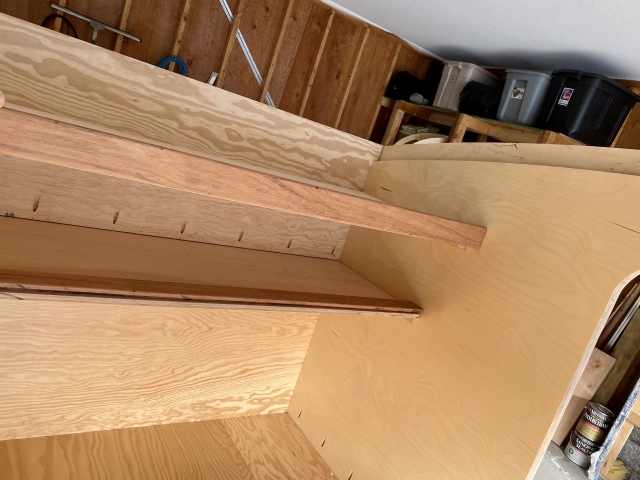
After that, I cut the upper shelf using 1/2" birch and processed some rough-sawn jatoba for the lips of both shelves. I started out using a Freud rabbeting bit for the router for the shelf/lip joints. Once again, the density of the jatoba was too much for another hand-held tool. The bit struggled to make the 3/8" x 1/2" rabbet and wound up blowing out a large chunk of the wood. Since I didn't want to go through the effort of processing another rough cut piece, I opted to cut out the blowout by making the lip shorter in height than I'd initially planned. (2-1/2" rather than 3-1/2") I then used the table saw to re-cut the rabbets. It worked a lot better. Hopefully things are still kept on the shelves as we're traveling down the bumpy two-tracks.

Image

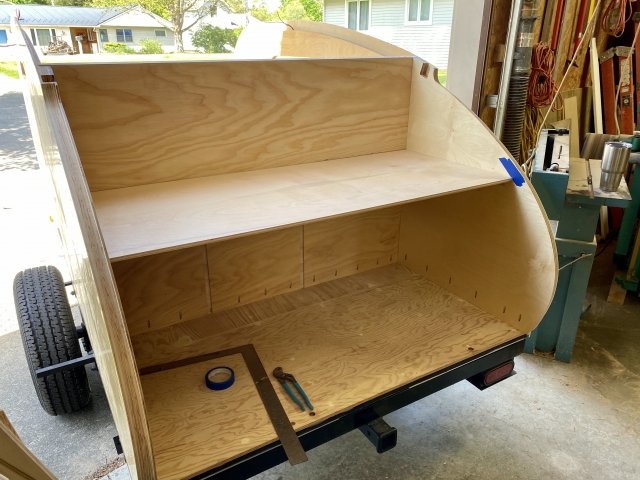
Somewhere along the line, I found that I made the counter an inch higher than plan. It's no biggie since my wife and I are both relatively tall. The extra inch of storage will be put to good use. I think it may have stemmed from the fact that I used Tony's CAD files to layout my template rather than the book. I must've snapped to an incorrect point when dimensioning. The original intention was to have the walls CNC cut by a local shop. They provided me a pretty reasonable cutting price (in my opinion) of $500 for all of the parts that Tony drew up. Unfortunately, they extended their turnaround time at the last minute and it was going to delay the build by too much. If there is ever a second 'Drop, it'll be CNC cut.

Back to the current build, I'm debating whether I have a practical amount of room for a drawer above the cooler. There is currently 3-5/8" of space, however some of that will be eaten up by the sliding tray for the cooler.

Image
GarthB
Teardrop Master
 
Posts: 141
Images: 212
Joined: Wed Mar 31, 2021 4:28 am
Location: Northern Michigan
Top

Re: G&M's 'Drop

Postby cjlangellier » Sun May 30, 2021 9:50 pm

GarthB wrote: I'm debating whether I have a practical amount of room for a drawer above the cooler. There is currently 3-5/8" of space, however some of that will be eaten up by the sliding tray for the cooler.


Probably won’t have enough space for drawer that will be of much use, but what about a slide out countertop extension/cutting board? It would only have to be thick enough to install the slide out rails and would add a good amount of useable counter space when prepping food.
Cody - Westmont, IL

5x11 Teardrop
http://www.tnttt.com/viewtopic.php?f=50&t=73740
6x12 Cargo Trailer/Ice Shanty/Toy Hauler
http://www.tnttt.com/viewtopic.php?f=42&t=73743
User avatar
cjlangellier
Teardrop Master
 
Posts: 171
Images: 332
Joined: Fri Apr 30, 2021 3:29 am
Top

Re: G&M's 'Drop

Postby GarthB » Mon May 31, 2021 6:14 am

cjlangellier wrote:
GarthB wrote: I'm debating whether I have a practical amount of room for a drawer above the cooler. There is currently 3-5/8" of space, however some of that will be eaten up by the sliding tray for the cooler.


Probably won’t have enough space for drawer that will be of much use, but what about a slide out countertop extension/cutting board? It would only have to be thick enough to install the slide out rails and would add a good amount of useable counter space when prepping food.


I appreciate the suggestion! That idea has been added to my short list.
GarthB
Teardrop Master
 
Posts: 141
Images: 212
Joined: Wed Mar 31, 2021 4:28 am
Location: Northern Michigan
Top

Re: G&M's 'Drop

Postby JoeGrz » Mon May 31, 2021 8:06 pm

GarthB wrote:
All of the sudden, this thing has turned into a real unit rather than a pile of pieces.

Isn't seeing that a wonderful feeling? Sure looks good and is moving right along. At the rate you're going, you'll be camping while I'm still trying to get mine on the chassis
JoeGrz
Teardrop Master
 
Posts: 107
Joined: Thu May 28, 2020 4:24 am
Location: Panhandle of Texas
Top

Re: G&M's 'Drop

Postby GarthB » Tue Jun 01, 2021 8:41 pm

JoeGrz wrote:
GarthB wrote:
All of the sudden, this thing has turned into a real unit rather than a pile of pieces.

Isn't seeing that a wonderful feeling? Sure looks good and is moving right along. At the rate you're going, you'll be camping while I'm still trying to get mine on the chassis


Sure is! It's pretty exciting how fast things start moving when you finally get them mounted and can start focusing on more of the creature comforts and personalization. I've also been celebrating the fact that I don't have to wrestle the walls around the shop anymore.
GarthB
Teardrop Master
 
Posts: 141
Images: 212
Joined: Wed Mar 31, 2021 4:28 am
Location: Northern Michigan
Top

Re: G&M's 'Drop

Postby western traveler » Wed Jun 02, 2021 6:28 am

GarthB wrote:
JoeGrz wrote:
GarthB wrote:
All of the sudden, this thing has turned into a real unit rather than a pile of pieces.

Isn't seeing that a wonderful feeling? Sure looks good and is moving right along. At the rate you're going, you'll be camping while I'm still trying to get mine on the chassis


Sure is! It's pretty exciting how fast things start moving when you finally get them mounted and can start focusing on more of the creature comforts and personalization. I've also been celebrating the fact that I don't have to wrestle the walls around the shop anymore.


Great milestone Garth, i have enjoyed following your build and I’m looking forward to the day I no longer have to move my walls around.
western traveler
Donating Member
 
Posts: 396
Images: 264
Joined: Wed Dec 28, 2016 6:59 am
Location: The Front Montana
Top

Re: G&M's 'Drop

Postby cjlangellier » Wed Jun 02, 2021 8:32 am

western traveler wrote:
GarthB wrote:
JoeGrz wrote:
GarthB wrote:
All of the sudden, this thing has turned into a real unit rather than a pile of pieces.

Isn't seeing that a wonderful feeling? Sure looks good and is moving right along. At the rate you're going, you'll be camping while I'm still trying to get mine on the chassis


Sure is! It's pretty exciting how fast things start moving when you finally get them mounted and can start focusing on more of the creature comforts and personalization. I've also been celebrating the fact that I don't have to wrestle the walls around the shop anymore.


Great milestone Garth, i have enjoyed following your build and I’m looking forward to the day I no longer have to move my walls around.


I'll commiserate! Shuffling walls around is getting old fast. Both of you guys have good looking builds going! It's fun tracking everyone's progress.
Cody - Westmont, IL

5x11 Teardrop
http://www.tnttt.com/viewtopic.php?f=50&t=73740
6x12 Cargo Trailer/Ice Shanty/Toy Hauler
http://www.tnttt.com/viewtopic.php?f=42&t=73743
User avatar
cjlangellier
Teardrop Master
 
Posts: 171
Images: 332
Joined: Fri Apr 30, 2021 3:29 am
Top

Re: G&M's 'Drop

Postby GarthB » Wed Jun 02, 2021 8:51 pm

Continuing to chip away at interior components as we get time after work this week in order to have another batch of components ready for poly. For the hatch spar, I laminated 3 pieces of oak together. I considered using Jatoba for this since it will be partially visible when the hatch is open, however I didn't want to risk shearing a screw during the test fitment of the hurricane hinge. It should blend in with the birch fairly well since it will just be getting poly. They can't be seen in the picture, but I rounded the bottom edges of the spar with a 1/4" round-over bit to match the radii that were still in the wall slots in order to make it look more finished. The top edges will be kept at hard 90 degree corners since they will be mating with the roof.

Image

Next, I added a shelf support on the upper bulkhead for the upper shelf. I made a small mistake here and used finish nails that were a little too long. Each one poked into the galley about a sixteenth of an inch. I'll knock them down with a dremel tool when we sand everything.

Image

After that, I cut the headboard door sliders out of oak on the table saw. I would've used jatoba to match the headboards but didn't have any scrap that was long enough. They didn't seem worth cutting down a whole new rough sawn board for.

Image

I did, however, have enough jatoba cutoffs laying around for making it into edge banding for the edges of the countertop and vertical counter supports. I had bought some white birch, iron-on edge banding to match the ply since I didn't think I had a good way to clamp the jatoba to the edges, however it felt like too much of a compromise. The contrasting wood with the birch drawer faces sounded too appealing not to at least try. I slathered glue along the edges and brad nailed them in place in order to get a good glue joint. It split in one small area, but shouldn't be noticeable after sanding and poly. I'll have a photo once I've flushed up all of the edges.

As for the trailer, I ended up purchasing a swivel mount trailer jack. The original didn't swivel and I knew it was just a matter of time until I got a nice new dent in my tailgate. It isn't nearly as stout as the original jack, so we'll see if it lasts.

Image
GarthB
Teardrop Master
 
Posts: 141
Images: 212
Joined: Wed Mar 31, 2021 4:28 am
Location: Northern Michigan
Top

Re: G&M's 'Drop

Postby MickinOz » Thu Jun 03, 2021 12:11 am

Lovely work.
MickinOz
1000 Club
1000 Club
 
Posts: 1255
Images: 3
Joined: Mon Feb 04, 2019 3:54 pm
Location: Somewhere, in 379,725 square miles of South Australia
Top

Re: G&M's 'Drop

Postby GarthB » Fri Jun 04, 2021 6:36 pm

MickinOz wrote:Lovely work.


Thank you!
GarthB
Teardrop Master
 
Posts: 141
Images: 212
Joined: Wed Mar 31, 2021 4:28 am
Location: Northern Michigan
Top

Re: G&M's 'Drop

Postby GarthB » Fri Jun 04, 2021 6:38 pm

The least glamorous part of teardrop building: Sand, sanding sealer, sand, poly, sand, poly...

Image

Image

Starting on the headliner tomorrow.
GarthB
Teardrop Master
 
Posts: 141
Images: 212
Joined: Wed Mar 31, 2021 4:28 am
Location: Northern Michigan
Top

Re: G&M's 'Drop

Postby GarthB » Sat Jun 05, 2021 12:47 pm

Got the headliner glued up and the final coat of poly on our current batch of components today. Having four large fire extinguishers in the shop has made for some great weights when gluing.

Image

While trimming 1/8" birch for the headliner, I noticed that my walls each have a whoop-dee-doo in them along the 1/4" roof lip. They bow in about 1/4". I've attached the photo below trying to show it. I'm debating whether to trim the headliner around the marginal error or whether to try to straighten the walls out. My concern with trying to straighten them revolves around how stiff the walls are. I don't want to push them out of plumb with the floor or have them under a significant amount of stress once the roof system is complete. It just seems wrong to build around a known error rather than trying to fix it...

It isn't a noticeable amount of bow, visually, when looking at the camper as a whole.

Image

Thanks in advance for any insight!
GarthB
Teardrop Master
 
Posts: 141
Images: 212
Joined: Wed Mar 31, 2021 4:28 am
Location: Northern Michigan
Top

Re: G&M's 'Drop

Postby tony.latham » Sat Jun 05, 2021 3:01 pm

I'm debating


I would try a dry fit of the headliner with a pipe clamp or two standing by and see where you're at ––you can set a few screws. That may satisfy you that it'll get straightened out during the installation.

I'm an optimist and that affliction has bitten me in the butt more than once. :shock: 
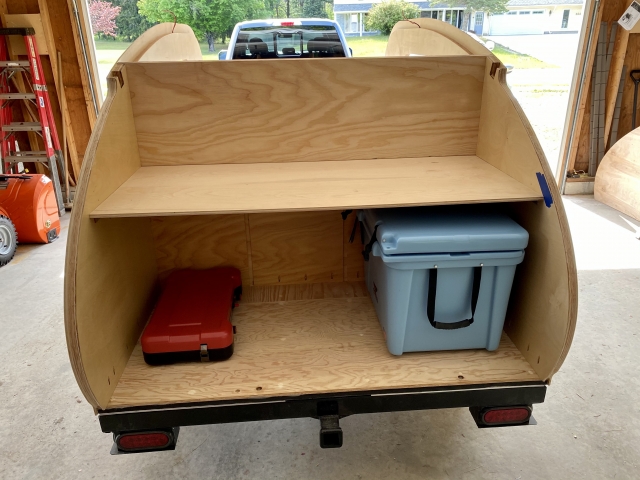
But I think it'll work.

Tony
User avatar
tony.latham
Gold Donating Member
 
Posts: 6908
Images: 17
Joined: Mon Jul 08, 2013 4:03 pm
Location: Middle of Idaho on the edge of nowhere
Top

PreviousNext

Return to Build Journals

Who is online

Users browsing this forum: No registered users and 5 guests