The LT... Thomas' Luxury Tent

...ask your questions in the appropriate forums BUT document your build here...preferably in a single thread...dates for updates, are appreciated....

Postby Juneaudave » Sat May 10, 2008 10:46 pm

Thomas...that is looking really good, it will be a beaut!!!!...I also have to admire your organization skills. Your so organized!!! Nice build!!!

:thumbsup: :thumbsup: :thumbsup: :thumbsup:
User avatar
Juneaudave
Super Duper Lifetime Member
 
Posts: 3237
Images: 380
Joined: Sun Jul 03, 2005 12:11 pm
Location: Juneau, Alaska

Postby 2bits » Sun May 11, 2008 10:59 pm
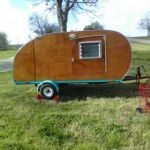
Thanks! I have to keep organized to keep from drowning in stuff! I started out this job with building the little woodshop along the wall, so I haven't had much time to trash it yet haha!

I got alot done today. I cut some forgotten shelf uprights, finalized some locations and measurements and marked and cut the angles for the rear shelves and stained everything except the Galley/Interior divider wall. I am using a new stain color from Minwax called Gunstock for the interior. Sorry the pic of the walls is not color accurate, It was at 10pm, they look just like the shelves though.

Later this week, I will cut the curve off the front cabinets, and then prep the divider wall. I just need to cut holes for the AC and DC power and for the sliding doors.

Image
Image
Image
Image
Thomas

Image
User avatar
2bits
2bit Member
 
Posts: 5130
Images: 8
Joined: Thu Dec 27, 2007 6:04 pm
Location: Lake Tawakoni, TX

Postby 2bits » Sat May 31, 2008 5:37 pm

Finally! The major poly work is done! I got frustrated with how long it was taking since one side had just been finished. So last night I flipped over the boards and put a coat on at 8pm, then another at 11pm, and as soon as I woke up at 8am I put another coat on and then another at 11am, then one more at 1pm. This side actually looks better than the first side! Maybe it is because I didn't let it sit so long between coats, or I decided to use slightly thinner coats but whatever, the front and rear cabinets are done now!
Image
Image
Image

I still have the big galley wall to cut the doors and A/C hole for, and then I need to pick up some 3/4" Plywood and do the counter top, not to mention doing the walls themselves, but at least now I can move forward to doing that stuff! I also bought a new mattress for my bedroom, and I am going to use my old mattress for the teardrop, so that is another big expense down, and I also got a body pillow to use as the pillow, it was $20 for two of them so I couldn't resist and it looks alot cooler than a couple of old house pillows in there.
Image

I also realized that even though I am not planning to camp in hot weather, I might actually create so heat in there at certain times :) so an A/C unit might actually be a smart choice for when 110 power is available. I found this Window unit at Home Depot for $99 and I really like that it has the vents pointing straight up so it won't be blowing right on our toes! This was my girlfriend's contribution to the project.
Image

The vents also got me thinking that I could utilize the two skinny bookshelf areas and I have devised a plan to create an air duct that will travel straight up the unused back of each cabinet, and then run along the top of it, and exit at the top. So the unit will be on the floor but the air will come out at the top through nice looking vents right where it is needed most. Here's a mock up I did for how it will look, the A/C vents are the silver boxes at the top, and the chute going from the AC to the shelf section has yet to be designed and built.
Image

And a side view of the plan:
Image


Time to get back in the garage!
Thomas

Image
User avatar
2bits
2bit Member
 
Posts: 5130
Images: 8
Joined: Thu Dec 27, 2007 6:04 pm
Location: Lake Tawakoni, TX
Top

Postby 2bits » Mon Jun 09, 2008 11:18 pm

I FINALLY decided on the exterior color. I just didn't like the black look of the "Red" Mahogany stain, and I really like this new Gunstock and there is nothing else that strikes my fancy, so I cut the hatch notch, and stained the exterior walls tonight.

Image

Image
Thomas

Image
User avatar
2bits
2bit Member
 
Posts: 5130
Images: 8
Joined: Thu Dec 27, 2007 6:04 pm
Location: Lake Tawakoni, TX
Top

Postby hiker chick » Tue Jun 10, 2008 6:43 am

That is looking terrific!

Am looking forward to future pics.

:applause:
Hot Stuff Today, Dog Stuff Tomorrow

www.thegidg.com
User avatar
hiker chick
1000 Club
1000 Club
 
Posts: 1501
Images: 621
Joined: Sat Aug 18, 2007 6:26 pm
Location: Washington, D.C.
Top

Postby 2bits » Fri Jun 13, 2008 1:20 pm

Thanks! I took off Friday and Monday, and am on a push for assembling the walls, and cabinets on Monday! I put three coats of water based poly on the inside walls Wednesday, and I just finished putting my first coat of spar Urethane on the exterior walls just now. Going to do three coats of that, then assemble, then add my final light coat or two on the inside and outside after assembly. Here's some pics:

Interior Walls:
Image
Image

Exterior walls unsanded with first coat 1 hr old:

Image
Image
Thomas

Image
User avatar
2bits
2bit Member
 
Posts: 5130
Images: 8
Joined: Thu Dec 27, 2007 6:04 pm
Location: Lake Tawakoni, TX
Top

Postby Joamon » Fri Jun 13, 2008 6:41 pm

Hey Thomas!
Looks Good. Let me know if you need some help standing those walls up.
How are you going to fasten them to the trailer?( I E what kind of screws)
Let me know if I can help or when you start putting spars up I want to come look.
Keep up the good work.
Keith
User avatar
Joamon
Teardrop Master
 
Posts: 293
Images: 244
Joined: Tue Jun 14, 2005 7:25 pm
Location: Texas , Garland
Top

Postby 2bits » Mon Jun 16, 2008 11:29 am

Thanks Keith, I sent you a PM about coming by, I hope I can get to it today. I was in Houston all weekend, but I got home yesterday afternoon and added the third coat of spar poly on the exterior walls and I am done doing that and I think they look pretty awesome:

The other panel is the inner cabenet floor that shows the hole for the A/C to come up through like in yours:
Image

This one just looks pretty. It is not wet either!
Image

I also moved my A/C to the driver's side so the controls would be centered and the airvent would be directly below the driver's side shelf so I can get the same vent action that you have in yours.

I had to move the A/C down below the mattress line by a couple of inches and I just hope that is OK, I had been going on the measurements for the interior because before the galley counter and the inner cabinets were only an inch apart but after sitting in it, I moved them back and up, so that left more space on the wall, but that was space I couldn't use because the counter didn't move :shock: It's only a couple of inches but still with blankets and stuff I don't know how it is going to work and I don't want to have to baby it, but I can't move it up any more, so we will just have to see.

Here's a pic of the inner cabinet floor, the Galley wall and the galley counter (closest one), still need to get a couple of small vents and cut the holes for it and the 110 outlets. I better get to it, it's getting late!

Image
Thomas

Image
User avatar
2bits
2bit Member
 
Posts: 5130
Images: 8
Joined: Thu Dec 27, 2007 6:04 pm
Location: Lake Tawakoni, TX
Top

Postby 2bits » Wed Jun 18, 2008 10:23 pm

Love that stain :D
Image
Shiny!
Image
Front cabinets
Image
Thomas

Image
User avatar
2bits
2bit Member
 
Posts: 5130
Images: 8
Joined: Thu Dec 27, 2007 6:04 pm
Location: Lake Tawakoni, TX
Top

Postby Miriam C. » Wed Jun 18, 2008 10:28 pm

:applause: :thumbsup: :applause: Thomas that stain is really beautiful. Honestly if I built all those parts separately they would never go together right.

Image
“Forgiveness means giving up all hope for a better past.â€
User avatar
Miriam C.
our Aunti M
 
Posts: 19675
Images: 148
Joined: Wed Feb 15, 2006 3:14 pm
Location: Southwest MO
Top

Postby pathdoc2 » Thu Jun 19, 2008 7:45 am

Looks fantastic.
pathdoc2
Teardrop Builder
 
Posts: 40
Joined: Sat Jun 07, 2008 3:25 am
Location: Allen, TX
Top

Postby 2bits » Sun Jun 22, 2008 2:29 am

OK, major day today.. It's definitely Miller Time.

Bolted the floor to the frame, 4 bolts, I didn't want to counter sink since it is just 1/2" wood and the mattress is going to sit on top of it anyway.

Image

My fellow teardropper Keith came by as I was predrilling for the spars and when we set the two profiles up against each other we discovered that the dadoes for the galley wall were off by a half inch as well as the hatch notch! I considered matching the dadoes and trimming the ends of the profile down, but after going back and forth in my head and talking it out, the most logical step was to widen the dado and just fix the notch on the bad side. The visible portion would be from the counter UP on the passenger side. underneath would never be seen, and on top I planned on putting corner molding anyway, so this never happened right! :lol:

Image

Keith took off since I had to go buy a new router to repair my boo boo (the ex took hers back Tuesday) I got a router and table for $99 so that is cool.
Image

Next, all the predrilling was done for the spars:
Image

On to predrilling for the sides, had to finalize the placement of the side trim. I tried my original idea with three trim pieces, but with three, they missed the cabin shelf, and spaced to include the cabin shelf looked wrong.
Image

Now that's better! With four, it covers both the counter and the shelf and allows four screws on the galley wall. I think it looks better than the three now. I think I will stick with this width also.

Image

NEXT.... alone, I managed to get the walls up, and the basic assembly DONE! Screwed and glued with polyurethane on the screws. I like to see what I can get accomplished on my own sometimes haha
:thumbsup:
Image
Now the spars are installed the same fashion, except for one rear one, to be able to slide the headliner in:
Image
Image
Nice one of the counter and galley wall, can't wait to see it in the daylight.
Image

A view of the basic interior, there will be matching speaker holes and 110 on the inside face frame same as the galley face.
Image

Now that I am looking at it I just realized that I put the shelves in the middle, on the wrong side! A hangar will not fit on the open side, DOH! No biggie, I can just cut the shelves down, and the center piece will slide over.

Image

The front shelves are just sitting in place as they cannot be installed until the headliner is in, but check it out... sitting at the front of the dado in the walls, with 1/8" luan coming and there is 1/8" clearance to the spar, nice...

Image
Thomas

Image
User avatar
2bits
2bit Member
 
Posts: 5130
Images: 8
Joined: Thu Dec 27, 2007 6:04 pm
Location: Lake Tawakoni, TX
Top

Postby mikeschn » Sun Jun 22, 2008 5:05 am

Hi Thomas,

It's looking nice. Yes, it's amazing what a person can do on his own, without help sometimes. I like the way it's turning out. ;)

Mike...
The quality is remembered long after the price is forgotten, so build your teardrop with the best materials...
User avatar
mikeschn
Site Admin
 
Posts: 19202
Images: 479
Joined: Tue Apr 13, 2004 11:01 am
Location: MI
Top

Postby zen » Sun Jun 22, 2008 8:58 am

Thomas, your tear is looking real good. I can see all the pre planing you have put into it. Congrats on getting the walls up. Sure is fun watching it go together.
Dan
Daniel Zen
[email protected]
Morgan Hill Ca.
User avatar
zen
Teardrop Builder
 
Posts: 47
Joined: Sun Nov 04, 2007 11:08 am
Location: Morgan Hill Ca.
Top

Postby Juneaudave » Sun Jun 22, 2008 9:20 am

It really is looking most excellent!!!! I think the proportions of the trailer are going to give it "The Look"!!!
:thumbsup: :applause: :applause:
User avatar
Juneaudave
Super Duper Lifetime Member
 
Posts: 3237
Images: 380
Joined: Sun Jul 03, 2005 12:11 pm
Location: Juneau, Alaska
Top

PreviousNext

Return to Build Journals

Who is online

Users browsing this forum: No registered users and 5 guests