Deryk's lil Vardo

...ask your questions in the appropriate forums BUT document your build here...preferably in a single thread...dates for updates, are appreciated....

Postby StandUpGuy » Sat Apr 16, 2011 8:23 pm

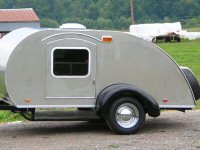
Deryk what are the interior dimensions of that bad boy? Looks pretty roomy!
User avatar
StandUpGuy
1000 Club
1000 Club
 
Posts: 1090
Images: 52
Joined: Sun Mar 27, 2011 6:15 pm

Postby Deryk the Pirate » Sun Apr 17, 2011 9:38 am

Thanks!

Well Joshua, I was over at the local Ace hardware and they didnt have it but Im looking for a pair of heavy duty black gate hinges, something that looks more old fashioned. My friend Connor gave me a link but sadly the prices are out of my range but some awesome stuff.

http://www.ballandball-us.com/

Great stuff but Im too poor lol. Im still at a loss for what to use for secureing the door, so I would love some input. Ive thought of something like this because its probably closer to what they might have used...

http://www.hardwaresource.com/index.php ... ist&c=1314

with this for a lock http://cgi.ebay.com/All-metal-Medieval- ... 3f08ea820a

Something like this would look cool but I really want to be able to secure it...
http://www.lowes.com/ProductDisplay?par ... &cId=PDIO1

http://www.wildwesthardware.com/Slide_b ... _bolts.htm
http://www.wildwesthardware.com/hinges/ ... ks_unf.jpg

But Im open for other ideas!

Size wise inside is, its 55" across, 104" deep and 54" tall in the center. I wanted enough headroom to be able to sit on a porta potty if need be. I found a few small porta potties that are 12" tall and my friend measured me from sitting on the floor to the top of my head Im 37" so lets say 50" for shits and giggles so I can be retrained (lol) to not whack my head on the roof when I get off it.
Build Thread lil vardo 1: http://tinyurl.com/baqe6py
Build Thread lil vardo 2: http://tinyurl.com/b3rwffm
User avatar
Deryk the Pirate
500 Club
 
Posts: 809
Images: 158
Joined: Tue Aug 18, 2009 11:03 am
Location: Parlin NJ

Postby tsmiley23 » Sun Apr 17, 2011 11:09 am

Hi Deryk, I'm enjoying your build and thought I'd add my 2 pennies. I like the hinges in the first link, if you want something like this but can't afford the $130, buy the heaviest ones you can find at a hardware and take them to a welding shop and have him add steel in any shape you like. He can also burn off the galvanizing on the new hinges and peen them so they look old. If you were close I'd do them for you, it's amazing how creative you can get with something like this and how original you can make them look for cheap.

These are some I did out of copper. You can see how creative I could have been. Give it a try you'll enjoy and the more unique the more realistic they'll appear.
Image

The bolts that they are fastened with are just standard 3/8 inch bolts I heated and reshaped square for originality.

Just don't get carried away:
Image :lol: :lol: :lol: :lol:
CONSISTENCY!!!!!! It's only a good thing if you're not a screw up.
User avatar
tsmiley23
Teardrop Advisor
 
Posts: 70
Images: 159
Joined: Thu Feb 04, 2010 10:44 am
Location: Woodland Park, CO
Top

Postby StPatron » Sun Apr 17, 2011 11:27 am

Deryk, hope you don't mind the hijack. I gotta admire those hinges of tsmiley23, especially the bottom set. Great advice, modifying a plain jane hinge.
User avatar
StPatron
Donating Member
 
Posts: 748
Images: 297
Joined: Tue Dec 15, 2009 8:38 pm
Location: OK
Top

Postby Deryk the Pirate » Sun Apr 17, 2011 11:54 am

Wow tsmiley23 Im really impressed! It is possible things might change and hinges can be upgraded. I have a friend who is a blacksmith but he is way too backed up to mess around with it but I thought of havein him cook the finish off and hammer it a few times to make it look more man made.
Build Thread lil vardo 1: http://tinyurl.com/baqe6py
Build Thread lil vardo 2: http://tinyurl.com/b3rwffm
User avatar
Deryk the Pirate
500 Club
 
Posts: 809
Images: 158
Joined: Tue Aug 18, 2009 11:03 am
Location: Parlin NJ
Top

Postby Deryk the Pirate » Sat Apr 23, 2011 5:15 pm

Well I got a little bit of work done before the rain. Image

I cut the trim for the rest of it but didnt get a chance to paint it yet... I need to pickup 2 1x3's and 2 1x2's to put them together for the 4 edges to finish it off. Hopeing for some good weather next week... plan on camping in it for a party on my friends property next weekend. Will be useing an air mattress temporarily till I can afford a nice foam mattress.

Image

When I got home the adhesive for the EPDM roofing showed up...so next week I get to install it. I picked up some 12 gauge wire for the ac outlet inside the trailer, and have 2 12 volt light fixtures to install, and a 12 volt socket for a fan....so much more to do lol!
Build Thread lil vardo 1: http://tinyurl.com/baqe6py
Build Thread lil vardo 2: http://tinyurl.com/b3rwffm
User avatar
Deryk the Pirate
500 Club
 
Posts: 809
Images: 158
Joined: Tue Aug 18, 2009 11:03 am
Location: Parlin NJ
Top

looking good

Postby mike66442 » Sat Apr 23, 2011 9:17 pm

:thumbsup: 
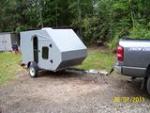
I like the looks of your trailer, :thinking: :thinking: or call it a Reniassance wagon
User avatar
mike66442
Teardrop Builder
 
Posts: 28
Images: 55
Joined: Fri Mar 25, 2011 10:02 pm
Location: north pole, Alaska
Top

Postby Deryk the Pirate » Wed Apr 27, 2011 9:16 pm

Thanks Mike!... Ive definatly got Vardo's on the brain lol.

So today I rolled the adhesive on and got the EPDM membrane on. Was interesting lol. I got my friend Connor to give me a hand. I put the membrane on the roof and used squeeze clamps to hold it in place.

Then rolled half the membrane onto itself, then rolled the adhesive onto the primed wood roof and then the membrane waited 5 minutes or so till it wasnt tacky and we slid a 2x2 under the membrane and use it to roll the membrane onto the roof, keeping tension on it and rolling slow it worked out pretty good, then did the same on the other side.

If anyone is contemplateing doing it and is a little worried it was real easy to do with a 2nd person helping to keep tension on it to avoid air pubbles. I have 2 little pieces of tree debree under my roof, always something but what can ya do .... didnt notice it till after.

Got the skirt and trim cut, still have to do the corners (need to get the wood for that)
Image

Tomorrow I have to sart paintin the trim if the weather holds
Build Thread lil vardo 1: http://tinyurl.com/baqe6py
Build Thread lil vardo 2: http://tinyurl.com/b3rwffm
User avatar
Deryk the Pirate
500 Club
 
Posts: 809
Images: 158
Joined: Tue Aug 18, 2009 11:03 am
Location: Parlin NJ
Top

Postby Deryk the Pirate » Sun May 01, 2011 10:28 am

Well got the outside mainly done
Image
Image
Image
Image

Image
Build Thread lil vardo 1: http://tinyurl.com/baqe6py
Build Thread lil vardo 2: http://tinyurl.com/b3rwffm
User avatar
Deryk the Pirate
500 Club
 
Posts: 809
Images: 158
Joined: Tue Aug 18, 2009 11:03 am
Location: Parlin NJ
Top

Postby bve » Sun May 01, 2011 2:05 pm

Deryk, that looks awesome and quite cozy.

:thumbsup: :thumbsup:
Burke

KISS > COMPLEX
Image
Image

Build threads converted to PDFs.
As of 2008-08-08 I have added more build threads to the pdf collection
User avatar
bve
500 Club
 
Posts: 694
Images: 98
Joined: Sat Aug 25, 2007 1:44 am
Location: Edmonton, Alberta, Canada
Top

Postby Steve_Cox » Sun May 01, 2011 5:01 pm

Deryk,

I like it! :thumbsup:

Image
Steve
User avatar
Steve_Cox
4000 Club
4000 Club
 
Posts: 4903
Images: 196
Joined: Sun Apr 03, 2005 8:46 am
Location: Albuquerque New Mexico
Top

Postby Loader » Sun May 01, 2011 5:12 pm

Steve_Cox wrote:Deryk,

I like it! :thumbsup:

Image


I'll second that! Looks great!!
Earl & Kerry

"Loader"

Blue Yonder Build Thread - viewtopic.php?f=50&t=42611

ImageImage
User avatar
Loader
Platinum Donating Member
 
Posts: 1584
Images: 245
Joined: Tue Apr 26, 2005 2:33 pm
Location: Fort Worth, Texas
Top

Postby 2bits » Sun May 01, 2011 5:37 pm

That paint scheme really sets it in place! Cool!
Thomas

Image
User avatar
2bits
2bit Member
 
Posts: 5131
Images: 8
Joined: Thu Dec 27, 2007 6:04 pm
Location: Lake Tawakoni, TX
Top

Postby StandUpGuy » Sun May 01, 2011 8:43 pm

I like the bold color choices.
User avatar
StandUpGuy
1000 Club
1000 Club
 
Posts: 1090
Images: 52
Joined: Sun Mar 27, 2011 6:15 pm
Top

Postby CliffinGA » Sun May 01, 2011 10:11 pm

Beautiful Deryk!! Great Job!! :thumbsup: :thumbsup:
In God we trust, shoot the rest and he will sort out!

My Build:

viewtopic.php?f=50&t=42628
User avatar
CliffinGA
1000 Club
1000 Club
 
Posts: 1499
Images: 207
Joined: Sat Nov 14, 2009 1:29 pm
Location: Jefferson, GA
Top

PreviousNext

Return to Build Journals

Who is online

Users browsing this forum: No registered users and 22 guests