G&M's 'Drop

...ask your questions in the appropriate forums BUT document your build here...preferably in a single thread...dates for updates, are appreciated....

Re: G&M's 'Drop

Postby GarthB » Mon Jun 07, 2021 10:34 am

tony.latham wrote:
I'm debating


I would try a dry fit of the headliner with a pipe clamp or two standing by and see where you're at ––you can set a few screws. That may satisfy you that it'll get straightened out during the installation.

I'm an optimist and that affliction has bitten me in the butt more than once. :shock: But I think it'll work.

Tony


I was all geared up with a couple of 6 foot bar clamps and a third hand extendable rod but was pleasantly surprised to find they didn't require as much persuasion as I'd thought they would. Everything fits together and straightens out pretty nicely with the headliner in place for the dry-fitting.
GarthB
Teardrop Master
 
Posts: 141
Images: 212
Joined: Wed Mar 31, 2021 4:28 am
Location: Northern Michigan

Re: G&M's 'Drop

Postby tony.latham » Mon Jun 07, 2021 9:01 pm

GarthB wrote:
tony.latham wrote:
I'm debating


I would try a dry fit of the headliner with a pipe clamp or two standing by and see where you're at ––you can set a few screws. That may satisfy you that it'll get straightened out during the installation.

I'm an optimist and that affliction has bitten me in the butt more than once. :shock: But I think it'll work.

Tony


I was all geared up with a couple of 6 foot bar clamps and a third hand extendable rod but was pleasantly surprised to find they didn't require as much persuasion as I'd thought they would. Everything fits together and straightens out pretty nicely with the headliner in place for the dry-fitting.


Tony


Sent from my iPad using Tapatalk
User avatar
tony.latham
Gold Donating Member
 
Posts: 6907
Images: 17
Joined: Mon Jul 08, 2013 4:03 pm
Location: Middle of Idaho on the edge of nowhere

Re: G&M's 'Drop

Postby GarthB » Wed Jun 09, 2021 4:41 am

Turned a few pages the last couple of days. We started out with getting the headboard buttoned up. Since we polyurethaned all four sides of the rails and the headboard cross members, I decided to try Titebond's polyurethane glue to attach the rails. It provided a strong bond, but made for a very messy glue up. I ended up attaching the top rail with screws instead of glue in order to avoid making a mess of the lower rail.

After the rails, we got the sliding doors for the headboard cut and dry fitted. These will get polyurethaned and installed once I have another batch of components ready for finish. The headboard shelf will be kept off until these are installed since I will have to swing the doors in place from behind the headboards.

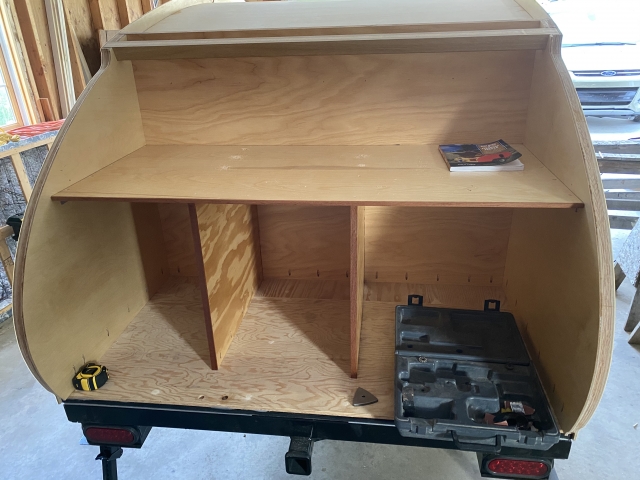
Next, we got the vertical countertop supports installed. They were glued and screwed along the bottom, back, and top. We were pretty happy with how the jatoba edge banding turned out.

Image

Last, we got the headliner finished and installed. My wife helped us out big time by sanding and getting the second coat of polyurethane applied while I was at work, so we were able to get it done sooner. The headliner was probably the most challenging part of the build so far for us, mainly due to some frantic trimming that had to be done with an orbiting multitool at the end because it was too long and slightly too wide. For most of the install, it felt like the headliner was more in control of the situation than we were.

Leading up to the install, I'd planned to complete it with glue and screws, however, dry fitting made me rethink how necessary a crown stapler really was for this task. I broke down and bought one and I'm glad I did. The ability to sink a large quantity of fasteners in a hurry was a big help.

The only collateral damage that occurred during this task was that we were using fairly long staples and I accidentally shot two in at a bit too much of an angle. They managed to poke through the fiberglass. Oh well. I'll sand them down with a dremel and use thickened epoxy as a patch during the fairing process.

Image

Next up will be roof spars. These were a lot more expensive than I anticipated. $200 for five 1"x8"x10' poplar boards. :shock:
GarthB
Teardrop Master
 
Posts: 141
Images: 212
Joined: Wed Mar 31, 2021 4:28 am
Location: Northern Michigan
Top

Re: G&M's 'Drop

Postby western traveler » Wed Jun 09, 2021 7:07 am

Great progress Garth. I wish I was only dealing with a couple errant staples on my build. I have a couple errors that won’t be resolved for a while yet.
Members of this board have been so gracious and helpful and solutions freely given.
western traveler
Donating Member
 
Posts: 396
Images: 264
Joined: Wed Dec 28, 2016 6:59 am
Location: The Front Montana
Top

Re: G&M's 'Drop

Postby eLink » Wed Jun 09, 2021 10:42 am

Looking good!
I also had some issues with 1" staples poking through where I least expected it (reminder to keep fingers clear!). Wish I had thought of it sooner, but I think 1/2" staples would have worked fine. Not usually sold at stores, but they are available on Amazon.
User avatar
eLink
Teardrop Master
 
Posts: 191
Images: 142
Joined: Mon Nov 12, 2018 3:34 pm
Location: Los Angeles
Top

Re: G&M's 'Drop

Postby GarthB » Fri Jun 11, 2021 7:01 am

Thank you both!

I got the roof spars cut last night. When following Tony's book, I got slightly confused about whether to cut the shelf for the roof down 2-1/4" or 2-1/8". I went with 2-1/4", but I think that it likely should've been the latter option. With my headliner in place, I have a 2-1/8" space from the top of the headliner to the top edge of the outer skin. Knowing this, I cut my spars to 2-1/8". However, this 2-1/8" space presents a bit of an issue in regards to insulation and roof blocking.

From what I can find, rigid foam comes in 2" thickness and you can occasionally find it in 2-1/2". As a fix, I'm considering having the roof spray foamed with closed cell foam. This will be more expensive, which I'm not super enthused about. The only other solutions I can think of are:

1. Use some 1/8" birch strips as spacers across the top of the headliner to bring the gap down to 2". This option doesn't seem like a good idea to me, because it would leave air voids (future moisture traps) in the roof between the strips. I don't have enough material to do an additional solid layer of 1/8".
2. Try to find 2-1/2" foam or use a combination of 3/4" foam layers, yielding a thickness of 2-1/4". Either way, it will be a lot of foam sanding/shaving.

As for the roof blocking, there will be an 1/8" gap no matter what the shelf was cut to if the blocking was cut off using a 1/4" router bit. I'm assuming I will need some small 1/8" shims between the headliner and the roof blocking since my roof blocking is 2". Without shims, it would be 1/8" shy of the edge of the exterior skin.

Tony, if you happen to be reading this, did you cut your roof to 2-1/4" or 2-1/8"? If 2-1/4", what did you do about the 1/8" gap?

Not a show stopping issue, just curious what others have done that have followed similar designs. Hopefully my long winded explanation of the situation makes sense. I noticed that Joe had to confront the same issue in his build, and decided to push his headliner up in the middle in order to make contact with 2" spars.

Thanks for the help!
GarthB
Teardrop Master
 
Posts: 141
Images: 212
Joined: Wed Mar 31, 2021 4:28 am
Location: Northern Michigan
Top

Re: G&M's 'Drop

Postby tony.latham » Fri Jun 11, 2021 7:16 am

Tony, if you happen to be reading this, did you cut your roof to 2-1/4" or 2-1/8"?


I cut it 2-1/4". And I wrote it 2-1/4". But in the latest rendition of the book, it is edited to 2-1/8".

The 2-1/4" cut still works since it allows for a 1/16" PL glue line -–top and bottom-- on the 2" blocking. But you might install the blocking and then run a bottom-bearing bit against the blocking to flush up the exterior sheeting. Please excuse my error. But it'll work.

:frightened:

Tony
User avatar
tony.latham
Gold Donating Member
 
Posts: 6907
Images: 17
Joined: Mon Jul 08, 2013 4:03 pm
Location: Middle of Idaho on the edge of nowhere
Top

Re: G&M's 'Drop

Postby GarthB » Fri Jun 11, 2021 7:42 am

tony.latham wrote:
Tony, if you happen to be reading this, did you cut your roof to 2-1/4" or 2-1/8"?


I cut it 2-1/4". And I wrote it 2-1/4". But in the latest rendition of the book, it is edited to 2-1/8".

The 2-1/4" cut still works since it allows for a 1/16" PL glue line -–top and bottom-- on the 2" blocking. But you might install the blocking and then run a bottom-bearing bit against the blocking to flush up the exterior sheeting. Please excuse my error. But it'll work.

:frightened:

Tony


Thanks for the input! I hadn't thought about the fact that the glue will probably fill the gap well enough on its own for the roof blocking. I'll ponder the options a little more as I'm installing spars and report back what solution I go with. It's good for us "apprentice" teardrop builders to have to think on our own once in a while. ;)
GarthB
Teardrop Master
 
Posts: 141
Images: 212
Joined: Wed Mar 31, 2021 4:28 am
Location: Northern Michigan
Top

Re: G&M's 'Drop

Postby tony.latham » Fri Jun 11, 2021 7:46 am

I'll ponder the options a little more as I'm installing spars and report back what solution I go with.


Whatever you choose will work. When I did my roof, I could tell something was "different." I couldn't put a finger on it. And then a couple of readers pointed out the "missing" 1/8". But it will work.

Tony
User avatar
tony.latham
Gold Donating Member
 
Posts: 6907
Images: 17
Joined: Mon Jul 08, 2013 4:03 pm
Location: Middle of Idaho on the edge of nowhere
Top

Re: G&M's 'Drop

Postby western traveler » Fri Jun 11, 2021 8:07 am

tony.latham wrote:
Tony, if you happen to be reading this, did you cut your roof to 2-1/4" or 2-1/8"?


I cut it 2-1/4". And I wrote it 2-1/4". But in the latest rendition of the book, it is edited to 2-1/8".

The 2-1/4" cut still works since it allows for a 1/16" PL glue line -–top and bottom-- on the 2" blocking. But you might install the blocking and then run a bottom-bearing bit against the blocking to flush up the exterior sheeting. Please excuse my error. But it'll work.

:frightened:

Tony


Me three,
To compound the issue even while using the spacers I managed to goof the glue up on one of the panels and my top edge is misaligned (I was trying to avoid using fasteners in the outer skin).
I plan on using Tony’s solution to even out the top line. I have just enough material I think. I had to jump ahead in the book to see the spacer cutting technique to understand the concept.
western traveler
Donating Member
 
Posts: 396
Images: 264
Joined: Wed Dec 28, 2016 6:59 am
Location: The Front Montana
Top

Re: G&M's 'Drop

Postby cjlangellier » Fri Jun 11, 2021 2:43 pm

western traveler wrote:
tony.latham wrote:
Tony, if you happen to be reading this, did you cut your roof to 2-1/4" or 2-1/8"?


I cut it 2-1/4". And I wrote it 2-1/4". But in the latest rendition of the book, it is edited to 2-1/8".

The 2-1/4" cut still works since it allows for a 1/16" PL glue line -–top and bottom-- on the 2" blocking. But you might install the blocking and then run a bottom-bearing bit against the blocking to flush up the exterior sheeting. Please excuse my error. But it'll work.

:frightened:

Tony


Me three,
To compound the issue even while using the spacers I managed to goof the glue up on one of the panels and my top edge is misaligned (I was trying to avoid using fasteners in the outer skin).
I plan on using Tony’s solution to even out the top line. I have just enough material I think. I had to jump ahead in the book to see the spacer cutting technique to understand the concept.


I feel a little fortunate that I caught this one. I was scratching my head when I was thinking everything through and trying to figure out where the extra 1/8" was going to come from. Ultimately made the cut for the spar rails at 2-1/8" figuring I could take an extra 1/16th or 1/8th if needed.

Tony, I can't imagine the work that went into writing that book. There are thousands of decisions that need to be made during a build and some of them are made on the fly. You've done a great job capturing and presenting the technical information required to build one of these tiny trailers. To have such a complete technical resource has been extremely valuable for my build.
Cody - Westmont, IL

5x11 Teardrop
http://www.tnttt.com/viewtopic.php?f=50&t=73740
6x12 Cargo Trailer/Ice Shanty/Toy Hauler
http://www.tnttt.com/viewtopic.php?f=42&t=73743
User avatar
cjlangellier
Teardrop Master
 
Posts: 171
Images: 332
Joined: Fri Apr 30, 2021 3:29 am
Top

Re: G&M's 'Drop

Postby cjlangellier » Fri Jun 11, 2021 2:44 pm

western traveler wrote:
tony.latham wrote:
Tony, if you happen to be reading this, did you cut your roof to 2-1/4" or 2-1/8"?


I cut it 2-1/4". And I wrote it 2-1/4". But in the latest rendition of the book, it is edited to 2-1/8".

The 2-1/4" cut still works since it allows for a 1/16" PL glue line -–top and bottom-- on the 2" blocking. But you might install the blocking and then run a bottom-bearing bit against the blocking to flush up the exterior sheeting. Please excuse my error. But it'll work.

:frightened:

Tony


Me three,
To compound the issue even while using the spacers I managed to goof the glue up on one of the panels and my top edge is misaligned (I was trying to avoid using fasteners in the outer skin).
I plan on using Tony’s solution to even out the top line. I have just enough material I think. I had to jump ahead in the book to see the spacer cutting technique to understand the concept.


I feel a little fortunate that I caught this one. I was scratching my head when I was thinking everything through and trying to figure out where the extra 1/8" was going to come from. Ultimately made the cut for the spar rails at 2-1/8" figuring I could take an extra 1/16th or 1/8th if needed.

Tony, I can't imagine the work that went into writing that book. There are thousands of decisions that need to be made during a build and some of them are made on the fly. You've done a great job capturing and presenting the technical information required to build one of these tiny trailers. To have such a complete technical resource has been extremely valuable for my build.
Cody - Westmont, IL

5x11 Teardrop
http://www.tnttt.com/viewtopic.php?f=50&t=73740
6x12 Cargo Trailer/Ice Shanty/Toy Hauler
http://www.tnttt.com/viewtopic.php?f=42&t=73743
User avatar
cjlangellier
Teardrop Master
 
Posts: 171
Images: 332
Joined: Fri Apr 30, 2021 3:29 am
Top

Re: G&M's 'Drop

Postby tony.latham » Fri Jun 11, 2021 3:07 pm

Tony, I can't imagine the work that went into writing that book.


It was a bit trying. Creative writing––which this wasn't of course--is trying too... but more enjoyable. You caught me working on another fiction. Here's the scene I'm working on:

Throughout this conversation, Cove had been watching his eye movement, the direction he looked, and the muscles in his face. With one exception, Reynolds’s eyes had looked up and to the left while answering. Those were the moments when he was recalling the truth. The exception had been when Reynolds had denied hunting with Sullivan. His eyes had darted up to the right. At the same time, he had touched his nose in an effort to cover his mouth. Reynold's eyes had been looking for the lie with that glance. It–-and the nose touch–-were his tells. And Cove had just caught it again.
For a moment, Cove hung back. He was searching for the truth but a single lie could help lead him to it. Cove knew Reynolds was hiding something. And it was possible that this was the guy. Sullivan’s killer. If he was, this moment was critical.


:frightened:

Thanks for the support. ;)

Tony
User avatar
tony.latham
Gold Donating Member
 
Posts: 6907
Images: 17
Joined: Mon Jul 08, 2013 4:03 pm
Location: Middle of Idaho on the edge of nowhere
Top

Re: G&M's 'Drop

Postby western traveler » Fri Jun 11, 2021 5:35 pm

cjlangellier wrote:
western traveler wrote:
tony.latham wrote:
Tony, if you happen to be reading this, did you cut your roof to 2-1/4" or 2-1/8"?


I cut it 2-1/4". And I wrote it 2-1/4". But in the latest rendition of the book, it is edited to 2-1/8".

The 2-1/4" cut still works since it allows for a 1/16" PL glue line -–top and bottom-- on the 2" blocking. But you might install the blocking and then run a bottom-bearing bit against the blocking to flush up the exterior sheeting. Please excuse my error. But it'll work.

:frightened:

Tony


Tony, I can't imagine the work that went into writing that book. There are thousands of decisions that need to be made during a build and some of them are made on the fly. You've done a great job capturing and presenting the technical information required to build one of these tiny trailers. To have such a complete technical resource has been extremely valuable for my build.


To be clear, I cannot imagine the work that went into Tony’s build manual and I would have been lost long ago.
My hat is off to you Tony.
When I finally sit down with a completed build I think the first book to be read will be one of your novels. It only seems fitting…
western traveler
Donating Member
 
Posts: 396
Images: 264
Joined: Wed Dec 28, 2016 6:59 am
Location: The Front Montana
Top

Re: G&M's 'Drop

Postby Tom&Shelly » Fri Jun 11, 2021 5:41 pm

tony.latham wrote:
Tony, I can't imagine the work that went into writing that book.


It was a bit trying. Creative writing––which this wasn't of course--is trying too... but more enjoyable. You caught me working on another fiction. Here's the scene I'm working on:

Throughout this conversation, Cove had been watching his eye movement, the direction he looked, and the muscles in his face. With one exception, Reynolds’s eyes had looked up and to the left while answering. Those were the moments when he was recalling the truth. The exception had been when Reynolds had denied hunting with Sullivan. His eyes had darted up to the right. At the same time, he had touched his nose in an effort to cover his mouth. Reynold's eyes had been looking for the lie with that glance. It–-and the nose touch–-were his tells. And Cove had just caught it again.
For a moment, Cove hung back. He was searching for the truth but a single lie could help lead him to it. Cove knew Reynolds was hiding something. And it was possible that this was the guy. Sullivan’s killer. If he was, this moment was critical.


:frightened:

Thanks for the support. ;)

Tony


Glad you're working on another Tony! At the rate I go through fiction while camping, I'll need all the good ones I can get. (Already read your other two.) Though, to tell the truth, I liked your game warden non-fiction even more.

Tom
172912 170466 173366
Tom&Shelly
Palladium Donating Member
 
Posts: 2228
Images: 2021
Joined: Tue Sep 05, 2017 3:27 pm
Location: Upstate New York/New Mexico
Top

PreviousNext

Return to Build Journals

Who is online

Users browsing this forum: Bing [Bot] and 5 guests