A Minnesota Build - The Lily Pad

...ask your questions in the appropriate forums BUT document your build here...preferably in a single thread...dates for updates, are appreciated....

Postby mcspin50 » Tue Jul 05, 2011 11:24 pm

Thanks Tom and David. All encouragement gratefully accepted.
Lil M.
In every walk with nature, one receives far more than he seeks. - John Muir
Generic Benroy Build Journal here - My LilScamper Update Journal here
The Lily Pad...Image My LilScamper...Image Image
User avatar
mcspin50
Gold Donating Member
 
Posts: 488
Images: 158
Joined: Mon Oct 12, 2009 6:35 pm
Location: Perham, MN

Postby eaglesdare » Wed Jul 06, 2011 8:26 am

loving all the "cute" factors. :applause:
Louella
May the foam be with you.
User avatar
eaglesdare
Donating Member
 
Posts: 3168
Images: 13
Joined: Tue Aug 26, 2008 7:06 pm

Postby Boanerges4 » Wed Jul 06, 2011 9:10 pm

Love your build. I would like to know what kind of sealant you used on the exterior side walls. Thanks and continue to march your doing a great job. Thanks Dennis :thumbsup:
Boanerges4
Teardrop Advisor
 
Posts: 73
Joined: Fri Mar 26, 2010 10:34 pm
Top

Postby mcspin50 » Thu Jul 07, 2011 7:29 pm

Hi Louella,
Thanks! I'm hoping the "cute" factor diverts attention away from my not-so-stellar carpentry skills. 8)

Hi Dennis,
I put one coat of CPES on both sides of the plywood (rotary cut natural birch which does all the work of lookin' purty), then I brushed on three coats of Minwax Helmsman Spar Urethane (Clear Gloss), sanding with 220 grit sandpaper in between coats. I put the finish on while the plywood was lying flat so there are no drips. :thumbsup:
Lil M.
In every walk with nature, one receives far more than he seeks. - John Muir
Generic Benroy Build Journal here - My LilScamper Update Journal here
The Lily Pad...Image My LilScamper...Image Image
User avatar
mcspin50
Gold Donating Member
 
Posts: 488
Images: 158
Joined: Mon Oct 12, 2009 6:35 pm
Location: Perham, MN
Top

Postby mcspin50 » Thu Jul 14, 2011 12:33 am

Hi all,
A little progress made. Last Sunday, after what I thought was carefully measuring an opening in the countertop for the sink, I brought out my new-to-me refurbished Bosch jigsaw, readied myself for battle, and powered it up to cut the hole. Wow!! What a difference from the Skil jigsaw! I actually felt like I had control of it and could make it follow the line that I drew. It didn't bounce around, but stayed nice and steady and smooth. :dancing :dancing I think I'm gonna call this one SIR Jigsaw!
Image
Only trouble was, I didn't measure precisely enough, so the sink/bowl sort of slopped around a bit too much. After talking with No. 1 Son, he suggested using weatherstripping to "pad" the opening a bit.
Image
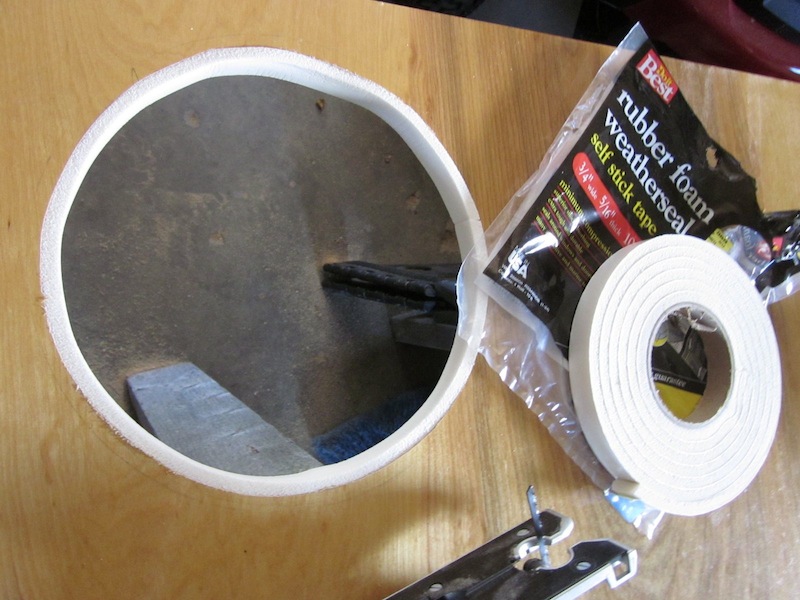
Worked like a charm. I also figure, when I use the sink as an ice bucket for a few beers or a bottle of white wine :D , the sweating bowl won't cause the plywood to rot. How's that for rationalizing?? 8)
The sink drain I ordered from Amazon fit perfectly. The plumber's putty sealed the connection between sink strainer and bowl. I'm a happy camper.
So my next step is assembling all the finished parts of the galley, then installing the inside skin so I can start the electrical.
Haven't had much time this week to work on the Lily Pad. Been cleaning up the two downstairs bedrooms, shampooing carpets and moving furniture and clothes around since No. 3 Son has moved into a house with 2 other guys. I kinda miss him. :(
But I'm looking forward to the day when he takes this item out of the house...
Image
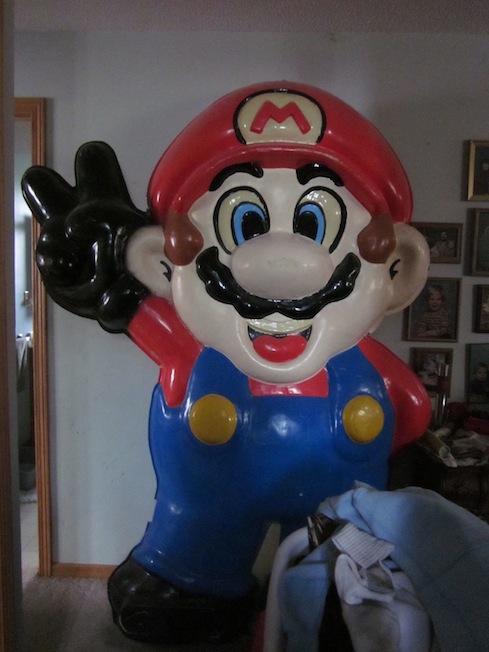
He and a buddy bought this to decorate their first apartment when they went to college. Although, come to think, Mario is a big hit on Halloween, because when I open the front door to give out candy, he's the first thing the kids see standing at the bottom of the stairs, so I hear lots of happy cries of "MARIO!!" Maybe I'll miss him too...NOT!
Lil M.
In every walk with nature, one receives far more than he seeks. - John Muir
Generic Benroy Build Journal here - My LilScamper Update Journal here
The Lily Pad...Image My LilScamper...Image Image
User avatar
mcspin50
Gold Donating Member
 
Posts: 488
Images: 158
Joined: Mon Oct 12, 2009 6:35 pm
Location: Perham, MN
Top

Postby GuyllFyre » Thu Jul 14, 2011 6:21 am

I have a Bosch jigsaw much like the one you have, also purchased refurbished, and yes, I agree wholeheartedly that it a MUCH better jigsaw than most!
Things I have for sale on craigslist:
http://albany.craigslist.org/search/?ar ... catAbb=sss

Things I have for sale on eBay:
http://www.ebay.com/sch/merchant/seansmith
User avatar
GuyllFyre
Donating Member
 
Posts: 209
Joined: Fri May 21, 2010 9:35 pm
Location: Scotia, NY
Top

Postby mcspin50 » Sun Jul 31, 2011 1:31 am

Got a little further along. I did most of this last Monday but haven't had a chance to post words and pics until now.

Assembled all the finished galley/sleeping compartment pieces. Installed the galley counter and promptly had to remove it so I could install the small vertical shelf face on the sleeping compartment side. The Kreg jig square bit to drive the screws is too long to use in such tight spaces. Does Kreg or someone make a short/angled version?

Galley side. Notice the ever-so cute sink and faucet.
Image

Sleeping compartment side.
Image

Gaps abound, but I'm counting on a little help from some molding to cover my inaccurate cuts. I think that next time Community Ed offers a finish carpentry class, I'm going to take it so I can learn how to do accurate cuts and proper joins.

Screwed hinges and handles on the underbed storage. Made a cut in each piece to clear the lower shelf but forgot to take into consideration the upper shelf, so I think I'll need to make some kind of brace to hold the panel open while I access the area.
Image

Then on to trimming and dry-fitting the 1/8th inch 5x5 bending ply to fit inside the sleeping compartment. I learned that I needed to cut 1/4 inch narrower than the measured width so I'm not swearing and struggling to get the sheet pf plywood to slide into place, PLUS I should cut with the wrong side up so the jig saw leaves the smooth cut on the right side. The second sheet I cut looks much better.

Here's the first sheet clamped in place.
Image

By this time, it was close to 6 in the evening and I was getting tired, and I noticed that this little fellow landed on the teardrop.
Image

Since I started this obsession when I discovered the simplicity of Sid's Dragonfly build, I'm taking this as a MAJOR sign that I'm on the right track. The gods are blessing my Lily Pad.
Lil M.
In every walk with nature, one receives far more than he seeks. - John Muir
Generic Benroy Build Journal here - My LilScamper Update Journal here
The Lily Pad...Image My LilScamper...Image Image
User avatar
mcspin50
Gold Donating Member
 
Posts: 488
Images: 158
Joined: Mon Oct 12, 2009 6:35 pm
Location: Perham, MN
Top

Postby eaglesdare » Sun Jul 31, 2011 8:45 am

how did you attach your weather stripping? just a warning from experience here. the self adhesive does not seem to hold. hot glue also does not seem to hold over time. the latest i tried was gorilla glue, very little, but enough. so far that seems to be the trick.
..you might/should be ok with the way you have it thoug, that bowl might keep it in place.

i am not expert, just reporting what i have found while using this stuff here.
Louella
May the foam be with you.
User avatar
eaglesdare
Donating Member
 
Posts: 3168
Images: 13
Joined: Tue Aug 26, 2008 7:06 pm
Top

Postby S. Heisley » Sun Jul 31, 2011 9:33 am

Lil, your build is looking superb! You're doing a good job. It looks like everything is going according to plan. :thumbsup: :applause:

As far as the Kreg square bit, I don't know about an angled one but they do make different lengths. I don't know what you are using but my shortest one is about 2". I got mine at Lowes.
User avatar
S. Heisley
Super Lifetime Member
 
Posts: 8774
Images: 495
Joined: Mon Sep 17, 2007 10:02 am
Location: No. California
Top

Postby aggie79 » Mon Aug 01, 2011 8:11 am

Hi Lil!

The LilyPad is really coming together nicely. The finishes look excellent.

Like yours, a lot of my cabinetry will be assembled in place. I am using Kreg screws/fasteners. As far as the drive bit, it is a No. 2 square drive bit. They are pretty common. For the really hard to reach screws, you may want to use a socket wrench with a No.2 bit.

Take care,
Tom
Tom (& Linda)
For build info on our former Silver Beatle teardrop:
Build Thread

93503
User avatar
aggie79
Super Duper Lifetime Member
 
Posts: 5405
Images: 686
Joined: Tue Aug 07, 2007 5:42 pm
Location: Watauga, Texas
Top

Postby mcspin50 » Wed Aug 03, 2011 2:04 pm

Hi Louella,
The weatherstripping had a pre-glued side. I just "peeled and stuck" it. Right now the sink is just pressure-fitted into the opening. I haven't decided if I'll permanently secure the sink or just let it be. I'll be sure to keep an eye on how the weatherstripping holds. Thanks for the heads up!

Hi Sharon and Tom,
Thanks again for your encouraging words. I stopped at Menard's the night before last and picked up a bendable thingy that might work for securing the Kreg screws in tight spaces. It was only $3 so I won't be out much if it doesn't, or I just might take it back. The short bit and ratchet should work just as well. Sure do love the Kreg jig system.

Cut the opening for the WFCO 8725 in the upper bulkhead with Sir Jigsaw. Frittered around with how to cut the opening so as not to block the top and bottom vents. Thought I might need some kind of frame out of 1/4" or 1/8th" plywood, then realized all I needed to do was cut the opening narrow enough to be able to secure the screws on the side flanges, and tall enough to allow the vents to be unobstructed but the top and bottom flanges to be supported. I'll get a pic as soon as I get back home so my words make more sense. :?

Went to put a coat of gloss Spar Urethane on the upper bulkhead and discovered the last time I sealed the gallon I did a lousy job so there was a hard, thick crust on the remaining @ quart and the liquid was now a goo. :x So, off to Menard's to purchase two quarts of gloss. $>

Sealed the two 1/8th" sheets of bending ply that will form the inside ceiling with Thrifty Alternatives formula, then applied one coat of semi-gloss spar urethane. That's as far as I've made it. Family is visiting from Canada for the past two weeks until this Saturday, so time to build is limited.

Any tips on securing the 1/8" ply inside ceiling to the spars so that it's got good contact without using obvious staples or screws? Or is there a way to make the obvious beautiful? I bought some cedar 5/16" thick wainscoting that I might use as a "headboard", plus I'm planning a 1x8 cedar shelf above my head in the front curve of the benroy, so I'm thinking I can hide some staples there. The join of the two sheets falls about halfway across the area where the fantastic fan will be. I was thinking I could just add another spar on either side to secure the join. Sound OK, or is there a better way?

Golly! I'm getting awfully close to wiring! :shock: Then the hatch! :baby: Then the doors! :scratchthinking:
Lil M.
In every walk with nature, one receives far more than he seeks. - John Muir
Generic Benroy Build Journal here - My LilScamper Update Journal here
The Lily Pad...Image My LilScamper...Image Image
User avatar
mcspin50
Gold Donating Member
 
Posts: 488
Images: 158
Joined: Mon Oct 12, 2009 6:35 pm
Location: Perham, MN
Top

Postby David S » Wed Aug 03, 2011 3:33 pm

Lil,I used 1/4 narrow crown staples and alot of construction adhesive.
I like to use staples insted of brads for 2 reasons,Staples hold twice as well and if you shoot them so the long ways is with the grain they disapear with a little colored putty. :applause: looking good....
User avatar
David S
Donating Member
 
Posts: 218
Images: 53
Joined: Wed Aug 05, 2009 9:18 pm
Location: Rose Hill Kansas
Top

Postby mcspin50 » Wed Aug 03, 2011 3:51 pm

David S wrote:Lil,I used 1/4 narrow crown staples and alot of construction adhesive.
I like to use staples insted of brads for 2 reasons,Staples hold twice as well and if you shoot them so the long ways is with the grain they disapear with a little colored putty. :applause: looking good....


Great idea! Thanks so much!

Just read part of your build. Oh my, that walnut looks lovely! Plus the rest of your build! :thumbsup:
Lil M.
In every walk with nature, one receives far more than he seeks. - John Muir
Generic Benroy Build Journal here - My LilScamper Update Journal here
The Lily Pad...Image My LilScamper...Image Image
User avatar
mcspin50
Gold Donating Member
 
Posts: 488
Images: 158
Joined: Mon Oct 12, 2009 6:35 pm
Location: Perham, MN
Top

Postby aggie79 » Wed Aug 03, 2011 5:04 pm

Lil,

Someone, or probably several people, on the forum mentioned a technique that may work for attaching your ceiling plywood.

It uses narrow crown staples, but instead of leaving them in place, they are only there until the glue sets. To be able to remove them, the staples are shot through a length of nylon strapping tape. This would be a lot of work but may work.

Take care,
Tom
Tom (& Linda)
For build info on our former Silver Beatle teardrop:
Build Thread

93503
User avatar
aggie79
Super Duper Lifetime Member
 
Posts: 5405
Images: 686
Joined: Tue Aug 07, 2007 5:42 pm
Location: Watauga, Texas
Top

Postby mcspin50 » Wed Aug 03, 2011 10:53 pm

aggie79 wrote:It uses narrow crown staples, but instead of leaving them in place, they are only there until the glue sets. To be able to remove them, the staples are shot through a length of nylon strapping tape. This would be a lot of work but may work.

Take care,
Tom


Another great idea!
:thinking: Hmmm, I might have to do a little experimenting to see which one I like best.

Thanks Tom.
Lil M.
In every walk with nature, one receives far more than he seeks. - John Muir
Generic Benroy Build Journal here - My LilScamper Update Journal here
The Lily Pad...Image My LilScamper...Image Image
User avatar
mcspin50
Gold Donating Member
 
Posts: 488
Images: 158
Joined: Mon Oct 12, 2009 6:35 pm
Location: Perham, MN
Top

PreviousNext

Return to Build Journals

Who is online

Users browsing this forum: No registered users and 5 guests