Bear's Lair

...ask your questions in the appropriate forums BUT document your build here...preferably in a single thread...dates for updates, are appreciated....

Re: Bear's Lair West Texas

Postby Nobes » Thu May 19, 2016 2:35 pm

Progress this week but nothing really photo worthy since my last post. Inner wall 1 is done, inner wall 2 is glued and clamped. Inner walls are clear poly and they look great. We are going with an 'english chestnut' finish for the outer walls, cabinets, bulkhead, and galley. I've been working on getting those items buttoned up, sanded, and ready for finishing. Still no doors--that's later! Hopefully I will get at least 1 coat on everything tonight, then at least 2 on everything tomorrow, and hopefully all done by Friday night. This weekend I plan to place wiring in the walls and insulate the walls, make repairs to the vinyl floor, and then get the glassing started for the 2 outer walls. After glassing I will place the outside skins on the frames then raise the walls. Looking forward to having them back up!

Also, I ordered my hatch locks from Frank Bear/Vintage Technologies, and returned my tail light kit in exchange for a different one. Saved a few bucks in the process. Thanks to Frank for making that an easy process.

I started to say I am 'inching' toward that July 4 goal, but actually time is crashing downhill terribly out of control. I feel like my deadline is tomorrow and there is so much still to be done. Hoping I will make it. Still trying to not rush, take my time, do it once and do it right...but work diligently. We'll see if I make it.

*edited to change name of stain. At the last minute we decided to use a Zinsser stain called 'Tuscan.' I have a little of it but need more--but couldn't find any! Since I have 2 almost full quarts of English Chestnut, thrift made the decision for us. And it's a gorgeous color.
Nobes
Teardrop Master
 
Posts: 214
Images: 508
Joined: Sun Dec 20, 2015 5:01 am

Re: Bear's Lair West Texas

Postby Nobes » Sat May 21, 2016 10:59 pm

I worked hard today. I did lots of stuff, but most of it was small and slow. The good news is I have now finished the cabin cabinets, except for doors. Ready to install. I have decided I am going to rebuild the galley, after the first camping trip, so the galley 'as is' is done and ready to go, but will get a redesign and rebuild later this summer.

141908141912141911

Also I have repaired the vinyl floor on the deck, as you can see in those pictures.

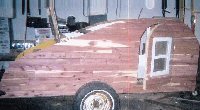
We have gone back and forth on an exterior stain. We said let's use the English Chestnut, so we used that for the inside cabinets. But on further thought it hides more than accentuates the grain of the exterior ply, so after much more discussion and testing we are going with golden oak. Pretty much a 180 from dark to light. We think it will show the grain and minimize differences between the separate pieces of plywood that will be fiber glassed together to make the sides. Here's the bulkhead with golden oak applied.

141919

The other big step was skin on one side of the hatch. My locks came in today so I was able to design and install the framing needed for the locks and move on to skinning. Hopefully I will get the other side done tomorrow. This shows almost 400 pounds of stuff on the hatch as weight clamps plus tons of clamp clamps on the edges. I kerfed the inside of the skin with a utility knife and I think it helped a lot.

141918

Here are the 2 walls with inner skins done. Next step is insulation and wiring.

141909

As I was about to wrap up tonight a big wind blew these clouds in. Really beautiful. It was a typical west texas night--wind, lots of lightning, huge clouds, and no rain.

141916141915

The last bit of news is on the electrical. I did a lot of research this week, then spent over an hour at an RV repair place here, talking with their electrical guy about ideas and procedures--and I still am not sure what I want to do. Obviously trailer lights, brake lights, etc. The AC 110 system will be either the super simple or a close variation. My fantastic fan is DC so I need something, but how simple can I get it? I'm struggling with how to accomplish these tasks. I've read lots of threads, but I have no experience here so I'm pretty intimidated and I just don't have a good feeling about what I really want. It is definitely time to decide.
Nobes
Teardrop Master
 
Posts: 214
Images: 508
Joined: Sun Dec 20, 2015 5:01 am

Re: Bear's Lair West Texas

Postby Nobes » Mon May 23, 2016 12:40 pm

Yesterday was electrical prep day. I built the 'chase' the 110 system will live in, and bought what I think are all the components I will need to build it. Which meant, of course, more time at my favorite store.

141950141951

141952141953

Then I drilled a hole and cut 2 rectangles in the middle of my perfectly good bulkhead. Hoping my math is correct and the holes are in the right places.

I also had a conversation with a friend who is an electrician, and hopefully he will have time to come over in a day or 2 to give me the last tips/warnings/instructions I need to actually run wires.

This week I will finish cutting the ceiling and roof pieces, then sand/stain/poly those as well as the exterior ply pieces. I need to have electrical finalized before cutting insulation for the walls and am hoping that will happen this week. Hopefully, I will start glassing the exterior walls this weekend, and if everything goes just great, have the walls up and cabinets installed by Monday night.

And today I made reservations for my maiden voyage, July 4 weekend, to a little spot near Ruidoso, NM, where hopefully it will be clear and cool.
Nobes
Teardrop Master
 
Posts: 214
Images: 508
Joined: Sun Dec 20, 2015 5:01 am
Top

Re: Bear's Lair West Texas

Postby KCStudly » Mon May 23, 2016 12:49 pm

Nobes wrote:a little spot near Ruidoso, NM


I did a google image search on Ruidoso, NM and it looks like a very nice place! Great carrot to dangle in front of yourself. You are doing nice work and more power to ya'! :thumbsup:
KC
My Build: The Poet Creek Express Hybrid Foamie

Poet Creek Or Bust
Engineering the TLAR way - "That Looks About Right"
TnTTT ORIGINAL 200A LANTERN CLUB = "The 200A Gang"
Green Lantern Corpsmen
User avatar
KCStudly
Donating Member
 
Posts: 9616
Images: 8169
Joined: Mon Feb 06, 2012 10:18 pm
Location: Southeastern CT, USA
Top

Re: Bear's Lair West Texas

Postby Nobes » Tue May 24, 2016 10:18 pm

Thanks KC! Ruidoso is a nice mountain town. It has a ski area--curiously not open on July 4--lots of fun little shops and good restaurants. We will be at 'along the river' which says it is about 10 minutes outside town. North of town is the White Mountain Wilderness Area, where I have done many backpack trips. While it is not large (by western US standards anyway) it is very beautiful. My daughter and her boyfriend will be tenting next to us, and my son and his family will come for Saturday & Sunday, taking my little grand babies to a hotel in town for overnights. We are looking forward to a great weekend. It should be cool at night and 'not too warm' during the day.
Nobes
Teardrop Master
 
Posts: 214
Images: 508
Joined: Sun Dec 20, 2015 5:01 am
Top

Re: Bear's Lair West Texas

Postby Nobes » Tue May 24, 2016 10:52 pm

Last night I took the clamps and weights off the hatch and trimmed the edges of the inner skin flush with the edges of the frame. So far no spring back. There is only one place where the PL glue didn't adhere the skin to the frame, and the lovely and gracious Mrs. Nobes suggested putting some more of the stuff in the gap with the caulk gun. Smart girl.

141983

I will come back to that after I nail down all the electrical plans, which should be Thursday night. I talked to an electrician friend from church tonight and we are set to meet then to go over my plans.

From there I went on to putting poly on the ceiling pieces. They look good, and are ready for installation--I might have to do some final trimming, but that's easy.

141984141985141986

I also went ahead and did a test of the Golden Oak stain on one of my door cutouts. You can see it on the table saw in those pics. I put poly on there as well to see how the exterior will likely look after glassing and clear coat. I am very pleased--and more importantly so is Mrs. Nobes. I gave all that a light sanding with 400 grit today, and they are all ready to go.

So tonight I moved on to getting the exterior ply finished with golden oak stain. I am joining 4 pieces with glass, so I picked out the pieces that look best together and laid them out on my big work table. I am joining factory edges, so all should just slide together and look great, right? Ha! Not so much. I can deal with small gaps, but these were too big. I went through various fixes in my head, and decided my best shot was Steve Frederick's method. When I first read this in his shop manual, I thought "Steve you have got to be kidding. Regular people can't do that." But lo and behold, this regular guy did it and it worked perfectly.

First you line the pieces up and leave a 3/8 gap between them. I clamped them to the table. I chucked a 1/2" bit in the router and set the depth to leave about 1/32 of material, so as to not dig a hole in my table. Clamping to the table was an adventure as well. One end had normal clamps, but the other end was 2' from the end of the table, so taking another arrow from the Steve Frederick quiver, I laid a piece of scrap over the edge of the work piece and the straight edge and screwed the scrap to the table. It worked.

141987141989141990

Then I put a straight edge at the right distance from the cut, said "Boy don't screw this up," and went for it. I had thought through whether I had enough cord, where my feet would go as I cut through 8' of ply, and amazingly made an almost perfect cut. I took about 1/16 off each piece in a single pass, making perfectly matched pieces. The only problem was my bit wasn't deep enough. I adjusted the bit and did it again. Perfect cut again.

141991141992141993

I trimmed off the 1/32 overhang with a utility knife and some very light sanding. When I slid everything together the parts matched perfectly as planned. I then did it all again for the 4' side. A little more light sanding on the surface, blow off dust with the compressor, tack cloth, and apply stain. I think they came out great.

141994141995

Here's a close up of the alder ply with golden oak stain. I think this is going to be striking, assuming I don't screw up the glass.

141996

Tomorrow it's the same steps on side 2, then golden oak on the roof pieces including the outer hatch skin on Thursday, then I have a 4-day weekend to hopefully really plow through a ton of items on the list.
Nobes
Teardrop Master
 
Posts: 214
Images: 508
Joined: Sun Dec 20, 2015 5:01 am
Top

Re: Bear's Lair West Texas

Postby Nobes » Wed May 25, 2016 10:22 am

A shot of the 4 pieces that will be glassed together pushed together sitting on the work table.

142008

I think it looks good.

The problem I am now running into is what to do with all these finished pieces?? I am leaning them against a wall with pieces of quilt batting (excess from the cutoffs of Mrs. Nobes' 'Margo's Quilting Corner')--and hoping they don't get scratched up before I can get them installed in the build.
Nobes
Teardrop Master
 
Posts: 214
Images: 508
Joined: Sun Dec 20, 2015 5:01 am
Top

Re: Bear's Lair West Texas

Postby Nobes » Sat May 28, 2016 2:15 pm

Pics and more details later, but I have the electrical plans in enough detail to actually build it, I spent well over $200 on wire and plugs (!!!), and started building the 110 system under the cabinet in the cabin. so far so good--but I still have to buy the battery. My electrician friend said "no, you gotta go 30 amps!" so I did. More overkill. today I am glassing. I went to get a 6" plastic putty knife for the glass and a mask, and spent $81 on those and "just a few things I'll probably need." THAT is why this thing is over 4 Gs now. Started glassing last night--it's going good. I have done 4 coats so far, two last night and two this morning. the ones this morning were probably too close together, so I will wait till late afternoon to do the next coat. Hopefully that's it, or if #6 is needed I can do it late tonight and move on to side 2 tomorrow. I really need to move on to side 2 tomorrow!

And I took thursday night off. I needed a break, and the grandkids were coming over, so it was good timing all around.

I was hoping to have walls back up by Monday, but if I start glassing side 2 early Sunday am, probably the best I can hope for is to have the glassed skins attached to the sides by Monday night. Final side marker light wire placement, insulation and then gluing to the wall frame, cutting to shape, and cutting out doors--yeah maybe I will have walls up on Wednesday.
Nobes
Teardrop Master
 
Posts: 214
Images: 508
Joined: Sun Dec 20, 2015 5:01 am
Top

Re: Bear's Lair West Texas

Postby Nobes » Sun May 29, 2016 12:00 am

Ok, pics. They're actually not so great.

Side 1 getting its 4 coats of resin & glass:

142076142078

The 4 boards had some significant bowing at the joints. I thought I had seen pics somewhere of someone wetting out the glass then putting weights on joints, so I did that. It didn't work. I had too much resin under the weights and ended up with some 'humps' of resin. The 3 additional coats did a pretty good job of hiding the humps.

After 4 rounds I asked the lovely and gracious Mrs. Nobes what she thought. Is it good enough to move on to side 2? She said it was good to go. I thought to myself, 'well it's not perfect, so it matches the rest of this thing. Move on to side 2.'

So Mrs. Nobes helped me lean side 1 on the stack and I began laying out side 2. I made sure it was a mirror image--right and left sides, you know.

Here is side 2 wetted out:

142081

Meanwhile, I worked on the electrical build. I got pretty far along--just a couple more things to do before final assembly. Plus I mowed the lawn for 2 neighbors. Next door is a sweet 'little old lady' who has been having some hard times. I don't know what happened but no one has mowed her yard in weeks so it was time. Since I was doing her lawn, it only took 15 more minutes to do the one next to hers. Both were seriously in need of attention and I was tired of looking at them. I had done my yard on Friday so I had all my stuff out anyway.

142080

The electrical build as it sits. I think it looks pretty good. 3 outlets in the cabin, 2 in the galley. The galley outlets are GFCI, the center cabin plug has 2 USB slots. It's the idea of the super simple system, I just built my own extension cord. GFCI is overkill I'm sure, as is the 30 amp power supply.

Big storms in the area so it's all covered up, hopefully it will stay dry. Oh who am I kidding, it won't rain. Lots of lightning, wind, storms around us, but this desert town stays dry. Almost always, that is.

Tomorrow is hopefully just 2 more rounds of resin, and putting the insulation in the walls and threading up DC wires for the marker lights. If all goes to plan I will be gluing outside glassed skins on the walls Monday morning.
Nobes
Teardrop Master
 
Posts: 214
Images: 508
Joined: Sun Dec 20, 2015 5:01 am
Top

Re: Bear's Lair West Texas

Postby Nobes » Sun May 29, 2016 11:19 pm

Good day today, right up to the end.

I continued glassing exterior skin side 2, put on 3 coats (8 am, 2 pm, 10 pm). I used the foam roller on the middle coat and it seemed like it introduced tons of air bubbles, so I scraped through the whole thing again. On the last round, just as I was finishing up a quick wind blew up and threw dust all over the panel. Nothing I can do but wait till morning to see how bad it is and hope I can scrape stuff off. Worst case I have to sand it and put on another coat of epoxy.

Meanwhile I finished up the 110 AC system as far as I can before final assembly. On final assembly I will connect the plug on the side of the TD and hook up via pigtails the 2 GFCI plugs for the galley.

I also got insulation cut and glued in to the 2 wall frames. Finally, I made holes and channels for the DC wires for the side marker lights. I had to go buy an extra long 1/8 bit, and broke it on the last hole, but had enough bit left to finish the job.

We'll see how bad the damage is to the wet epoxy on the external skin in the morning. Hopefully it is easily fixed and I can get the 2 glassed skins glued on the wall frames, cut them to shape, get the door openings cut out, and raise the walls. It would be awesome to hit that milestone tomorrow.
Nobes
Teardrop Master
 
Posts: 214
Images: 508
Joined: Sun Dec 20, 2015 5:01 am
Top

Re: Bear's Lair West Texas

Postby Nobes » Mon May 30, 2016 3:51 pm

Moving at Mach 3 now. In just 6 hours, I have:

--Soldered longer leads to all 4 marker lites (that's EIGHT, count em 8 solders), and taped each solder--this is after trying a compression connection method that didn't work. First time to use the solder gun in probably 20 years. It worked!
--Cut holes in my glassed skins to accept the marker lights (which means figuring out where the hole should be, of course). That's just ONE of the 2 skins, you understand.
--Cut channels with the router for the wires from the marker lights to get to the ceiling/roof compartment--in one skin-- since the holes I cut with the long drill bit I bought yesterday on a special trip to lowes JUST FOR THAT didn't work. And of course the bit broke as I finished drilling the holes anyway.
--Sanded the wind-dirtied skin from last night and determined I was done with glassing till I get to the roof and hatch. Yay! Good news!
--Moved material around so I can get the 2 skins glued on. I'm getting really good at moving material around. Nothing is glued, things are just staged so they CAN get glued.
--Had phone calls from my daughter and a friend overseas. Good calls, glad to have spoken with each of them.
--Had a nice lunch at Jason's Deli with the lovely and gracious Mrs. Nobes. Followed by a short stop at the grocery store. Seriously, maybe 10 minutes total at the grocery.
--Helped a neighbor move a couch. The neighbor then helped me move materials, and I got to give him the whole spiel on what I'm doing.
--Put a couple of coats of The Mix on the wood piece at the rear of the trailer that the hatch overhang will sit on. Like a sill. There was just a little in the can. First coat went on fine. Second coat, the stuff was strangely thick and it came out blotchy. Now I have to figure out how to fix that. And possibly make more Mix.

Great day. So far. At this rate I'll be done in 2 days, tops.

All right smoke & coke break is over. Back to work.
Nobes
Teardrop Master
 
Posts: 214
Images: 508
Joined: Sun Dec 20, 2015 5:01 am
Top

Re: Bear's Lair West Texas

Postby Nobes » Mon May 30, 2016 5:55 pm

142088

My neighbor helped me move material around and we got a wall frame, with inner skin and cleat previously attached, face down on the deck of the trailer. Quilt batting underneath. We then put a newly glassed exterior skin face up on the wall frame. He left, and then I moved and scooted and adjusted the skin, going from end to end and side to side, until it was in the right place. I measured and found the spots where the side marker lights go, and drilled holes for the wires.

That took a really, really long time.

142089

Then I realize the holes I drilled yesterday weren't going to work. The lovely and gracious Mrs. Nobes suggested routing channels, proving her worth once again. I tried using compression connectors to extend the leads on the marker lights but they easily failed, so I found my soldering gun and got the 8 wires extended for the 4 marker lights.

That took a really, really long time.

142090142091142093

If you look REALLY closely at this next pic you'll see the 2 marker lights in place. I took this pic at 3:30. I started at 9:30.

142094

Then I griped and complained a while. Then I decided to glue that dang skin on. I took it off, cleaned up the frame, caulked it up with PL wood glue/caulk/stuff, and put the skin back on. I got the wires pulled and started clamping. Of course, it's a 5x10 skin now so I can't clamp all around--but that's why I have 11 40 lb bags of dirt and concrete. After clamping where I could and putting all the weight on, it was obvious that wasn't enough. I yelled for help and the lovely and gracious Mrs. Nobes stopped what she was doing. I changed a router bit and began cutting the front and rear curves. She managed the cut-offs so they didn't break. We then began clamping. And it started raining.

So now we need to finish clamping ASAP and we need to get everything rigged for rain ASAP. We put on all the clamps that would fit. We put on all the dirt and concrete we had. We put on flower pots and decorative bricks. Then I grabbed buckets and we put them on the deck and filled them up. (I would have done that in reverse order, but a smarter person prevailed. Thank you Mrs. Nobes!) Thankflly the sides finally sagged into place. I didn't cut the bottom edge because I still want/need to attach another piece of wood ther and I'm not sure how long the skin needs to extend toward the ground.

Then we rushed around and got everything out of the rain--thankfully it was slow not torrential. And now 30 minutes later it has stopped but the thunder sure is cracking, and there are still sprinkles every now and again.

142095142096

I scratched half way through the first item on my list, "attach skin--set marker lights." That's it for an 8-hour day. If it's not ready for July 4, it's not ready. Sue me.

I think it's Margarita Time.
Nobes
Teardrop Master
 
Posts: 214
Images: 508
Joined: Sun Dec 20, 2015 5:01 am
Top

Re: Bear's Lair West Texas

Postby KCStudly » Mon May 30, 2016 8:51 pm

That was an eventful day! Lots of progress made. :thumbsup:
KC
My Build: The Poet Creek Express Hybrid Foamie

Poet Creek Or Bust
Engineering the TLAR way - "That Looks About Right"
TnTTT ORIGINAL 200A LANTERN CLUB = "The 200A Gang"
Green Lantern Corpsmen
User avatar
KCStudly
Donating Member
 
Posts: 9616
Images: 8169
Joined: Mon Feb 06, 2012 10:18 pm
Location: Southeastern CT, USA
Top

Re: Bear's Lair West Texas

Postby Nobes » Tue May 31, 2016 4:04 pm

And I didn't even include all of it. Here's one example:

I decided to solder the elec lines. I knew--well, that's a little strong--I had the very firm impression the solder gun was on the big shelf under my woodworking workbench, so I went there and yup there it was. Now, somewhere in the bowels of this 2-car garage I have some solder. Where did I see that?

Not in the workbench drawers. Not on the shelves. All 3 sets. Not in the tool box. Any of em. Wait, I think in one of the boxes up in that corner I can't reach unless I move 3-4 tools. Ugh, moving those tools again.

BUT, if I scooch behind the workbench, then climb up on and over the jointer, then drop down on the other side--ha! here I am. No, not in that box. There it is in the second box. A roll of solder wire, unopened. Who knows how long I have had this. Then I climbed back up on the jointer, carefully stepped back down in the little space behind the workbench, scooted sideways past the bench and tablesaw, and I was out in the open again. I move pretty good for a...big-boned guy.

After all that, and given what happened to my biscuit joiner earlier in this build, I fully expected the gun to just fizzle and laugh at me. Maybe shoot out a little flag that says "Bang!" But, it worked like a champ and I did probably the best solder job I ever have. No idea if that is good or bad, but you can judge for yourself by looking at the pics above.
Nobes
Teardrop Master
 
Posts: 214
Images: 508
Joined: Sun Dec 20, 2015 5:01 am
Top

Re: Bear's Lair West Texas

Postby KCStudly » Tue May 31, 2016 5:30 pm

:lol: :lol: :lol: Someday around the campfire I'll tell you the story about how I came to own two hacksaws.
KC
My Build: The Poet Creek Express Hybrid Foamie

Poet Creek Or Bust
Engineering the TLAR way - "That Looks About Right"
TnTTT ORIGINAL 200A LANTERN CLUB = "The 200A Gang"
Green Lantern Corpsmen
User avatar
KCStudly
Donating Member
 
Posts: 9616
Images: 8169
Joined: Mon Feb 06, 2012 10:18 pm
Location: Southeastern CT, USA
Top

PreviousNext

Return to Build Journals

Who is online

Users browsing this forum: No registered users and 5 guests