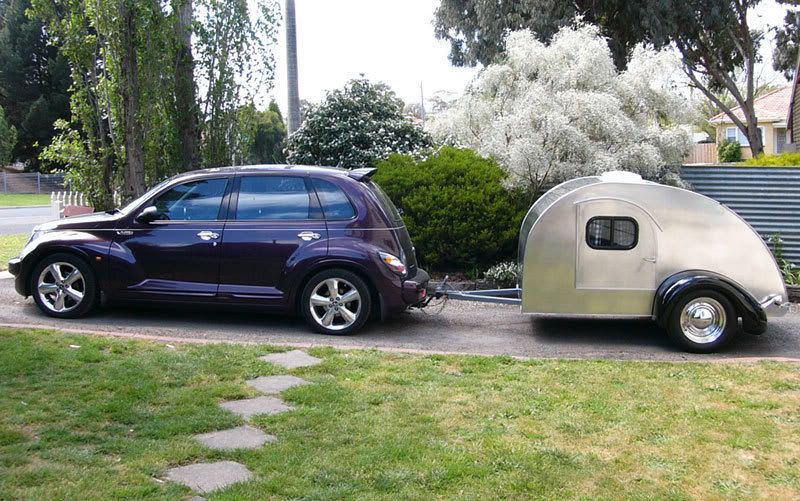
Silver Beatle - She's now with an old friend!

...ask your questions in the appropriate forums BUT document your build here...preferably in a single thread...dates for updates, are appreciated....

Postby Woodbutcher » Sat Jul 31, 2010 9:37 pm

Your doing a great job....I wish I was that far. You will be camping in no time! :applause:
User avatar
Woodbutcher
Platinum Donating Member
 
Posts: 4187
Images: 45
Joined: Fri Mar 10, 2006 10:01 pm
Location: Chicago Suburbs

Postby aggie79 » Sun Aug 01, 2010 3:08 pm

:thumbsup: Thanks for the nice words about our teardrop.

I already let the cat out of the bag of my long weekend's accomplishments, but besides getting the wheels and tires on the Silver Beatle, I was able to finish a bunch of time consuming details.

The biggest focus was on the doors. I liked the look of the RV locks that Mark (Planovet) used, so I changed my plan to use these. I had already mortised the doors for mortise locksets, so the first thing was to fill the mortises. Then I went about trying to figure out how to install the RV locksets.

Image

Using a series of different jigs, I cut and routed the lockset openings.

Image

I then epoxied the outer plywood skin of the doors and door edges. After the epoxy cured - I waited until the next day - I applied 3M 4200 around the perimeter and openings to hold the aluminum in place.

Image

After the sealant set, I routed the openings in the aluminum.

Image

The last thing I did related to the doors was to mock up my hinges to be sure they were aligned and would open. I'll take off one side of the plywood and use this jig to drill the hinge holes into the teardrop.

Image

I then moved back to the teardrop to permanently attach the shell to the frame. I'm using a combination of 3/16" SS trailer deck screws at 12" on center and 5 - 5/16" SS lag bolts per side. I finished about half of them and then got bored, so the last thing I did this long weekend was to mock up the fenders.

Image

Aesthetically, I had hoped that my fenders would be even with the bottom of the sidewalls. I tried to calculate all the dimensions and variables, and eventually gave up, but as dumb luck would have it, the fenders are in the location I was hoping.

Thank you,
Tom
Last edited by aggie79 on Sun Aug 01, 2010 9:44 pm, edited 3 times in total.
Tom (& Linda)
For build info on our former Silver Beatle teardrop:
Build Thread

93503
User avatar
aggie79
Super Duper Lifetime Member
 
Posts: 5405
Images: 686
Joined: Tue Aug 07, 2007 5:42 pm
Location: Watauga, Texas

Postby Lookfar » Sun Aug 01, 2010 3:18 pm

This is really coming out nicely, you're on quite a roll. And I'll admit, I'm a big fan of dumb luck.
Butch
Image
User avatar
Lookfar
Donating Member
 
Posts: 225
Images: 22
Joined: Sun Jan 31, 2010 9:58 am
Location: Arkansas
Top

Postby S. Heisley » Sun Aug 01, 2010 6:10 pm

So far, Tom, you've got a huge "Cool" factor going. :thumbsup: With your attention to detail, it can only get better. :)
User avatar
S. Heisley
Super Lifetime Member
 
Posts: 8774
Images: 495
Joined: Mon Sep 17, 2007 10:02 am
Location: No. California
Top

Postby 2bits » Sun Aug 01, 2010 7:08 pm

I like how careful you are in mocking up a sample piece many times to let the surprises come out then. Very smart!

Sooo... How many times have you looked at the photograph with the fenders mocked up?!?!? I would be looking at it all the time hehe
Thomas

Image
User avatar
2bits
2bit Member
 
Posts: 5130
Images: 8
Joined: Thu Dec 27, 2007 6:04 pm
Location: Lake Tawakoni, TX
Top

Postby StPatron » Tue Aug 03, 2010 11:01 pm

WOW!

Lookin' super as I expected. You're quite the craftsman, Tom, I like your template approach. Great ideas.

I'm saving those pics of your door/locks, and will use them as a guide when I start on mine. Many thanks for the pics. :thumbsup:
User avatar
StPatron
Donating Member
 
Posts: 748
Images: 297
Joined: Tue Dec 15, 2009 8:38 pm
Location: OK
Top

Postby J.Heyboer » Wed Aug 04, 2010 11:32 am

Those doors look sharp! Keep up the good work!

John
User avatar
J.Heyboer
Teardrop Advisor
 
Posts: 93
Images: 84
Joined: Mon Apr 19, 2010 12:00 pm
Location: Zeeland, MI
Top

Postby planovet » Wed Aug 04, 2010 11:41 am

aggie79 wrote:Image

Using a series of different jigs, I cut and routed the lockset openings.

Image


Looks good Tom! :thumbsup:

I like the way you did your locks. I didn't use a jig, just cut the hole and then trimmed away wood a little at a time until I could slide the lockset in. Also my door was completely finished when I did mine, made it much harder.
ImageMark (& Cindi)
Visit our website: Little Swiss Teardrop

I was wondering why the water balloon was getting bigger... and then it hit me.

ImageImageImageImage
User avatar
planovet
The Cat Man
 
Posts: 5583
Images: 3
Joined: Tue Nov 27, 2007 4:48 pm
Location: Plano, Texas
Top

Postby aggie79 » Sun Aug 15, 2010 2:32 pm

:? Ugghh...it was 87 degrees at 7:00 this morning when I headed out to the garage.

The heat has slowed me down but not stopped me. I've been busy doing a bunch of uninteresting details the last two weeks. My main projects have been: finishing the aluminum work, building the interior door surrounds, and deciding a fender location and drilling holes for the carriage bolts to attach the fenders to the sidewalls.

When I attached the aluminum to my teardrop, I rough cut the door openings. I needed to come back with a router and trim the aluminum to the openings in the sidewalls.

Image

It's kind of messy, but a router does a nice job on the aluminum. It does throw aluminum "sawdust" everywhere.

Image

While I had those tools out, I also cut out and trimmed the opening for my electrical inlet.

Image

I agonized over where to locate the fenders. Once I found a location I liked, I traced the outline on the sidewall. Stainless steel carriage bolts will be used to attach the fenders to the sidewalls. Rather than freehand drilling the holes, I made a template out of some scrap 3/4' mdf.

Image

The template is in place. Now its time to gather courage to drill the holes.

Image

Holes are drilled in the sidewalls.

Image

Now its time for for the fender holes.

Image

I drilled the holes in the fenders 1/16" larger than the sidewalls to give me a little wiggle room when installing them.

Image

It's 2:30 pm on Sunday, the temperature is 94 degrees (with a heat index of 100) and I am spent. Still a productive last two weeks.
Tom (& Linda)
For build info on our former Silver Beatle teardrop:
Build Thread

93503
User avatar
aggie79
Super Duper Lifetime Member
 
Posts: 5405
Images: 686
Joined: Tue Aug 07, 2007 5:42 pm
Location: Watauga, Texas
Top

Postby 2bits » Sun Aug 15, 2010 3:20 pm

Great work Tom, you can have the rest of the afternoon off! I am about to START working on mine for the day, we'll see how long I last.

So once the fenders are on, it is just finishing up the doors mainly?

Thanks for taking all the time to post the photos with the commentary, I know you would probably rather be laying on the couch! LOL
Thomas

Image
User avatar
2bits
2bit Member
 
Posts: 5130
Images: 8
Joined: Thu Dec 27, 2007 6:04 pm
Location: Lake Tawakoni, TX
Top

Postby aggie79 » Mon Aug 16, 2010 8:26 am

2bits wrote:Great work Tom, you can have the rest of the afternoon off! I am about to START working on mine for the day, we'll see how long I last.


Thanks, Thomas.

The temparture on Sunday didn't get as high as it had been. I just the think it was a cumulative effect from working on the teardrop on weeknights and Saturday. Hopefully you survived the heat.

2bits wrote:So once the fenders are on, it is just finishing up the doors mainly?


To get it campable, I need to finish and hang the doors, install the trailer lighting, Frankenstein my Petcool until I can get the TD electrical system in, and decide how I'm going to keep the hatch closed. Of course, fenders are optional for the first outing!

Tom
Last edited by aggie79 on Mon Aug 16, 2010 8:58 am, edited 1 time in total.
Tom (& Linda)
For build info on our former Silver Beatle teardrop:
Build Thread

93503
User avatar
aggie79
Super Duper Lifetime Member
 
Posts: 5405
Images: 686
Joined: Tue Aug 07, 2007 5:42 pm
Location: Watauga, Texas
Top

Postby planovet » Mon Aug 16, 2010 8:37 am

aggie79 wrote:The temperature on Sunday didn't get as high as it had been.


Really? The high yesterday was 103 at the airport. Pretty much par for the course the past 2 weeks. :?

Good progress! :thumbsup:
ImageMark (& Cindi)
Visit our website: Little Swiss Teardrop

I was wondering why the water balloon was getting bigger... and then it hit me.

ImageImageImageImage
User avatar
planovet
The Cat Man
 
Posts: 5583
Images: 3
Joined: Tue Nov 27, 2007 4:48 pm
Location: Plano, Texas
Top

Postby 2bits » Mon Aug 16, 2010 9:04 pm

Tom, Well placed ratchet straps may do the trick in a pinch for that hatch! I am looking into an additional method for mine too since mine just has 1/8" of rod going into each side. I fear big bumps...
Last edited by 2bits on Thu Aug 19, 2010 9:40 pm, edited 1 time in total.
Thomas

Image
User avatar
2bits
2bit Member
 
Posts: 5130
Images: 8
Joined: Thu Dec 27, 2007 6:04 pm
Location: Lake Tawakoni, TX
Top

Postby oklahomajewel » Thu Aug 19, 2010 9:22 pm

Great work Tom ....


Would someone come work on mine please?
Some things are way over my head !! ...but it keeps me looking UP!
oklahomajewel
3000 Club
3000 Club
 
Posts: 3693
Images: 82
Joined: Fri Jul 22, 2005 11:12 am
Location: McLoud, OK
Top

Postby aggie79 » Sun Aug 22, 2010 8:39 pm

Thanks y'all for keeping motivated.

I didn't get much time to work this weekend, but I did get the doors hung. I've been putting this off, not wanting to mess up the aluminum with a bunch of holes. As it turned out, they almost fell into place.

Image

And they even open without binding.

Image

Now, I need to pull them off to add the aluminum trim to the doors and the opening and add the door surrround.

I also bolted in the stabilizer jacks at the rear and started fitting out my tongue box to house my Petcool.

:thumbsup: Gig'em!
Tom (& Linda)
For build info on our former Silver Beatle teardrop:
Build Thread

93503
User avatar
aggie79
Super Duper Lifetime Member
 
Posts: 5405
Images: 686
Joined: Tue Aug 07, 2007 5:42 pm
Location: Watauga, Texas
Top

PreviousNext

Return to Build Journals

Who is online

Users browsing this forum: No registered users and 31 guests