Silver Beatle - She's now with an old friend!

...ask your questions in the appropriate forums BUT document your build here...preferably in a single thread...dates for updates, are appreciated....

Postby aggie79 » Wed May 19, 2010 8:13 pm

Pressing onward...sort of. I haven't had much time to work on the SB in the last two weeks, but I did manage to get time to do some epoxying.

First up - epoxying the inside edges of the hatch.

Image

Then I added a second coat of epoxy to the tongue box that will house my Petcool.

Image

Image

Hopefully this weekend, I'll have some time to apply the aluminum to the hatch. Then I can begin adding the edge trim.
Tom (& Linda)
For build info on our former Silver Beatle teardrop:
Build Thread

93503
User avatar
aggie79
Super Duper Lifetime Member
 
Posts: 5405
Images: 686
Joined: Tue Aug 07, 2007 5:42 pm
Location: Watauga, Texas

Postby Cliffmeister2000 » Wed May 19, 2010 11:19 pm

Very sharp! :thumbsup:
God Bless

Cliff

♥God. ♥People.
1 John 4:9-11

My Teardrop build pictures
User avatar
Cliffmeister2000
Titanium Donating Member
 
Posts: 3622
Images: 157
Joined: Thu Jul 26, 2007 10:18 pm
Location: Phoenix, AZ

Postby aggie79 » Sat Jun 05, 2010 8:59 pm

I was able to work today and the last few nights - 100 degree weather be darned.

The "skinning" of the Silver Beatle continues. First up, I added aluminum to the underside of the hatch edge. The aluminum is adhered with 3M 4200.

Image

After a little set time, I flipped the hatch over and began applying the skin. As it turns out, I need to use two sections of aluminum on the hatch. The first section as applied to the bottom of the hatch. I used 3M 4200 around the perimeter, tacked the skin in place with staples, and clamped the assembly.

Image

I then turned the hatch around and added the second section of aluminum. The aluminum is overlapped to form a seam. Screws are used along the seam edge.

Image

Next, I installed the hatch hinge sections on the teardrop and the hatch.

Image

Image

Then I finished the day, by starting to fit the edge trim.

Image

That will do it for this weekend.
Tom (& Linda)
For build info on our former Silver Beatle teardrop:
Build Thread

93503
User avatar
aggie79
Super Duper Lifetime Member
 
Posts: 5405
Images: 686
Joined: Tue Aug 07, 2007 5:42 pm
Location: Watauga, Texas
Top

Postby S. Heisley » Sun Jun 06, 2010 11:14 am

It appears that the build is picking up speed! :)

.....It's looking good like we knew it would! :thumbsup:
User avatar
S. Heisley
Super Lifetime Member
 
Posts: 8774
Images: 495
Joined: Mon Sep 17, 2007 10:02 am
Location: No. California
Top

Postby 2bits » Sun Jun 06, 2010 4:31 pm

Looking good Tom! Wow, I can't wait to see it when you pull the plastic off the aluminum! Is it going to be OK to do it after the edge trim, or are you going to pull it off the edges first? It is REALLY coming together!

Yeah even thought it has been 100 every day, every night has been pretty nice, well, not 100 anyway haha... I really think hitting Loyd Park in Sept will be no problem for you and LCG you will be well done! Just keep it up, summer's comin but you can do it!

I need to line the underside edge of my hatch with a strip of aluminum like you did, that is a good idea! I love the look of the curve in the rear, it might have been a bit scary to make, but it really looks great!

:thumbsup:
Thomas

Image
User avatar
2bits
2bit Member
 
Posts: 5130
Images: 8
Joined: Thu Dec 27, 2007 6:04 pm
Location: Lake Tawakoni, TX
Top

Postby aggie79 » Thu Jul 15, 2010 10:54 pm

Hey Thomas,

The 100-degree heat got to us so we took a week vacation to Portland, Seattle, and Vancouver. The high temperature was 74 degrees.

Between work and vacation and oppressive heat, I haven't worked on my teardrop much. Plus, I've been installing trim and that's about as exciting to report as paint drying.

My procedure has been to test fit and then install. I was putting off fitting the edge trim for the hatch. I don't have a picture of it (lost my camera on vacation) but I used a piece of plywood cut to the profile of the hatch to bend and shape the trim. I then placed it on the hatch to drill holes for the rivets that will fasten it in place. I used 1/8" plywood as spacers.

Image

Image

I made some rain diverters for below the hatch hinge out of 3/4" aluminum angle.

Image

Image

Then I started permanently installing the trim. I used 3M 4200 as a sealant under the trim.

First the rain diverters:

Image

Then the front sections of RV edge trim:

Image

Then the roof sections of the trim back to the galley hinge:

Image

This weekend, I'm going to install the hatch trim and the trim along the bottom of the sidewall, and hopefully get my doors going.
Tom (& Linda)
For build info on our former Silver Beatle teardrop:
Build Thread

93503
User avatar
aggie79
Super Duper Lifetime Member
 
Posts: 5405
Images: 686
Joined: Tue Aug 07, 2007 5:42 pm
Location: Watauga, Texas
Top

Postby 2bits » Thu Jul 15, 2010 11:42 pm

I guess I like watching paint dry because those photos are good to see! When I did my roof trim, I just pushed mine slowly around the angle and used my knee to help shape it. I wish I had my dad's "bender" that he made. He does solar screens and uses it to bed the trim sweetly. I think your method is good though because your side overhang looks to hang over more than mine does.

I love the rain diverters. I need to epoxy my one poxy hatch corner to seal up that exposed area then make me some rain diverters too, I think driving in the rain opens up leaks more than sitting in the park where you can protect it. Thanks for reminding me!

I hope you guys had a great time on the vacation! that is great to get away!
Thomas

Image
User avatar
2bits
2bit Member
 
Posts: 5130
Images: 8
Joined: Thu Dec 27, 2007 6:04 pm
Location: Lake Tawakoni, TX
Top

Postby grizz » Fri Jul 16, 2010 12:16 am

Absolutely great progress.

Your finishing is great and the rain diverters are something I never did. Would look at doing it next time though.
Greetings from England.

Rian.


Hoping to get it all done in time.
User avatar
grizz
1000 Club
1000 Club
 
Posts: 1210
Images: 29
Joined: Mon Sep 21, 2009 2:37 pm
Location: Rochester, Kent, UK
Top

Postby Lookfar » Fri Jul 16, 2010 6:01 am

Tom;
I'm with Thomas and Grizz, good to seem some photo's again. The rain diverter looks good, and another idea worth stealing. Of course, I'm not quite ready for them yet.
Look forward to seeing you at LCG V.
Butch
Image
User avatar
Lookfar
Donating Member
 
Posts: 225
Images: 22
Joined: Sun Jan 31, 2010 9:58 am
Location: Arkansas
Top

Postby planovet » Fri Jul 16, 2010 9:06 am

Getting closer! :twisted:
ImageMark (& Cindi)
Visit our website: Little Swiss Teardrop

I was wondering why the water balloon was getting bigger... and then it hit me.

ImageImageImageImage
User avatar
planovet
The Cat Man
 
Posts: 5583
Images: 3
Joined: Tue Nov 27, 2007 4:48 pm
Location: Plano, Texas
Top

Postby aggie79 » Fri Jul 16, 2010 11:31 am

Thanks all for the nice comments. It feels good to get the build moving along.

2bits wrote:I love the rain diverters. I need to epoxy my one poxy hatch corner to seal up that exposed area then make me some rain diverters too, I think driving in the rain opens up leaks more than sitting in the park where you can protect it. Thanks for reminding me!


grizz wrote:Your finishing is great and the rain diverters are something I never did. Would look at doing it next time though.


Lookfar wrote:The rain diverter looks good, and another idea worth stealing.


Continuing my theme of no new original ideas, I borrowed the rain diverter detail from "halfdome, Danny".

planovet wrote:Getting closer! :twisted:


Mark, I'm now thinking the light at the end of the tunnel may not be a train. I'm taking a few days off from work in August to "make the big push" to being campable by end of September for the Loyd Park outing. Come you know what it'll be campable for the LCG V outing at the end of October.

Tom
Tom (& Linda)
For build info on our former Silver Beatle teardrop:
Build Thread

93503
User avatar
aggie79
Super Duper Lifetime Member
 
Posts: 5405
Images: 686
Joined: Tue Aug 07, 2007 5:42 pm
Location: Watauga, Texas
Top

Postby tonyj » Fri Jul 16, 2010 1:57 pm

Don't worry--you have plenty of time for it to not be finished by the LCG. :D

My suggestion always is to make sure it is waterproof (or at least, water tolerable) before you consider it campable. You don't want to have the weather backtrack your hard earned progress just to get to the first campout.
Still graced with two eyes and ten fingers (due in no small part to luck!).

Just when you think a problem is solved, an uglier result replaces it.

tony
User avatar
tonyj
Super Lifetime Member
 
Posts: 2468
Images: 160
Joined: Mon Sep 26, 2005 10:18 pm
Location: Texas, Corpus Christi
Top

Postby aggie79 » Mon Jul 19, 2010 7:21 am

Whew! :?

100+ degree temperature and 85+ percent humidity be darned.

Image

Since it couldn't be seen, I was going to paint the lower back roll pan (below the galley lid) black instead of skinning it with aluminum, but I knew it would be one of those things that bugged me if I didn't do it. So...

Image

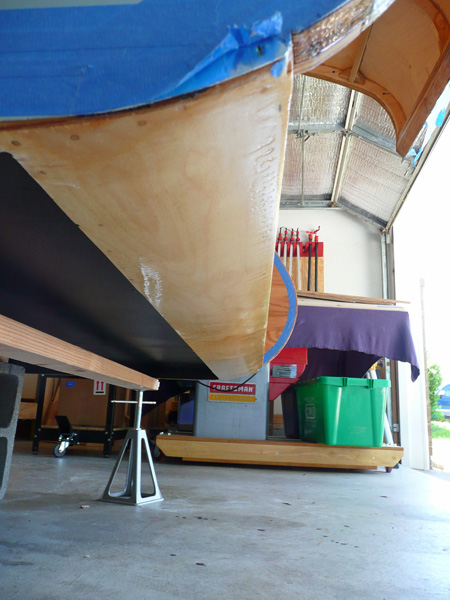
It is now in place. (I think I feel better.)

Image

Then I finished all of the trim at the bottom of the teardrop sidewalls. (The heat must have been getting to me because I didn't get any pictures.)

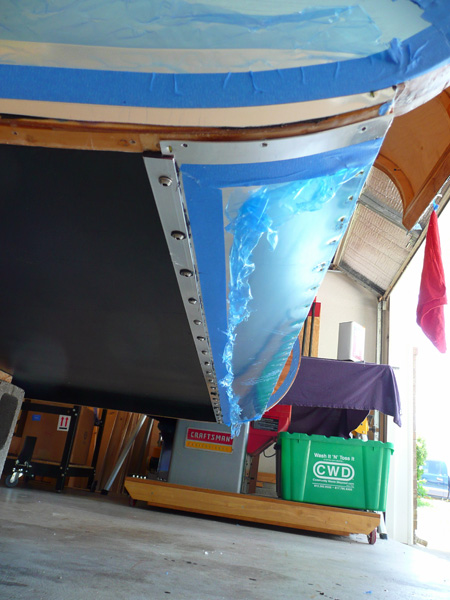
With the bottom trim done, I can now set the teardrop shell back on the frame. But before I did, I covered the top of the frame with window weathershield wrap. (I'll be using deck screws to attach the shell to the frame, and thought the wrap would help prevent any water intrusion.)

Image

This stuff sticks like mad anyway, but with a black frame baking in the heat it almost welded itself to the frame. I then put the teadrop shell back on the frame. (It will be screwed down later.)

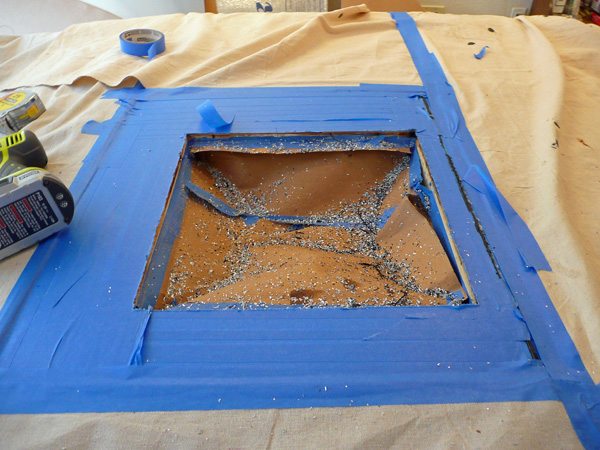
Last item for the weekend was to cut opening for the vent fan. After a little masking with tape, the el cheapo HF trim router was doing a good job on the aluminum.

Image

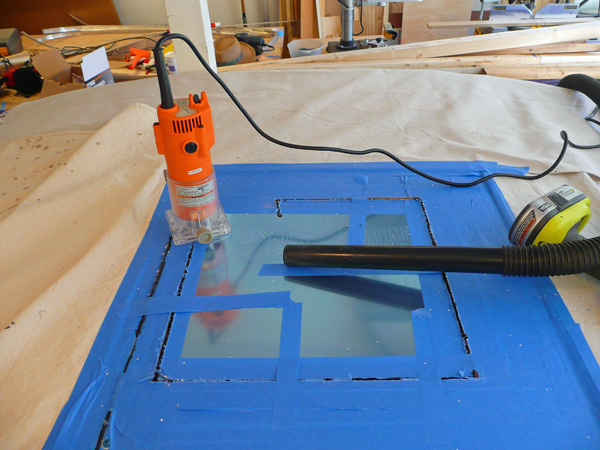
And, we have a hole for the fan!

Image

Not shown, but all my aluminum edging and trim is complete except for doors and permanently attaching the hatch edging.

That summed up my weekend. Time for some cold adult beverages.

:thumbsup: Gig'em, Tom
Last edited by aggie79 on Mon Jul 19, 2010 4:09 pm, edited 1 time in total.
Tom (& Linda)
For build info on our former Silver Beatle teardrop:
Build Thread

93503
User avatar
aggie79
Super Duper Lifetime Member
 
Posts: 5405
Images: 686
Joined: Tue Aug 07, 2007 5:42 pm
Location: Watauga, Texas
Top

Postby S. Heisley » Mon Jul 19, 2010 3:04 pm

Yup! Gotta say it. Your use of painters' masking tape beats the amount I use by a mile! :lol: (Nothing wrong with that...better too much than too little.)
User avatar
S. Heisley
Super Lifetime Member
 
Posts: 8774
Images: 495
Joined: Mon Sep 17, 2007 10:02 am
Location: No. California
Top

Postby 2bits » Mon Jul 19, 2010 10:15 pm

Hey Tom, Good job getting out there in the heat! I still haven't cleaned up the garage from getting home from the Sweat Fest at Loyd Park in June. Before the Sept camping season begins, I want to do my epoxy fix, and redo all my edge sticker "trim" in the lighter wood color, and fix my high fan switch on my AC unit, but hey this is your thread!

You will thank yourself for that roll pan aluminum when you take those low angle shots of it parked neatly in it's spot on your many camping trips to come! I am itching to camp so bad now! I am missing July and August!

So you say you are attaching the wood shell to the frame with deck screws? How many are you planning? That scares me a little at first thought, but I know you think things through, so I was just wondering since I used big-ole-bolts with nuts on the end.

I like the way you caught all the shavings when you cut the roof vent hole, very nice! :thumbsup:
Thomas

Image
User avatar
2bits
2bit Member
 
Posts: 5130
Images: 8
Joined: Thu Dec 27, 2007 6:04 pm
Location: Lake Tawakoni, TX
Top

PreviousNext

Return to Build Journals

Who is online

Users browsing this forum: No registered users and 34 guests