Northwestern Build - Updated 7/4/2010 - Done!

...ask your questions in the appropriate forums BUT document your build here...preferably in a single thread...dates for updates, are appreciated....

Postby wlivesey » Sat Jun 27, 2009 5:05 pm

the pvc bike guy wrote:won't that be heavy to lift to the up position for sitting or is there a helper to lift the back. O were did you get your plans?


It shouldn't be too heavy - not with gas struts for extra muscle. I drew up the plans myself. My design is based upon the Winter Warrior.
User avatar
wlivesey
The 300 Club
 
Posts: 469
Images: 283
Joined: Sun Aug 12, 2007 1:22 pm
Location: DFW, Texas

Postby wlivesey » Sat Jun 27, 2009 5:28 pm

wlivesey wrote:I went to home depot last night and took a look at the Lexan (and Plexiglass) they had on the shelf. I don't recall how thick it was but it was VERY easy to bend. The Plexi, on the other hand was very stiff. I've seen a few other threads where folks talked about heat forming etc. It didn't seem as though it would be nessesary with the Lexan. Of course, it may just be that what I was looking at was too thin. Surely, thicker Lexan would be harder to bend.


Back the the Lexan conversation - I went back to Home Depot to take another look at what they had on the shelf. They carry 3/32 Lexan in just about any size sheet you could want. It seems that 3/32 is the minimum recommended thickness for a windsheild ON A RACECAR! It seems pretty thin but I know the stuff is strong.

As for flexibility, take a look at the pics below. My wife wasn't even trying... It's very easy to bend.

Image

I like that both sides are UV protected with a 10yr warranty.

Image
User avatar
wlivesey
The 300 Club
 
Posts: 469
Images: 283
Joined: Sun Aug 12, 2007 1:22 pm
Location: DFW, Texas

Postby chorizon » Sat Jun 27, 2009 5:37 pm

wlivesey wrote: It seems that 3/32 is the minimum recommended thickness for a windsheild ON A RACECAR! It seems pretty thin but I know the stuff is strong.


Just for fun I took some drops of lexan from some parts I was working on and conducted a little experiment. They were 1/8" thick and I sandwiched 4 pieces with some kant-twist clamps. I then conducted a little ballistic projectile experiment which involved a .22 rifle. The bullet penetrated the first layer and stopped in the middle of the second. The total weight of everything clamped up was maybe 2# or so, and it didn't really move as the bullet struck, so the bullet transferred pretty close to full momentum with respect to the lexan. Strong Stuff!
User avatar
chorizon
Platinum Donating Member
 
Posts: 871
Images: 94
Joined: Tue Feb 26, 2008 12:44 pm
Location: Austin, Texas
Top

Postby bobhenry » Sun Jun 28, 2009 5:46 am

wlivesey wrote: How did you attach/seal the lexan to your tear?


I screwed it directlly to the spars. You must predrill a slightly oversized hole and I used rosettes to distribute the pressure. I set it into a heavy bead of 100% silicone acrossed each spar and the sidewalls. It overhangs the sides about 1" and I also caulked under this overhang with the same 100% silicone. Ice dam tape was used at the seams. This stuff is great sticky as hell rubber gasket like material, works great at the hatch hinge also. To form large curves I used large ratchet straps and on 3-4 concetive hot as hell days I just tighted a bit and next day a bit more ad the next day a bit more always waiting for the resounding
" CRACK" but it never came.

Image

In this pic you can see the 2 outboard rosettes and 2 at the center seam.

For your window or skylite I would simply screw the lexan directly to some formed wooden bows as your window casing. I would then use some 1 " aluminum flat stock in place of the rosettes to sandwich the lexan between the wood casing and the aluminum trim . I would use the ice damn tape cut into small 1 1/2 strips and stick it to the casing then fold it longways so the sticky is also facing the lexan.This forms a horse shoe so any mosisture has no way of getting inside. Tip: a few small brad nails will help hold the looped material in place while you seat the lexan in it's new home. Place another small strip under the aluminum trim and you are good to go.
Growing older but not up !
User avatar
bobhenry
Ten Grand Club
Ten Grand Club
 
Posts: 10355
Images: 2614
Joined: Fri Feb 09, 2007 7:49 am
Location: INDIANA, LINDEN
Top

Postby wlivesey » Sun Jun 28, 2009 9:35 pm

My wife and I didn't get much done this weekend. We really only got a template made for the hatch. We should start framing it up this week.

We made a 6 inch grid on a sheet of plywood. I also made a 6 inch grid in sketchup. I then copied the grid/hatch intersections, per sketchup, onto the plywood. After that I just played connect the dots, cut it out with a jig saw and smoothed it out with the belt sander.

Image

Image

Image

Image

We did experiment with the interior finish. This is birch ply, with a coat of sanding sealer followed by two coats of pickling stain and two coats of satin polycrylic. I think it needs one more coat of polycrylic before it's done. I'm really impressed with how closely this matches the Airstream interior I posted previously. Thanks a bunch!! You guys really helped me get the look I was going for.

Image
User avatar
wlivesey
The 300 Club
 
Posts: 469
Images: 283
Joined: Sun Aug 12, 2007 1:22 pm
Location: DFW, Texas
Top

Postby wlivesey » Wed Jul 01, 2009 9:17 pm

We got the hatch sides framed out this evening. This turned out to be a pretty easy to do. We used the plywood template to layout the pieces and get all of our angles right. After both sides of the hatch were framed, we clamped them together and used the belt sander to get them to match perfectly.

Image

Image

It's starting to look like a trailer!

Image
User avatar
wlivesey
The 300 Club
 
Posts: 469
Images: 283
Joined: Sun Aug 12, 2007 1:22 pm
Location: DFW, Texas
Top

July 4th Progress

Postby wlivesey » Sat Jul 04, 2009 9:20 pm

I couldn't resist the opportunity to hook the Northwestern up behind my FJ. I think it looks pretty good.

Image

We got one interior wall skinned today. We seriously considered Birch or Ash but ultimately decided to go with Oak.

Image

Image
User avatar
wlivesey
The 300 Club
 
Posts: 469
Images: 283
Joined: Sun Aug 12, 2007 1:22 pm
Location: DFW, Texas
Top

Postby S. Heisley » Sat Jul 04, 2009 11:33 pm

wlivesey wrote:
I couldn't resist the opportunity to hook the Northwestern up behind my FJ. I think it looks pretty good.


It does! :thumbsup: I think I'm going to be jealous! :)

Keep up the good work. I can't wait to see more!
User avatar
S. Heisley
Super Lifetime Member
 
Posts: 8774
Images: 495
Joined: Mon Sep 17, 2007 10:02 am
Location: No. California
Top

Postby stomperxj » Sun Jul 05, 2009 11:49 am

Great progress Bill. Looks awesome. Beautiful framing :thumbsup:
User avatar
stomperxj
The 300 Club
 
Posts: 395
Images: 1
Joined: Tue Jul 29, 2008 12:25 am
Location: Kuna ID
Top

Postby aggie79 » Sun Jul 05, 2009 6:41 pm

Great job Bill! :applause:

I need to stop by your home pretty soon or you'll be done.

Tom
Tom (& Linda)
For build info on our former Silver Beatle teardrop:
Build Thread

93503
User avatar
aggie79
Super Duper Lifetime Member
 
Posts: 5405
Images: 686
Joined: Tue Aug 07, 2007 5:42 pm
Location: Watauga, Texas
Top

Postby wlivesey » Mon Jul 06, 2009 6:19 am

Thanks everyone! We've gotten the other wall skinned and we're moving on to the hatch today. We will skin the interior of the hatch, then put in a few roof bows. With any luck, the hatch will be functional soon. I'll post pictures this evening.
User avatar
wlivesey
The 300 Club
 
Posts: 469
Images: 283
Joined: Sun Aug 12, 2007 1:22 pm
Location: DFW, Texas
Top

Postby wlivesey » Mon Jul 06, 2009 10:28 pm

Its been a long day... Thankfully, a "cold" front came through last night and made for really comfortable conditions in the garage.

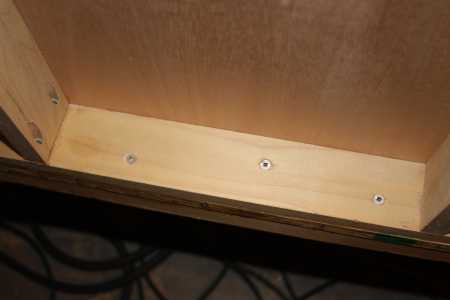
Both walls are now skinned and permanently attached to the floor. I cannot believe how strong this trailer is. I knew it would be strong, but once we attached the sides to the floor with [countless] stainless steel screws, the strength of the walls, and trailer in general, became much more apparent. I can't even begin to explain how strong it is!

2.25 inch Stainless Steel screws.
Image

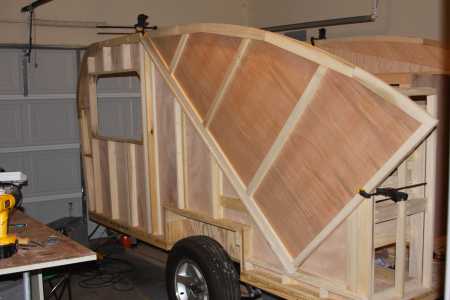
The interior hatch sides are skinned...

Image

For those who are interested in a Winter Warrior style hatch, here is what I have done. This is a big topic of research for me before I started my build.

The front most end of the hatch side extends about 3 inches in front of the hinge point. I've made this end rounded, with about a 3 inch radius, so when the hatch opens, the leading edge just pivots in place without opening up any unnecessary gaps. This will give me more room for weather strips on the leading end of the hatch. The angular part, just in front of the hatch, will be made to match the radius soon.

Image

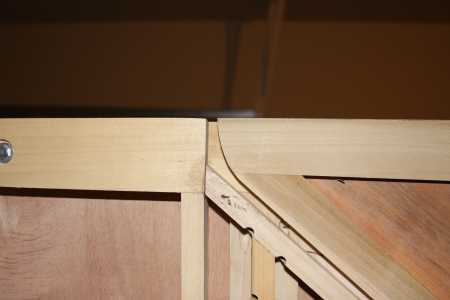
Here is a top view of the hinge point. You can see that I've left a gap between the hatch on the side wall. I'll put a nice thick weather strip in here. The gap looks bigger than it will be. I've still got exterior skin that needs to go in there as well. There should be a .25 inch gap for a weather strip when I'm done.

Image

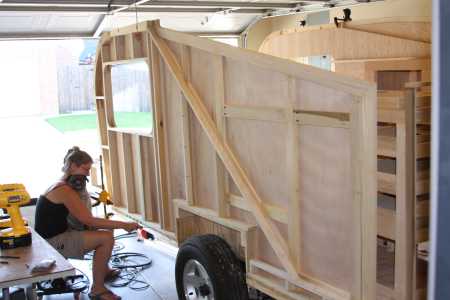
Boston is helping (supervising) mom on a little glue cleanup.

Image

Next on the agenda is some roof bows. I can't wait to see a functional hatch!
User avatar
wlivesey
The 300 Club
 
Posts: 469
Images: 283
Joined: Sun Aug 12, 2007 1:22 pm
Location: DFW, Texas
Top

Postby starleen2 » Mon Jul 06, 2009 10:36 pm

wlivesey wrote:Next on the agenda is some roof bows. I can't wait to see a functional hatch!


I hope you mean spars? I put a compound bow on mine and like to never got the ply to shape right. I had to cut individual strips and layer them up with fibreglass on the joints. Let me tell you - that's one heck of a job. you're lookin' good so far. Our lady bug is finished (the Spots are on!)and making its first trip this week to Lake Bob Sandlin
User avatar
starleen2
5th Teardrop Club
 
Posts: 16272
Images: 224
Joined: Sat May 12, 2007 8:26 pm
Location: Pea Ridge ,AR
Top

Postby wlivesey » Mon Jul 06, 2009 10:44 pm

starleen2 wrote:
wlivesey wrote:Next on the agenda is some roof bows. I can't wait to see a functional hatch!


I hope you mean spars? I put a compound bow on mine and like to never got the ply to shape right. I had to cut individual strips and layer them up with fibreglass on the joints. Let me tell you - that's one heck of a job. you're lookin' good so far. Our lady bug is finished (the Spots are on!)and making its first trip this week to Lake Bob Sandlin


That's right, spars. I've always heard them called bows - incorrectly. My spars will be nice and flat fron side to side. I've got plenty of curvature from front to back to prevent any standing water.
User avatar
wlivesey
The 300 Club
 
Posts: 469
Images: 283
Joined: Sun Aug 12, 2007 1:22 pm
Location: DFW, Texas
Top

Postby Miriam C. » Thu Jul 09, 2009 11:30 am

:applause: :thumbsup: :thumbsup:
Can't wait for the finish. Your WW is looking fantastic.

Image
“Forgiveness means giving up all hope for a better past.â€
User avatar
Miriam C.
our Aunti M
 
Posts: 19675
Images: 148
Joined: Wed Feb 15, 2006 3:14 pm
Location: Southwest MO
Top

PreviousNext

Return to Build Journals

Who is online

Users browsing this forum: No registered users and 34 guests