Building The Atma Travelear Teardrop

...ask your questions in the appropriate forums BUT document your build here...preferably in a single thread...dates for updates, are appreciated....

Re: Building The Atma Travelear Teardrop - Update 9/04 pg 29

Postby aggie79 » Tue Sep 04, 2012 10:20 am

Very nice Dave (as usual from you)! :applause: :thumbsup: :applause:

The t-molding is very soft aluminum. What I did to eliminate the "curl" was to use a large piece of 3/4" MDF - about 4-5 times the area of the radius - and overlay it on the radius and surrouding area. Then very lightly tap the MDF with a dead blow hammer until the "curl" becomes the same plane as the t-molding on the straight portions of the door.

Take care,
Tom
Tom (& Linda)
For build info on our former Silver Beatle teardrop:
Build Thread

93503
User avatar
aggie79
Super Duper Lifetime Member
 
Posts: 5405
Images: 686
Joined: Tue Aug 07, 2007 5:42 pm
Location: Watauga, Texas

Re: Building The Atma Travelear Teardrop - Update 9/04 pg 29

Postby DMcCam » Tue Sep 04, 2012 10:37 am

Wow, Thanks Tom!!! So you're making a radius to cover the inside of the 'T' from the center to the inner edge overlaying the door face? Then you 'message' it with the dead blow hammer. I assume you'd tape the door face under the MDF too?

Thanks again Sir,

Dave
User avatar
DMcCam
Gold Donating Member
 
Posts: 883
Joined: Wed Jan 06, 2010 8:30 pm
Location: Reno, Nevada

Re: Building The Atma Travelear Teardrop - Update 9/04 pg 29

Postby aggie79 » Tue Sep 04, 2012 3:17 pm

DMcCam wrote:Wow, Thanks Tom!!! So you're making a radius to cover the inside of the 'T' from the center to the inner edge overlaying the door face? Then you 'message' it with the dead blow hammer. I assume you'd tape the door face under the MDF too?

Thanks again Sir,

Dave


Hi Dave,

I'm a big fan of blue tape! :lol: On a serious note, it does keep the aluminum from scratching. The radius I was talking about was at top of my door. Although it is no where as tight a radius as on your doors, the aluminum t-molding did curl. I used the MDF block and hammer technique on it. If you go a little too far on the bend, it is easy to straighten it out on the back side with a wood block.

Take care,
Tom
Tom (& Linda)
For build info on our former Silver Beatle teardrop:
Build Thread

93503
User avatar
aggie79
Super Duper Lifetime Member
 
Posts: 5405
Images: 686
Joined: Tue Aug 07, 2007 5:42 pm
Location: Watauga, Texas
Top

Vinyl for ATMA Travelear, test cut - -1

Postby PubUltraStar » Mon Sep 17, 2012 7:05 pm

I did a test run on printing your logo on vinyl tonight, and ran into a small issue. Based upon your original software, it looks like the Adobe Illustrator import did not 'weld' the entire image together, so the cutter made a number vertical cuts where we don't want them. Basically, any vertical path you have on the image is being taken by the cutter as a valid path.

Here is the sample file in Illustrator showing the vertical lines in red.
Image

It also cut most of the letters with a vertical line through them too.
Image

You'll notive that when removing the excess vinyl, due to the additional vertical cuts, iI accidentally removed a piece by the head. You can barely see the cuts in the final product, but you definitely want one continuous piece of vinyl.
Image

Here is one of the side logos as an example. At this point I need to see if there is an easy way in Illustrator to group all these vectors and create a solid path without the verticals for the cutter to follow. If you have any ideas, let me know. I just wanted to make sure you knew that I didn't forget about you.
Image
Image
There is always risk in being awesome!
http://www.diy-teardrop.com/
http://www.m2-photo.com
User avatar
PubUltraStar
Gold Donating Member
 
Posts: 184
Joined: Thu Jul 26, 2012 8:11 pm
Top

Re: Building The Atma Travelear Teardrop - Update 9/04 pg 29

Postby TRP » Mon Sep 17, 2012 7:12 pm

Hello Pub,

Ping me off thread, I'll see if I can get you set up. Which version of IL are you using? Mac? PC? (You mention a vinyl cutter, so I assume PC.)

Ted
User avatar
TRP
Silver Donating Member
 
Posts: 316
Images: 341
Joined: Wed Jun 27, 2012 2:50 pm
Location: Morgan Hill, CA
Top

Re: Building The Atma Travelear Teardrop - Update 9/04 pg 29

Postby DMcCam » Wed Sep 19, 2012 9:48 pm

Hi PubUltraStar, The graphics are looking awesome in vinyl!!! This is a common issue with Illustrator from CorelDraw original files. Illustrator wants to make a whole lot out of very little. After seeing what is happening, I think I have a simple solution. I sent the files to you directly exported from Corel to Illustrator. You can see that the issues are with areas that have holes like the letter 'R'. This works most of the time but when it doesn't, it usually can be corrected by converting all the paths to layers in Corel, then exporting. I'll send you a new file tomorrow. Sorry about the problems. It should be an easy fix from my end.

All the Best,

Dave
User avatar
DMcCam
Gold Donating Member
 
Posts: 883
Joined: Wed Jan 06, 2010 8:30 pm
Location: Reno, Nevada
Top

Re: Building The Atma Travelear Teardrop - Update 9/04 pg 29

Postby S. Heisley » Wed Sep 19, 2012 10:08 pm

You're almost finished! ...Love the logo! :thumbsup: :applause:
User avatar
S. Heisley
Super Lifetime Member
 
Posts: 8772
Images: 495
Joined: Mon Sep 17, 2007 10:02 am
Location: No. California
Top

Re: Building The Atma Travelear Teardrop - Update 9/04 pg 29

Postby PubUltraStar » Fri Sep 21, 2012 3:39 pm

Vinyl is cut. The updates you sent to the Illustrator files were perfect. I will roll them up and have them sent sometime next week. If you've never applied vinyl, please contact me first. If you don't use application fluid, it's sort of a one time shot. If you use the fluid, you can move the vinyl around a bit until it's positioned just right. I'm still negotiating to get my trailer started, but need to put up a shed to get the crap out of the garage, to have a work space for the build. I'll get there eventually.

Image

Also, thanks to the others who offered to help with the files. Very generous.
Image
There is always risk in being awesome!
http://www.diy-teardrop.com/
http://www.m2-photo.com
User avatar
PubUltraStar
Gold Donating Member
 
Posts: 184
Joined: Thu Jul 26, 2012 8:11 pm
Top

Re: Building The Atma Travelear Teardrop - Update 9/04 pg 29

Postby CliffinGA » Sat Sep 22, 2012 8:12 am

Wow I absolutely love the graphics and they are going to look gorgeous on the tear Dave!!! PubUltraStar you did a greatjob!!

Cliff :thumbsup:
In God we trust, shoot the rest and he will sort out!

My Build:

viewtopic.php?f=50&t=42628
User avatar
CliffinGA
1000 Club
1000 Club
 
Posts: 1499
Images: 207
Joined: Sat Nov 14, 2009 1:29 pm
Location: Jefferson, GA
Top

Re: Building The Atma Travelear Teardrop - Update 9/04 pg 29

Postby S. Heisley » Sat Sep 22, 2012 7:24 pm

CliffinGA wrote:Wow I absolutely love the graphics and they are going to look gorgeous on the tear Dave!!! PubUltraStar you did a greatjob!!

Cliff :thumbsup:


...Beautiful! :thumbsup: :applause:
User avatar
S. Heisley
Super Lifetime Member
 
Posts: 8772
Images: 495
Joined: Mon Sep 17, 2007 10:02 am
Location: No. California
Top

Re: Building The Atma Travelear Teardrop - Update 9/04 pg 29

Postby DMcCam » Tue Sep 25, 2012 10:54 pm

Thank you so much Mike, the graphics are going to be the icing on the cake!!! Please let me know if I can be of any help with your build sir! :applause: :applause: :applause:

Thank you both Cliff and Sharron for your continued support of my little project too. :thumbsup:

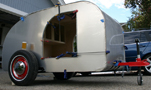
We didn't make it to Twain and Tears but we did work on the trailer a bit more over the weekend. The tongue box and hatch are ready for final trim and assembly.

Image
The aluminum went on very easily then we made a ton of aluminum 'sawdust'.

Image
While routing the passenger side, the platform slipped enough for the bit to camphor the edge a little. Thank God for molding huh?

Image
Now on to the hinge and trim.

Image
We finally got around to skinning the hatch with the .063 aluminum. Here it is with the vinyl contact cement in place. It takes two coats.

Image

Image
You can see the vinyl cement on the unfinished ply.

Image
We worked from the bottom edge to the hinge side placing clamps and bars where needed. Here I am checking the tightness of the clamps.

Image
I had to take one of my best pal Mark doing the same.

Image
This is how the whole thing got clamped up.

Image
The underside of the set up showing how we used cripples to hold up the bottom edge.

Image
My brother's always using the table and bits of plywood for make shift clamps.

Image
Another view.

Image

Image
The hatch is ready to finish.

All the best,

Dave
User avatar
DMcCam
Gold Donating Member
 
Posts: 883
Joined: Wed Jan 06, 2010 8:30 pm
Location: Reno, Nevada
Top

Re: Building The Atma Travelear Teardrop - Update 9/04 pg 29

Postby TRP » Wed Sep 26, 2012 10:14 am

Man, that's inspirational. Just looking at your hatch makes me want to redo mine.

I love what you're doing. I can't wait to start to skin mine.

Keep the updates coming,
Ted
User avatar
TRP
Silver Donating Member
 
Posts: 316
Images: 341
Joined: Wed Jun 27, 2012 2:50 pm
Location: Morgan Hill, CA
Top

Re: Building The Atma Travelear Teardrop - Update 9/04 pg 29

Postby DMcCam » Thu Sep 27, 2012 9:56 am

TRP wrote:Man, that's inspirational. Just looking at your hatch makes me want to redo mine. I love what you're doing. I can't wait to start to skin mine. Keep the updates coming,
Ted


Hi Ted, Thank you for kind compliments sir. I hope you're using .040 aluminum instead of the 0.063 I had to use. The heavier stock was a real bear to bend and work with. I think it will turn out alright but dang, what a battle! All I can say is get the bend very close and rehearse the whole process before you actually put the cement on, this includes installing the plywood. We did it that way and found that several of our ideas couldn't work in real time. Take your time and have fun.

We got a couple of things done yesterday, mostly gluing with a little routing. The tongue box lid and the hatch received their under seal lip aluminum strips. The tongue box lid was flush routed for the lower edge. We also permanently installed the aft lower 'pan'.

Image

Image
Here's the tongue box sitting roughly in place; the wiring is holding it away from the body.

Image
Here you can see the under seal lip aluminum cemented in place.

Image
We are very close to installing the hatch now!

All the best,

Dave
User avatar
DMcCam
Gold Donating Member
 
Posts: 883
Joined: Wed Jan 06, 2010 8:30 pm
Location: Reno, Nevada
Top

Re: Building The Atma Travelear Teardrop - Update 9/26 pg 29

Postby jdp8402 » Mon Oct 01, 2012 12:21 pm

This is an amazing build. I've been stuck reading and rereading for a couple of days now. I love the profile. I've been trying to make something just like this on SketchUp for awhile but I just can't get the radiuses right. Great job!
jdp8402
Teardrop Inspector
 
Posts: 6
Joined: Wed Sep 05, 2012 9:40 pm
Location: Nebraska
Top

Re: Building The Atma Travelear Teardrop - Update 9/26 pg 29

Postby Oldragbaggers » Tue Oct 02, 2012 11:31 am

This build is so good it makes me want to throw mine away and start over.

You've got some mad skills!!!
Life is sooooo good.........
Sail...camp....bike...repeat
Becky

Build Journal http://www.tnttt.com/viewtopic.php?f=50&t=45917
Visit our blog at http://www.oldragbaggers.com
Image Image
User avatar
Oldragbaggers
Gold Donating Member
 
Posts: 1842
Images: 331
Joined: Mon Aug 01, 2011 9:22 pm
Location: Essex, MD
Top

PreviousNext

Return to Build Journals

Who is online

Users browsing this forum: No registered users and 18 guests