"Silver Nugget" Teardrop Trailer

...ask your questions in the appropriate forums BUT document your build here...preferably in a single thread...dates for updates, are appreciated....

Postby down under tech » Sat Jun 05, 2010 11:30 pm

Hi Everyone: I did get a little done today. I was able to finish up the wall studs and I placed the remainder of the blocking for the red oak wall panels to attach to. I need to finish trimming the door openings out tomorrow. I will take pictures of that tomorrow. I went to HD today and bought a four foot counter top that was pre-built. I had to cut 3/4" off one side so it would fit into the opening. I need to cut it so I can fit the sink into it tomorrow. There is a 3/4" overhang under the front edge of it where my lower cabinet face frame will slide in to. It is starting to show progress now.

Image

Image

More to come tomorrow. I was so busy last month with all of the overtime I had to put in, plus I enjoy helping Pam M. get her build up to speed and now have to think about things that will happen later on in the build of my TD. Now I need to try and get Pam to post those pictures of her progress. ;)
Last edited by down under tech on Mon Jun 07, 2010 9:31 am, edited 1 time in total.
Johnny D.

"If you think you can, you can. If you think you can't, your right !" ... Henry Ford

"The Silver Nugget" Build
viewtopic.php?t=35314&postdays=0&postorder=asc&start=0
User avatar
down under tech
Silver Donating Member
 
Posts: 565
Images: 571
Joined: Sat Feb 06, 2010 10:01 pm
Location: Reno, Nevada

Postby down under tech » Sun Jun 06, 2010 9:30 pm

Here is the sink installed in the counter top.

Image

It is just setting in the TD now.

Image

I had to intrude into the cabin to get the sink to fit.

Image

Image

Image

I will build a box to cover the sink from view and make a smaller wire chase along the top of the foot well.

Image

Image

That's what I got done to day. It has been a productive day if you ask me.
Johnny D.

"If you think you can, you can. If you think you can't, your right !" ... Henry Ford

"The Silver Nugget" Build
viewtopic.php?t=35314&postdays=0&postorder=asc&start=0
User avatar
down under tech
Silver Donating Member
 
Posts: 565
Images: 571
Joined: Sat Feb 06, 2010 10:01 pm
Location: Reno, Nevada

Postby grizz » Sat Jun 12, 2010 8:28 am

Looking great JD.

Continue to be impressed with your attention to detail.

No wonder you know about a good weld.
Greetings from England.

Rian.


Hoping to get it all done in time.
User avatar
grizz
1000 Club
1000 Club
 
Posts: 1210
Images: 29
Joined: Mon Sep 21, 2009 2:37 pm
Location: Rochester, Kent, UK
Top

Postby parnold » Sat Jun 12, 2010 9:00 am

Looking very good Johnny!

Bummer about the sink fitment, but easy to hide, and when you're done, no one will know. Well, except for all of us that you told! :)
User avatar
parnold
Donating Member
 
Posts: 2344
Images: 302
Joined: Mon Feb 08, 2010 4:49 pm
Location: Northwest New Jersey
Top

Postby down under tech » Sat Jun 12, 2010 10:48 am

Grizz: Thanks for your vote of confidence in my abilities to "try" and do acceptable work. Coming from you that is a highly sought after compliment to me. I hope I can keep up with your abilities and only time will tell where it all turns out.

Parnold: Thank you, Sir. I knew when I extended the cabin length from 6' to 6' 4" I might run into problems of having a shorter galley area. I am only 5' 8" tall but I don't want to be cramped up when I sleep. Plus, if I end up selling it, a taller person will like the added space to stretch out. This is one of the expected problems to deal with in the construction of one of these monsters. I will remedy this added build dilemma and like you said, It will be taken care of. As far as anyone knowing about it, I am glad I told all of you out there. It shows that I am only human and it will still be mine and "Hand Built in 2010."

I do enjoy a good challenge and this is why I chose to build the "Silver Nugget" in the first place. I slept in until 8 AM this morning for the first time in a long while and I feel refreshed. Well all, I had better get back to working on the TD now so I can make an update for you over the week-end. I promised Pam M. that I would spend some quality build time with her this afternoon as well. Has she updated her post yet ??? I will nudge her to doing so for you when I see her today. I have my plate full so I better run.

Hope all is going great for everyone in "Teardrop Land". :thumbsup:
Johnny D.

"If you think you can, you can. If you think you can't, your right !" ... Henry Ford

"The Silver Nugget" Build
viewtopic.php?t=35314&postdays=0&postorder=asc&start=0
User avatar
down under tech
Silver Donating Member
 
Posts: 565
Images: 571
Joined: Sat Feb 06, 2010 10:01 pm
Location: Reno, Nevada
Top

Postby YuGun » Sat Jun 12, 2010 11:16 am

Very good looking hatch,
Good luck for working
User avatar
YuGun
The 300 Club
 
Posts: 445
Joined: Sun Apr 11, 2010 1:25 pm
Location: Turkey
Top

axle question

Postby sschevel » Sat Jun 12, 2010 1:47 pm

I hate to ask but if you could, can you tell me how much travel you have in your axle between the top of the axle (or top of u bolt) to where it would hit the frame?

Thank you
Guy
User avatar
sschevel
Teardrop Advisor
 
Posts: 66
Images: 46
Joined: Sat Nov 04, 2006 10:10 pm
Location: Maine
Top

Postby down under tech » Sat Jun 12, 2010 3:26 pm

Hi Guy: That is no problem asking questions. This is how we learn, right? I have 2" from the top of axle tube and the top of the notch with the weight of the trailer on the ground. The U bolts set on the outside of the spring mount and won't hit. I would not worry about that now as you can fix that later if needed after you get done with your build. The important thing is axle placement, front to rear for best weigh/load carrying and safest for towing. Search for axle placement at top of page, click search. I think it works out to 30% from the back of trailer, check it out. Mine is 36" from the rear to the center of the axle on my 4x8 trailer. Your trailer is longer and wider that mine. You will need to place your axle in a different place than mine because of the extra 2 feet of length you have. You will just have to make a test drive around town to see if it/axle hits anywhere. If you have any more questions feel free to PM me. Look for the link at the bottom of mine or any other member's posts. It says PM (private message). That way we don't get hijacked on our build threads. That is the way it is supposed to be done here as I have learned since I joined. ;)
Last edited by down under tech on Mon Jun 14, 2010 9:33 am, edited 1 time in total.
Johnny D.

"If you think you can, you can. If you think you can't, your right !" ... Henry Ford

"The Silver Nugget" Build
viewtopic.php?t=35314&postdays=0&postorder=asc&start=0
User avatar
down under tech
Silver Donating Member
 
Posts: 565
Images: 571
Joined: Sat Feb 06, 2010 10:01 pm
Location: Reno, Nevada
Top

Update, 6-13-2010

Postby down under tech » Sun Jun 13, 2010 8:11 pm

Hello out there: Like I said yesterday, I went to Pam M.'s house and we got a bunch more done on her TD. I spent the afternoon and early evening helping her on "Miss. Independence", :shake hands: so I put mine on hold.

I got back on my TD this morning and got some more done today on the build. I finished up installing the wall studs and blocking for the light switches, porch lights and I finished trimming out the door openings.

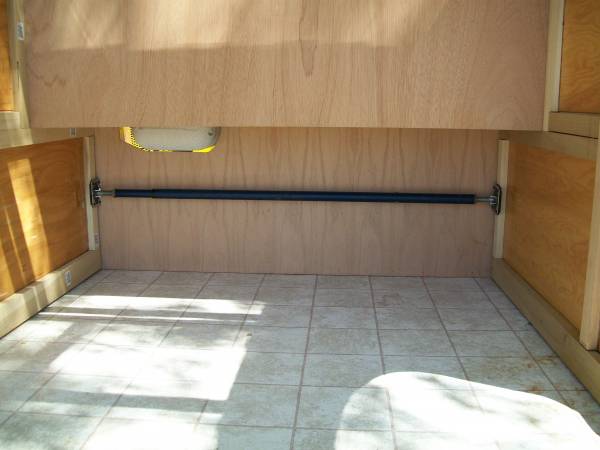
I did not have any help when I placed these rear vertical supports for the wall skins and I had this cargo holding bar in my truck and it would not go as narrow as I needed it to. So I drilled new locking holes it the bar and it worked like a champ. The two holes go straight through the bar and there are spring loaded pins that snap into the holes I drilled. This held the two boards in place so I could glue and screw them in place from the outside of the trailer.

Image

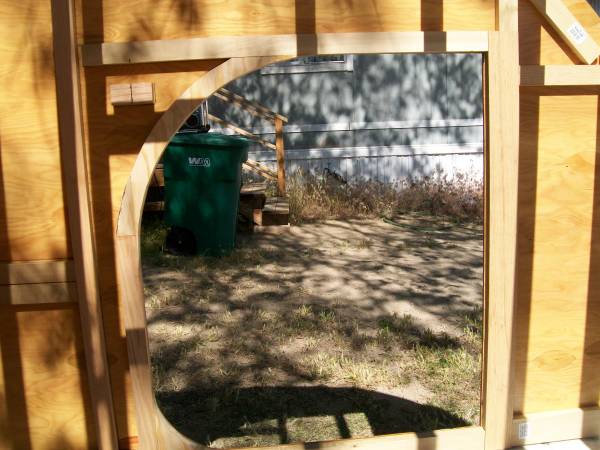
This is what it looks like now with the framing and blocking installed.

Image

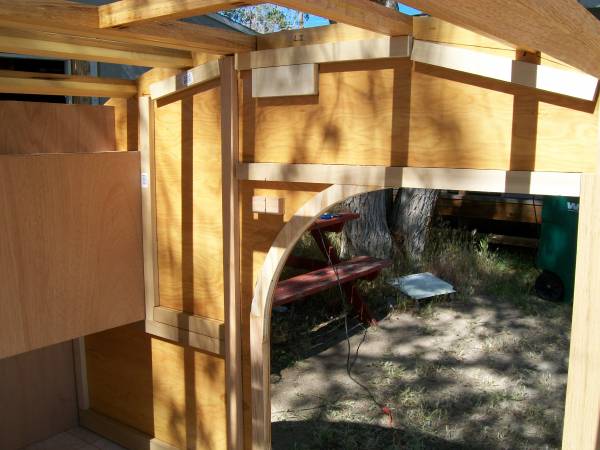
In the next picture, the blocking for the light switches and the larger piece of wood on the top will support the screws for the porch light and are now attached.

Image

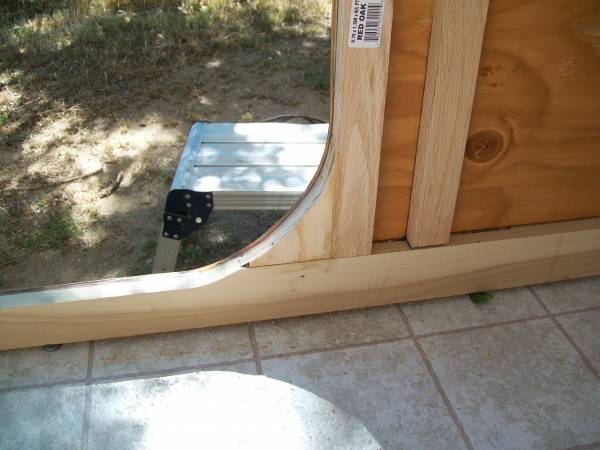
Below you can see how the door opening was trimmed out. I used some oak, some poplar and some 3/4" plywood. You can see the different woods in these next few pictures. I used oak for where the door latch will be attached to. This way the screws will hold better than they would if I used a softer wood.

Image

Image

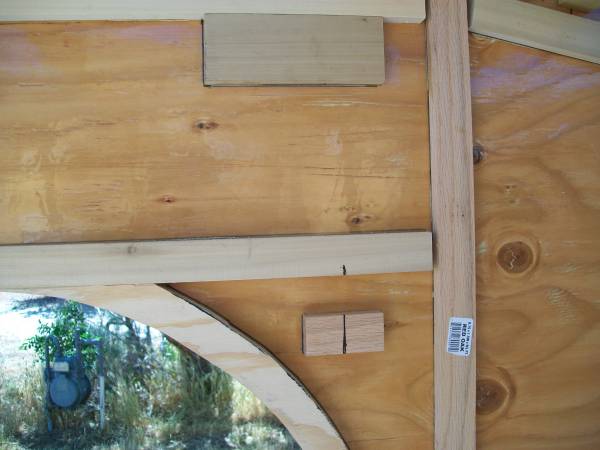
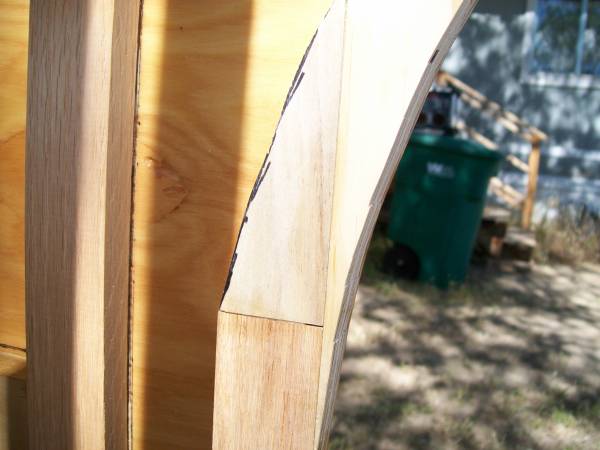
In this picture you can see all three kinds of wood I used. They are glued to the inside piece of wall plywood and glued to the other types of wood and they butt up together. I used a lot of PL poly adhesive here.

Image

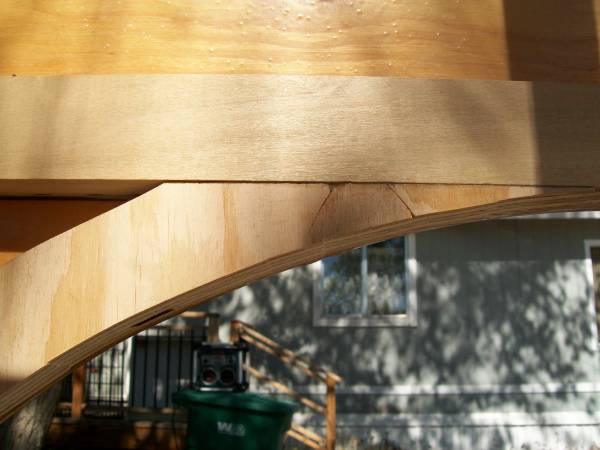
This is at the top of the door opening where it starts to sweep downward on the rear of the opening. I still need to do some finish sanding.

Image

I still have some daylight so I think I will try to get the wood supports for the overhead cabin lights added to the vent fan spars before calling it a day. After that I will need to remove the spars and cut the inner wall skins to fit over the wall studs and blocking. Then I will start running wiring to the lights and switches and insulate the wall cavities.

It is getting there! :awesome:
Last edited by down under tech on Mon Jun 14, 2010 12:05 am, edited 1 time in total.
Johnny D.

"If you think you can, you can. If you think you can't, your right !" ... Henry Ford

"The Silver Nugget" Build
viewtopic.php?t=35314&postdays=0&postorder=asc&start=0
User avatar
down under tech
Silver Donating Member
 
Posts: 565
Images: 571
Joined: Sat Feb 06, 2010 10:01 pm
Location: Reno, Nevada
Top

Update # 2, 6-13-2010

Postby down under tech » Sun Jun 13, 2010 11:27 pm

Well I still had some daylight, so I kept building. I added the cabin overhead light bracing. This way I will have some meat to screw into when I install the cabin lights.

Image

Image

Image

Image

Image

Image

Image

OK, I'm done for and I am whopped. Everyone have a good week, now. Take Care,
Johnny D.

"If you think you can, you can. If you think you can't, your right !" ... Henry Ford

"The Silver Nugget" Build
viewtopic.php?t=35314&postdays=0&postorder=asc&start=0
User avatar
down under tech
Silver Donating Member
 
Posts: 565
Images: 571
Joined: Sat Feb 06, 2010 10:01 pm
Location: Reno, Nevada
Top

Postby grizz » Mon Jun 14, 2010 1:44 am

I can only shake my head at the thoroughness of your build Johnny.

Glad you and Pam got on with her build too.

I hope she updates soon.

Anyway, I am off to work as well.
Greetings from England.

Rian.


Hoping to get it all done in time.
User avatar
grizz
1000 Club
1000 Club
 
Posts: 1210
Images: 29
Joined: Mon Sep 21, 2009 2:37 pm
Location: Rochester, Kent, UK
Top

Postby down under tech » Mon Jun 14, 2010 6:03 am

Hi Grizz: Thanks for your nice words. It has taken a long time to get to this point, but it is coming together. It should now start to get more interesting too. The normal boring stuff is about done and you should begin to see more of my personality come through in the items I find to incorporate in the build.

As far as Pam's posting a new update, I'm sure it is coming soon. We all have demanding lives now a days and there is never enough time in a day to get everything done. Keep in mind when she does get the time to post her update it will be a large one with plenty of pictures included.

See Ya Later, :thumbsup:
Johnny D.

"If you think you can, you can. If you think you can't, your right !" ... Henry Ford

"The Silver Nugget" Build
viewtopic.php?t=35314&postdays=0&postorder=asc&start=0
User avatar
down under tech
Silver Donating Member
 
Posts: 565
Images: 571
Joined: Sat Feb 06, 2010 10:01 pm
Location: Reno, Nevada
Top

New Tool Alert, 6-19-2010

Postby down under tech » Sat Jun 19, 2010 8:30 am

Hey everyone: With all of the overtime I have been putting in at my job lately, I was able to keep some of that OT pay that "Uncle Sam" didn't take for himself. I used some to buy a new tool that I can use on my build here in the near future. I also plan to build and replace the cabinet doors in my kitchen using this tool.

Image

Image

I paid dearly for this Kreg portable bench top router table. $>
It took a while to put together, but this is what it looks like.
I still have to mount the router in the mounting plate. I will do that a little later on.

Here is the plan for this week-end's festivities. Remove the spars and make up the inner wall skins and get them cut to fit and then start to insulate the walls. I will get started on the wiring, at least for the walls. For now, this is only for the overhead lights and for the porch light switches. I plan to use a different color wire for each light or 12 volt fixture, so if I have an issue in the future, it will be easier to trace and to hopefully fix the problem. I have heard too many horror stories from other builders that used the same color wires and found it difficult to trace one of the wires down when they had a problem with their wiring. It cost more to do it this way but it will make life easier now and at a future date if need be.

See you guys and good luck on your builds. :guzzle:
Johnny D.

"If you think you can, you can. If you think you can't, your right !" ... Henry Ford

"The Silver Nugget" Build
viewtopic.php?t=35314&postdays=0&postorder=asc&start=0
User avatar
down under tech
Silver Donating Member
 
Posts: 565
Images: 571
Joined: Sat Feb 06, 2010 10:01 pm
Location: Reno, Nevada
Top

Postby grizz » Sat Jun 19, 2010 10:44 am

I love neat tools.

Nicola has been traumatising me..... making me pack up my study, while she packed up the loads of loose stuff in the spare room.

These are jobs that need doing before we move, obviously. But man its hard work. Packing up after moving here 5 years ago.


Look forward to your after weekend updates.
Greetings from England.

Rian.


Hoping to get it all done in time.
User avatar
grizz
1000 Club
1000 Club
 
Posts: 1210
Images: 29
Joined: Mon Sep 21, 2009 2:37 pm
Location: Rochester, Kent, UK
Top

Postby down under tech » Sat Jun 19, 2010 11:04 am

Hi Grizz: I don't envy you a bit on you having to move. That is one of the things I really hate to do. You can get a lot of stuff added to your possessions in five years. I hope you get a lot of boxes and just start filling them up and pile them in an unused room for now. That seems to work for me when I move. Moving day, just load in a truck and go.
Good luck Grizz & Nicola,
Johnny D.

"If you think you can, you can. If you think you can't, your right !" ... Henry Ford

"The Silver Nugget" Build
viewtopic.php?t=35314&postdays=0&postorder=asc&start=0
User avatar
down under tech
Silver Donating Member
 
Posts: 565
Images: 571
Joined: Sat Feb 06, 2010 10:01 pm
Location: Reno, Nevada
Top

PreviousNext

Return to Build Journals

Who is online

Users browsing this forum: No registered users and 11 guests

cron