"Silver Nugget" Teardrop Trailer

...ask your questions in the appropriate forums BUT document your build here...preferably in a single thread...dates for updates, are appreciated....

Postby down under tech » Sun Aug 29, 2010 10:27 pm

Thanks Paul, It makes me feel good that you think I am doing a nice job on my teardrop, coming from someone that has build a really nice teardrop trailer such as yours. I will have something different than a regular "Cubby" when I am finished. I saw a couple of teardrop trailers at a car show at "Hot August Nights" that I would never claim to owning. I saw a Shasta Travel trailer there that was exceptionally restored and of high quality. That is what I am aiming for on my build. Keep looking in from time to time and I hope I can live up to my own expectations. As far as under the bottom of the counter, I have not decided what will happen there yet.

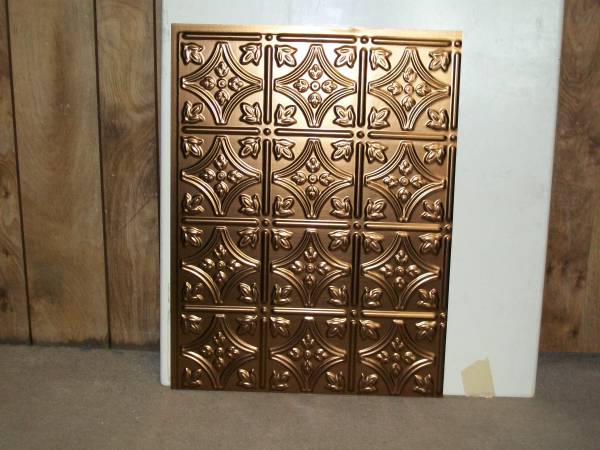
Today, Terry and I went and picked out the tin ceiling panels that will go on the inside to make the finished ceiling. It is really plastic panels that are made to look like the tin ceilings that were used in kitchens back about one hundred years ago. Here is a picture of what we got. The color is called oil rubbed bronze. The color will contrast nicely with the light colored oak side walls. It will look nice and it has the retro look and it will bend to conform to the inside roof contours. They measure 18" x 24".

Image
Last edited by down under tech on Wed Sep 08, 2010 4:37 pm, edited 1 time in total.
Johnny D.

"If you think you can, you can. If you think you can't, your right !" ... Henry Ford

"The Silver Nugget" Build
viewtopic.php?t=35314&postdays=0&postorder=asc&start=0
User avatar
down under tech
Silver Donating Member
 
Posts: 565
Images: 571
Joined: Sat Feb 06, 2010 10:01 pm
Location: Reno, Nevada

Postby High Desert » Sun Aug 29, 2010 11:33 pm

I look forward to seeing those ceiling panels installed Johnny. It takes some doing to come up with a truely original idea for a teardrop with so many great builds here, and I think you've got one going there. :thumbsup:
Shaun

"it's not the years honey, it's the mileage"
High Desert
Platinum Donating Member
 
Posts: 8780
Images: 27
Joined: Wed Apr 08, 2009 1:46 pm
Location: SW Washington state

Postby S. Heisley » Mon Aug 30, 2010 6:34 pm

I look forward to seeing those ceiling panels installed Johnny. It takes some doing to come up with a truely original idea for a teardrop with so many great builds here, and I think you've got one going there.


Ditto what High Desert said!
User avatar
S. Heisley
Super Lifetime Member
 
Posts: 8774
Images: 495
Joined: Mon Sep 17, 2007 10:02 am
Location: No. California
Top

Update, 9-1-2010

Postby down under tech » Wed Sep 01, 2010 8:54 pm

Shaun: You are right, it is tough to top the great builds on this forum. I want my TD to be unique. It took me a while to come up with the idea to make an imitation tin ceiling for the "Silver Nugget". I think by me using this as my ceiling, it will help to make the interior that much more appealing to the eye and maybe bring me more compliments when it is done.

Sharon: Ditto to what I told Shaun... Just kidding!!! Thanks for your approval, Sharon. That is a compliment coming from an expert builder as yourself.

I went and bit the bullet and got the 4'x10' .040" aluminum for the outside of the TD yesterday. Trust me my wallet is much lighter now!!! That was the biggest bite to buy that stuff, let me tell you. Luckily, I was able to use my overtime pay to buy it.

Image

Image

Today, I lifted out the counter top and finished installing the insulation to the rear section of the TD. I measured and placed the measurements in their appropriate cavities, then I cut out the pieces as I needed to, to fill the cavities. This made it so much more simpler and faster by pre-measuring the openings.

Image

Image

How is this thing looking, now??? :thinking:

See Ya,
Last edited by down under tech on Fri Sep 03, 2010 5:54 pm, edited 2 times in total.
Johnny D.

"If you think you can, you can. If you think you can't, your right !" ... Henry Ford

"The Silver Nugget" Build
viewtopic.php?t=35314&postdays=0&postorder=asc&start=0
User avatar
down under tech
Silver Donating Member
 
Posts: 565
Images: 571
Joined: Sat Feb 06, 2010 10:01 pm
Location: Reno, Nevada
Top

Stereo

Postby down under tech » Wed Sep 01, 2010 9:26 pm

I forgot, I bought this stereo system a couple of weeks ago. I bought this from Camping World in Rocklin, CA. It is a Jensen wall mount unit with a CD player and it has an alarm feature in it. I am going to mount it in the (front of teardrop) overhead cabinet that I have yet to build.

Image

bbfn, ;)
Johnny D.

"If you think you can, you can. If you think you can't, your right !" ... Henry Ford

"The Silver Nugget" Build
viewtopic.php?t=35314&postdays=0&postorder=asc&start=0
User avatar
down under tech
Silver Donating Member
 
Posts: 565
Images: 571
Joined: Sat Feb 06, 2010 10:01 pm
Location: Reno, Nevada
Top

Update, 9-12-2010

Postby down under tech » Sun Sep 12, 2010 10:04 pm

Over the last week I did a little more on the TD. I got the insulation installed in the walls and over the rear bulkhead. I also started to wire the TD for the 12 volt wiring. It got late while I was running the wires and I had to stop due to the sun going down and I wasn't able to take a picture of how I ran the wires. I will post more later on to show details of how I did it.

Image

Image

Image

Image

More to come later this week...
Johnny D.

"If you think you can, you can. If you think you can't, your right !" ... Henry Ford

"The Silver Nugget" Build
viewtopic.php?t=35314&postdays=0&postorder=asc&start=0
User avatar
down under tech
Silver Donating Member
 
Posts: 565
Images: 571
Joined: Sat Feb 06, 2010 10:01 pm
Location: Reno, Nevada
Top

Postby S. Heisley » Sun Sep 12, 2010 11:12 pm

Johnny:

I like the radio/CD player. Your TD is a lot of work but it'll be worth it. Keep going!!! :thumbsup:
User avatar
S. Heisley
Super Lifetime Member
 
Posts: 8774
Images: 495
Joined: Mon Sep 17, 2007 10:02 am
Location: No. California
Top

Update, 9-13-2010

Postby down under tech » Mon Sep 13, 2010 4:22 pm

Thanks Sharon, It is taking for ever, it seems.

I took some picks of how I am running the wires through the TD. I used my drill press to drill 15 holes just a little bigger than the 14 gauge wires in the three rear spars and I ran the wires through each spar to the next one and so on. I used my countersink bit to knock off the sharp edge on each hole to keep chafing to a minimum. I will drill any other needed wire routing holes as I need to. I marked the top of the spar 2" right and left of center so I know where not to nail or screw into after the roof is on. I used a different color wire for each light fixture or radio or fantastic vent fan or 12V outlet. I ran a black ground wire along with the power 12 volt positive wire. All lights will have it's own fuse. I am not ganging the lights together. This way if I blow a fuse I will still have one light that will work until morning and I can look at it then. I will have the fuse box inside the cabin cabinet. I will build some kind of cover for it to protect it and the wires later. I will need to run a couple of speaker wires to the rear speakers as well through the spars. The stereo will be in the front overhead cabinet.

Image

Image

Image

Image

Image
Last edited by down under tech on Tue Sep 14, 2010 4:05 pm, edited 2 times in total.
Johnny D.

"If you think you can, you can. If you think you can't, your right !" ... Henry Ford

"The Silver Nugget" Build
viewtopic.php?t=35314&postdays=0&postorder=asc&start=0
User avatar
down under tech
Silver Donating Member
 
Posts: 565
Images: 571
Joined: Sat Feb 06, 2010 10:01 pm
Location: Reno, Nevada
Top

Postby starleen2 » Mon Sep 13, 2010 6:41 pm

:thumbsup: Love those color coded wires! :thumbsup:
User avatar
starleen2
5th Teardrop Club
 
Posts: 16272
Images: 224
Joined: Sat May 12, 2007 8:26 pm
Location: Pea Ridge ,AR
Top

Postby S. Heisley » Mon Sep 13, 2010 8:18 pm

Starleen2 wrote:
Love those color coded wires!


Me too! Very Festive! :)
User avatar
S. Heisley
Super Lifetime Member
 
Posts: 8774
Images: 495
Joined: Mon Sep 17, 2007 10:02 am
Location: No. California
Top

Postby Miriam C. » Mon Sep 13, 2010 9:04 pm

S. Heisley wrote:Starleen2 wrote:
Love those color coded wires!


Me too! Very Festive! :)


:thumbsup: :applause: Wonderful!!!!! I love the wiring and hope you will post in our thread or make your own.

http://tnttt.com/viewtopic.php?t=20164
“Forgiveness means giving up all hope for a better past.â€
User avatar
Miriam C.
our Aunti M
 
Posts: 19675
Images: 148
Joined: Wed Feb 15, 2006 3:14 pm
Location: Southwest MO
Top

Wire color code...

Postby down under tech » Tue Sep 14, 2010 12:08 am

Starleen2, Sharon & Miriam: I thought it looked pretty cool, too.
Here is a list of what color wires goes where. I am not an artist, so I will not try to diagram it out, but I can tell you what color wires go to each fixture.

You can use the picture below to follow along.

Image


From Left to Right

Purple & Black, Right Porch Light
Green & Black, Right Dome Light
Brown & Black, Front Under Cabinet Reading Light
Orange, Red & Black, Stereo/CD Player
Black & Pink, Fantastic Vent Fan
Black & Yellow, Left Dome Light
Black & Light Blue, Left Porch Light

The black wires are the ground wires and the colorful wires are the 12 volt positive wires that will go to the fuse box to supply power to each item on a separate fuse for each fixture.

I will run the rear speaker wires through the spars too. The stereo will be in the front overhead cabinet.

I need to get some Dark Blue wire for the three 12 volt (lighter) outlets.

If this does not work, I will have to learn how to play the guitar on my roof. lol :roll:
Johnny D.

"If you think you can, you can. If you think you can't, your right !" ... Henry Ford

"The Silver Nugget" Build
viewtopic.php?t=35314&postdays=0&postorder=asc&start=0
User avatar
down under tech
Silver Donating Member
 
Posts: 565
Images: 571
Joined: Sat Feb 06, 2010 10:01 pm
Location: Reno, Nevada
Top

Update, 9-23-2010

Postby down under tech » Thu Sep 23, 2010 9:33 pm

Miriam: I did not get what you ment when you asked me to post in your thread. I figured it out when I clicked on the link you included in your post. I will be glad to post how I did the wiring when I get it done. I am a master auto technician and have been doing so for 33 plus years. This part of the build, I am very comfortable doing. It is the fun part for me.

I had to build the front overhead cabinet. I built the face frame for it tonight. It will have two small cupboards and the center section will house the RV stereo and two 12 volt lighter sockets. I will mount the reading light under the center section, too.

Here is the face frame and how I did it. This is the back side of it.

Image

This is the center that I routed out to just over 1/4" over-sized all the way around. It is just a hair over 1/4" deep to accept a 1/4" piece of red oak plywood. The radio will mount into the plywood. I will put some added supports behind it to make sure the mounting screws stay tight. I ran the top and bottom troughs long as you can see. This will not effect the final look on the front side of the frame.

Image

This what it looks like on the show side of it. I placed the stereo in there so you can get a feel of how it is ment to go. The open space below the stereo is where the 12 Volt outlets will go. I will also drill a hole to feed a 1/8" stereo cable that goes to the rear cabin cabinet so I can send the speaker output from my laptop to the stereo to amplify it and play it through the TD speakers. It was a challenge to get it to come out like this, but "If there is a will, there is a way"!!! Right?

Image

I hope to get more done tomorrow afternoon and I have all day Saturday to work on it. Yeah!!! :twisted:
Johnny D.

"If you think you can, you can. If you think you can't, your right !" ... Henry Ford

"The Silver Nugget" Build
viewtopic.php?t=35314&postdays=0&postorder=asc&start=0
User avatar
down under tech
Silver Donating Member
 
Posts: 565
Images: 571
Joined: Sat Feb 06, 2010 10:01 pm
Location: Reno, Nevada
Top

Postby grizz » Sat Sep 25, 2010 12:40 pm

Just got my internet back in the new house.

Not much use as the company is making me redundant at the end of October, but good to see your progress JD,

Sure you are still having much fun at this point.
Greetings from England.

Rian.


Hoping to get it all done in time.
User avatar
grizz
1000 Club
1000 Club
 
Posts: 1210
Images: 29
Joined: Mon Sep 21, 2009 2:37 pm
Location: Rochester, Kent, UK
Top

Postby down under tech » Sat Sep 25, 2010 12:55 pm

Thanks Grizz: I'm glad you are back up and running again. I hope all is well with your home purchase and the move in was smooth. When you say they are making you redundant, I hope that your company is not kicking you to the curb.

I will post an update later today. All I can say is ALUMINUM... This might keep everyone guessing on what is up on the build.

More to come. 8)
Johnny D.

"If you think you can, you can. If you think you can't, your right !" ... Henry Ford

"The Silver Nugget" Build
viewtopic.php?t=35314&postdays=0&postorder=asc&start=0
User avatar
down under tech
Silver Donating Member
 
Posts: 565
Images: 571
Joined: Sat Feb 06, 2010 10:01 pm
Location: Reno, Nevada
Top

PreviousNext

Return to Build Journals

Who is online

Users browsing this forum: smeerkees and 35 guests