A Minnesota Build - The Lily Pad

...ask your questions in the appropriate forums BUT document your build here...preferably in a single thread...dates for updates, are appreciated....

Lily's Pad

Postby down under tech » Wed Jun 16, 2010 8:09 pm

Hi Lil: I was not sure of your name and I thought I saw it as Sandy. My bad? I got it now and it won't happen again, I promise. Have you ever heard that from a man before? Ha Ha

Make sure you seal the end grain of the ply an extra coat of CPES. That is where the water will get in for sure. I am not an expert builder of these things because I too am on #1. Great advice here in the forum. You will find your self learning every day.

I will have to check out the floor on the Dragonfly.

I like "Lily's Pad". But it is your choice.

Propane tank? I would check with a local RV dealer for advice on the set up of the supply lines. They would know...

I won't call you Shirley or Sandy anymore. Like the dirt bike riders might say, "Get It Sideways and Hang On". It is going to be a fun ride. See Ya, and luck be with you, "Lil' One" ;)
Johnny D.

"If you think you can, you can. If you think you can't, your right !" ... Henry Ford

"The Silver Nugget" Build
viewtopic.php?t=35314&postdays=0&postorder=asc&start=0
User avatar
down under tech
Silver Donating Member
 
Posts: 565
Images: 571
Joined: Sat Feb 06, 2010 10:01 pm
Location: Reno, Nevada

Postby mcspin50 » Thu Jun 17, 2010 6:42 am

Hey JohnnyD,
Hmmm...Lily's Pad. :thumbsup: I think I'll put that one on the short list. Thanks!

Good luck with your build too.
Lil M.
In every walk with nature, one receives far more than he seeks. - John Muir
Generic Benroy Build Journal here - My LilScamper Update Journal here
The Lily Pad...Image My LilScamper...Image Image
User avatar
mcspin50
Gold Donating Member
 
Posts: 488
Images: 158
Joined: Mon Oct 12, 2009 6:35 pm
Location: Perham, MN

Postby perche » Fri Jun 18, 2010 8:37 pm

mcspin50 wrote:Hey Randi,
I told the guys at Perham Steel that you'll be in some time in the next year. ;)


Heh, that sounds about right (although I keep changing my mind about my design and the trailer is soooo critical to what I think I wish to do...). But I like what they did on your stabilizers. I reckon they'll be able to handle anything I throw at them. What a comfort! :D

mcspin50 wrote:While waiting for the paint to dry, I finished a project begun many years back by another person in this house who shall remain nameless...I put up the pegboard on the back of the workbench. I cut the pegboard to length, mounted a brace between the uprights, painted the pegboard with primer, and screwed the two pieces to the uprights. I also installed the two flourescent fixtures that I had bought seven years ago at a garage sale. Sideways progress is good!


You have some talent there....hmmmm, you'll have a firmer foundation with all the sideways progress. Sure looks a treat to putter in now. :thumbsup:

Ahhh, I can almost smell the sawdust.... :banana:
User avatar
perche
Teardrop Builder
 
Posts: 39
Images: 3
Joined: Fri Mar 26, 2010 4:25 pm
Location: NW Minnes(n)ota, USA
Top

Postby mcspin50 » Tue Jun 29, 2010 1:24 pm

It’s been a while since I last posted any build progress. I had visions of being much further along by now, but then I do tend to have unrealistic expectations…er, I mean, I tend to be overly optimistic. I was overly optimistic when I was mudding and taping the drywall in the lower level of our house twenty years ago. One week tops and I’d have it all done. After all I had been an art major in college. This would be piece of cake, right?? Well, two weeks later, the joints refuse to smooth out and carpel tunnel is setting in, I called the drywall guy back and he fixed it in two days. History does seem to be repeating itself.

My son and I spent a Sunday two weeks ago cutting 2 of the ½â€
Lil M.
In every walk with nature, one receives far more than he seeks. - John Muir
Generic Benroy Build Journal here - My LilScamper Update Journal here
The Lily Pad...Image My LilScamper...Image Image
User avatar
mcspin50
Gold Donating Member
 
Posts: 488
Images: 158
Joined: Mon Oct 12, 2009 6:35 pm
Location: Perham, MN
Top

Postby down under tech » Wed Jun 30, 2010 12:18 am

Hi Lil Lil: I see you are building a Teardrop Trailer. Duh, I knew that. You can not turn back now. I like the material you choose for your PJs. I ordered some fabric today for my curtains from ebay that has Lil teardrop trailers on it and it looks like it is out of the '50s. Doug Hodder used the same fabric on his "Sierra Nomad" build, for his curtains. Here is a picture of Doug's finished curtains. I hope it is OK with Doug to use his picture.

Image

You did right by remounting the floor to get it square. This way it will be easier to do the rest of it as you go. I never used the CPES. I heard it is very pungent.

Are you going to insulate the floor? I would so you can keep your back side warm. It does not cost that much and you can do it now before you can't get to it. I would use the flat rigid 2" stuff because it looks like you have room for it. It will repel the cold at night and the heat radiating up from the ground in the day. Remember a comfy camper is a happy camper. Use foam panel glue and place some "L" brackets around the edges to also help hold it in and then cover the whole bottom with the waterproofing Herculiner including the insulation. This will keep the insulation dry and the rest of the floor, too.

I would mount the floor assembly right down on the frame with no spacers. This way it will be solid and not flex as it is towed. I would put at least four bolts down each side and three on the front and back of the floor around the perimeter. That should hold it down OK. I did use lag screws in the rear from under the frame up into the floor so you don't see them. This will give you a flat floor so the vinyl flooring will set flush and it will look cleaner when finished.

I like the birch you got. If you are going to have the wood showing on the outside, it won't be a problem with the extra 1/2 inch on the hight of the sides. If you are going to skin it with aluminum you might want to cut the extra 1/2 inch of as the ally panels are 48" wide. Cut the length the same as your floor measurement length.

You are doing a nice job, Lil. Just take it slow and think about what comes next and think that out before acting on it, and pretty soon you will be in the finished Teardrop builders club.

Do what ever you have to to keep it sideways... :thumbsup:
Johnny D.

"If you think you can, you can. If you think you can't, your right !" ... Henry Ford

"The Silver Nugget" Build
viewtopic.php?t=35314&postdays=0&postorder=asc&start=0
User avatar
down under tech
Silver Donating Member
 
Posts: 565
Images: 571
Joined: Sat Feb 06, 2010 10:01 pm
Location: Reno, Nevada
Top

Postby mcspin50 » Tue Sep 28, 2010 7:57 pm

Well, I took your advice JohnnyD and took things real slow...so slow as a matter of fact that I've only been able to work on the trailer twice since my last post! Did a lot of thinking and puzzling tho. :) 
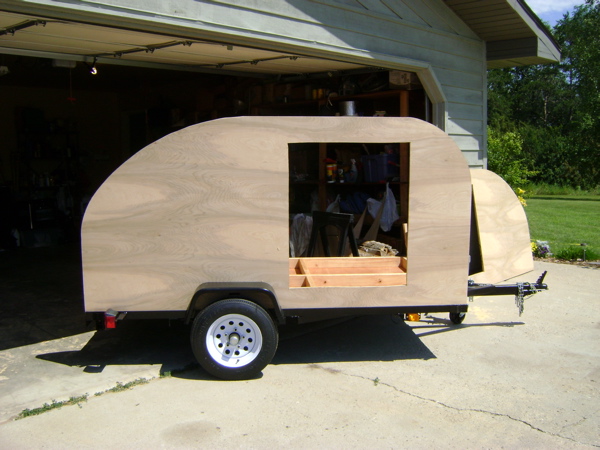
My business during the summer takes up a lot of energy and time. But I did manage to corrall No. 1 and No. 3 Sons' help at the end of July to get the second side cut and drill holes in the trailer. Gotta agree with No. 1 Son, the jig saw is not my friend. My next build :lol: I'm going to have to find a better way to cut curves. There'll also be a little work getting the doors to have nice straight edges.

Image

Image

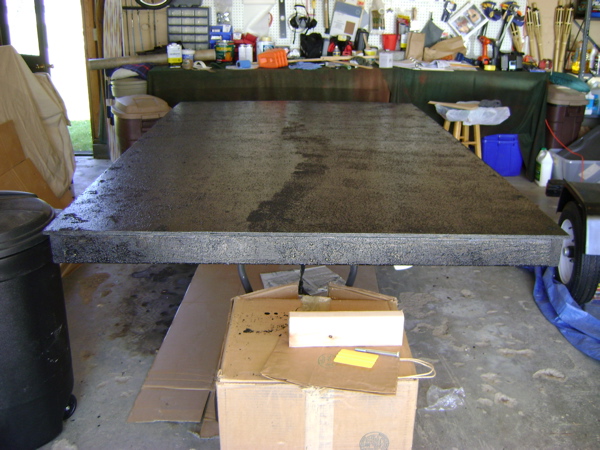
Floor has Herculiner on the bottom and front.

Image

Cut most of the spars yesterday. Had to make a trip to Menard's as I cut a couple of them too short...getting used to the compound miter saw, you know. (BTW, saw some lovely green/blue/grey 6x6 porcelain tiles there on deep discount, so I'm rethinking the galley counter top. Somebody please talk me out of that).
Cut the 3/8" jog out of the back for the galley hatch. For sure, the jig saw and I aren't friends! :x The plans say to use that piece to make the hatch ribs. Well, mine came off in pieces. Belt sanded things smooth and will use kraft paper to trace the edge to use as a pattern.

I find that in order to do each next step, I need to think 5 steps ahead. (That's what I get for deviating from the plans.) For example, before I attach the walls to the floor/storage base, I need to not only CPES, but apply some coats of spar urethane. In order to determine the height and depth of the galley counter, I need to build the slide-out tray for the Camp Chef oven. But first I have to practice using the Kreg jig. Think I'll build a bird feeder.

Still pondering the gas line from tongue to galley...that's connected to the height/location of above oven. So...gotta build the slide out tray. Step at a time.

I'm hoping to get it so that I don't have both sides of the garage taken up with the build when the cold weather comes. Husband is a rural mail carrier and I know he's not down with parking his car outside here in Minnesota all winter long. :o

Step at a time. Just gonna keep plugging away.
Last edited by mcspin50 on Wed Sep 29, 2010 5:06 pm, edited 1 time in total.
Lil M.
In every walk with nature, one receives far more than he seeks. - John Muir
Generic Benroy Build Journal here - My LilScamper Update Journal here
The Lily Pad...Image My LilScamper...Image Image
User avatar
mcspin50
Gold Donating Member
 
Posts: 488
Images: 158
Joined: Mon Oct 12, 2009 6:35 pm
Location: Perham, MN
Top

Hey Lil Lil...

Postby down under tech » Tue Sep 28, 2010 11:24 pm

Hi Lil: It looks like number 1 & 3 sons are both number ones. It is nice they helped you out. It looks like you are building a teardrop trailer, are you??? LOL Now you see what I mean by thinking several steps ahead before acting on it. I like the Benroy profile. I am still building my TD, and I plan something and before I know it, I change something and have to change something else. Just remember you will be sleeping in it and you are the only one that has to like it. That is all that matters. I am planning on building another one after this one. It will be a minimal cost one though. My first one will be one I will keep ahold of. I will be taking my time on #1 because I want it to be really nice. I hope you have a nice one too when you are finished.

Good luck at going sideways... :thumbsup:
Johnny D.

"If you think you can, you can. If you think you can't, your right !" ... Henry Ford

"The Silver Nugget" Build
viewtopic.php?t=35314&postdays=0&postorder=asc&start=0
User avatar
down under tech
Silver Donating Member
 
Posts: 565
Images: 571
Joined: Sat Feb 06, 2010 10:01 pm
Location: Reno, Nevada
Top

Postby mcspin50 » Wed Sep 29, 2010 4:54 pm

Hi JohnnyD,
I just checked out your gallery, and it looks like you know what you're doing when you make changes! Great work, and it looks like you're on the home stretch! My changes seem to be more on the lines of guesses. Gotta keep remembering that it's just lumber. I can always go get a new sheet of plywood, right??
Got a package in the mail today. I'm excited that now I'll have a little window on the front of the teardrop. It's a marine grade window so, if I seal it properly to the vinyl roof, it should be watertight. I saw the same style/brand window on another build here (thought I saved it in my bookmarks, but alas not there, so I can't give credit), looked on ebay and this one seemed to be reasonably priced compared to others. It'll be nice to be able to look out the front of the teardrop...that is, when I'm done. 8)
Image

Update: I found the build. It's loader's Bungalette.

Image

Cute, huh?
Last edited by mcspin50 on Wed Oct 06, 2010 12:10 am, edited 1 time in total.
Lil M.
In every walk with nature, one receives far more than he seeks. - John Muir
Generic Benroy Build Journal here - My LilScamper Update Journal here
The Lily Pad...Image My LilScamper...Image Image
User avatar
mcspin50
Gold Donating Member
 
Posts: 488
Images: 158
Joined: Mon Oct 12, 2009 6:35 pm
Location: Perham, MN
Top

Postby mcspin50 » Sun Oct 03, 2010 11:01 pm

This morning's air was a little chilly as I headed out to the garage with my cuppa joe. I could hear shots in the distance. It's duck and goose season here in Minnesota. Plugged in and turned on the milk house heater in the garage to take the chill off. My plan...to put CPES on both sides of both walls. The instructions said it would take 16 hours at 50 deg. for the CPES to cure. Then I plan to start coating the walls with several coats of spar urethane.
It turned into a beautiful, warm, sunny fall day. Got the walls coated with the epoxy sealer. And I lu-u-u-uv how it enhanced the grain on the natural birch plywood!

Image

Image

The second pic is a little more yellow than in real life, but you can get an idea of how pretty the patterning of the grain is.

Then I decided to acquaint myself with my little Kreg jig since that's how I'd like to join the spars to the walls. Decided to use the jig to build a shelf for the Camp Chef Oven. It will eventually have drawer slides on the sides and be installed on the left side of the galley. Turned out pretty good for a first attempt I think.

Image

Scanned through the instructions, but couldn't see any guidelines for spacing the screws, so I went all out on the bottom. Did I overdo it? Found I had to make sure the jig was FIRMLY clamped otherwise it would skitter. Put one of those rubbery mesh placemats between the wood and the table when I clamped to keep things from slipping around.

Image

Here's the stove in place. Thought I allowed 1/4" side clearance total. It ended up pretty snug but not sticking. Looks OK. Gotta figure a way to stain the pine to match the birch. Might consider painting it, we'll see.

Image

The Camp Chef's regulator screws into the back of the oven and sticks out quite a ways. I'm hoping there'll be a enough depth in the galley to leave it attached as it's a bit of a bother to screw it in each time. But, if I have to disconnect it after each camping trip, oh well. Not a big deal.

Image

Oh, by the way, I was not born in the US. 8)
Lil M.
In every walk with nature, one receives far more than he seeks. - John Muir
Generic Benroy Build Journal here - My LilScamper Update Journal here
The Lily Pad...Image My LilScamper...Image Image
User avatar
mcspin50
Gold Donating Member
 
Posts: 488
Images: 158
Joined: Mon Oct 12, 2009 6:35 pm
Location: Perham, MN
Top

Postby Hillmann » Mon Oct 04, 2010 11:19 am

Oh, by the way, I was not born in the US. 8)[/quote]

Up untill I saw that I thought it was a good build, now I am not so sure :lol:
After the twins game on Saturday my 7 year old son decided that the Blue Jays suck and Canada is only good for there bacon. I will have to see if he will make an exception for Canadian teardrops as well. ;)
Hillmann
Teardrop Master
 
Posts: 212
Joined: Fri Jun 25, 2010 1:41 pm
Location: Wisconsin
Top

Postby mcspin50 » Mon Oct 04, 2010 1:27 pm

Hahaha. Sounds like Jr. needs to learn about good sportmanship. We can't all be No. 1 all the time. We Canadians, living next to Merkuns, have learned to appreciate second place, and third place, and world views, etc. etc.
And actually I became an American citizen...hmmm...about 23 years ago when my oldest son was 5. I had kept my Canadian citizenship just out of pride for my birthplace, but a school bond vote came up, and because I was Canadian, I couldn't vote on it. Seemed kinda futile not being able to vote on something to do with my child's education; so I gathered important documents, filed the papers, got fingerprinted by both the RCMP and the FBI, studied a ninth grade civics book, took the test on US government, passed, and took the oath. Now I'm officially a Merkun. My three older sisters say I have a funny accent now. And I very rarely say toque, chesterfield and serviette. Sigh! But I only live @ 250 miles from my birthplace....Winnipeg.
Yes, yes, go Twinkies and Vikes, but secretly I say YESSS! when a Canadian team/athlete wins. It's just in my blood.
So I hope Jr. will learn to love things Canadian. We really are a fine bunch, eh. ;)
Lil M.
In every walk with nature, one receives far more than he seeks. - John Muir
Generic Benroy Build Journal here - My LilScamper Update Journal here
The Lily Pad...Image My LilScamper...Image Image
User avatar
mcspin50
Gold Donating Member
 
Posts: 488
Images: 158
Joined: Mon Oct 12, 2009 6:35 pm
Location: Perham, MN
Top

Postby atahoekid » Mon Oct 04, 2010 4:25 pm

I admire what you're doing there Lil. It sounds like you took a leap of faith. Good for you!! :thumbsup: You will get to love that Kreg jig. I built all of my kitchen cabinets and my entertainment center with that tool. It is really easy to use and I plan to use it a lot during my build. Makes it easy to get square and strong joints. Keep going, keep us posted and keep the pictures coming. :pictures: I'm going to keep watching with keen interest
Mel

"Believe in your abilities... Remember amateurs built the ark, professionals built the Titanic"

"Indecision may or may not be my problem" Jimmy Buffet

Image

The Road Foamie Build Thread: viewtopic.php?t=45698
User avatar
atahoekid
Platinum Donating Member
 
Posts: 1773
Images: 158
Joined: Sat Jul 24, 2010 2:49 am
Location: Incline Village, NV
Top

Postby mcspin50 » Wed Oct 13, 2010 10:30 pm

I'm sorry I don't have any pics to post, but I/we have made some progress. There's one coat of Helmsman Spar Urethane on the outside of both walls and doors. I lu-u-u-uv the look of the grain of the natural birch even more! I haven't ordered windows yet, so I just urethaned the whole surface of the door panels. I figure I can use the cut-outs for shelves or small table tops somewhere in the build.

Then tonight, No. 3 Son and I finally were able to get time together at home to cut the last of the full sheets of plywood that have been languishing in the garage. We...or more correctly I should say he (I held while he cut cuz his arms are lots longer and he cuts straighter than I can) cut the lower bulkhead wall, the piece that is both galley countertop & lower shelf in sleeping compartment, plus the face piece for said lower shelf out of the last sheet of 3/4" birch plywood, as well as the two pieces of 1/2" plywood that will top off the under-mattress storage area. Now I can heft the sheets around and not have to wait for help to move them.

Once the walls have 3 coats of spar urethane, No. 3 Son & I will attach them to the floor/underbed storage assembly, drop the whole assembly into the NT 5x8 trailer, and I can start to install the spars. I can hardly wait, but wait I must. I have a MN Weavers Federation conference this weekend that I'll be attending/selling my wares. The next weekend is a knitting retreat (yeah, don't all yawn at once...) that I'm co-hosting with two other shops.

Hey, but I'm closed on Mondays, and now that I have the plywood cut into manageable sizes, I can get out the ol' Kreg jig and get those spars and shelves and walls attached. I'll have this baby done in no time...right???...
...I can only hope. :worship:
Lil M.
In every walk with nature, one receives far more than he seeks. - John Muir
Generic Benroy Build Journal here - My LilScamper Update Journal here
The Lily Pad...Image My LilScamper...Image Image
User avatar
mcspin50
Gold Donating Member
 
Posts: 488
Images: 158
Joined: Mon Oct 12, 2009 6:35 pm
Location: Perham, MN
Top

Postby mcspin50 » Thu Oct 14, 2010 11:48 pm

Progress has been made, but nothing worth photographing except the new family member, Walnut, (our new kitten rescued from Detroit Lakes Walmart parking lot) exploring various regions of the garage after I made sure the second coat of Spar Urethane I applied to outer walls and doors tonite had dried. I'm just a little too lazy to download the pics onto my laptop, but believe me, they're ever so cute. :thumbsup:
Then I mixed up "Thrifty Alternatives" version of waterproofing (25% polyurethane & 75% mineral spirits) and slopped a coat on the lower bulkhead, the galley countertop/sleeping compartment shelf, the 4" edge piece for the sleeping compartment shelf. Then I used the dregs to start coating the oven shelf and the 1/2" plywood cover for the underbed storage/mattress base. Not fussy about that. And besides, I'd already finished of the dregs of a bottle of Merlot and started on a bottle of Malbec :wine: and my standards began to drop, so I figured it was time to stop painting and start talking to you folks. Less damage recovery. :D
Project will go on hold as I'll be at a weaving conference this weekend. Back at the build on Monday, Frost is comin' to MN!
Lil M.
In every walk with nature, one receives far more than he seeks. - John Muir
Generic Benroy Build Journal here - My LilScamper Update Journal here
The Lily Pad...Image My LilScamper...Image Image
User avatar
mcspin50
Gold Donating Member
 
Posts: 488
Images: 158
Joined: Mon Oct 12, 2009 6:35 pm
Location: Perham, MN
Top

Postby S. Heisley » Fri Oct 15, 2010 12:04 am

Hi, Lil,

I love your wood and that material is great too! You're moving along smoothly and doing a great job! Looks like you'll be done in time for camping in the very near future. :thumbsup: :applause:
User avatar
S. Heisley
Super Lifetime Member
 
Posts: 8774
Images: 495
Joined: Mon Sep 17, 2007 10:02 am
Location: No. California
Top

PreviousNext

Return to Build Journals

Who is online

Users browsing this forum: No registered users and 28 guests