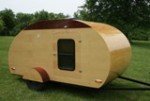
A Minnesota Build - The Lily Pad

...ask your questions in the appropriate forums BUT document your build here...preferably in a single thread...dates for updates, are appreciated....

Postby myoung » Fri Oct 15, 2010 7:31 am

Regarding your drawer construction:

Attaching the sides with the Kreg system seems reasonable and effective, but there are simpler and lighter ways of attaching the bottom. Often the bottom is slid into rabbets cut into the sides, front, and rear. By leaving the bottom loose in these grooves it will have room to expand and contract naturally.

Just a thought.
Mike Young
build thread: viewtopic.php?t=40459
User avatar
myoung
500 Club
 
Posts: 644
Images: 250
Joined: Sat Aug 07, 2010 11:21 am
Location: Nipomo, CA

Postby mcspin50 » Fri Nov 05, 2010 6:02 pm

Attaching the sides with the Kreg system seems reasonable and effective, but there are simpler and lighter ways of attaching the bottom. Often the bottom is slid into rabbets cut into the sides, front, and rear. By leaving the bottom loose in these grooves it will have room to expand and contract naturally.


Mike, I was wanting to try out the Kreg jig on something that wouldn't show, hence my attempt at a drawer for the stove. I'm glad you reminded me there are other more efficient and lighter ways to make a drawer as I probably would've continued merrily on making the other drawers is some similar, convoluted fashion. :crazy:

Sharon, Thanks so much for the compliments and encouragement. I'm really pleased with the grain and how the 3 coats of Spar Urethane look. It sure helped applying the coats with the walls lying flat. I kinda rushed through the underbed platform and storage parts and it shows. Not glass smooth like the sides. But no one will looking under the mattress right?. 8)
Lil M.
In every walk with nature, one receives far more than he seeks. - John Muir
Generic Benroy Build Journal here - My LilScamper Update Journal here
The Lily Pad...Image My LilScamper...Image Image
User avatar
mcspin50
Gold Donating Member
 
Posts: 488
Images: 158
Joined: Mon Oct 12, 2009 6:35 pm
Location: Perham, MN

Postby mcspin50 » Fri Nov 05, 2010 6:47 pm

I take Sundays and Mondays off at my shop, so Sunday I continued applying coats of Helmsman Spar Urethane (HSU) to the underbed storage and bed platform. I figure I might as well try to make as much of the teardrop water repellent as possible. I had the unattached pieces out in the driveway on sawhorses since the sun was nice and warm but the wind was cool.

Image

Image

These three pieces have 3 coats of HSU and I did them along with the outside walls so they're much smoother and "glassier" than the above pieces.

Image

I think it's because:
1) I did a better job of sanding and wiping between coats. Also the 3/4" plywood is much better quality than the 1/2". You can actually see through parts of the top veneer of the 1/2" so I didn't sand it much especially pre-HSU.
2) I didn't work the brush so hard and fast just tryin' to get it done, and
3) possibly because the outside walls and these three pieces were first coated with CPES and not the cheaper alternative of 75% mineral spirits 25% polyurethane like the underbed storage and bed platform. Any thoughts on that?

Sunday I applied another coat of HSU to floor and storage pieces. Was going to start assembling this:

Image

but since it was Halloween and there were MANY parts, I thought better of it and just put it away until Monday after my dentist appointment. I narrowly averted a $959 crown and got a $243 filling instead. Our insurance covers about $50 on a filling and zilch on a crown. :x What a deal! Send your kids to dental school!

So Monday the teardrop winter quarters/building space went from this:

Image

to this (done all by my little bitty 5' 2" ol' self):

Image

Then my friend and neighbor happened to walk by and I roped her into helping me get it to this:

Image

BTW, if you notice in shed pic 2, I don't usually hang clothes on the line in November. No. 3 Son is preparing his wardrobe for Deer Hunting Opener tomorrow morning.

Image

These clothes have been on the line for a week to get the smell of civilization out of them before he heads into the woods and shoots Bambi. :cry: You see, I grew up in a big city where I neither hunted nor fished. In the years that my boys and husband have hunted deer (not very many as husband is not an avid hunter/fisherperson), I've told them I don't want to see a dead, gutted deer hanging in the garage or off the deck, just bring it home in white freezer paper and I can eat it. But I do really like the venison sausage that the local butcher makes. Am I a hypocrite or what??
Last edited by mcspin50 on Fri Nov 05, 2010 8:23 pm, edited 2 times in total.
Lil M.
In every walk with nature, one receives far more than he seeks. - John Muir
Generic Benroy Build Journal here - My LilScamper Update Journal here
The Lily Pad...Image My LilScamper...Image Image
User avatar
mcspin50
Gold Donating Member
 
Posts: 488
Images: 158
Joined: Mon Oct 12, 2009 6:35 pm
Location: Perham, MN
Top

Postby mcspin50 » Fri Nov 05, 2010 7:35 pm

Wednesday was a monumental day for the Lily Pad!
The walls are now firmly attached to the floor system, and one spar has been secured to keep things square as the PL(can't recall the number right now) adhesive dries. (The lower bulkhead is just wedged in there at the moment.) Oh joy! Oh joy!

Here's pics of the process. No. 3 Son manning the drill:

Image

and (drumroll) now you're watching adhesive dry:

Image

We had one small booboo. Andy screwed one of the screws a little high. :( It will show even when the teardrop is dropped into the frame of the trailer, so I figured that's where I'm going to put the penny that marks the year the teardrop was built. I thought I'd drill a very shallow hole, CPES the bare wood, epoxy the penny in, caulk or somehow seal any space, and give the outside walls another coat of Spar Urethane. Any thoughts on that idea?

Now it's on to plan the galley since now I can ACTUALLY, PHYSICALLY SEE how deep, wide and tall it will be.

Image

Here's my first plan (although I've already made changes :thinking: ) Fewer drawers for one thing. The espresso machine is optional and only for times when there's shore power.

Image

I was thinking that I could place the WFCO 8725 behind the battery in the lower left corner of the galley, but facing into the sleeping compartment (I'll shorten the drawer to allow space for WFCO). There should be enough room for air circulation for it and the battery in the one space. I'll put a small vent on the side wall to vent the battery as well. Can the two be in the same space? Safety issues?

The Camp Chef Oven will be on the right side of the galley and slide out when I want to use it. I have contemplated putting a protected copper line under the trailer, but that kinda stumps me as to how to connect things. I already have this black gas hose that will reach from the galley to the 5# cylinder mounted on the tongue. I thought I might drill a hole in the side wall so that, when I'm ready to cook, I just pass this rather large fitting attached to the end of the hose through some kind of weatherproof access port and run it under the side of the trailer up to the gas tank. Just detach and place back behind stove when done camping.

Image

I remember our old Bethany pop-up camper had something like that, because I could hook up the stove on the inside or the outside of the camper and I would push the hose through a weatherproof opening on the side of the camper. I've tried to find one on the internet but haven't had much luck. Kinda like the electric or water hookups. Something like a central vac outlet, but weatherproof. Any ideas?

Thanks for stopping in and making it through my ramblings.
Lil M.
In every walk with nature, one receives far more than he seeks. - John Muir
Generic Benroy Build Journal here - My LilScamper Update Journal here
The Lily Pad...Image My LilScamper...Image Image
User avatar
mcspin50
Gold Donating Member
 
Posts: 488
Images: 158
Joined: Mon Oct 12, 2009 6:35 pm
Location: Perham, MN
Top

Postby S. Heisley » Fri Nov 05, 2010 7:54 pm

Lil, you are a hard-working lady! You're moving fast and you're doing a beautiful job! Thank you for posting the progress on your build. :applause:
User avatar
S. Heisley
Super Lifetime Member
 
Posts: 8772
Images: 495
Joined: Mon Sep 17, 2007 10:02 am
Location: No. California
Top

Postby mcspin50 » Fri Nov 05, 2010 8:11 pm

Aw shucks, Sharon. Thanks so much. I'm just basically copying a lot of ideas from Mark & Pat's Dragonfly. I just knew I had to keep it simple or I'd get scared and discouraged.
Your trailer is AMAZING! Your courage to tackle such a project is also AMAZING! And to design it and not just copy it...You go girl! :thumbsup:
I have a son who lives in San Diego so a trip to California with my teardrop is virtually assured. I hope I can stop by and see your trailer some day.
Take care,
Lil M.
In every walk with nature, one receives far more than he seeks. - John Muir
Generic Benroy Build Journal here - My LilScamper Update Journal here
The Lily Pad...Image My LilScamper...Image Image
User avatar
mcspin50
Gold Donating Member
 
Posts: 488
Images: 158
Joined: Mon Oct 12, 2009 6:35 pm
Location: Perham, MN
Top

Postby mcspin50 » Sat Nov 06, 2010 6:25 pm

Think I found a solution for the gas line exiting the side of the teardrop...

Image

Ordered it from here...
http://www.dyersonline.com/jr-round-electric-cable-hatch-polar-white.html

Gosh it's a mighty big hole to be drilling in the side of the Lily Pad though! :frightened:
Lil M.
In every walk with nature, one receives far more than he seeks. - John Muir
Generic Benroy Build Journal here - My LilScamper Update Journal here
The Lily Pad...Image My LilScamper...Image Image
User avatar
mcspin50
Gold Donating Member
 
Posts: 488
Images: 158
Joined: Mon Oct 12, 2009 6:35 pm
Location: Perham, MN
Top

Postby mcspin50 » Sat Nov 06, 2010 8:09 pm

And now for the latest hunting report...
No. 3 Son has bagged a yearling buck and an 8-point buck on opening day. What a marksman! :applause:
But he's not over the limit. Legally, a hunting party can bag as many deer as licenses in the group. So, technically, if there are 10 licenses, one person could go out and shoot all 10 deer while the rest stayed back in the hunting shack and drank beer and watched DVD's. Talk about getting back to nature!
Lil M.
In every walk with nature, one receives far more than he seeks. - John Muir
Generic Benroy Build Journal here - My LilScamper Update Journal here
The Lily Pad...Image My LilScamper...Image Image
User avatar
mcspin50
Gold Donating Member
 
Posts: 488
Images: 158
Joined: Mon Oct 12, 2009 6:35 pm
Location: Perham, MN
Top

Postby mcspin50 » Tue Nov 09, 2010 12:14 am

Progress to report. All except the double spars for the hatch are installed. Lo-o-o-ove that little ol' Kreg jig. That Kreg right angle clamp sure would've come in handy, but for $25 :shock: I figured I could just buck up and hold the spars in place. It's a little tricky to keep them from moving. Hey, but I've been doing a women's weights program twice a week for almost a year and I've got more muscle tone than I have had most of my adult life. :ok:

Just had to get the roof fan out of its box and set it in its future home to see what it'll look like.

Image

I put the vertical braces in for the little Gebo window in front. I used the scrap from the poplar 1x2's for the hatch. It was getting pretty late, so I left the double hatch spar to install when I wasn't so tired. Figured I'd just do those two little pieces. First, I had a heckuva time getting the drywall screws to go through the spar into the braces. It was making a loud creaking noise and hard to drive in. (It finally dawned on me that the poplar must be harder than the pine and the screws were Phillips head.) Second, I screwed one brace on the wrong side of the line. Fixed it and then went to bed. Today I thought better of it, took out the braces, used the Kreg jig to drill holes in them, glue and mount them. Much better now.

Image

Notice that I laid the cover for the underfloor storage in place on Photo 2. I'll attach hinges when I get the bulkhead and front wall covering in place. I might have to trim them down a bit.

I'm heading over to Renneberg Hardwoods in Menahga tomorrow a.m. (@ 30 mi.) to pick up some 1/8" 5x5 sheets of Baltic Birch to do the inner front wall and ceiling. I decided against using the white vinyl Polymax for that. I'll have to put it in the pile of stuff to return to Menard's.

I had visions of a white ceiling (hence the vinyl polymax) and a birch "headboard". I toyed with using the piece that would be the galley counter as the headboard, but then that meant finding some other counter material...tile...laminate...butcher block??? Decisions, decisions, delays, delays. So I'm going with the KISS principle (keep it simple stupid). One kind of material for the front wall/ceiling (then I don't have to monkey with working a transition around the little window), and keep that gorgeous grained piece of birch plywood for the countertop.

Trying to make sense of the WFCO 8725. The manual leaves a lot to be desired as far as clarity. Of course, it's not like I have a vast understanding of the basic principles of electricity and wiring. :scratchthinking: Found some great pics from N523RV/George & Sandi's build pics here that are helping me understand how to bring light and power to the Lily Pad. Thanks so much you two!
Lil M.
In every walk with nature, one receives far more than he seeks. - John Muir
Generic Benroy Build Journal here - My LilScamper Update Journal here
The Lily Pad...Image My LilScamper...Image Image
User avatar
mcspin50
Gold Donating Member
 
Posts: 488
Images: 158
Joined: Mon Oct 12, 2009 6:35 pm
Location: Perham, MN
Top

Postby S. Heisley » Tue Nov 09, 2010 11:02 am

You're doing great, Lil. The WFCO manual is a little on the foggy side, but after you've read it a few times, you'll wonder why it seemed foggy to begin with. If you find that you still have questions, there is a 'help' phone number buried in the manual and they are truly helpful. You're a smart woman. You can and will do this.

Setting your vent in place on your spars is just one example of your smarts. There are tales here of builders who didn't check their fit and had to add extra wood later.
User avatar
S. Heisley
Super Lifetime Member
 
Posts: 8772
Images: 495
Joined: Mon Sep 17, 2007 10:02 am
Location: No. California
Top

Postby aggie79 » Tue Nov 09, 2010 11:06 am

Lil,

:thumbsup: :applause: :thumbsup: Your teardrop is looking amazing! I'm jealous of the quality of your wood finishes. (I don't have the patience to make things look that nice.)

I'll be looking forward to your experience with the WFCO converter. I have the same one and am almost to the point of trying to figure it out, too.

Tom
Tom (& Linda)
For build info on our former Silver Beatle teardrop:
Build Thread

93503
User avatar
aggie79
Super Duper Lifetime Member
 
Posts: 5405
Images: 686
Joined: Tue Aug 07, 2007 5:42 pm
Location: Watauga, Texas
Top

Postby GeoDrop » Tue Nov 09, 2010 2:08 pm

mcspin50 wrote:Trying to make sense of the WFCO 8725. The manual leaves a lot to be desired as far as clarity. Of course, it's not like I have a vast understanding of the basic principles of electricity and wiring. :scratchthinking: Found some great pics from N523RV/George & Sandi's build pics here that are helping me understand how to bring light and power to the Lily Pad. Thanks so much you two!


I have a draft post documenting my WFCO installation and all I've learned, which is a lot. I'll clean it up and get it posted soon. I've sort of outlined it already on my blog at http://teardrop.n523rv.com/?p=260.

Let me know if you have any specific questions or need help, will be happy to answer with what I know.
Matthew (& Sandi)
The GeoDrop
User avatar
GeoDrop
Donating Member
 
Posts: 243
Images: 2
Joined: Mon Sep 07, 2009 9:45 pm
Location: Northeast Kansas
Top

Postby myoung » Tue Nov 09, 2010 2:19 pm

Fantastic blog. I'm sure that I will learn a lot from it.

I too noticed the minimal and confusing WFCO documentation. I appreciate the clarifications and suggestions. These should also apply to my 8712 model.

Your blog link is now prominently listed in my RSS feeds page of the Safari browser. Thanks.
:thumbsup:
Mike Young
build thread: viewtopic.php?t=40459
User avatar
myoung
500 Club
 
Posts: 644
Images: 250
Joined: Sat Aug 07, 2010 11:21 am
Location: Nipomo, CA
Top

Postby mcspin50 » Tue Nov 09, 2010 3:34 pm

N523RV wrote:
mcspin50 wrote: :scratchthinking: Found some great pics from N523RV/George & Sandi's build pics here that are helping me understand how to bring light and power to the Lily Pad. Thanks so much you two!


I have a draft post documenting my WFCO installation and all I've learned, which is a lot. I'll clean it up and get it posted soon. I've sort of outlined it already on my blog at http://teardrop.n523rv.com/?p=260.

Let me know if you have any specific questions or need help, will be happy to answer with what I know.


First off...sorry Matthew, I don't know why I called you George. :oops: I'm hopeless with names. :?

I was studying my WFCO 8725 after looking at your pics, and it looks like the two circles on the backside top right side are knockout plugs, right? Looks like you only had to knock out the one.
And I can remove the front panel and door by releasing the two tabs on the backside top, correct? Would a screwdriver work? I don't want to damage it. I'm really looking forward to your post. I try to ask folks (who I think should be knowledgeable about such stuff) about wiring 12v from scratch and they all just nod and smile and look a little stunned.

And it looks like my common sense is going as well as my memory for names. Drove the 30 miles in ye ol' 2002 Dodge Grand Caravan to pick up the 5x5 sheets of Baltic Birch (3-1/8", 1-1/4", 1-1/2" $112.66 incl. tax), and guess what?!? You can't get 5x5 sheets into the back of a minivan. I just assumed since you can lay a 4x8 sheet of plywood in there flat on the floor, that you can just tilt the 5x5's sideways and it'll slide right in...NOT!!! The top of the opening tapers in. What's that old saying...measure twice, cut once? I must be of the school of thought...don't measure, drive twice. :roll:

So it looks like I'll have to get some help tonight lifting the partially built teardrop (which, thank goodness, is still resting unattached on top of the trailer bed on 2-2x4's) onto temporary supports, and take the trailer to Menahga tomorrow morning. Missed my Pilates class this a.m. Now I'm gonna miss Yoga tomorrow a.m. :( Oh well, its a pretty drive through Minnesota pine country.

Weather has been absolutely beautiful here this week and is supposed to be nice through the end of the week. This, to me, is a sign from the Teardrop Gods that I need to keep on keeping on it. Tonight I think I'll attach the hatch support spars to the side walls and work on getting a pattern for the hatch ribs. It'll be me and Mr. Jigsaw :x battling it out again.

Which reminds me...I see some hatches with two side ribs and long cross braces, and other hatches that have six ribs and lots of short braces. Any thoughts on which is better? Does it make a difference if the hatch is 4 or 5 feet wide?
Lil M.
In every walk with nature, one receives far more than he seeks. - John Muir
Generic Benroy Build Journal here - My LilScamper Update Journal here
The Lily Pad...Image My LilScamper...Image Image
User avatar
mcspin50
Gold Donating Member
 
Posts: 488
Images: 158
Joined: Mon Oct 12, 2009 6:35 pm
Location: Perham, MN
Top

Postby mcspin50 » Tue Nov 09, 2010 4:19 pm

S. Heisley wrote:Setting your vent in place on your spars is just one example of your smarts. There are tales here of builders who didn't check their fit and had to add extra wood later.


Yeah, I'm ver-r-ry careful about measuring. Did you read the part about fitting 5x5 plywood sheets in my minvan?? :lol: :lol:
Lil M.
In every walk with nature, one receives far more than he seeks. - John Muir
Generic Benroy Build Journal here - My LilScamper Update Journal here
The Lily Pad...Image My LilScamper...Image Image
User avatar
mcspin50
Gold Donating Member
 
Posts: 488
Images: 158
Joined: Mon Oct 12, 2009 6:35 pm
Location: Perham, MN
Top

PreviousNext

Return to Build Journals

Who is online

Users browsing this forum: No registered users and 16 guests