The MinneBago - (7/29 update - Campable!!)

...ask your questions in the appropriate forums BUT document your build here...preferably in a single thread...dates for updates, are appreciated....

Postby Elmosaurus » Sun Jun 27, 2010 8:05 am

Thanks guys. I was pretty impressed myself that the angles turned out so precise on the wheel wells; I didn't think I'd get them _that_ exact...

The asphalt emulsion actually dried in about two days. It was no longer tacky, and only slightly 'squishy' in a few places on Friday afternoon. We did end up having rain and wind that night and throughout the following day, so it was a good thing the canopy was up. I'm sure that in direct blazing sunlight, it might have dried faster, but we just didn't get that kind of clear weather unfortunately.

planovet; thanks. It's not my cat, just a picture I found online a long time ago. But it sums up my personality very nicely. I do like cats, even though I am without one currently, I'm into collecting modern firearms, and I've very much always been somewhat (heh) geeky and into all things sci-fi, video game, and computer nerd. So, yeah... that's essentially 'me'. :lol:

I'll post update pics of the finished floor later today.

E.
User avatar
Elmosaurus
Teardrop Advisor
 
Posts: 51
Images: 71
Joined: Mon Jun 21, 2010 1:06 pm
Location: Northeast Pennsylvania

Postby Elmosaurus » Sun Jun 27, 2010 6:48 pm

Score and Snap. Or, use the power tools... hmmm...(Friday, 6/25/10)

So, I set out to insulate the floor. I bought 4 sheets of 2x8 1 inch polystyrene from the HD and got to work as soon as I got home Friday.

At first, I was scoring with a sharp razor, and snapping off the pieces I needed. But since so many of them were the same width, I said to heck with it, and set the fence on the table saw. After ripping to width, I continued to score and snap for each section. Things went much smoother and faster that way.

Words of caution; don't bind the material on the sides of your blade, and keep it moving the entire time! It stinks something fierce when it melts. (plus, it's probably really bad for the blade) Watch where that razor goes carefully. A few times, I'd nearly sliced myself because you get so used to the material having no real resistance when you cut.

After filling all the cavities, I gave each panel a few screws or so to just give it some extra 'hold'. They all fit in tightly, but I figured it would not hurt to have that extra little mechanical method of attachment, rather than relying entirely on friction.

Image

It turned out I only needed three sheets, and had some left over anyhow, so while my wife was out for the day doing errands, she returned the fourth sheet to get my $9 back yesterday. :) (I lost the entire build day to having to go out of state to move furniture for a relative. :( )

After finishing up the insulation panels, I flipped the floor with my wife's help, and we proceeded to line up the holes I had predrilled. Insert bolts up through the frame, and finger tighten as they line up with the hole as the floor is lowered down into alignment. It was a good thing I pretapped the bolts into the hole about 2 turns; it made the thread engagement much easier.

After getting it all partially bolted in place, while the floor had some 'float', we jostled it back and forth while measuring the side clearance on each side of the trailer. The goal was to center it on the trailer frame again, like I had before I measured and marked the hole locations I drilled for the lag bolts. A few minutes of frustration pushing the floor around (the asphalt became slightly tacky in a few places because it wasn't dry to the core, and when loaded down on the frame, smudged to the 'semi-fresh' asphalt emulsion deeper down) and I had things lined back up just fine. 4 15/16" on each side, perfectly along the entire length. With that, I completed torquing down the lag bolts, and the floor was now mounted to the trailer.

At that point, the mosquitoes were doing their best to attack, so not wanting to get covered in bites, I cleaned up and covered up with the tarp for the night.

E.
User avatar
Elmosaurus
Teardrop Advisor
 
Posts: 51
Images: 71
Joined: Mon Jun 21, 2010 1:06 pm
Location: Northeast Pennsylvania

Postby Miriam C. » Tue Jun 29, 2010 11:14 pm

:applause: :thumbsup: Your getting there! Little more sawdust and a lot more :pictures: :pictures: :pictures:

Image
“Forgiveness means giving up all hope for a better past.â€
User avatar
Miriam C.
our Aunti M
 
Posts: 19675
Images: 148
Joined: Wed Feb 15, 2006 3:14 pm
Location: Southwest MO
Top

Postby Elmosaurus » Sat Jul 10, 2010 9:02 pm

Of Compressors, Plywood, and Trailer Walls.... (Saturday, July 3rd through Today)

So, it's been a while, but a little 'large' update.

First, it took me much longer than I wanted to source my plywood. I wanted something strong enough to do the wall justice, since I am going to do the maiden voyage sans interior skin. This meant I needed something substantial enough to handle the dynamic load forces the walls will see while being towed.

Long story short, Marine ply is awesome but ungodly expensive. I couldn't bring myself to drop $600+ on plywood exterior skins. CDX is, well, CDX. It's got knots and issues even on the C grade side, which means even with my sealing primer before the paint job, it's not going to be truly 'waterproof'.

So, after two weeks of searching, I found a product called Ultraply XL. It's sold as an underlayment, in 1/4" thickness. It is made by Moreland products. (Moreland Wood Website) They claim it is made with a true exterior grade glue, and is free of voids, just like Marine ply. (they use filler instead of 100% defect free layers) I did a few days worth of searching and research on it, and it seems many modern boat builders (kayak mostly) are willing to attest that it's a suitable light duty replacement for marine grade ply. Given that those final products are immersed in water when in use, and my application will be shielded with an exterior primer and paint that makes it 'mostly' waterproof, I figured it was a safe bet.


I have to say, for a 3+2 veneer (not exactly a true five plys) layered sheet, it's very well built thusfar from my working with it. I strongly encourage you to check into it if it's a product niche you think you need to fill.


With the wood sourcing issues out of the way, I set out to build the first wall. I decided to attack the passenger side wall first, because it has the door, which means trickier cuts, placement, etc. By tackling it first, I figured I'd want (and need) the initial 'let's build a wall!' drive I had to overcome the minor frustrations I was sure to encounter. I was of course, unfortunately right.

As I went to sketch and lay out the framing on paper, I realized that with the strength of the Ultraply product, I really didn't have to worry about turning the frame spars like I was planning on. Initially, I wanted to lay the 1x2 spars flat against the plywood, resulting in a .75" cavity. A week or so ago, I had concerns that this might not be strong enough, so I decided to turn them, and place them in the wall 'house stud' style. This would create 1.5" cavity walls, and get the greatest dimensional strength from the spars. Right before starting though, I saw that when I laid them flat on a test glue up piece, the wall would be just perfectly fine strength-wise. (I have basically been very aware of the 'overbuilding' moniker on this site the whole time, and realized I was falling into that trap when I had decided to turn the spars) So, never be afraid to mock up some test pieces; they proved my plan of turning the spars was un-needed. (and would have caused much more grief in the build, and lost interior space!)

If some of you haven't figured out yet, I don't have a lot of plans on paper for this build; much of it is coming from sketches on paper and what's in my head. I'd have taken the time to install CAD software and use it but I'm so much under the gun, I'm just throwing down as I go. (not the first time, I've built tons of cabinets and furniture this way too, so I knew I wasn't damning myself to failure instantly) So, this means that finding measurements for the wall based on positional location of things (like where the window will fall, or where the wheel well actually is, and where the door needs to go in relation to those, and then where the seams for the plywood and the structural spars need to go, etc.) was an interesting and time consuming process. :?

But, without any fears, this is what it looked like when I got started Saturday morning last weekend.

Image

One of the interesting issues I ran into: how do you clamp something 'farther in' from the edge when you don't have a deep throat clamp? You improvise! :lol:

Image

My approach is to only staple from the skin side, as I don't want screw heads on the skin that can flex and create problems in the inflexible primer later on. But I needed to get the spar running parallel to the edge clamped down in place so the staples could do their job. (the spar warped just enough from the humidity that it would have pulled any staple I shot before I could get to the next one) So I took a piece of scrap, and half screwed a deck screw into it, and into the back of a spar (not too deep now!) and used it like a lever to hold down the parallel spar. With home-made clamping device conceived and the clamp in place, I was then able to shoot all the staples and lock it together perfectly!


Now, if you were sharp eyed, beneath the trailer you can see the compressor I bought for this project in the first picture. I knew I'd need one to make things go smoothly, and since I was having troubles sourcing plywood, I made use of the time to research and choose a decent compressor for the job. I picked up this DeWalt using a 10% off coupon at Lowes, and brought it home happily to handle the supply needs of the cheapo $16 (after 20% off coupon) Harbor Freight 2 in 1 18 Gauge brad/staple gun and $12 Harbor Freight Air drill. As much as I liked the portability of the unit, for the $315 price, it just wasn't up to handling the needs of the air drill like I wanted. It handled the stapler just fine of course, but I felt it was cycling on and off way too much when using the drill. I really wanted a compressor that I'd be able to use with other hungrier air tools down the road, since I work on cars frequently and paint things and such occasionally.

I finished most of the wall up on Monday anyhow, but couldn't get the final profile routed and finished up due to rain Thunderstorms that were coming from Tuesday through Thursday. So.... idle hands being the devil's playground and all....

On Tuesday, I returned the DeWalt to Lowes and headed over to Home Depot to buy this...
:lol:

Image

In case anyone doesn't know, Home Depot DOES accept reasonable competitor's coupons (aka, another Lowes 10% off coupon) without even batting an eye, so I was able to upgrade significantly for only $60 more...
:thumbsup: :thumbsup:

Of course, it's bigger, and not really portable (even though it has wheels) so I decided to place it in my basement where it's pretty much going to always live. (barring any huge projects elsewhere like at my parents house that need me to move it there temporarily) Of course, now I had to get the air from the unit to outside the house for the time being until I run nice copper mainlines around my basement workbench area and out through the exterior wall.

So, the basement window was 'borrowed' for the time being, and I sealed it in using a spare piece of CDX to keep the weather, bugs, and heat out.

Image

Ghetto, I know, but I don't have time or budget to do the copper mainlines right now, and I'm officially behind schedule BIG TIME because of the plywood sourcing issues.

With that done, and the rain cleared out for the next two days, I finished up the wall this morning finally, even though it was 95% done on Monday earlier this week thanks to the day off from work for July 4th. (Happy Birthday America! Eternal thanks to all those that sacrificed to give this country freedom!) The only thing remaining is to route out the door opening after the walls are up and installed. (windows will be done after maiden voyage)

Image

Not bad, all things considered: had I not had issues with weather and wood sourcing, and personal commitments last weekend, I'd have had this wall done in under 8 hours I think. But even with the interruptions, it only took about 2 and a half days. Still not bad I guess.... but I'm still behind schedule! So, onto the second wall tomorrow morning! (even though I only have until noon to work on it)

E.
Last edited by Elmosaurus on Mon Jul 12, 2010 8:53 am, edited 1 time in total.
User avatar
Elmosaurus
Teardrop Advisor
 
Posts: 51
Images: 71
Joined: Mon Jun 21, 2010 1:06 pm
Location: Northeast Pennsylvania
Top

Postby Cliffmeister2000 » Sun Jul 11, 2010 11:10 am

Great progress so far! Keep the photos coming! :thumbsup:
God Bless

Cliff

♥God. ♥People.
1 John 4:9-11

My Teardrop build pictures
User avatar
Cliffmeister2000
Titanium Donating Member
 
Posts: 3622
Images: 157
Joined: Thu Jul 26, 2007 10:18 pm
Location: Phoenix, AZ
Top

Postby Elmosaurus » Tue Jul 20, 2010 1:19 pm

Rain, Rain, go away.... (and stay the hell away)(on or about July 11, 2010 through yesterday)

I've been dodging rain constantly, and it's putting huge dampers in my construction. If you are building inside a garage, take a moment to be thankful. VERY thankful. Sealed inside, you are immune to bugs, sorching afternoon sun, and drizzle to downpour rainstorms that have you looking over your shoulder every few minutes at the sky!

Last week, near the beginning of the week, wall number two was started. I was supposed to start on Sunday morning, but having literally only 45 minutes of time apparently, all I got done was area preparation for it's build. How come you ask? Well, I started the morning by moving all my tools outside, got the saw, cords, hoses, etc. set up, and starting clearing up and sorting the lumber so I could make sawdust and frame the second wall, when it started drizzling and I had to break everything down and bring it all right back inside. ARGH! :x It wasn't the end of the world though, since I had an afternoon commitment that would have pulled me away shortly thereafter regardless.

So, I actually didn't get to start the wall until Tuesday after work. Using the first floor as an elevated work space, and somewhat as a template for the second wall, I was able to quickly cut framing spars and start assembling them in place.

It all went so smoothly, that within another night of work, the wall was 95% done. I even took some extra time to ensure that it matched up exactly to the other wall in profile and shape. And I mean, EXACTLY. I was not off by even 1/64" in any location on the outer dimensions of the wall profiles. I was stoked! :D

Now, I'm going to temporarily interrupt this broadcast to bring you a side note on the use of Gorilla glue: If you choose to use it as an adhesive in your build, you may encounter the problem I had with the floor frame, and then again while building the first wall. That being, after dampening one side, then spreading glue on the other, when you clamp and fasten, and the glue activates, it foams. Like crazy. Everywhere. And you have an enormous sticky mess if you try to deal with it. Over time, you learn to apply 'just enough' glue so that it only oozes a little bit of foam. But it still oozes; oh yes it does. Well, I learned two things important to deal with it.

First - You'll need a sharp chisel. Use a decent wood chisel (I'm using a 3/4" blade) and flip it over. (so that the flat side is facing upwards) You can run this along your plywood at about a 35-40 degree angle, with it's side to the spar, and it'll get the glue foam off after it's cured. If you try to mess with the foam before it's cured, you'll just make a sticky mess and ruin anything that touches the foam.

Second and much more important! - Timing; the foam is tacky for about 90 minutes. After that, the foam has set, and will remain soft like semi-frozen bread. It gives, but not too easily. (hence the sharp chisel mentioned above) After more than 3 hours, the foam begins to solidify, and I mean solidify. The key to removing the foam is to run your chisel and clean everything up at around the 2 hour mark. If you do, it all comes up very easily, in long easy to manage complete strands of foam. Once I learned this, I was often able to clean a joint in one pass, unless it was too long for me to reach, or I ran into a major defect in the wood. (protruding splinter or something) Prior to learning this, I had been fighting with chiseling 2 day old foam on the first wall due to it raining and stopping my work; and that was like sculpting marble! So, lessons learned - get in there and clean up your foam at the 2 hour mark and you'll be very glad you didn't let it sit longer!!!

With that, I return you to your regularly scheduled build log... :)


Of course, before I could finalize the wall by routing the front profile clean, the rain interjected and put me on hold through the second half of the week, yet again...

I finished the routing of the plywood front profile early Saturday morning, and finally remembered to take a picture.

Image

Later that day, after some personal commitments, I framed and squared the rear wall framing. I partially skinned it to lock in the squaring I carefully measured out, but left it partly open so that I would still have access to pass things in and out of the trailer easily to the rear of the TT. By nightfall, it was ready to be erected in the morning.


Finally, on Sunday morning, we got to work making this thing finally look like more than just a pile of flat panels! Lots of Gorilla Glue mess, pre-drilling, and screwing!

Rear wall is ready and in position:

Image

Rear goes up and is braced temporarily during fastening:
The top of the brace is clamped, and the bottom is lightly screwed to the inside of the wheel well. No, the screw did not go all the way through the 3/4" ply, as that would have punctured my asphalt seal! (And yes, that's yours truly predrilling to install the decking screws; apparently my wife doesn't understand the response, "...nah, I don't want to be in the pictures")

Image


And now the drivers side wall, raised, braced, and fastened:

Image

Now, a little comment on preparedness. (and my lack thereof) If you're going to tackle a big gluing job, make sure you have enough glue. Yes, you guessed it; mid wall raising, I ran out of adhesive. Durrrr.

It wasn't the end of the world, as I had an afternoon commitment anyhow, so we broke off for the afternoon, and I went and cleaned up. My wife ran out and got more glue while I was taking my brother to an event, so not too much time was lost. But I was fortunate I ran out in between walls, not after having applied half the adhesive needed and ran out in the middle of a wall. So, be wary. Make sure you have enough for the entire step ahead you are about to undertake!


Later that evening when I returned, we put in the final 2 hours to raise the passenger side wall, and after gluing, pre-drilling and fastening, the main walls are in place. "It actually looks like a trailer!" exclaimed my wife. Well, I should HOPE so.... :roll:

Of course, the weather was calling for heavy, HEAVY rains that night (again? really? whodathunkit!) so we put ourselves to task of trying to protect the project as much as possible. We used some scrap spars to create a false roof frame, laid out sheets of ply on top to create a roof, and then elevated the canopy over a foot above the ground to get some kind of rain coverage over the TT. I used the tarps to protect the exposed sides, and crossed my fingers.

Image


The next day? Some rain splatter here and there, but nothing horrible. Canopy fell off our elevated supports, kind of as expected... Luckily the canopy frame held together. (the picture was taken the next day in the afternoon once the sun was out and I was already elbow deep on the front wall frame, since I forgot to photograph the makeshift shelter the night before)

So, I cleaned things up and got to work framing the front wall. Squared, skinned, it was almost ready to mount!

Image

I cut and installed a few more spars to fill in the space so that there's a spar every 12".

I forgot (as usual) to take pics as I finished it, then mounted it, so I'll get those tonight.

I did however take a picture of my new doorway, before I mounted the front wall. I knew once the front wall was in place, with gaps between spars that are 12" or less in distance, I wasn't going to be able to get into or out of the TT without a serious body contortion exercise that would make a yoga master proud, so I decided to partially rough cut an opening in the doorway area. I have hesitated to cut it out entirely as I want the wall as rigid as possible while I complete the front wall and roof spar installation, since there is some flexing that goes on during that process and I'd be majorly peeved if I cracked something important due to a temporary weak point in wall stability.

Image

Once the roof is sparred in and skinned, and the wall is tied to the roof, I'll be more comfortable cutting out the rest of the doorway. (I'm probably being paranoid here, but after so many hours of labor, I'm not taking chances; I'd rather wait until all wall flexing is done with and the structure is complete before I cut out any more doorway material)


Stay tuned for more! (I'm pretty much out of time as it needs to be camp-able by next weekend.... It's going to be an interesting and exhausting NINE days.... :thinking: )

E.
User avatar
Elmosaurus
Teardrop Advisor
 
Posts: 51
Images: 71
Joined: Mon Jun 21, 2010 1:06 pm
Location: Northeast Pennsylvania
Top

Postby Elmosaurus » Wed Jul 21, 2010 11:14 am

A good sense of space... (July 20, 2010)

I got to work immediately after I got home from work last night; using the power of my Bosch router and flush cut bit, I cleaned up the front flat wall section that was installed the night before. Despite the constant threat of rain (60% chance according to Weather.com) I decided to push through, and get as much done as possible.

Image


Image

Notice the splint'ed spar. I was getting tired of good waste stock lying around, and figured I could scarf/splint two pieces and have a plenty durable piece for a spar. So, a few screws and extra glue, and I have a nice sturdy spar. :) I think I may do this in a few other places, but minimally, as I don't want to add too much weight unnecessarily.

The sanding of the plywood profile actually took more time than than I wanted, but I wanted a nice clean seam. I had to do both the top and bottom edges of the plywood so that the angled slant walls would mate cleanly to the front flat panel. About half an hour later and two fresh 100grit sander discs, both edges were profiled to match the 45 degree slant coming from where the slanted walls will be.

Of course, a 45 degree contact edge is basically nothing as far as gluing and stapling goes, so I needed more meat for the slanted panels to be glued and stapled to. Enter the table saw.

I ripped some of the scrap 1x2 waste stock I had laying around, and created a series of beveled stock. These pieces were cut to length, and glued and stapled to the top and bottom of the spars that framed the front wall. This provided a very nice amount of surface area. Some glue, and stapling later, and the top and bottom surfaces are ready to receive the angled wall plywood.

Image

The flash makes the pic look like it was taken at night, but it's still well lit outside. It doesn't look like much of a picture, but if you stop to realize the spar the beveled piece is sitting on is perpendicular to the plywood surface, you can see it came out pretty clean looking, matching the 45 degree angle nicely. (I was happy with it. :D )


With that, I set out to mount the upper most front angle/slant wall. Glue was laid, and while my lovely wife exhausted her arms holding it in place from the inside, I climbed up on the ladder with pneumatic stapler in hand, and locked it in place. Due to humidity, there were slight warps in the walls that I had to pull out while stapling. On one side, I used my makeshift 'deep throated clamp' technique to impart the counter bend to straighten the drivers side. (forgot to take a pic; sorry) It allowed me to staple into it perfectly square, so one side down and good. The passenger side however, was more tricky. I had to staple it 1/3 of the way up, then bend the wall slightly, and staple it more, etc. I finally got it all done, and installed the upper spar to finish the rough framing for that panel.

Image

Image

Upon interior inspection, I found a minor problem; while the upper spar was being installed, it slipped downwards slightly on the drivers side. :o Apparently the clamp did not hold it in place properly, and since I was on the outside gluing and stapling before I got inside and noticed it, taking it off would have destroyed too much of the plywood. (it was thoroughly glued and stapled at that point) I decided to leave it go for now, and will fix it by shimming the bevel that I'll be installing on that edge to create the gluing/stapling surface for the roof sheet that will meet at that edge.

The panel still needs three cross spars to fill it in and strengthen the sheet loading forces of the plywood, since it will encounter the most buffeting at highway speeds. Then I'll clean up the plywood edges on the outside, shim and install the bevel, and sand those two edges to 45 degree profile. That will probably be the goal for tonight.

Even still, with that wall in place, one can get a very good idea of how much space is inside the TT. At this point, the wife and I are pretty satisfied with the volume of space we'll have.

E.
User avatar
Elmosaurus
Teardrop Advisor
 
Posts: 51
Images: 71
Joined: Mon Jun 21, 2010 1:06 pm
Location: Northeast Pennsylvania
Top

Postby vtx1029 » Thu Jul 22, 2010 1:19 am

Looking good!

How tall is it inside? and the overall height outside?
User avatar
vtx1029
Teardrop Master
 
Posts: 251
Images: 70
Joined: Fri Apr 23, 2010 11:42 pm
Location: MN
Top

Postby Elmosaurus » Thu Jul 22, 2010 2:04 pm

vtx1029 wrote:Looking good!

How tall is it inside? and the overall height outside?


Thanks!

The interior ceiling height should be right at 6 feet. Perhaps 3/4" less if I decide to install engineered hardwood flooring instead of vinyl or laminate junk. (seriously considering it, since the price per box of clearance engineered hardwood just isn't really that bad at the one closeout place up here)

The height was chosen mostly because I wanted to use exactly so many sheets of plywood. Currently I have very little plywood waste; maybe a couple of square feet in small sub-two sq. ft. pieces at most. Had I been willing to have extra waste, and buy a few more sheets of ply, I could have pushed it out to a higher interior clearance. But since I didn't want to spend more money on ply, and given that I'm 5'6", and my wife is a few inches shorter, even at that height if we are wearing sneakers our heads should not touch. :) (I figure we'll be wearing flip flops most of the time though. :D )

I doubt we'll spend that much time standing though; once the interior is finished, either we'll be sitting in the dinette, or laying in the converted dinette on the mattress.

More progress pics coming tomorrow AM. I made huge progress last night and expect to have all exterior woodwork done by the end of tonight. Then, it's on to exterior finishing; putty, sanding, primer, then paint.

Seven days remaining!.....
:worship:

E.
User avatar
Elmosaurus
Teardrop Advisor
 
Posts: 51
Images: 71
Joined: Mon Jun 21, 2010 1:06 pm
Location: Northeast Pennsylvania
Top

Postby Elmosaurus » Fri Jul 23, 2010 11:33 am

Just when you think you'll flip out if you inhale any more sawdust... (Wednesday, July 21 and Thursday, July 22)

These last two days have shown huge progress; So much so, that I'm basically done with wood work. In some funny way, I'm almost going to miss being covered in sticky glue residue, varying grades of sawdust from the ultra fine mist made by my sander to the coarse chunks that fly everywhere and stick to my skin made by my table saw and router.

Almost. :R


So, let's get the show and tell moving... (less show and more tell; I was so busy I forgot to takes pics often. Sorry!)

Wednesday

There aren't any pics for Wednesday nights work, as I was pushing feverishly since I got home from work late. Even though I didn't have much time to work, I started by cleaning up the front slant wall plywood, using the router on the side edges, and a handheld sabre saw to rough cut the ply at the top and bottom edges. I used a few fresh sanding discs to bring the edges down to match the plywood, applying a 45 degree edge to them like I had to the other front wall sections previously.

I then had to install the remaining bevel stock in the front wall sections, both down low at the floor frame connection, as well as near the top where the spar had previously slipped down a little.

I did end up having to make a 1/8" thick tapered shim to 'level' the top piece of bevel stock to account for the spar that slipped downwards. This should be a warning to those of you doing builds; make sure pieces are where they are supposed to be before fastening them permanently! That one little mistake ended up taking me longer to deal with than I would have liked. But problem solved and crisis averted, so I glued and stapled everything into place and could finally move on to other things the next day. (I only got in about two and a half hours that night)


Thursday

The following day was scheduled for perfect weather, and being on a time crunch, I decided to take the day off from work. I figured I could get done, or very very close to done with the woodwork if I used a vacation day, so I made the call when I woke up and got outside to start on the sawdust pile.

First thing for the morning was simply cleaning up the rear upper wall profile in prep for putting the rear roof section in. This was a quick matter of router application and light sanding and within minutes the rear upper wall was all sharp corners. :)

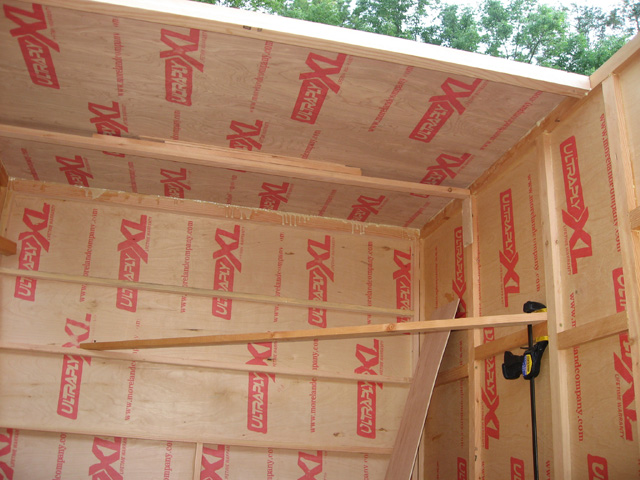
Next was the last important and critical junction I'd be making; the installation of the rear roof skin. I needed to do this before anything else as I wanted to make sure it was as square as possible back there to increase the strength of the completed torsion box effect. So, I placed a spar across the drivers side wall to the rear wall, clamped it in place, and locked it into square using a temporary screw. This can be seen in the lower half of the photo. Up top, I temporarily placed a spar to keep the walls exactly the correct distance apart, and pushing up on the roof skin so it wouldn't sag at all.

With the trailer walls prepped, I glued the forward most spar to the skin precisely while it was all down on the ground. (and easier to manage) The skin is only applied to the back half of the 2x2, as the front half will be the ledge that the skylight sits on. (more on that later) With the spar glued and clamped, I set it aside to dry.

While the glue cured, I ripped some more 2x2 and 1x2 stock based on my estimates of what I'd need. I'll say this since it's the last time I should have to rip stock for this project; it may be awesome getting a bunch of better quality spar stock out of one piece of 2x10 or 2x12, but man, it's messy, and cumbersome, and just plain work. I suppose it's better than the alternative, (paying for overpriced precut stock that is wildly warped and of imprecise width) but when it covers you in tons of sawdust, requires two people to safely handle the large long board while you are ripping, it's just not exactly fun. Perhaps it wouldn't be as bad if I had a nicer table saw; I have a crappy very old Delta 10" $90 saw that drifts if I don't check it religiously that I use so infrequently I can't justify replacing. Anyhow, I digress; ripping spars kind of sucks. :lol:

Once the glue was cured, I lifted the skin with it's forward most spar onto the frame, and began applying glue to the perimeter wall tops. A generous application of glue (too much; it oozed everywhere) and a quick flip over of the roof skin and lining up of my marks, and the roof was in place.

Image

You can't see it in the picture, but there's a bunch of concrete blocks and paver stones sitting on top of the roof skin to weigh it down and ensure contact. I decided to not use staples on the roof as I didn't want any punctures in the plywood at all up there; I figure it's one less potential point of entry for moisture or water vapor.

I then clamped the two walls towards each other using my homemade jig, which tightened their grip on the forward spar, (the one glued to the skin previously) and pocket drilled and fastened the spars to the wall.


While that was drying, I then moved on to the rear lower wall. I had to add two vertical spar sections in the lower half, as I was using two left over small sheets of plywood. (waste from the forward roof sections) Since the two sheets were going to meet 'in the middle' of the wall, I needed something to fasten them to. Spars in place, I glued and stapled the sheets in place, and took a break for lunch.


I came back out after lunch, and got to work cleaning up the roof skin and lower wall skin with the router. Very quick and smooth. Well, mostly.

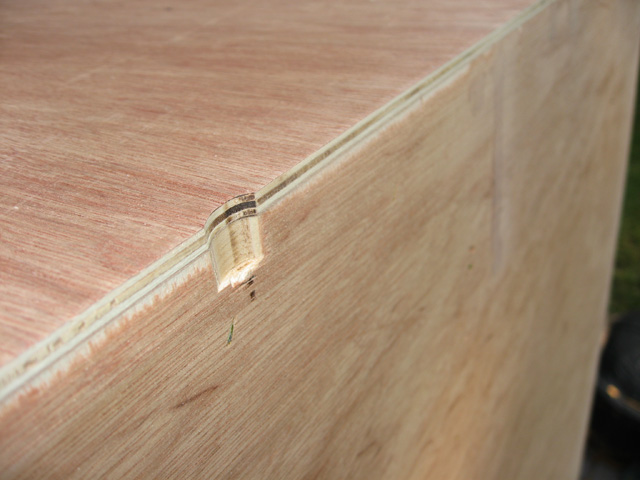
See, there's this point I want to make about tool maintenance. I forgot to oil the bearing on the flush cut bit when I started work, and as expected, Murphy reared his head. Part way through flush cutting the roof profile, the bearing blew out and the bit dug partly into the side wall. :shock: Luckily, I had more bearings on hand to repair the bit and continue work, but make this point to yourself; take care of your tools! I'll have to putty the divot that the router bit made digging 1/4" or so into the sidewall. It's not the end of the world, but I'll pay particular attention to that spot from now on to make sure the putty doesn't crack and let moisture in.

Image

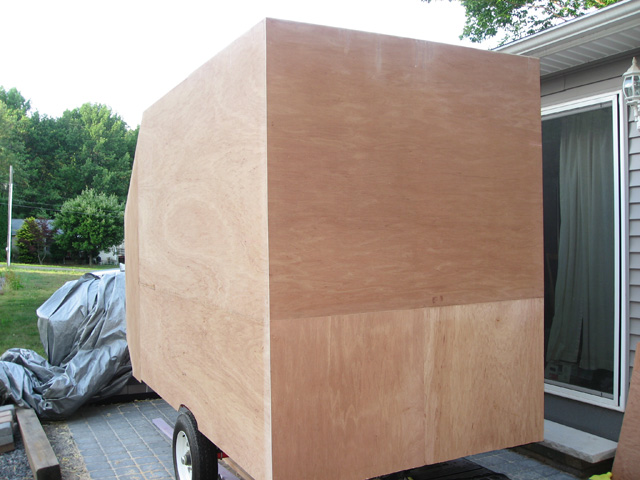
With the roof and lower rear wall skins cleaned up, I remembered to stop and take a pic, and realized I now had a really big box!


Image


Next, I moved on to finishing up the spars in the front slant wall area. I reinforced the top spar making it into a 2x2, while inserting three more 1x2 spars horizontally. I had the lumber after ripping so many more 1x2s that I decided not to bother splicing any with makeshift splints here. Lastly for this section, I installed a 2x2 for the roof. (sorry, I didn't move the ladder)

Image

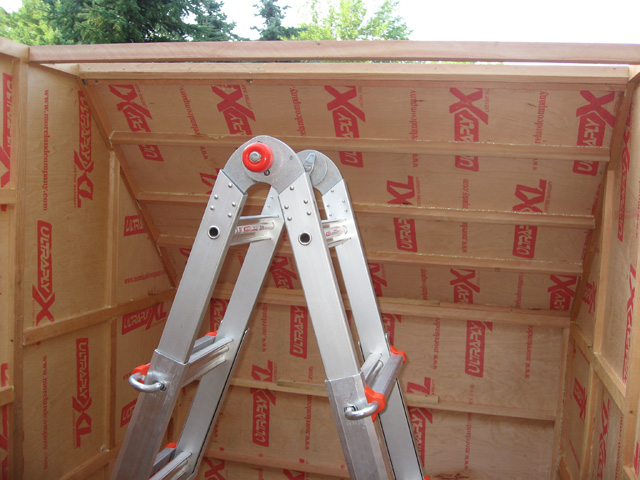
The first roof spar is the rearmost edge of a small roof skin that will be about 9" wide. It's half skinned like the forward edge of the rear roof skin I installed earlier. The other half is left bare to receive the skylight.

The skylight is an idea borrowed from member Bobhenry, but with a small twist. Bobhenry used Lexan material as his entire teardrop roof; I didn't want to do that, given that I'm a more boxy shape, and I didn't want 'that' much of an open to the sky feeling. So, the largest sensible size the BORG sells of Lexan is 36x72. Turning it sideways, this makes for a perfect 3 foot skylight the width of the trailer. The two ledges that were left on the spars will be the mounting areas for the edges of the sheet. (along with the top's of the side walls obviously) I will also run two spars in the opening to add support for the Lexan sheet. We haven't decided yet, but I will probably tint the Lexan using something that hopefully rejects heat. (automotive window tint)

Now, the moment that made me giddy; since the roof skin was in place, and the rear wall was complete, I took the router and zipped out the entire doorway entrance! Yay! No more hunching over just to get into and out of the trailer!

Image

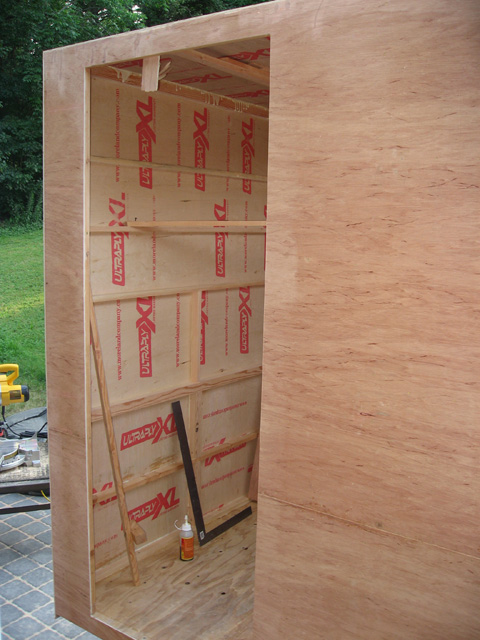
Yes, that's right, with that one task, this thing is really, really beginning to feel like an enclosed travel trailer!

In that picture, you can see right behind my carpenters square the two verticals spars I installed where the two rear lower sheets of plywood meet up and are fastened. Thought I'd point it out since I didn't have a pic from when I was building it earlier in the day.

I put the camera down and got back to work, but forgot to pick it up again the rest of the night. (sorry, no more pics for the work)

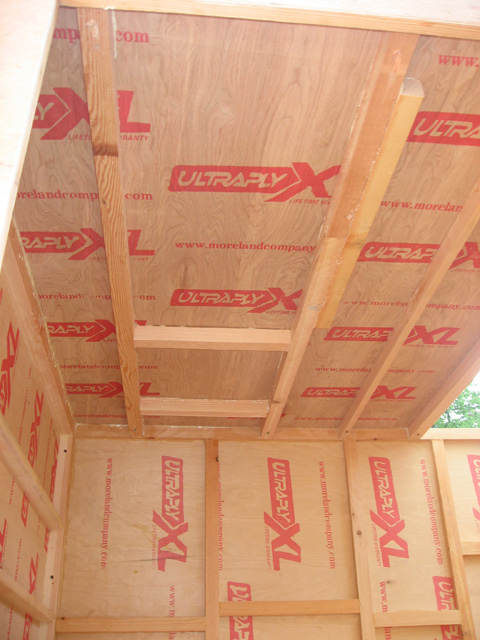
After opening the doorway, I assembled the spars for the fantastic vent fan using 2x2 stock, and glued and lifted it into place in the center of the rear roof skin. I decided to offset the fantastic vent towards the drivers side, putting it about 8 inches from the exterior side wall, and 8 inches from the exterior rear wall. I figure this will place it directly over where the cook area will be someday when I install a small stove or hotplate. (With the fan on high, it should more than adequately exhaust all cooking steam and burner byproducts. Never ever use propane or white gas cooking appliances indoors without large amounts of ventilation!) Oh, and I had to splice/splint one of my 2x2 stock pieces since I ran out of long pieces. D'oh! No big deal, it just adds to the strength of the roof anyhow. :)

(picture added)
Image

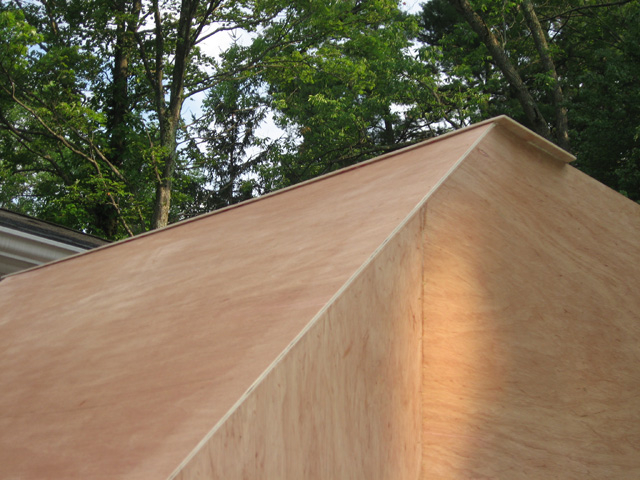
With the rear roof spars in place, I moved on to the front roof section, and marked the front spar down the middle of it's length to leave the required 'mounting ledge' for the skylight. I glued the approximately 9" wide skin into place, paying attention to have it's edge right on that line. Once again, no staples, just lots of paver stones and two concrete blocks to weigh it down.


(picture added)
Image

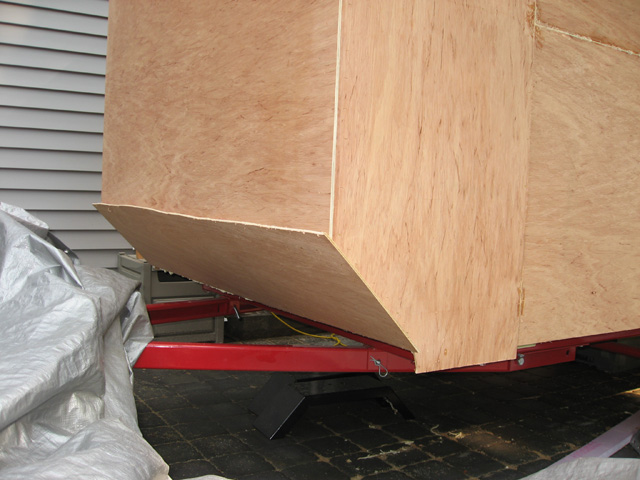
As the glue was drying, I moved down to the front lower slant section. This piece was tricky given it's low position and lack of lighting at this point. (it was now 9:30 at night and I was relying solely on a single halogen worklamp) The way I accomplished it was to have my wife mark the inside perimeter of the spars while I held the board in place. Once I had those marks, we knew where glue needed to be applied, and were able to do it without making an enormous oozing mess. (had we applied the glue to the wall frame spars instead, it would have dripped down due to gravity and made an unbelievable mess) With glue applied to the board, I lined it up along the bottom edge, began stapling, and held it tight to the frame as I completed the stapling.


(picture added)
Image

At this point, it was too late in the evening for me to run my screaming router, so we tarped up the trailer for the night.

I'll get more pictures of the rear roof spars and the front plywood skins before I start work next time. (probably not going to be today, due to more rain. ARGH)

At this point, the woodwork is about 97% complete!!! Woohoo!

E.
Last edited by Elmosaurus on Sat Jul 24, 2010 10:05 am, edited 5 times in total.
User avatar
Elmosaurus
Teardrop Advisor
 
Posts: 51
Images: 71
Joined: Mon Jun 21, 2010 1:06 pm
Location: Northeast Pennsylvania
Top

Postby Cliffmeister2000 » Fri Jul 23, 2010 11:44 am

Elmosaurus wrote:
At this point, the woodwork is about 97% complete!!! Woohoo!

E.


And history tells us, the last 3% will take at least as long as the first 97% :D
God Bless

Cliff

♥God. ♥People.
1 John 4:9-11

My Teardrop build pictures
User avatar
Cliffmeister2000
Titanium Donating Member
 
Posts: 3622
Images: 157
Joined: Thu Jul 26, 2007 10:18 pm
Location: Phoenix, AZ
Top

Postby Elmosaurus » Fri Jul 23, 2010 11:55 am

Cliffmeister2000 wrote:
Elmosaurus wrote:
At this point, the woodwork is about 97% complete!!! Woohoo!

E.


And history tells us, the last 3% will take at least as long as the first 97% :D


:lol: :lol:


Shush, you.

:R

LMAO.

Nah, it's truly about 3%. I mean, unless the whole thing collapses or something. As an engineer, I estimate using real math. I only apply imaginary math to my hobby finances. :D

I have four things left to do: (woodworking wise)

- Clean the edges up on the forward roof skin
- Clean the edges up on the lower slant angle skin
- Install two spars to support the Lexan skylight.
- Run the router along the entire lower perimeter of the walls to clean up the 'excess' inch or so of plywood skin that I had left hanging down past the floor frame. (I did this on purpose, in case there was rain water drippings that would run down and damage the exposed edge of the plywood skin) This will also effectively trim out the wheel wells for me as the flush cut bit will follow the interior wheel well profile.
:)

E.
User avatar
Elmosaurus
Teardrop Advisor
 
Posts: 51
Images: 71
Joined: Mon Jun 21, 2010 1:06 pm
Location: Northeast Pennsylvania
Top

Postby grizz » Fri Jul 23, 2010 12:06 pm

Have missed the last few updates for some reason.

I like your writing style and observations.

Looking great so far.
Greetings from England.

Rian.


Hoping to get it all done in time.
User avatar
grizz
1000 Club
1000 Club
 
Posts: 1210
Images: 29
Joined: Mon Sep 21, 2009 2:37 pm
Location: Rochester, Kent, UK
Top

Postby Wolfgang92025 » Fri Jul 23, 2010 12:09 pm

Nice work............

Keep the :pictures: coming.

Wolfgang
Wolfgang

Image
User avatar
Wolfgang92025
Lifetime member
 
Posts: 1061
Images: 651
Joined: Fri Apr 18, 2008 10:16 pm
Location: Salt Lake City area, Utah
Top

Postby aggie79 » Fri Jul 23, 2010 12:17 pm

Cliffmeister2000 wrote:
Elmosaurus wrote:
At this point, the woodwork is about 97% complete!!! Woohoo!

E.


And history tells us, the last 3% will take at least as long as the first 97% :D


Don't want to be a downer, but Cliff is right. I had my shell completed last summer. A year later and I am still 3 months out on finishing. But I guess I am realizing the concept of teardrop time.
Tom (& Linda)
For build info on our former Silver Beatle teardrop:
Build Thread

93503
User avatar
aggie79
Super Duper Lifetime Member
 
Posts: 5405
Images: 686
Joined: Tue Aug 07, 2007 5:42 pm
Location: Watauga, Texas
Top

PreviousNext

Return to Build Journals

Who is online

Users browsing this forum: No registered users and 43 guests