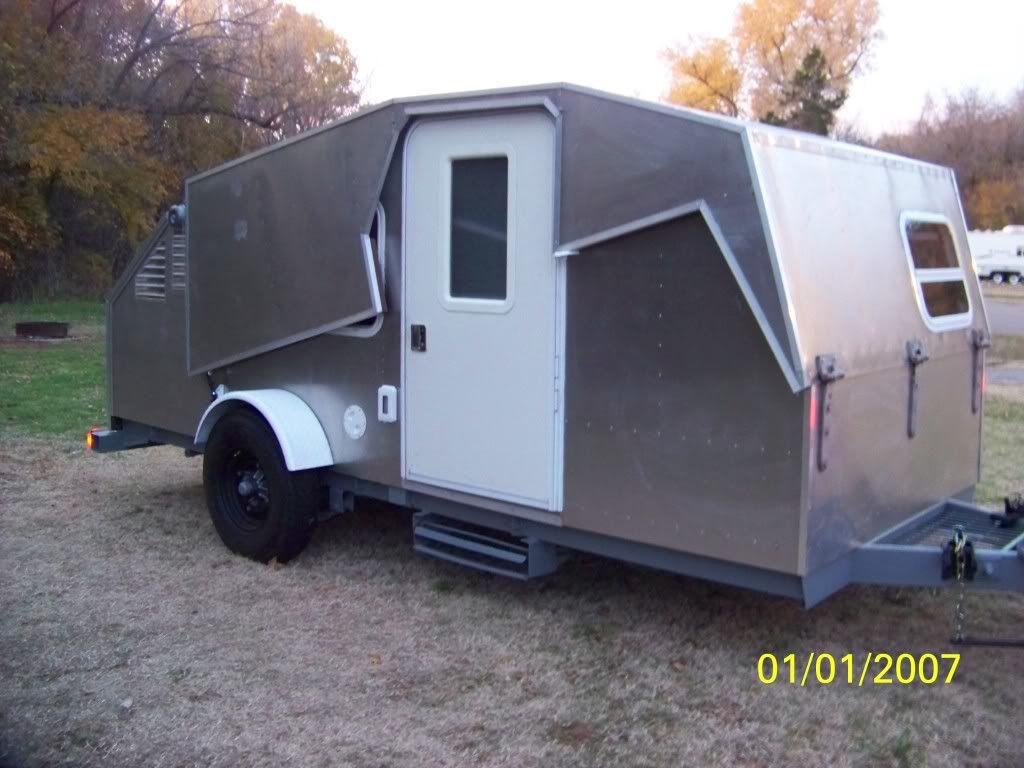
SkipperSue's Build is Finished!!!!!!

...ask your questions in the appropriate forums BUT document your build here...preferably in a single thread...dates for updates, are appreciated....

SkipperSue's Build is Finished!!!!!!

Postby SkipperSue » Thu Jun 24, 2010 9:38 pm

The Harbor Freight trailer kit came in 2 boxes.

Image

I had to load it up in my old Mercedes.

Image

The trailer kit done.

Image

The trailer kit in the workshop ready for the axle modifications.

Image

The original axle position.

Image

I dropped the axle back down to put it on top of the springs to lower it.

Image

I had to cut out the spring support in order to have enough bounce travel space.

Image

I had to reverse the spring pack bolt so it wouldn't be in the way of the mounting.

Image

The axle and springs are reinstalled in a now lowered state.

Image

Continued......
Last edited by SkipperSue on Fri Jun 25, 2010 12:04 am, edited 2 times in total.
Skipper
User avatar
SkipperSue
Gold Donating Member
 
Posts: 585
Images: 114
Joined: Thu Sep 14, 2006 7:12 am
Location: South Carolina, Table Rock

SkipperSue's Build

Postby SkipperSue » Thu Jun 24, 2010 9:59 pm

Another view of the axle from below.

Image

Next I moved the whole axle assembly to the rear of the trailer. The black mark shows where the original position was.

Image

A closer view.

Image

With the trailer frame completed I was able to take it to work and pick up a load of good hard oak wood that was left over from a hand rail renovation project.

Image

Good wood! And free!!

Image

Image

The wood stacked in the shop.

Image

Starting the floor lay out.

Image

The pocket hole jig, wonderful tool!

Image

The floor frame done.

Image

A close up of the gussets showing the pocket holes.

Image

The floor frame is now covered with roofing tar. The cut outs for the wheel wells are cut out.

Image

Continued......
Skipper
User avatar
SkipperSue
Gold Donating Member
 
Posts: 585
Images: 114
Joined: Thu Sep 14, 2006 7:12 am
Location: South Carolina, Table Rock

SkipperSue's Build

Postby SkipperSue » Thu Jun 24, 2010 10:27 pm

The wheel wells done.

Image

I changed my mind and decided to add insulation to the floor.

Image

The insulation installed I then added more plywood to the bottom.

Image

More roofing tar!!!

Image

I recessed the bolt holes and mounted the floor to the trailer frame.

Image

Image

Starting the side lay outs.

Image

Using the string compass.

Image

Tracing out the second side from the first one.

Image

Belt sanding the two sides together.

Image

Continued......
Last edited by SkipperSue on Sun Nov 07, 2010 1:16 pm, edited 1 time in total.
Skipper
User avatar
SkipperSue
Gold Donating Member
 
Posts: 585
Images: 114
Joined: Thu Sep 14, 2006 7:12 am
Location: South Carolina, Table Rock
Top

SkipperSue's Build

Postby SkipperSue » Thu Jun 24, 2010 10:41 pm

Attaching the sides.

Image

Starting to add the spars.

Image

More spars.

Image

Image

Starting the rear bulkhead.

Image

Testing the counter top.

Image

Skinning the rear bulkhead. Insulation was added in between.

Image

Added the interior skin. I used a 1/8" simulated pine paneling.

Image

I used pocket hole screws to attach the leading edge to the counter top.

Image

Continued........
Skipper
User avatar
SkipperSue
Gold Donating Member
 
Posts: 585
Images: 114
Joined: Thu Sep 14, 2006 7:12 am
Location: South Carolina, Table Rock
Top

SkipperSue's Build

Postby SkipperSue » Thu Jun 24, 2010 10:55 pm

The edge installed to the counter top.

Image

Frame out of the galley.

Image

Inside view of the galley framing.

Image

The vent hole cut out.

Image

Added an air conditioner.

Image

Inside view of the A.C.

Image

Added separate compartments for the batteries and inverter.

Image

Added a little rail for the galley storage area. Also added receptacles.

Image

Image

Continued.......
Skipper
User avatar
SkipperSue
Gold Donating Member
 
Posts: 585
Images: 114
Joined: Thu Sep 14, 2006 7:12 am
Location: South Carolina, Table Rock
Top

SkipperSue's Build

Postby SkipperSue » Thu Jun 24, 2010 11:12 pm

Adding the insulation.

Image

Image

The electrical is done. The switch will turn the inverter on and off, another switch is inside also.

Image

The inside electrical. Also installed a phone and cable jack, just in case there is that service available.

Image

The A.C. condensate drain installed.

Image

Added a small flip down flat screen T.V. / radio system.

Image

Adding the outer skin.

Image

Image

Sanding all the hatch ribs together to get them all even.

Image

Continued.......
Skipper
User avatar
SkipperSue
Gold Donating Member
 
Posts: 585
Images: 114
Joined: Thu Sep 14, 2006 7:12 am
Location: South Carolina, Table Rock
Top

SkipperSue's Build

Postby SkipperSue » Thu Jun 24, 2010 11:28 pm

The hatch frame is done.

Image

The hatch skin is installed.

Image

Test fitting the hatch.

Image

The holes for the windows are cut out and installed the hinges.

Image

Test fitting the tail lights.

Image

The first time out of the work shop!

Image

Sanding all the Bondo filler.

Image

Image

Painted three coats of polyurethane to help fill in the wood grain and then sanded it down smooth.

Image

Continued.......
Skipper
User avatar
SkipperSue
Gold Donating Member
 
Posts: 585
Images: 114
Joined: Thu Sep 14, 2006 7:12 am
Location: South Carolina, Table Rock
Top

SkipperSue's Build

Postby SkipperSue » Thu Jun 24, 2010 11:47 pm

Starting the first coat of epoxy paint. I used Sherwin Williams Industrial and Marine paint. It comes in two parts, A & B.

Image

Mr. Buzz is keeping the hood of the car warm for me!

Image

Two coats on so far, added three all together. This paint is super tough!!

Image

Working on the cabinet doors.

Image

The curtains and all the door hardware are done, camo! :)

Image

All the edge trim is installed.

Image

It's all finished but I still need to figure out what to do about a rear bumper and the hood prop system. I'm going to try to fit the gas shocks.

Image

Image

Image

Yay!!! :D :D :applause: :R 8)

I'm ready to try it out now, I might sleep in it in the yard this week end.
Skipper
User avatar
SkipperSue
Gold Donating Member
 
Posts: 585
Images: 114
Joined: Thu Sep 14, 2006 7:12 am
Location: South Carolina, Table Rock
Top

Postby grizz » Fri Jun 25, 2010 12:15 am

Love Mr Buzz.

Good help is hard to find. Hope you have a closer pic of him to post 8)

Could you please give me a desctiption of this item?

I like the fact it is so small, and though TV etc is not something I car for, it can be usefull at times.


Absolutely awesome build.

Thanks for posting.


Image
Greetings from England.

Rian.


Hoping to get it all done in time.
User avatar
grizz
1000 Club
1000 Club
 
Posts: 1210
Images: 29
Joined: Mon Sep 21, 2009 2:37 pm
Location: Rochester, Kent, UK
Top

Postby Ratkity » Fri Jun 25, 2010 7:24 am

Wonderful progress picts!!!

Do you just have a vent or a fan as well?

I liked Mr. Buzz's pict too. Good inspectors are hard to find.

Hugs,
Ratkity
Ratkity
Gold Donating Member
 
Posts: 1065
Images: 0
Joined: Wed May 26, 2010 1:01 pm
Top

Postby vtx1029 » Fri Jun 25, 2010 8:52 am

nice work :thumbsup:
User avatar
vtx1029
Teardrop Master
 
Posts: 251
Images: 70
Joined: Fri Apr 23, 2010 11:42 pm
Location: MN
Top

Postby Wolfgang92025 » Fri Jun 25, 2010 9:31 am

Good looking trailer, very nice :applause:

Wolfgang
Wolfgang

Image
User avatar
Wolfgang92025
Lifetime member
 
Posts: 1062
Images: 651
Joined: Fri Apr 18, 2008 10:16 pm
Location: Salt Lake City area, Utah
Top

Postby Mary K » Fri Jun 25, 2010 9:48 am

WOW AWESOME!!!


Time for the Teardrop DANCE!!!!


:awesome: :dancing :dancing :dancing :dancing :awesome:
Mary K

I don't know half of you half as well as I should like; and I like less than half of you half as well as you deserve. Bilbo Baggins
User avatar
Mary K
6000 Club
6000 Club
 
Posts: 6425
Images: 44
Joined: Wed Aug 02, 2006 3:07 pm
Location: Florida, Pensacola
Top

Postby NightCap » Fri Jun 25, 2010 11:12 am

Superb. Thanks for the photo log.
Image
#1 - 100% Done #2 - 100% Done Thinking about #3
User avatar
NightCap
1000 Club
1000 Club
 
Posts: 1131
Images: 259
Joined: Sun Jul 02, 2006 9:28 pm
Location: Iowa, Dayton
Top

Postby SkipperSue » Fri Jun 25, 2010 12:14 pm

Grizz,

I got the little TV system at a K-Mart store but they have a web site.

http://www.gpx.com

I wish I had waited to buy mine, got it about 2 years ago. Now I just tested it and it will not work without adding a digital converter. :x
Look at the under counter models on that web site, there are several similar ones but they have the converter built in them.

Also here's another pic of Mr. Buzz and Rufus. 8)

Image

Ratkity,

Yes there is a fan in the vent but it's a cheap one. I wish I could have afforded the Fantastic Fan, but the one I have does work fairly well. :)
Here's a pic of it.

Image

And thanks to all on this forum, I don't think I ever would have tried to build one without you all here! :applause: :thumbsup:
Skipper
User avatar
SkipperSue
Gold Donating Member
 
Posts: 585
Images: 114
Joined: Thu Sep 14, 2006 7:12 am
Location: South Carolina, Table Rock
Top

Next

Return to Build Journals

Who is online

Users browsing this forum: No registered users and 7 guests