Terry's TTT Garageable Standy Build modifications

...ask your questions in the appropriate forums BUT document your build here...preferably in a single thread...dates for updates, are appreciated....

Postby atahoekid » Tue Dec 21, 2010 3:12 pm

Terry,

I'm admiring your organizational skills, metalworking and welding skills and now we're getting to the woodworking. I'm watching your build with interest, especially since I'm considering a drop floor for a dinette and the "inboard" wheels/fenders. Hopefully, you don't mind me stealing... err, umh, learning from your progress. :lol: It looks like I'll learn lots.

So far, it looks great! :thumbsup:
Mel

"Believe in your abilities... Remember amateurs built the ark, professionals built the Titanic"

"Indecision may or may not be my problem" Jimmy Buffet

Image

The Road Foamie Build Thread: viewtopic.php?t=45698
User avatar
atahoekid
Platinum Donating Member
 
Posts: 1773
Images: 158
Joined: Sat Jul 24, 2010 2:49 am
Location: Incline Village, NV

Postby terryjones1 » Wed Dec 22, 2010 8:59 am

Mike Young said:

"I'm curious about your choice of fasteners, a combination of adhesive and self-tapping screws. In my research on the forum for methods of attaching the body to the frame, it appears that most use just a few bolts.
I don't recall seeing any mention of adhesive between the body and the frame, presumably because there might be a need to separate the two at some future date.
Was your decision based on the contours of the floor and the possible difficulty attaching all the pieces to one another?"

My response:

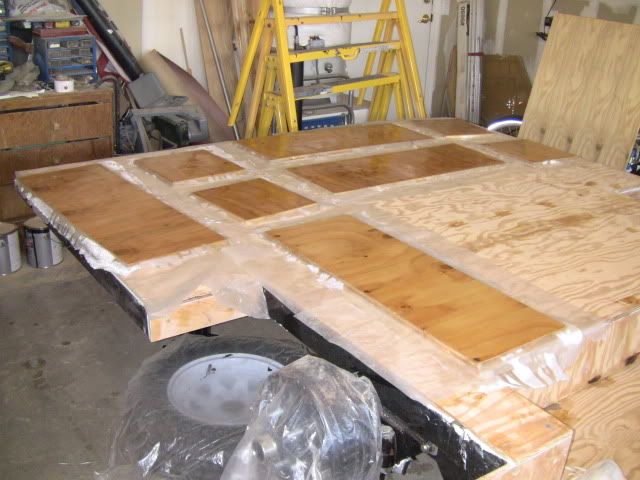
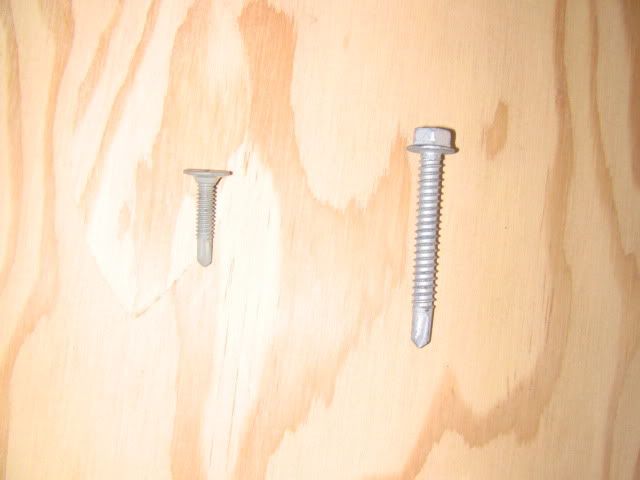
The screws & adhesive/sealant were used just to attach the plywood floor to the frame. The bottom plate (body) will be attached to the frame, through the plywood, with 1/4" x 2" self tapping cap screws. The adhesive/sealant also, was used to seal the screw holes, (in the plywood) from moisture. There will not be a separation of the plywood from the frame in the future. I do not see a need. I used more than 250 screw to attach the plywood. I have 100 1/4" screws to attach the bottom plate to the frame through the plywood floor. A photo of the #10 x 1" screw is on the left. The 1/4" x 2" screw is on the right


Image
My TTT Garageable Standy Build Journal: viewtopic.php?f=50&t=40591
User avatar
terryjones1
Gold Donating Member
 
Posts: 266
Images: 1
Joined: Wed Aug 25, 2010 2:09 pm
Location: Lincoln, Ca

Postby Cliffmeister2000 » Wed Dec 22, 2010 9:07 am

terryjones1 wrote: I used more than 250 screw to attach the plywood. I have 100 1/4" screws to attach the bottom plate to the frame through the plywood floor.

That's a lot of screws! :thumbsup:

Your build is very interesting! I am enjoying it immensely! :applause:
God Bless

Cliff

♥God. ♥People.
1 John 4:9-11

My Teardrop build pictures
User avatar
Cliffmeister2000
Titanium Donating Member
 
Posts: 3622
Images: 157
Joined: Thu Jul 26, 2007 10:18 pm
Location: Phoenix, AZ
Top

Postby terryjones1 » Wed Dec 22, 2010 9:09 am

Cliff said:

"On one very scary trip, when I hit a huge hole in the pavement followed by a raised section, my 1300 lb Weekender became airborne, then landed on the left wheel before the right. This bent the axle, which was evident immediately. What took a second trip to discover was that the all of self taping screws on the tongue side of the axle had snapped. (there were 5 of them. I ended up drilling through the frame and bolting the unit together more traditionally, with bolts, washers, and nuts."

My response:

I will be attaching the body to the frame with 1/4" x 2" self tapping cap screws. I will use approximately 60 of the 1/4" screws. I hope that I do not have your bad experience.
My TTT Garageable Standy Build Journal: viewtopic.php?f=50&t=40591
User avatar
terryjones1
Gold Donating Member
 
Posts: 266
Images: 1
Joined: Wed Aug 25, 2010 2:09 pm
Location: Lincoln, Ca
Top

Postby Cliffmeister2000 » Wed Dec 22, 2010 9:13 am

terryjones1 wrote:I hope that I do not have your bad experience.


I'm sure you will be fine. I thought those self tapping screws were strong, and they are, but I mounted mine with 10 self tapping screws. Now I have 10 bolts.
God Bless

Cliff

♥God. ♥People.
1 John 4:9-11

My Teardrop build pictures
User avatar
Cliffmeister2000
Titanium Donating Member
 
Posts: 3622
Images: 157
Joined: Thu Jul 26, 2007 10:18 pm
Location: Phoenix, AZ
Top

Postby terryjones1 » Wed Dec 22, 2010 9:21 am

Mel said:

"Terry,
I'm admiring your organizational skills, metalworking and welding skills and now we're getting to the woodworking. I'm watching your build with interest, especially since I'm considering a drop floor for a dinette and the "inboard" wheels/fenders. Hopefully, you don't mind me stealing... err, umh, learning from your progress. It looks like I'll learn lots.
So far, it looks great!"

My response:

Thanks! I too am learning a lot. My frame and drop floor is similar to Doug Hodder's. I am a lot heavyier though. See his frame at the following site:

http://tnttt.com/viewto ... 893#596893
My TTT Garageable Standy Build Journal: viewtopic.php?f=50&t=40591
User avatar
terryjones1
Gold Donating Member
 
Posts: 266
Images: 1
Joined: Wed Aug 25, 2010 2:09 pm
Location: Lincoln, Ca
Top

Think Northridge...

Postby myoung » Wed Dec 22, 2010 10:06 am

In that earthquake a few years ago, the vertical force was a couple of Gs. This was enough to drive concrete columns through concrete parking decks with sudden and devastating consequences.

The experience that Cliff relates is mechanically and structurally the same situation. In his case and yours, the resistance to the sharp vertical thrust is one or two thread pitches in the steel frame web (I don't know the thickness of the frame or the pitch of the screws to be more precise.) and the small difference in screw head area subtracting the area of the screw body from the area of the head itself.

So, in a sharp vertical thrust where the greater mass of the trailer seeks to stay airborne while the trailer frame seeks to fall away, I picture great local stress on tiny screw threads and small screw heads ripping through relatively weak plywood. A bad dream that I hope will not become a reality.

Perhaps having 100 screws holding the floor in place is the equivalent of some big bolts, but in my mind I see the stresses localized enough to overwhelm a small set at a time just like Cliff relates.

I'm sure that others with far more experience and insight than I will be willing and eager to join in on the discussion. I look forward to that.

For me, I'll stick with bolts with large diameter washers to spread the load and especially to resist pulling the head through the wooden parts of the body. I'll place one-inch nominal poplar stringers around the perimeter over a three-quarter inch plywood floor and bolt through this sandwich where possible and just through the plywood in a few other places all with big washers.
Mike Young
build thread: viewtopic.php?t=40459
User avatar
myoung
500 Club
 
Posts: 644
Images: 250
Joined: Sat Aug 07, 2010 11:21 am
Location: Nipomo, CA
Top

Postby terryjones1 » Wed Dec 22, 2010 1:41 pm

Mike Young said:

"In that earthquake a few years ago, the vertical force was a couple of Gs. This was enough to drive concrete columns through concrete parking decks with sudden and devastating consequences.
The experience that Cliff relates is mechanically and structurally the same situation. In his case and yours, the resistance to the sharp vertical thrust is one or two thread pitches in the steel frame web (I don't know the thickness of the frame or the pitch of the screws to be more precise.) and the small difference in screw head area subtracting the area of the screw body from the area of the head itself.
So, in a sharp vertical thrust where the greater mass of the trailer seeks to stay airborne while the trailer frame seeks to fall away, I picture great local stress on tiny screw threads and small screw heads ripping through relatively weak plywood. A bad dream that I hope will not become a reality.
Perhaps having 100 screws holding the floor in place is the equivalent of some big bolts, but in my mind I see the stresses localized enough to overwhelm a small set at a time just like Cliff relates.
I'm sure that others with far more experience and insight than I will be willing and eager to join in on the discussion. I look forward to that.
For me, I'll stick with bolts with large diameter washers to spread the load and especially to resist pulling the head through the wooden parts of the body. I'll place one-inch nominal poplar stringers around the perimeter over a three-quarter inch plywood floor and bolt through this sandwich where possible and just through the plywood in a few other places all with big washers."

My response:

Frame wall thickness is .120 & .083. Frame height is 3". Again, the wall or body or bottom plate of the trailer is attached to the frame with 1/4" cap screws. I will use washers with the 1/4" cap screws. I am satisfied that 1/4" cap screws will hold the body to the frame.
My TTT Garageable Standy Build Journal: viewtopic.php?f=50&t=40591
User avatar
terryjones1
Gold Donating Member
 
Posts: 266
Images: 1
Joined: Wed Aug 25, 2010 2:09 pm
Location: Lincoln, Ca
Top

Postby Ageless » Wed Dec 22, 2010 4:43 pm

One thought: having worked on cars since a kid, I saw a lot of self-tapping screws used for mounting into steel body parts. Most were either frozen or sloppy from the effects of rust. Having worked as a Toolmaker for 36 years, it became standard practice to use some type of lube or sealer when attaching fasteners. Personally, I would tap the holes and use standard threaded fasteners which have been coated to reduce or eliminate the corrosion issue. Self-tapping screws used cut a very ragged thread and have less strength than a tapped location.
Strangers on this road we are on; we are not two, we are one - Raymond Douglas Davies
User avatar
Ageless
Platinum Donating Member
 
Posts: 1603
Images: 8
Joined: Tue Aug 04, 2009 8:34 am
Location: Pt. Orchard, WA
Top

Postby terryjones1 » Wed Dec 22, 2010 5:15 pm

adgeless said:

"One thought: having worked on cars since a kid, I saw a lot of self-tapping screws used for mounting into steel body parts. Most were either frozen or sloppy from the effects of rust. Having worked as a Toolmaker for 36 years, it became standard practice to use some type of lube or sealer when attaching fasteners. Personally, I would tap the holes and use standard threaded fasteners which have been coated to reduce or eliminate the corrosion issue. Self-tapping screws used cut a very ragged thread and have less strength than a tapped location."

My response:

The self tapping screws that I am using are double coated to minimize corosion. The #10 screws are, in reality, 10-24 (which is a standard thread). In addition, I have treated every screw hole with the Adhesive/ sealant. Most of the screws are screwed into rectangular tubing (the frame) that has been sealed at the ends. The only screw ends that are exposed are in the drop floor area, where I used 1-1/2" .120 angle steel.
My TTT Garageable Standy Build Journal: viewtopic.php?f=50&t=40591
User avatar
terryjones1
Gold Donating Member
 
Posts: 266
Images: 1
Joined: Wed Aug 25, 2010 2:09 pm
Location: Lincoln, Ca
Top

Postby terryjones1 » Wed Dec 22, 2010 6:05 pm

I have measured for the slope needed on the trailer roof in order to park the trailer in the garage. The slope goes down 3-3/8 drop in the rear. and to a 1-7/8" drop in the front. The axle area measured 0" for drop (that is what it should be). I used a verticle piece of plywood to measure distance from garage opening to top of board. Measurements were made in 1 foot increments, back to front (I backed the trailer into the garage 1 foot at a time). I then subtracted the measurements from 6-7/8" (this is the distance from top of board to 84" at the 0" drop. 77-1/8" is the distance from top of verticle plywood to ground. The height of the plywood is 58-7/8". I can now design the side view of the trailer. I am now at 9" clearance at drop floor. I expect to be at 8" when more weight is added.

Image
My TTT Garageable Standy Build Journal: viewtopic.php?f=50&t=40591
User avatar
terryjones1
Gold Donating Member
 
Posts: 266
Images: 1
Joined: Wed Aug 25, 2010 2:09 pm
Location: Lincoln, Ca
Top

Postby bve » Wed Dec 22, 2010 11:38 pm

Terry, I'm enjoying your build, thanks for sharing.

On the self-tapping screws, I tore down a pop-up camper a few years back that had the floor held on with those, it was a bugger to get the deck off, I'm sure you'll be fine.


Burke
Burke

KISS > COMPLEX
Image
Image

Build threads converted to PDFs.
As of 2008-08-08 I have added more build threads to the pdf collection
User avatar
bve
500 Club
 
Posts: 694
Images: 98
Joined: Sat Aug 25, 2007 1:44 am
Location: Edmonton, Alberta, Canada
Top

Postby StPatron » Wed Dec 22, 2010 11:57 pm

I had the same experience that Burke had when I tore down the old pop-up I used for my build. Removing the floor took longer than disassembling the rest of the camper. There were no tear-outs in the plywood flooring and no gaps between the flooring and the chassis, solid as the day it was built. Convinced me it was fine and therefore I used the same coated self-tapping screws that you are using.

Enjoying watching your build, very nice work.
User avatar
StPatron
Donating Member
 
Posts: 748
Images: 297
Joined: Tue Dec 15, 2009 8:38 pm
Location: OK
Top

Postby Steve_Cox » Thu Dec 23, 2010 12:21 am

Terry,

Enjoying the build. I used self tapping trailer floor screws into 11 ga steel with no seconds thoughts about them staying there. Got the idea from MadJack as he had done a few Tear Drops that way. Keep on building :thumbsup:
Steve
User avatar
Steve_Cox
4000 Club
4000 Club
 
Posts: 4903
Images: 196
Joined: Sun Apr 03, 2005 8:46 am
Location: Albuquerque New Mexico
Top

Postby terryjones1 » Mon Dec 27, 2010 2:03 pm

Shown below is a photo of the plywood panels that will be assembled to make up the fender wells. The photo shows the first coat of epoxy over fiberglass.

Image
My TTT Garageable Standy Build Journal: viewtopic.php?f=50&t=40591
User avatar
terryjones1
Gold Donating Member
 
Posts: 266
Images: 1
Joined: Wed Aug 25, 2010 2:09 pm
Location: Lincoln, Ca
Top

PreviousNext

Return to Build Journals

Who is online

Users browsing this forum: No registered users and 13 guests