Whitney's Weakender - Hatch / Galley Lid Redesign - Pg 11

...ask your questions in the appropriate forums BUT document your build here...preferably in a single thread...dates for updates, are appreciated....

Postby mikeschn » Fri Sep 02, 2011 4:46 pm

WhitneyK wrote:Image


I like it. It turned out real good!

Mike...
The quality is remembered long after the price is forgotten, so build your teardrop with the best materials...
User avatar
mikeschn
Site Admin
 
Posts: 19202
Images: 479
Joined: Tue Apr 13, 2004 11:01 am
Location: MI

Postby Kharn » Mon Sep 05, 2011 10:09 am

Whitney,
Do you have a drawing detailing the hatch design? I'm a little unsure of how to modify the Weekender design so that 45 degree panel can swing with the hatch.
User avatar
Kharn
500 Club
 
Posts: 655
Images: 1
Joined: Sun Jul 17, 2011 1:54 pm

Postby WhitneyK » Mon Sep 05, 2011 8:02 pm

Kharn,

I did my hatch seal like Planovet did his: http://littleswissteardrop.com/ (love that tear by the way), which, if I remember correctly was a Steve Frederick galley seal design. (somebody correct me if I'm wrong, I want to give credit where its due)

I built my hatch in place, then measured down 2" and cut it loose.
I'm a little unsure of how to modify the Weekender design so that 45 degree panel can swing with the hatch.

Assuming the 45 degree panel you're refering to is the bottom angle. That was a concern of mine too, however, after making the cut, when you start to lift it, everything starts coming away from its mated surface. No modifications required.

I'll try to post some pics showing how it works and how I built it.
Whitney & Tracie
Crothersville, IN

We never really grow up, we only learn how to act in public.

Do not confuse what you hear with what I mean.

My build: http://www.tnttt.com/viewtopic.php?t=41955

160061-------------------------------101114
States we've drug our
li'l camper through. (44 States + Vancouver Island and over 45,000 miles so far)
User avatar
WhitneyK
Gold Donating Member
 
Posts: 559
Images: 412
Joined: Sun Dec 12, 2010 10:28 pm
Location: IN, Crothersville (36mi N or Louisville)
Top

Postby WhitneyK » Thu Sep 08, 2011 10:10 pm

As I'm sitting here with ice packs on my back trying to get some relief, figured I might as well catch up my post a bit.

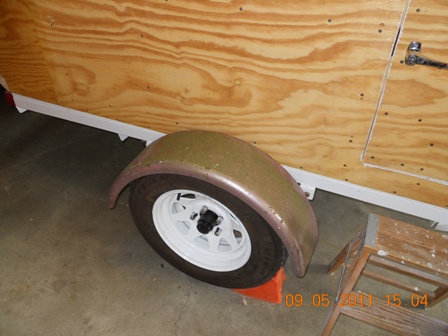
I had my car dolly chained to the tree with a "For Sale" sign on it for a couple of weeks with no hits what so ever. Well, Saturday someone finally stopped ..... and he bought it too! :thumbsup: Broke even on it, I think, as long as I didn't loose money. Had it for about 4 years and had yet to use it. Threw in a set of straps, chains, mag mount tail lights, but I kept the fenders. ;) After the deal was done, the buyer saw one of the fenders leaning against my dump bed & asked "are those the fenders for the dolly?" I politely stated "they were" (past tense highly emplied). Should work out just fine
Image
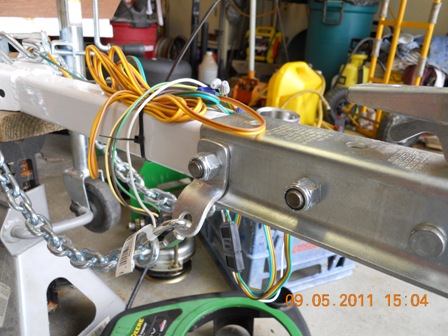
Oh ya, came up with this idea to mount the safety chains to the tongue
Image

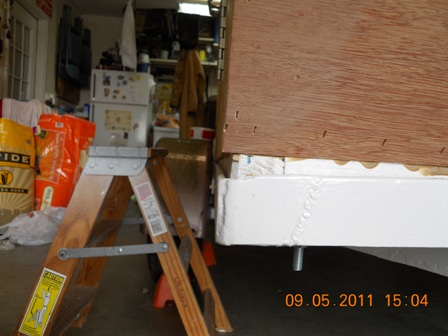
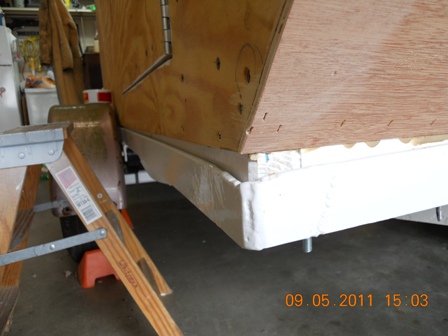
The aluminum skin material that I'm looking at purchasing is 103" wide. When split in half, would give me enough to fold over the top a little (1/2" is what I'm thinkin'), and extent down to the frame of the trailer. If I do this, it will cover up the uneven gap between the wall/floor/spacer/frame. My question is 1) do I want to do this? 2) do you think it will cause me any moisture issues down the road? 3) if I do extend it to the frame, do I fill the gap with silicone or something or leave it open to breathe?

My thoughts are to cover the gap, use my trim strip along the bottom edge, don't fill the gap so it can breathe. But, this is why I'm posting it, hoping to get some input. Here's what it looks like:
ImageImage

Come on folks, help me out here... :roll:
Whitney & Tracie
Crothersville, IN

We never really grow up, we only learn how to act in public.

Do not confuse what you hear with what I mean.

My build: http://www.tnttt.com/viewtopic.php?t=41955

160061-------------------------------101114
States we've drug our
li'l camper through. (44 States + Vancouver Island and over 45,000 miles so far)
User avatar
WhitneyK
Gold Donating Member
 
Posts: 559
Images: 412
Joined: Sun Dec 12, 2010 10:28 pm
Location: IN, Crothersville (36mi N or Louisville)
Top

Postby Alan and Lianna » Thu Sep 08, 2011 10:47 pm

Well, if it were me, I would fill the Gap. I believe any place moisture can get in, it will, especially while driving in the rain..

Alan
Don't just dream about it!
Wake up and make it happen...
User avatar
Alan and Lianna
Teardrop Master
 
Posts: 120
Images: 389
Joined: Mon May 17, 2010 5:55 pm
Location: Pearland Tx
Top

reply

Postby mukulsharma » Fri Sep 09, 2011 4:06 am

Very funny, thanks for posting
mukulsharma
Teardrop Inspector
 
Posts: 1
Joined: Fri Sep 09, 2011 3:59 am
Top

Postby aggie79 » Fri Sep 09, 2011 12:45 pm

Whitney,

I hate to hear that you are having back issues. Mine will "go out" every couple of years, so I feel your pain.

Regarding extending the aluminum to cover the floor/frame, my first question is how do you plan to attach the aluminum? I'd almost be tempted to stop the aluminum at the bottom of the sidewall. Trim could be used to hold the bottom edge of the aluminum and could overlap the sidewall, floor, and part of the trailer frame to cover the gap.

As Alan said, you'll want to seal along the edge of the floor real well.

Hope you get to feeling better!

Take care,
Tom
Tom (& Linda)
For build info on our former Silver Beatle teardrop:
Build Thread

93503
User avatar
aggie79
Super Duper Lifetime Member
 
Posts: 5405
Images: 686
Joined: Tue Aug 07, 2007 5:42 pm
Location: Watauga, Texas
Top

Postby campmaster-k » Fri Sep 09, 2011 2:12 pm

Whitney sorry to hear about your back. I ride my bike alot to help mine. You are doing the right thing with ice. Ice it till its numb, keep the inflammation down. Hope you are building soon.
-Kirk

>TnTTT ORIGINAL 200A LANTERN CLUB

>CEO Coleman Recovery Inc.

>Nor Cal Camping Pinewood Racing Team


Build thread -

viewtopic.php?t=45307&postdays=0&postorder=asc&start=180

Check out my Pictures -

http://s1199.photobucket.com/albums/aa4 ... 0QQtppZZ24
User avatar
campmaster-k
Lifetime member
 
Posts: 3030
Images: 17
Joined: Fri Jun 17, 2011 5:02 pm
Location: Colusa, California
Top

Postby WhitneyK » Sat Sep 10, 2011 12:56 am

Thanks Alan & Tom on your ideas for my "gap". I think I'll take a day off in the middle of next week and at least go down and pick up a roll of aluminum. That way I'll have it on hand.

If this next part gets to lengthy administrators, feel free to nix it.

I, like many others, when they started their builds, wondered how to build the galley hatch. After researching as long as I could stand, I kept coming up empty handed. No one, that I could find, had documented step by step instructions on how to build one. After Kharn asked about how I built my galley hatch, I thought I would post how I did it, so here goes. My inspiration comes from Planovet & Steve Frederick, but don’t blame them if my comprehension was off. I’ll try to keep it simplified and not too long winded (too late for that). I built the hatch in place, then cut it loose after it was assembled.

My goal is / was / still hopes to be this:
Image
My walls are of the “sandwichâ€
Last edited by WhitneyK on Sat Sep 10, 2011 11:04 pm, edited 2 times in total.
Whitney & Tracie
Crothersville, IN

We never really grow up, we only learn how to act in public.

Do not confuse what you hear with what I mean.

My build: http://www.tnttt.com/viewtopic.php?t=41955

160061-------------------------------101114
States we've drug our
li'l camper through. (44 States + Vancouver Island and over 45,000 miles so far)
User avatar
WhitneyK
Gold Donating Member
 
Posts: 559
Images: 412
Joined: Sun Dec 12, 2010 10:28 pm
Location: IN, Crothersville (36mi N or Louisville)
Top

Postby Cliffmeister2000 » Sat Sep 10, 2011 8:33 am

Very nice!

Note: My hatch is very similar to yours, and it is very heavy. I have 2 - 125 lb gas springs to assist, and they make the hatch easy to lift, but do not hold it up. I use a piece of 1" dowel to do that. I also used metal reinforcing to attach the springs to the galley, as the first time they were mounted in 2x4, and the 2x4s both split after only a few days.

I don't have a photo that I can find of the springs, here's the hatch and dowell


Image
God Bless

Cliff

♥God. ♥People.
1 John 4:9-11

My Teardrop build pictures
User avatar
Cliffmeister2000
Titanium Donating Member
 
Posts: 3622
Images: 157
Joined: Thu Jul 26, 2007 10:18 pm
Location: Phoenix, AZ
Top

Postby Cliffmeister2000 » Sat Sep 10, 2011 8:42 am

Here's a photo showing the gas springs before adding the metal.

Image

I put 1/8" steel brackets on the 2x4s that were flattened on top and bottom to strengthen the point of attachment. I had no problems on the other end of the springs.
God Bless

Cliff

♥God. ♥People.
1 John 4:9-11

My Teardrop build pictures
User avatar
Cliffmeister2000
Titanium Donating Member
 
Posts: 3622
Images: 157
Joined: Thu Jul 26, 2007 10:18 pm
Location: Phoenix, AZ
Top

Postby WhitneyK » Sat Sep 10, 2011 10:58 pm

Howdy again folks!

Well, I'm still not up to doing much work yet (thanks to my back), but thanks to my wife and our "special little helper" we got the decorations, er, uh, I mean, uh, fuctional & beneficial additions to the interior of our little camper. Thought I'd post some pics.

Our "special little helper" is our 20 lbs of love (wierd little creature) OOOWW!, Sorry Honey. Let's see, where was I? Oh ya, back to the "baby", his name is Boobers (don't ask, even though it was my idea).
Image

Here's the interior shots after I got everything into position and securely mounted. Mounted everything like they do at Cracker Barrel, run big screws through it everywhere so it don't fall off. I also got my window frames made a week or so ago too. Wife's still wanting to put one of those vinyl letter cut out thingy's with a clever "awe inspired" "highly motivational / inspirational" saying in the center above the headboard storage. OOOWWW!!! Quit it! Sorry Dear. That's why there's a gap between the trees.
Image Image Image

After everything was done, we raised the lid on the headboard storage area, and nosey butt had to check it out. You know what they say about curiousity?.....
Image

... AND THERE HE GOES!
Image
(take a look at my new avatar)
Whitney & Tracie
Crothersville, IN

We never really grow up, we only learn how to act in public.

Do not confuse what you hear with what I mean.

My build: http://www.tnttt.com/viewtopic.php?t=41955

160061-------------------------------101114
States we've drug our
li'l camper through. (44 States + Vancouver Island and over 45,000 miles so far)
User avatar
WhitneyK
Gold Donating Member
 
Posts: 559
Images: 412
Joined: Sun Dec 12, 2010 10:28 pm
Location: IN, Crothersville (36mi N or Louisville)
Top

Postby LDK » Sun Sep 11, 2011 4:51 am

Hey Whitney


Your build is really looking great. I wish I had gave more thought in my hatch design like you did yours. I was wondering, how far does your locking rod expand? I bought one awhile back at a local camper supply store but I changed my mind about using it. It only expanded out maybe an inch and I didn't think that was enough. I'm just gonna use a handle and a hasp now. Here is a pic of the one I have.
Image
LDK
Gold Donating Member
 
Posts: 1419
Images: 1
Joined: Fri Jan 22, 2010 8:29 pm
Top

Postby Woodstramp » Sun Sep 11, 2011 6:53 am

Whitney,

The camper is gonna be really sharp when finished. I really like the interior decoration.
User avatar
Woodstramp
The 300 Club
 
Posts: 438
Joined: Fri Nov 20, 2009 9:28 pm
Location: Aladambama
Top

Postby crumbruiser » Sun Sep 11, 2011 1:37 pm

It's looking very nice. I want to say Thank You for posting pics of your interior. The decor adds a nice touch to the pics and it helps me get a better idea of what I'm going to build.
8) :applause:
Frank
I am not weird, I am a Limited Edition.
Facebook http://www.facebook.com/profile.php?id=100000303236631
User avatar
crumbruiser
Teardrop Master
 
Posts: 266
Images: 255
Joined: Sun Jul 10, 2011 6:11 pm
Location: Central Ohio
Top

PreviousNext

Return to Build Journals

Who is online

Users browsing this forum: No registered users and 25 guests