Scot's Track Shack - finishing touches - updated 4/26/12

...ask your questions in the appropriate forums BUT document your build here...preferably in a single thread...dates for updates, are appreciated....

Postby Facemeltingly Epic » Wed Mar 30, 2011 11:59 pm

Wow, it's been a week and a half since I updated this last! It's taken a while to get going again...

This week began with working on the doors. I added the latch on the right door for starters.

Image

I also got the left door finished (well, as much as I could before pulling everything off for painting). This one turned out better than the first.

Image

And, as the MC5 once said, it's time to kick out the jambs! No, wait, they said "jams", didn't they? :lol:

Image

Image

And finally, both doors are now off. I'm getting ready to cover everything with CPES and slap a couple coats of paint on the exterior.

Image

On the door shown in this picture, when I first attached it I put screws in every hole in the hinge. What that means is that removing this door required me to undo TWENTY SCREWS. By hand, because the Phillips bit that came with my cordless drill is too big to fit the heads in the screws that came with the hinge. Fortunately, I had realized the folly of this before attaching the left door; I only used three screws each in the wall and the door.

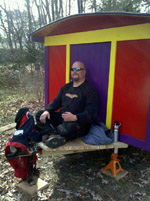
I plan to get started on building the hatch once the exterior is painted, but I am going to camp in this thing next weekend whether it has a hatch or not. :twisted:
Scot

My build journal: http://www.tnttt.com/viewtopic.php?t=42585

Not enough photos there? Try here:
http://www.facebook.com/media/set/?set= ... c3e73ca184

Or here:
http://www.facebook.com/media/set/?set= ... cf567dd7b7

"Politicians are like diapers. They should be changed often, and for the same reason." - Mark Twain
User avatar
Facemeltingly Epic
Teardrop Master
 
Posts: 143
Joined: Sun Jul 11, 2010 8:27 pm
Location: San Jose, CA

Postby Facemeltingly Epic » Sun Apr 03, 2011 8:21 pm

Made a little more progress... Thursday night I CPES'ed the body and the inside of the galley.

Image

I strongly recommend that a respirator be worn any time you are applying this stuff; I was high as a kite by the time I finished!

I pretty much slacked off on Friday night, then Saturday I worked a vintage auto race at Sears Point. Today I applied filler to the body.

Image

I didn't buy enough Fill-It to do the whole job, but thankfully I had some filler left over from when we painted the house a while back (and it had not completely hardened yet!). Hope it works!

Tomorrow I sand everything down, and if time allows I will paint the exterior of the trailer. I applied some of the paint I bought to an area that doesn't require any sanding.

Image

I also took the trailer on a short freeway drive (from San Jose to Cupertino) because I had to pick up the flag bags from my co-chief on the SFR-SCCA flag crew. I am flag chief at our next event this coming weekend at Thunderhill Raceway, and needless to say it's pretty hard to fit twelve sets of corner flags into a Miata!

The trailer tows pretty nicely, at least at 60mph. I think I noticed a very slight amount of swaying as I came home, but that might have been the trailer tires following the grooves in the concrete. It wasn't anything I could really feel through the wheel.

Speaking of racing, just for fun here's a pic of me playing race car driver!

Image
Scot

My build journal: http://www.tnttt.com/viewtopic.php?t=42585

Not enough photos there? Try here:
http://www.facebook.com/media/set/?set= ... c3e73ca184

Or here:
http://www.facebook.com/media/set/?set= ... cf567dd7b7

"Politicians are like diapers. They should be changed often, and for the same reason." - Mark Twain
User avatar
Facemeltingly Epic
Teardrop Master
 
Posts: 143
Joined: Sun Jul 11, 2010 8:27 pm
Location: San Jose, CA

Postby Facemeltingly Epic » Tue Apr 05, 2011 8:56 pm

Seems like the progress comes a bit more slowly at this point in the build...

Got the excess filler sanded off, and and a hole cut for the roof vent.

Image

Painted the insides of the doors. The whole interior will be this color as well.

Image

And lastly, the exterior is painted.

Image

Now all that remains to get it ready for this weekend is to mount the doors and roof vent and add the T-molding on the side doors. Still no hatch, but I'm off to the track this weekend and need the trailer to haul flags! Plus it'll be nice to sleep in.
Scot

My build journal: http://www.tnttt.com/viewtopic.php?t=42585

Not enough photos there? Try here:
http://www.facebook.com/media/set/?set= ... c3e73ca184

Or here:
http://www.facebook.com/media/set/?set= ... cf567dd7b7

"Politicians are like diapers. They should be changed often, and for the same reason." - Mark Twain
User avatar
Facemeltingly Epic
Teardrop Master
 
Posts: 143
Joined: Sun Jul 11, 2010 8:27 pm
Location: San Jose, CA
Top

Postby kevingb » Wed Apr 06, 2011 10:06 pm

Awesome doing a very good job... Very jealous of your progress

:thumbsup:
User avatar
kevingb
Donating Member
 
Posts: 73
Images: 97
Joined: Tue Mar 10, 2009 7:10 pm
Location: Granbury, Texas
Top

Postby Facemeltingly Epic » Thu Apr 07, 2011 2:16 am

Today when I got home from work I began the final big push to get the trailer ready for the road. I started with some paint touch-up and a sheet of aluminum across the front.
Image

I wound up spending close to two hours on the right side door! When I first fitted it I didn't trim it down enough to accomodate the T-molding.
Image

Needless to say, I checked the clearance on the left door BEFORE I attached any hardware, and I got it completed much quicker.
Image

And finally, I put the fenders back on. We're still without a hatch, but it's going up to Willows this weekend regardless.
Image

Tomorrow after work I take it on its first road trip. The forecast calls for showers during the afternoon, so I will find out the hard way whether it is watertight. I just hope it isn't too bad while I'm driving!

And of course I will have my camera with me. And my laptop, so you might see photos of it on the trip tomorrow evening if I'm not too worn out.
Scot

My build journal: http://www.tnttt.com/viewtopic.php?t=42585

Not enough photos there? Try here:
http://www.facebook.com/media/set/?set= ... c3e73ca184

Or here:
http://www.facebook.com/media/set/?set= ... cf567dd7b7

"Politicians are like diapers. They should be changed often, and for the same reason." - Mark Twain
User avatar
Facemeltingly Epic
Teardrop Master
 
Posts: 143
Joined: Sun Jul 11, 2010 8:27 pm
Location: San Jose, CA
Top

Postby Deryk the Pirate » Thu Apr 07, 2011 7:29 am

Scot, it looks Great! I wish ya luck on your first trip!
Build Thread lil vardo 1: http://tinyurl.com/baqe6py
Build Thread lil vardo 2: http://tinyurl.com/b3rwffm
User avatar
Deryk the Pirate
500 Club
 
Posts: 809
Images: 158
Joined: Tue Aug 18, 2009 11:03 am
Location: Parlin NJ
Top

Postby kevingb » Thu Apr 07, 2011 3:27 pm

Just noticed something... your missing wings!!! If you drive like you build its either wings, Z rating trailer tires, or Flux Capacitor.

Is your window fixed? I like the size.

Have a blast, make sure you take pictures in operation.

Kevin
User avatar
kevingb
Donating Member
 
Posts: 73
Images: 97
Joined: Tue Mar 10, 2009 7:10 pm
Location: Granbury, Texas
Top

Postby Facemeltingly Epic » Tue Apr 12, 2011 12:02 am

kevingb wrote:Just noticed something... your missing wings!!! If you drive like you build its either wings, Z rating trailer tires, or Flux Capacitor.

Is your window fixed? I like the size.

Have a blast, make sure you take pictures in operation.

Kevin


My car only tops out at 115mph and probably will not be able to go that fast with the trailer behind it, so I don't think I need Z-rated tires on the trailer. A little more downforce might be nice, though...

The windows are crank-outs.
Scot

My build journal: http://www.tnttt.com/viewtopic.php?t=42585

Not enough photos there? Try here:
http://www.facebook.com/media/set/?set= ... c3e73ca184

Or here:
http://www.facebook.com/media/set/?set= ... cf567dd7b7

"Politicians are like diapers. They should be changed often, and for the same reason." - Mark Twain
User avatar
Facemeltingly Epic
Teardrop Master
 
Posts: 143
Joined: Sun Jul 11, 2010 8:27 pm
Location: San Jose, CA
Top

Postby Facemeltingly Epic » Tue Apr 12, 2011 12:17 am

I took my first trip with the trailer last weekend to Thunderhill Raceway, which is about an hour and a half north of Sacramento. My first unscheduled stop was as I was driving through Fremont and the right door popped open. I'd been showing the trailer to one of the guys at work, so I figured I just hadn't closed it properly.

Here I am at a park-and-ride in Walnut Creek. This was my second unscheduled stop.

Image

The brads I had used to attach the stone guard on the front went in easily, and came out just as easily! Thank goodness for duct tape. I will replace it with either bolts or pop rivets before my next trip.

Image

I encountered hail as I was coming through Fairfield.

Image

Friday morning at the track...

Image

Time to make my coffee...

Image

Home sweet home! I forgot to bring a blanket with me and about froze my butt off Thursday night; apparently the temperature dipped below freezing overnight. I picked up a cotton blanket to throw over my sleeping bag at Walmart the next day and was fine for the rest of the weekend. Probably helped that it was also warmer the rest of the weekend.

Image

I'm not sure who wrote this, but apparently they think it's August. :lol:

Image

The trailer towed pretty well, as long as I kept my speed to around 60mph, but it swayed quite a bit any time I got into the slipstream of an 18-wheeler (quite a number of which passed me during the drive). I eventually took to just lifting off the throttle to get clear of them more easily. Naturally, the car uses a lot more fuel with the trailer in tow; I averaged about 23mpg for the whole trip (without the trailer it usually gets 29-32mpg on the freeway), which is still better than a pickup truck does empty.

Also, the left door popped open on the trip home. I had fabricated a striker from some angle aluminum I had lying around and it worked fine before I had the seals on the door but now the door doesn't latch properly. I eventually had to duct-tape the door closed.

So, I still need to build the hatch, plus I need to fix the few issues that cropped up on this trip. Overall, though, I'd say it was a success.
Scot

My build journal: http://www.tnttt.com/viewtopic.php?t=42585

Not enough photos there? Try here:
http://www.facebook.com/media/set/?set= ... c3e73ca184

Or here:
http://www.facebook.com/media/set/?set= ... cf567dd7b7

"Politicians are like diapers. They should be changed often, and for the same reason." - Mark Twain
User avatar
Facemeltingly Epic
Teardrop Master
 
Posts: 143
Joined: Sun Jul 11, 2010 8:27 pm
Location: San Jose, CA
Top

Postby Facemeltingly Epic » Tue Apr 12, 2011 12:22 am

(deleted double post)
Last edited by Facemeltingly Epic on Tue Apr 19, 2011 12:13 am, edited 1 time in total.
Scot

My build journal: http://www.tnttt.com/viewtopic.php?t=42585

Not enough photos there? Try here:
http://www.facebook.com/media/set/?set= ... c3e73ca184

Or here:
http://www.facebook.com/media/set/?set= ... cf567dd7b7

"Politicians are like diapers. They should be changed often, and for the same reason." - Mark Twain
User avatar
Facemeltingly Epic
Teardrop Master
 
Posts: 143
Joined: Sun Jul 11, 2010 8:27 pm
Location: San Jose, CA
Top

Postby Facemeltingly Epic » Mon Apr 18, 2011 11:46 pm

I'm posting tonight's update from inside the trailer. It now has 110v power.

Image

Image

The outlet boxes under the galley counter.

Image

I should have wired this before I mounted the power inlet to the wall! It was pretty tight in there...

Image

I also fixed my problem with the left door not latching. This striker used to wrap around the frame. It latched before I had the seals on, but it didn't work with them in place. You can see my old trackside digs in the background of this picture...

Image

The only major construction left is the hatch, and I intend to start that tomorrow.
Scot

My build journal: http://www.tnttt.com/viewtopic.php?t=42585

Not enough photos there? Try here:
http://www.facebook.com/media/set/?set= ... c3e73ca184

Or here:
http://www.facebook.com/media/set/?set= ... cf567dd7b7

"Politicians are like diapers. They should be changed often, and for the same reason." - Mark Twain
User avatar
Facemeltingly Epic
Teardrop Master
 
Posts: 143
Joined: Sun Jul 11, 2010 8:27 pm
Location: San Jose, CA
Top

Postby Facemeltingly Epic » Thu Apr 28, 2011 12:29 am

Wow, doesn't seem like I post as often as I used to. Probably because most of the major work is finished. And I got the last major piece mostly finished now... the hatch.

Image

Image

Image

I ended up skinning the hatch with 1/8" luan; the remaining piece of Italian poplar wound up getting damaged before I could use it. I initially tried skinning the hatch with it and had it pop off the brads I had attached it with. Expensive lesson... but the luan is much nicer looking and seems to be quite a bit stronger. Looking at that last pic, after coating the hatch with CPES, I would probably go with a natural wood finish if all the wood I used on this build looked as good as that sheet of luan I picked up from Southern Lumber.

Oh, and a quick PSA: Kids, don't try to drill through a plywood sheet with your thumb on the underside of it, no matter HOW tricky that hatch rib is to locate!

Image

I say this because I managed to drill a hole in the tip of my thumb! It turned out to be only a flesh wound (although it STILL hurts like hell), and I'll be doing well if this is the worst I ever hurt myself using power tools, but aside from really hurting I felt incredibly stupid after doing this... :x

Next road trip is coming up this weekend! I won't have time to paint the hatch, but we're expecting mild weather so I figure the CPES will protect it adequately until I do paint it.
Scot

My build journal: http://www.tnttt.com/viewtopic.php?t=42585

Not enough photos there? Try here:
http://www.facebook.com/media/set/?set= ... c3e73ca184

Or here:
http://www.facebook.com/media/set/?set= ... cf567dd7b7

"Politicians are like diapers. They should be changed often, and for the same reason." - Mark Twain
User avatar
Facemeltingly Epic
Teardrop Master
 
Posts: 143
Joined: Sun Jul 11, 2010 8:27 pm
Location: San Jose, CA
Top

Postby Facemeltingly Epic » Fri Apr 29, 2011 12:51 am

I got the hatch attached to the trailer tonight, and all the trim and latches attached to the hatch.

Image

Image

Image

Man, that luan looks nice. I'm seriously thinking about just polyurethaning it and calling that good... OTOH, it won't match the paint on the rest of the trailer, so maybe not. And I do plan to disguise the top edge of that second panel in some fashion; I'm leaning toward riveting another strip of aluminum on there.

Tomorrow I pack it up and I'm off to Laguna Seca!
Scot

My build journal: http://www.tnttt.com/viewtopic.php?t=42585

Not enough photos there? Try here:
http://www.facebook.com/media/set/?set= ... c3e73ca184

Or here:
http://www.facebook.com/media/set/?set= ... cf567dd7b7

"Politicians are like diapers. They should be changed often, and for the same reason." - Mark Twain
User avatar
Facemeltingly Epic
Teardrop Master
 
Posts: 143
Joined: Sun Jul 11, 2010 8:27 pm
Location: San Jose, CA
Top

Postby jeprovo » Sat Apr 30, 2011 11:49 am

Cool Build! How about masking off some letters or some graphic on the rear hatch when you paint it and leaving the letters wood grain?

Maybe I missed it, is your floor 1/2" ply too?
Any Plans to insulate?

Looking forward to seeing your progress!
jeprovo
Donating Member
 
Posts: 30
Images: 7
Joined: Sat Apr 02, 2011 8:30 pm
Location: Chino Hills, CA
Top

Postby xddorox » Sat Apr 30, 2011 7:20 pm

Awesome build thread. Thanks for sharing your adventures. :)
User avatar
xddorox
Teardrop Advisor
 
Posts: 82
Joined: Tue Jul 06, 2010 10:19 pm
Location: Montreal, Canada
Top

PreviousNext

Return to Build Journals

Who is online

Users browsing this forum: No registered users and 8 guests