"Red Woof Inn" 10-16 update Hubcaps!

...ask your questions in the appropriate forums BUT document your build here...preferably in a single thread...dates for updates, are appreciated....

"Red Woof Inn" 10-16 update Hubcaps!

Postby CliffinGA » Sat Feb 19, 2011 9:52 pm

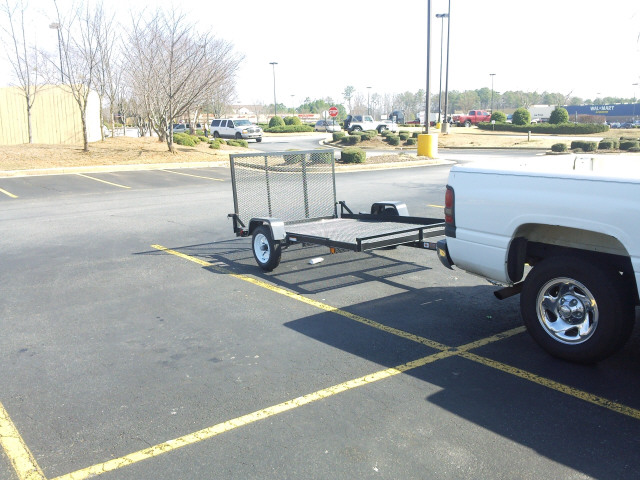
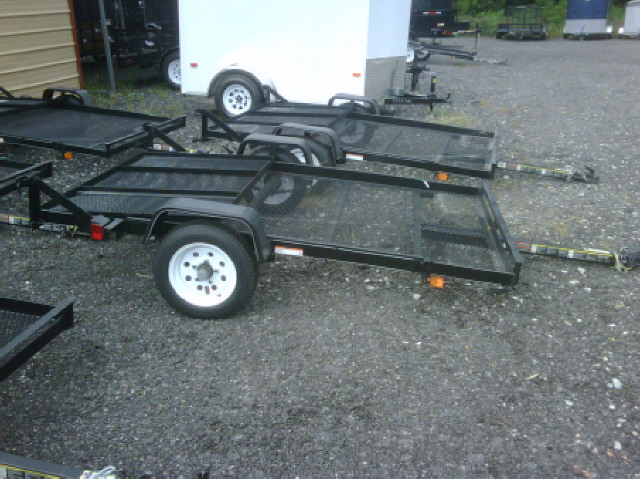
Well went and picked up the new trailer!! Cost $375 and is a nice trailer with 2000# dexter axle. Towed home great even better after going by the Depot and picking up the wood for the build. Tomorrow will unload the trailer and start demo on it: cut gate off, tubes on side rails for electrical, brackets on back (maybe, may use for a table for side).


Image

Image

Cliff
Last edited by CliffinGA on Tue Oct 16, 2012 7:50 pm, edited 40 times in total.
In God we trust, shoot the rest and he will sort out!

My Build:

viewtopic.php?f=50&t=42628
User avatar
CliffinGA
1000 Club
1000 Club
 
Posts: 1499
Images: 207
Joined: Sat Nov 14, 2009 1:29 pm
Location: Jefferson, GA

DoDropIn II

Postby down under tech » Sun Feb 20, 2011 8:18 am

Yea Cliff: I can't wait to see your trailer after the tear down. Please go easy on it though. If you get carried away, there won't be anything left. You can use the lift-gate as a work table for a while until you need the steel from it for other uses.

I bought the 5x8 trailer that had the higher side rails on it. I had to change the 1 7/8" coupler to a 2" one. That way I don't have to change the trailer ball all the time. Now all of my trailers have 2" couplers.

Seriously, That Carry-On trailer looks like a good start for your new TD. :thumbsup:
Johnny D.

"If you think you can, you can. If you think you can't, your right !" ... Henry Ford

"The Silver Nugget" Build
viewtopic.php?t=35314&postdays=0&postorder=asc&start=0
User avatar
down under tech
Silver Donating Member
 
Posts: 565
Images: 571
Joined: Sat Feb 06, 2010 10:01 pm
Location: Reno, Nevada

Postby CliffinGA » Thu Mar 10, 2011 9:46 pm

Ok finally got some stuff done so I can update w/pics. After getting the trailer home I had to wait a week to start demo on it. I started by taking off some of the piieces on the sides to protect the wiring on the landscape trailer, front edge piece, fenders, tail gate and tail gate side locks and installed a jack on the tongue:

Image

Then went and picked up my materials and dropped in my messy garage:

Image

Then I things got busy with work and wasn't able to work on it much until today i took off so I could be here along with DW while we were getting a new HVAC system installed. I had talked to my neighbor and he said if I would bring the trailer down sometime he would weld the diagonals and extra support on his down time at work. So when the Hvac guys left to get some parts I loaded up the trailer and drove it the 15 miles to his work. I dropped it off and went and picked up a 20ft piece of angle 2" x 3/16" thick. I thought he would take his time and drop it off this weekend but to my surprise received a call from him and he was nearly to my house with the trailer!!

Here's the pics:

New Jack and diagonal support

Image

Extra supports to stiffen frame, had way to much flex

Image

Stabilizer support

Image

better pic of the front diagonal, second cross member and extra diagonal back to 3rd crossmember

Image

and another pic of the jack and new diagonals to the tongue

Image

Now this weekend I will finish my floor even though I did find the trailer is not square, its 65 1/2" across the front and back sections and 65 1/4 to 3/8" in the center section. I plan on using a hydralic jack and a 2x4 to stretch it some in the center this saturday.

Cliff :thumbsup: [/img]
In God we trust, shoot the rest and he will sort out!

My Build:

viewtopic.php?f=50&t=42628
User avatar
CliffinGA
1000 Club
1000 Club
 
Posts: 1499
Images: 207
Joined: Sat Nov 14, 2009 1:29 pm
Location: Jefferson, GA
Top

Postby bobhenry » Fri Mar 11, 2011 7:59 am

You are worried about 1/8 " :lol: :lol: :lol:

You sir are a far better craftsman than I ! :applause:
Growing older but not up !
User avatar
bobhenry
Ten Grand Club
Ten Grand Club
 
Posts: 10353
Images: 2609
Joined: Fri Feb 09, 2007 7:49 am
Location: INDIANA, LINDEN
Top

Postby CliffinGA » Sun Mar 13, 2011 2:31 pm

Me a better crfaftsman....Not!!! I just QC alot of cabinets and make it hell for my installer lol. Actually didn't worry about it to much just flipped the trailer up on its side and primered and painted the new supports and then started building my subfloor. Because the insides of the rails are 2 1/2 inches I'm doing the subfloor with 1/2 ply, 2x4's ripped to 2" and 5 cross pieces.

Image

Then I drilled my bolt holes from the side rails and pulled it out flipped the floor over and started to cover it with the Fence Post Asphalt that you recommended Bob.

Image

30 Mins later and a heavy first coat that the can recommeneded and:

Image

In a couple of hours I will move the floor into the garage to finish drying after I clean up from ripping up all the wood for the floor. Tomorrow night I will try to cut the top ply for the actual floor and I will install it, after bolting sub down and installing pick foam insulation. NExt weekend will be the time I will be cutting out my walls out of the 3/4" Birch plywood. I did cut out a profile out of a 4x8 sheet of cabinets material we use to cover the side of thecabinets when they're damaged. You can see it in the last pic at the far upper right of the pic under the edge of the subfloor.

Cliff
In God we trust, shoot the rest and he will sort out!

My Build:

viewtopic.php?f=50&t=42628
User avatar
CliffinGA
1000 Club
1000 Club
 
Posts: 1499
Images: 207
Joined: Sat Nov 14, 2009 1:29 pm
Location: Jefferson, GA
Top

Postby CliffinGA » Mon Mar 14, 2011 7:38 pm

Ok today was a bad day especially when I realized that I will be scrapping the whole subfloor and starting over. Ain't life grand when you realize you screw up something and you have to do over!! :x :oops:

Cliff
In God we trust, shoot the rest and he will sort out!

My Build:

viewtopic.php?f=50&t=42628
User avatar
CliffinGA
1000 Club
1000 Club
 
Posts: 1499
Images: 207
Joined: Sat Nov 14, 2009 1:29 pm
Location: Jefferson, GA
Top

Postby joebobsqrpants » Mon Mar 14, 2011 7:56 pm

Why do you have to scrape it? I wanna make sure i didnt miss anything on mine? That really sucks! I hate doing stuff twice.
joebobsqrpants
Teardrop Inspector
 
Posts: 17
Images: 18
Joined: Wed Jan 26, 2011 9:18 pm
Location: THOMASVILLE, NC
Top

Postby CliffinGA » Mon Mar 14, 2011 8:13 pm

My frame is angle iron so the floor framing is setting down in the trailer frame. I did the math wrong and cut the 2x4's down to 2" so the top ply will be setting just at the top of the metal frame. Today when I got home I realized I have nothing to attach the walls to. Instead of trying to attach the walls through the iron into the 2x4's I'm just going to buy some more 2x4's and redo it, plus the ply I bought has alot of cracks thru it and I would rather use a btter quality ply this time. I found a lumber yard here that specializes in ply and they have 3/4 birch ply that is finished one one side and stain grade on the other. Its cheaper than the ply at HD and Lowe's and I can use it for the walls and not have to finish the inside .

Cliff
In God we trust, shoot the rest and he will sort out!

My Build:

viewtopic.php?f=50&t=42628
User avatar
CliffinGA
1000 Club
1000 Club
 
Posts: 1499
Images: 207
Joined: Sat Nov 14, 2009 1:29 pm
Location: Jefferson, GA
Top

Postby CliffinGA » Sat Mar 19, 2011 11:19 pm

Well after my screw up last weekend I had to redo the subfloor and decided to get better wood for my floor. This is the sub framing with the better plywood as the floor:

Image

With all the screw holes patched:

Image

and after we made it back from a co-workers wedding reception we installed the linoleum:

Image

Yes we did get the bubbles out :lol:

Tomorrow I will do the layout on the back side of the one side prefinished 3/4" ply I picked up friday. I'm using it for the cabinets and the walls of the tear with the prefinishe side in:

Image

I've got to sand the rough cuts on the template I cut out of some paneling I had before I use it to do the side tomorrow. Well thats it for tonight.

Cliff
In God we trust, shoot the rest and he will sort out!

My Build:

viewtopic.php?f=50&t=42628
User avatar
CliffinGA
1000 Club
1000 Club
 
Posts: 1499
Images: 207
Joined: Sat Nov 14, 2009 1:29 pm
Location: Jefferson, GA
Top

Postby LDK » Sun Mar 20, 2011 7:38 am

Cliff

I like that linoleum flooring your going with and that frame should be a rock with all the modifications you did to it. I have the harbor freight 1700lb frame and after I had it welded it it kinda flexed and its slightly higher in the center. I just worked around it and it seems ok now.
LDK
Gold Donating Member
 
Posts: 1419
Images: 1
Joined: Fri Jan 22, 2010 8:29 pm
Top

Postby CliffinGA » Tue Mar 22, 2011 8:42 pm

Thanks Larry thats a $26 6 x 8 piece from home depot!

Cliff
In God we trust, shoot the rest and he will sort out!

My Build:

viewtopic.php?f=50&t=42628
User avatar
CliffinGA
1000 Club
1000 Club
 
Posts: 1499
Images: 207
Joined: Sat Nov 14, 2009 1:29 pm
Location: Jefferson, GA
Top

Postby CliffinGA » Tue Mar 22, 2011 8:45 pm

Well update this week had a lil more time at home with not haveing to travel to Columbus, so my wife let me play in the garage on Monday (my 40th bday) and I was able to get the first side profile cut out.

Image

and the side thats is finished for the inside of the tear:

Image

Well thats it till Friday night, the better half is out of town for the weekend so I will have a lot more time to work on it.

Cliff
In God we trust, shoot the rest and he will sort out!

My Build:

viewtopic.php?f=50&t=42628
User avatar
CliffinGA
1000 Club
1000 Club
 
Posts: 1499
Images: 207
Joined: Sat Nov 14, 2009 1:29 pm
Location: Jefferson, GA
Top

Postby down under tech » Tue Mar 22, 2011 10:07 pm

Looking GOOD Cliff: Happy Belated Birthday too. You are just a whipper snapper you know... It looks like it is coming along nicely. I used the same flooring in my "Silver Nugget" build, from Lowes though.

Keep up the good work.
Johnny D.

"If you think you can, you can. If you think you can't, your right !" ... Henry Ford

"The Silver Nugget" Build
viewtopic.php?t=35314&postdays=0&postorder=asc&start=0
User avatar
down under tech
Silver Donating Member
 
Posts: 565
Images: 571
Joined: Sat Feb 06, 2010 10:01 pm
Location: Reno, Nevada
Top

Postby CliffinGA » Wed Mar 23, 2011 3:59 am

Thanks Johnny, wish I was in town around Atlanta more but atleast I have steady work out of town. When I am I try and do a lil every night, and I may have a guy from work helping out this weekend. He was showing his girlfriend my pics of the one I have now and she wants him to build them one :lol: . Well til next time.


Cliff
In God we trust, shoot the rest and he will sort out!

My Build:

viewtopic.php?f=50&t=42628
User avatar
CliffinGA
1000 Club
1000 Club
 
Posts: 1499
Images: 207
Joined: Sat Nov 14, 2009 1:29 pm
Location: Jefferson, GA
Top

Postby Loader » Wed Mar 23, 2011 5:26 am

Nice profile Cliff. Did you cut each side individually? I stack and cut all pieces at one time, just need to make sure I have them laid out right so the proper ply face will be inside.

Happy 40th.
Earl & Kerry

"Loader"

Blue Yonder Build Thread - viewtopic.php?f=50&t=42611

ImageImage
User avatar
Loader
Platinum Donating Member
 
Posts: 1584
Images: 245
Joined: Tue Apr 26, 2005 2:33 pm
Location: Fort Worth, Texas
Top

Next

Return to Build Journals

Who is online

Users browsing this forum: No registered users and 3 guests