Moho's First Build, Updated 10-25-11

...ask your questions in the appropriate forums BUT document your build here...preferably in a single thread...dates for updates, are appreciated....

Postby StandUpGuy » Tue Sep 27, 2011 12:58 pm

Are the walls skinned on the opposite side of one and other?
User avatar
StandUpGuy
1000 Club
1000 Club
 
Posts: 1090
Images: 52
Joined: Sun Mar 27, 2011 6:15 pm

Postby Moho » Tue Sep 27, 2011 6:48 pm

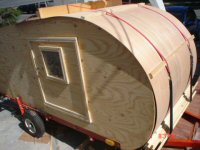
Jpageau wrote:Curious why the walls are skinned already. Don't you runs spurs / wire first ? Sorry- I'm a newbie .... :)


Not gonna have any wires in the sidewalls, except a couple close to the edges for a couple running lights. Those couple will be close enough to the edge and I can just poke through the wall with a special electrical drill bit I have. 99% of all the wires will be running overhead though the spars. The spars are just gonna butt up against the walls and get glued and screwed. Only skinning both of the side walls. The front, rear and roof sections will be skinned inside only until all of the wiring, etc is done.
User avatar
Moho
Teardrop Master
 
Posts: 244
Images: 69
Joined: Tue Sep 13, 2011 8:17 am
Location: Indianapolis, IN

Postby Jpageau » Tue Sep 27, 2011 6:56 pm

ah ha! now I see. Nice
Progress man. Lookin' good dude.
User avatar
Jpageau
Teardrop Advisor
 
Posts: 75
Joined: Tue Sep 20, 2011 11:05 am
Location: Wakefield nh
Top

Postby razorback » Wed Sep 28, 2011 8:13 am

nice job man. like the way you think.
Were you ever a member of the "BALDKNOBBERS"?
http://www.youtube.com/watch?v=3SmiBPEGa5w&NR=1

Like your avatar.
Larry
razorback
Super Lifetime Member
 
Posts: 585
Images: 12
Joined: Mon May 21, 2007 6:14 pm
Location: NLR, arkansas
Top

Postby Moho » Thu Sep 29, 2011 8:32 am

Walls have been up for a day or two. Not much build progress as I have been testing things removed from the popup I disassembled for the frame. I wanna make sure all this stuff works and is useable before planning out the space for it. The 12 gallon water tank is leak free and is useable. The faucet works, the stove works, water pump works but isn't check valve style, so it will be replaced.

Image
User avatar
Moho
Teardrop Master
 
Posts: 244
Images: 69
Joined: Tue Sep 13, 2011 8:17 am
Location: Indianapolis, IN
Top

Postby Moho » Thu Sep 29, 2011 9:13 am

So the 12v power supply works, however it is very basic. It's basically a 12v transformer with diodes for backfeed prevention.
Image
Image
I'm thinking a couple of options here.
  • Leave it as is, as it does work and the transformer windings are good, etc.
  • Add a rectifier circuit, bridge it, add necessary caps etc and install toroids for RF to this power supply
  • Build a new one from scratch with Toroidial Transformer (I have all the parts excluding the transformer)
  • Buy a power supply center

The cheap guy in me says leave it alone, the lazy guy in me says buy a new power center and the electrical engineer in me says build a competely new one as I would enjoy building it or update the current one. Gonna sleep on this one a few days before I decide.
User avatar
Moho
Teardrop Master
 
Posts: 244
Images: 69
Joined: Tue Sep 13, 2011 8:17 am
Location: Indianapolis, IN
Top

Postby Jpageau » Thu Sep 29, 2011 9:57 am

yeah... tough call. at some point i'll be making that decision, that's if mine works. You never know being torn from an old popup.
User avatar
Jpageau
Teardrop Advisor
 
Posts: 75
Joined: Tue Sep 20, 2011 11:05 am
Location: Wakefield nh
Top

Postby Breezy13 » Thu Sep 29, 2011 10:30 am

That thing looks tough as nails, especially if the coil is good!
User avatar
Breezy13
Teardrop Builder
 
Posts: 47
Images: 11
Joined: Mon May 23, 2011 9:20 am
Location: Estes Park, CO
Top

Postby Moho » Mon Oct 03, 2011 11:26 pm

Not much going on the past few days in build world. Waiting on parts and such to come in. The biggest setback was finding the cooler I wanted for the galley. I wanted the 70's coleman metal thats 6 inches longer than the normal size and with a good shell. Finally won it on eBay a couple days ago and should get it in this week. All of the galley dimensions are based around this cooler and want to maximize use of space so waiting til it got here to start framing out the galley.

Image

I did decide to repurpose the old power supply, using it for Electrolysis of old metals. I'm going to go with purchasing a new power supply. I got the water tank installed in position. Other than that it's been alot of standing back, looking at it, measuring and deciding how I wanted things in the galley. I've been getting a whole lot of "Will you quit staring at it and do something!" lol. Spent a TON of time in this album http://s134.photobucket.com/albums/q120/ams-texas/Galley%20Gallery/ getting ideas and such. I have the "have-to's" worked out and will see how much room I have for the "want-to's" when a few things come in this week that I ordered.
User avatar
Moho
Teardrop Master
 
Posts: 244
Images: 69
Joined: Tue Sep 13, 2011 8:17 am
Location: Indianapolis, IN
Top

Postby campmaster-k » Tue Oct 04, 2011 6:37 pm

Great work Moho! and way to go on the Coleman stuff. :applause:
-Kirk

>TnTTT ORIGINAL 200A LANTERN CLUB

>CEO Coleman Recovery Inc.

>Nor Cal Camping Pinewood Racing Team


Build thread -

viewtopic.php?t=45307&postdays=0&postorder=asc&start=180

Check out my Pictures -

http://s1199.photobucket.com/albums/aa4 ... 0QQtppZZ24
User avatar
campmaster-k
Lifetime member
 
Posts: 3030
Images: 17
Joined: Fri Jun 17, 2011 5:02 pm
Location: Colusa, California
Top

Postby canned o minimum » Tue Oct 04, 2011 10:24 pm

MORE Coleman stuff ??? This guy is a NUT ! What is he gonna start collectin next ?

Collect string lites... collect string lites.. collect string lites...

Subliminal...subliminal...subliminal...

:twisted:
canned o minimum
1000 Club
1000 Club
 
Posts: 1266
Joined: Sun Mar 21, 2010 11:54 pm
Location: Riverside,Ca.
Top

Postby Moho » Tue Oct 11, 2011 5:18 am

Made some progress on the build since I got some of the key components in for galley layout. It's way to early to do a full post, so updates can be found on my blog at http://mohovius.blogspot.com/
User avatar
Moho
Teardrop Master
 
Posts: 244
Images: 69
Joined: Tue Sep 13, 2011 8:17 am
Location: Indianapolis, IN
Top

Postby StandUpGuy » Wed Oct 12, 2011 10:13 pm

Did you remove the plastic film from the insulation before gluing?


Moho wrote:Image
Image
User avatar
StandUpGuy
1000 Club
1000 Club
 
Posts: 1090
Images: 52
Joined: Sun Mar 27, 2011 6:15 pm
Top

Postby Shadow Catcher » Thu Oct 13, 2011 6:49 am

Moho
I am big on adaptive reuse but Compass Rose came with a Progressive Dynamics power center so I did not face the question of trying to adapt something. I am however mindful of the care and feeding of deep cycle batteries and there are some over voltage and reverse voltage protections built in the PD devises.
User avatar
Shadow Catcher
Donating Member
 
Posts: 5993
Images: 234
Joined: Sat Apr 11, 2009 8:26 pm
Location: Metamora, OH
Top

Postby Moho » Fri Oct 21, 2011 11:19 pm

More progress on the galley, Spent alot of time setting up my work area in preperation for winter, since I will no longer have access to outside sawing etc. Got a dust collection system going and trying to clear out a few things to make more room.

I got the cooler slide and utensil drawer built and the upper cabinets finished. Temp hung the doors on clamps to see what it's gonna look like. Taking a little longer than I expected, as it's my first time doing cabinet construction. So glad I really like the shaker style cabinetry as I can;t imagine trying to do more detailed cabinet construction my first time. Also first time I've used my dado even though I've had it for many years, lol. I see alot more woodworking tools in my future as I am really enjoying this work.

Next will be the stove/grill slide out on the left side.

Image
User avatar
Moho
Teardrop Master
 
Posts: 244
Images: 69
Joined: Tue Sep 13, 2011 8:17 am
Location: Indianapolis, IN
Top

PreviousNext

Return to Build Journals

Who is online

Users browsing this forum: No registered users and 26 guests