Moho's First Build, Updated 10-25-11

...ask your questions in the appropriate forums BUT document your build here...preferably in a single thread...dates for updates, are appreciated....

Postby Moho » Thu Sep 22, 2011 8:30 am

bobhenry wrote: Others on here have ripped multiple layers of 1/8 plywood and bent and glued the layers, They are then held in a clamping jig designed to the desired profile.


Probably a lot less material wasted this way but I had extra 3/4" laying around.

btw, the true secret to bending wood is I have Elves working in the garage at night, no clue how they do stuff....

Image
User avatar
Moho
Teardrop Master
 
Posts: 244
Images: 69
Joined: Tue Sep 13, 2011 8:17 am
Location: Indianapolis, IN

Postby Jpageau » Thu Sep 22, 2011 8:35 am

Way cool bro.! Thank you!
User avatar
Jpageau
Teardrop Advisor
 
Posts: 75
Joined: Tue Sep 20, 2011 11:05 am
Location: Wakefield nh

Postby aggie79 » Thu Sep 22, 2011 8:40 am

Moho,

I'm really liking what I see so far. Very nice construction on the sidewalls.

The drive-in speakers and old mics are a cool, if eccentric, touch! (I'm a huge fan of what's becoming the lost art of industrial design. It's too bad that we are in a throw-away society. Okay - end of rant - back to topic.)

Have you decided on exterior finishes yet? Curious minds want to know.

Take care,
Tom
Tom (& Linda)
For build info on our former Silver Beatle teardrop:
Build Thread

93503
User avatar
aggie79
Super Duper Lifetime Member
 
Posts: 5405
Images: 686
Joined: Tue Aug 07, 2007 5:42 pm
Location: Watauga, Texas
Top

Postby Jpageau » Thu Sep 22, 2011 8:43 am

Everyone is so helpful. Rock on! Thanks!
User avatar
Jpageau
Teardrop Advisor
 
Posts: 75
Joined: Tue Sep 20, 2011 11:05 am
Location: Wakefield nh
Top

Postby Moho » Thu Sep 22, 2011 9:35 am

aggie79 wrote: Have you decided on exterior finishes yet? Curious minds want to know.


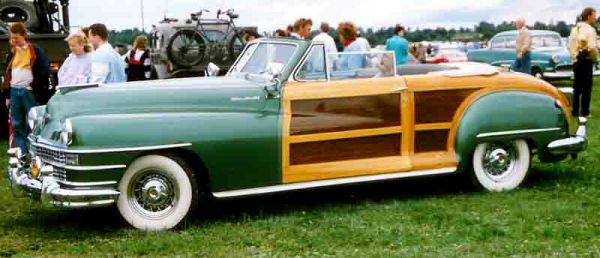
The finish itself will be a clear epoxy woody with minimal trim, using a photo of a 48 Chrysler Town and Country for the inspiration of style and stain color.

Image
If by finishes you mean finishing touches, I don't have all the details in place yet. I have a ton of different lighting options from alot of vintage 30's-50's harley lights, from my grandfather's ridiculous collection of harley parts, that I thought about maybe using in some way.

I've been looking at a ton of Art Deco, Art Nouveau and Mid Century Modern stuff for ideas for interior and exterior design elements. Alot of my ideas I post on my blog just to have a reference for myself more than anything, as I'm finding as I get older I forget things more often :?

The big up in the air part is the fenders, haven't got a clue yet and may just wait til the end to work on that one once I stand back and see what the final product looks like. Plus I'm keeping the popup wheels, so width will be a big factor in the fenders.

I'm really having a blast with this, even more than I thought I would :)
User avatar
Moho
Teardrop Master
 
Posts: 244
Images: 69
Joined: Tue Sep 13, 2011 8:17 am
Location: Indianapolis, IN
Top

Postby Jpageau » Thu Sep 22, 2011 9:44 am

I yer style Moho....
User avatar
Jpageau
Teardrop Advisor
 
Posts: 75
Joined: Tue Sep 20, 2011 11:05 am
Location: Wakefield nh
Top

Postby Moho » Thu Sep 22, 2011 11:35 pm

Got the first skin on tonight. Also posting a picture of how I started the door cut in the skin and only have a 1/16" kerf.

I drilled a 1/16" hole in the corners then 2 more holes about 1/2" away from the corner hole on each side for guide points. I then used a utility knife to cut small slits to insert a jigsawblade into it. Once done I only have a 1/16" of waste on each side of the door.

Wanted to do this to leave extra material for removal for door fitting, as too much material is much better than not having enough :) I plan on framing it out to size and then using roller guided router bit to trim the extra off to make the edges of the door skin the exact size of the frame.

Image Image
User avatar
Moho
Teardrop Master
 
Posts: 244
Images: 69
Joined: Tue Sep 13, 2011 8:17 am
Location: Indianapolis, IN
Top

Postby pete42 » Fri Sep 23, 2011 7:01 am

MOHO nice build from taillights to drive-in speakers.
by the way I copied your woodworking elf picture hope you don't mind
if copywrited let me know.

Pete
User avatar
pete42
Super Lifetime Member
 
Posts: 2203
Images: 13
Joined: Sat Nov 07, 2009 11:52 am
Location: SouthWest Ohio
Top

Postby Moho » Fri Sep 23, 2011 8:11 am

Thanks and the picture is from an open source picture site I use. So have at it no rights on the pic.
User avatar
Moho
Teardrop Master
 
Posts: 244
Images: 69
Joined: Tue Sep 13, 2011 8:17 am
Location: Indianapolis, IN
Top

Postby Moho » Fri Sep 23, 2011 10:27 am

Found a couple of cool old Presto brass mini fire extinguishers in my grandfathers collection of random stuff. Size of this one is 9" long by 1.5" wide. Also have a couple that are roughly 4" long and one even has a motorcycle mount clamp. Gonna put one of the small ones on my 1972 FLH Shovelhead.

These were sold door to door in the 40's and 50's. Here's an ADfrom a 1953 Popular Mechanics. You can pick these up cheap on evilBay.

Gonna polish it up and mount it in the tear. 8) They even still have a charge, I'll definately hide a real extinguisher but these are cool nonetheless.

Image
User avatar
Moho
Teardrop Master
 
Posts: 244
Images: 69
Joined: Tue Sep 13, 2011 8:17 am
Location: Indianapolis, IN
Top

Postby kinto » Fri Sep 23, 2011 1:49 pm

looking great man! keep it up! :thumbsup:


kent
:)
Is a hippopotamus just a really cool opotamus?

imay ildbay urnaljay

Image
User avatar
kinto
Gold Donating Member
 
Posts: 228
Images: 465
Joined: Tue Jul 19, 2011 10:20 am
Location: STL
Top

Postby Jst83 » Fri Sep 23, 2011 2:12 pm

Moho wrote:
btw, the true secret to bending wood is I have Elves working in the garage at night, no clue how they do stuff....

Image


I think I have gremlins living in mine

:thumbsup: Tear is looking good
Image
User avatar
Jst83
3000 Club
3000 Club
 
Posts: 3606
Images: 215
Joined: Thu Jul 20, 2006 7:33 pm
Location: Indiana, Greenfield
Top

Postby Moho » Tue Sep 27, 2011 10:58 am

Got 1st wall up and 2nd one skinned. Getting a wall vertical actually feels like I accomplished something :lol: I should be able to put the 2nd wall vertical tonight which is the one laying flat with insulation. I got it glued & skinned last night.

After getting the first wall up, I wish I had room to drop the height a little but function>form. It's only 4'6" tall but 4' would have looked a little more streamlined. So glad I didn't go with 5' tall.

Also decided the enclosed bunk is getting the boot. :cry: I would love to do it, but it takes up way to much cabin space in this size trailer. I'm gonna go with either a fold down bed or hanging cot at the head of the cabin.

Image
Image
User avatar
Moho
Teardrop Master
 
Posts: 244
Images: 69
Joined: Tue Sep 13, 2011 8:17 am
Location: Indianapolis, IN
Top

Postby Jpageau » Tue Sep 27, 2011 12:18 pm

Good luck dude. Ill watching to see what you do for the bunk/cot. Now you have me thinking... Oh kids... :lol:
User avatar
Jpageau
Teardrop Advisor
 
Posts: 75
Joined: Tue Sep 20, 2011 11:05 am
Location: Wakefield nh
Top

Postby Jpageau » Tue Sep 27, 2011 12:29 pm

Curious why the walls are skinned already. Don't you runs spurs / wire first ? Sorry- I'm a newbie .... :)
User avatar
Jpageau
Teardrop Advisor
 
Posts: 75
Joined: Tue Sep 20, 2011 11:05 am
Location: Wakefield nh
Top

PreviousNext

Return to Build Journals

Who is online

Users browsing this forum: No registered users and 21 guests

cron