My first build "Ruby Red"

...ask your questions in the appropriate forums BUT document your build here...preferably in a single thread...dates for updates, are appreciated....

Re: My first build "Ruby Red"

Postby CliffinGA » Sun May 06, 2012 4:28 pm

Looking good Angela! Keep it up and you'll have the sides cut and mounted! Don't go too crazy with belt sander and try to get sides even as you can so both sides will be square on the trailer. If your going to stain the inside its easier to do while you have them down than when they're standing up and attached, same with epoxy, fewer runs and smoother finish!

Cliff :thumbsup:
In God we trust, shoot the rest and he will sort out!

My Build:

viewtopic.php?f=50&t=42628
User avatar
CliffinGA
1000 Club
1000 Club
 
Posts: 1499
Images: 207
Joined: Sat Nov 14, 2009 1:29 pm
Location: Jefferson, GA

Re: My first build "Ruby Red"

Postby CHUNKYMONKEY » Mon May 21, 2012 8:14 pm

Well I have made some progress the last couple of weekends. I have my sides (MDO stretched to 5 x 9) completely cut and sanded. Thanks for the post on stretching my plywood. It worked beautifully for a first time router user. I got a great deal on a 1x used router with 6 brand new bits for $75. Of course my slot bit was $27. The splines are so beautiful even if I say so. My profile doesn't really look like a true profile. In my mind, it is a weekender with curves. Looks a bit like the whale profile I've seen. I freehanded it based on my material, trying to make the most of material. I'm sure many folks have changed their plans along the way.

My trailer went to the welder Saturday to be cut down, ammended and painted. I thank the member who posted his trailer picture featuring his bike rack hitched to the back of his trailer. I would have never thought of that without the great posters here!!

I will begin my coats of CPES this week on the profile ends. My trailer may be back this weekend (Memorial Day) so I should make a little progress. I will post many more pictures when i begin attaching the sides to the trailer.

Here is a picture of my profile. I had a volunteer to pose for the shot. I think I will have plenty of headroom and I am happy about that! As soon as I get the exact width dimension, I will order my doors, hinges, etc.

Thanks for everyone who has helped me so far. I visit the site daily looking for more inspiration, ideas and answers.

Image

8)
User avatar
CHUNKYMONKEY
Donating Member
 
Posts: 70
Images: 55
Joined: Tue Feb 14, 2012 4:49 pm
Location: Fernandina Beach, FL

Re: My first build "Ruby Red"

Postby CliffinGA » Mon May 21, 2012 9:59 pm

Your making progress on her thats for sure! Keep it up and Ruby will be finished in no=time at all!

Cliff :thumbsup:
In God we trust, shoot the rest and he will sort out!

My Build:

viewtopic.php?f=50&t=42628
User avatar
CliffinGA
1000 Club
1000 Club
 
Posts: 1499
Images: 207
Joined: Sat Nov 14, 2009 1:29 pm
Location: Jefferson, GA
Top

Re: My first build "Ruby Red"

Postby Oldragbaggers » Tue May 22, 2012 6:13 pm

does the volunteer go with the teardrop??
Life is sooooo good.........
Sail...camp....bike...repeat
Becky

Build Journal http://www.tnttt.com/viewtopic.php?f=50&t=45917
Visit our blog at http://www.oldragbaggers.com
Image Image
User avatar
Oldragbaggers
Gold Donating Member
 
Posts: 1842
Images: 331
Joined: Mon Aug 01, 2011 9:22 pm
Location: Essex, MD
Top

Re: My first build "Ruby Red"

Postby CHUNKYMONKEY » Tue May 22, 2012 6:44 pm

If she puts her time in the build she will. :)
User avatar
CHUNKYMONKEY
Donating Member
 
Posts: 70
Images: 55
Joined: Tue Feb 14, 2012 4:49 pm
Location: Fernandina Beach, FL
Top

Re: My first build "Ruby Red"

Postby CHUNKYMONKEY » Wed May 30, 2012 6:48 pm

Image

Got my trailer back after having the sides cut down and the tongue box added. The guy also extended my tongue to allow enough room for the jack. The rear leveling jacks are going to have to be moved. where they are they won't allow my sides to attach as planned. I will have those moved on Sunday. Hopefully next week I will be attaching my sides. Need to have it campable by the end of July! it is going to be hot work this summer. Still May and the heat is brutal.

:sweaty:
User avatar
CHUNKYMONKEY
Donating Member
 
Posts: 70
Images: 55
Joined: Tue Feb 14, 2012 4:49 pm
Location: Fernandina Beach, FL
Top

Re: My first build "Ruby Red"

Postby CliffinGA » Wed May 30, 2012 11:09 pm

Can't wait til you get farther along in it and you have it on the trailer and you can see the profile! That always gets you!! the heat is getting to us all right now thats why I go in and rest and go out early on weekend morning or later in aftenoon when it starts cooling down!

Cliff :thumbsup:
In God we trust, shoot the rest and he will sort out!

My Build:

viewtopic.php?f=50&t=42628
User avatar
CliffinGA
1000 Club
1000 Club
 
Posts: 1499
Images: 207
Joined: Sat Nov 14, 2009 1:29 pm
Location: Jefferson, GA
Top

Re: My first build "Ruby Red"

Postby CHUNKYMONKEY » Sun Jun 10, 2012 4:08 pm

Last Sunday I spent a couple hours getting my leveling jacks moved out further away from the sides to clear the side walls. You can see the levelers pop up nicely on the side.

Today I got the first side completely bolted to the sides using 5- 3/8 bolts. I recessed the heads so i can cover/conceal them. It was a real sense of accomplishment but in the process of hopping on the trailer to tighten the middle bolt, i had my other side laying on the trailer propped on the tire where i had applied the alsphalt at the bottom of the inside and I carelessly put my weight on the side and the splined pieces popped. It was a sick feeling but within an hour, i had them routed out again and i have the top piece setting up with the spline glued back. I'll go back in a while and reglue the front piece. It could have been a lot worse.

I glued each side with different glues. I wonder which one was the one that snapped? The garilla glue or the titebond III? Any guesses? I reglued with titebond III.

Here are the pictures. I call the first one, The Thrill of Victory
Image

:lol:
And the second, The Agony of Defeat.
Image
:cry:
I've rented a pop up next weekend for a little trip to the lake. I don't think I'll get much done until the following weekend.
User avatar
CHUNKYMONKEY
Donating Member
 
Posts: 70
Images: 55
Joined: Tue Feb 14, 2012 4:49 pm
Location: Fernandina Beach, FL
Top

Re: My first build "Ruby Red"

Postby crumbruiser » Sun Jun 10, 2012 4:32 pm

It's looking really good. :thumbsup: I used some GG wood glue also. I thing in the future I will "stick" :lol: with the Tightbond.
I really hate to hear the "POP" noise!
Frank
I am not weird, I am a Limited Edition.
Facebook http://www.facebook.com/profile.php?id=100000303236631
User avatar
crumbruiser
Teardrop Master
 
Posts: 266
Images: 255
Joined: Sun Jul 10, 2011 6:11 pm
Location: Central Ohio
Top

Re: My first build "Ruby Red"

Postby Oldragbaggers » Sun Jun 10, 2012 9:09 pm

I've used Gorilla glue in the past and never cared much for it. I'm sold on Titebond III and PL Premium.
Life is sooooo good.........
Sail...camp....bike...repeat
Becky

Build Journal http://www.tnttt.com/viewtopic.php?f=50&t=45917
Visit our blog at http://www.oldragbaggers.com
Image Image
User avatar
Oldragbaggers
Gold Donating Member
 
Posts: 1842
Images: 331
Joined: Mon Aug 01, 2011 9:22 pm
Location: Essex, MD
Top

Re: My first build "Ruby Red"

Postby CHUNKYMONKEY » Sun Jul 08, 2012 2:31 pm

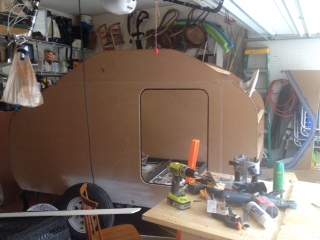
It has been about a month since I last posted any updates to this build. Mid June I took a camping trip to make sure I was building all the amenities needed in my teardrop. Unfortunately I had a few misfortunes on the trip. I was stung by a yellow jacket, had an allergic reation, passed out as I was trying to get to the ER, as I fell to the ground I severly twisted my ankle and my leg. The moral of this camping trip was to be equiped for any camping trip with an EPI pen. My ankle is still not well but I've managed to get a few hours of work in this past week.

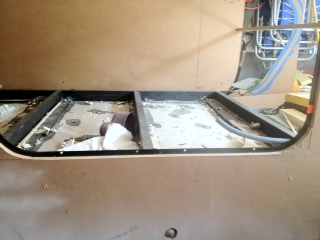
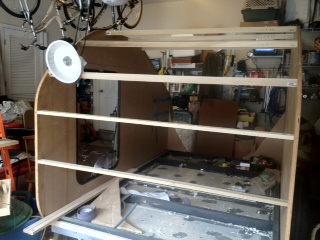
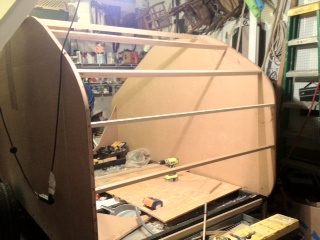
Second wall up last weekend and this weekend spars cut and attached and first door cut.

I ordered my doors, henge, fan, from Vintage Technologies and they arrived in about 5 days, just when I was laid up with my leg. I also purchased my air conditioner just prior to the camping trip. Last week I ordered the AC/DC panel on eBay. I'm about ready to begin running the conduit under the floor for the AC wire. I also puchased some primer to begin priming the sides before I get too much obstruction mounted to them.

It has been so hot I've been blowing the air from the house into the garage with the door closed. It still is hot but much more bearable. I don't look forward to seeing the Georgia Power bill! :sweaty:
Here are a few pictures of my slow/go progress.

:pictures:
Thanks for your continued feedback. I could never have gotten this far without the resources of this forum.
Image
Image
Image
Image
User avatar
CHUNKYMONKEY
Donating Member
 
Posts: 70
Images: 55
Joined: Tue Feb 14, 2012 4:49 pm
Location: Fernandina Beach, FL
Top

Re: My first build "Ruby Red"

Postby Martiangod » Sun Jul 08, 2012 6:19 pm

Looking good, making some good progress...build on
If it ain't broke, fix it till it is

Chris

Deep in the Heart of Nowhere
The topper viewtopic.php?f=50&t=58140, gone to a new home to be converted
into an ice fishing shack...FREEBIE !!! for a nice young family
The trailer viewtopic.php?f=50&t=48156
User avatar
Martiangod
500 Club
 
Posts: 856
Images: 432
Joined: Mon Jan 09, 2012 10:39 pm
Location: Peace River, Alberta
Top

Re: My first build "Ruby Red"

Postby S. Heisley » Sun Jul 08, 2012 6:32 pm

You're doing good, CM. :thumbsup: Sorry to hear about your wasp/leg problems. :thumbdown:
Keep going! :D
User avatar
S. Heisley
Super Lifetime Member
 
Posts: 8774
Images: 495
Joined: Mon Sep 17, 2007 10:02 am
Location: No. California
Top

Re: My first build "Ruby Red"

Postby CliffinGA » Sun Jul 08, 2012 9:24 pm

Angela sorry to hear about your misfortune on your camping trip, and it made me tell my wife to email our doc so we can carry one with us also as she is allergic to yellow jackets and ants. Take your time and don't over due it in this heat we'vebeen having here. I've been trying to work on mine either early in the am or late evening with large fans blowing in the garage. I'm picking up as used window ac unit for the garage in 2 weeks from a friend to help cool it off also. We need to have a weekend of a bunch of us get together and help work on our tears. There is a new gentleman up in your neck of the woods building a tear also, I think he's in Marietta. Take care of yourself and give a shout if we can give you a hand!

Cliff & Sheri :thumbsup:
In God we trust, shoot the rest and he will sort out!

My Build:

viewtopic.php?f=50&t=42628
User avatar
CliffinGA
1000 Club
1000 Club
 
Posts: 1499
Images: 207
Joined: Sat Nov 14, 2009 1:29 pm
Location: Jefferson, GA
Top

Re: My first build "Ruby Red"

Postby CHUNKYMONKEY » Mon Jul 09, 2012 11:33 am

Cliff,

Maybe my lesson learned will help many others too. I've got a target date in mind to finish mine of Oct 15th. I'm glad to know there are other builders in our area. I knew there was one in Acworth.

You take care too and don't let the heat get to you!

Angela
User avatar
CHUNKYMONKEY
Donating Member
 
Posts: 70
Images: 55
Joined: Tue Feb 14, 2012 4:49 pm
Location: Fernandina Beach, FL
Top

PreviousNext

Return to Build Journals

Who is online

Users browsing this forum: No registered users and 25 guests