2 Person Standy Build

...ask your questions in the appropriate forums BUT document your build here...preferably in a single thread...dates for updates, are appreciated....

Re: 2 Person Standy Build

Postby Fyddler » Mon Jun 17, 2013 12:51 pm

Primered the trailer yesterday, now to sand for a nice finish. I used a produce from Rodda Paint called First Coat. Basic Use First Coat is a fast drying pigmented acrylic emulsion coating designed for use as a prime coat on exterior/interior surfaces. Salesman said it is sand-able after 6 hours. Even though I put a coat of TB2 over the muslin there was still fibers giving a rough appearance. These pics are after one light coat, I did a second coat after this.
ImageUploadedByTapatalk1371491387.863253.jpg
ImageUploadedByTapatalk1371491387.863253.jpg (47.72 KiB) Viewed 1741 times

ImageUploadedByTapatalk1371491398.012999.jpg
ImageUploadedByTapatalk1371491398.012999.jpg (32.6 KiB) Viewed 1741 times

ImageUploadedByTapatalk1371491424.479133.jpg
ImageUploadedByTapatalk1371491424.479133.jpg (36.65 KiB) Viewed 1741 times

This was after scrubbing my hands. Even though it is water based it does not clean up well at the end of the day!
To err is human, to really foul up requires a computer

Build Log: http://www.tnttt.com/viewtopic.php?f=50&t=55017
User avatar
Fyddler
The 300 Club
 
Posts: 349
Joined: Sat Sep 01, 2012 9:52 am
Location: Port Orchard, WA

Re: 2 Person Standy Build

Postby KCStudly » Mon Jun 17, 2013 2:52 pm

Forging ahead and looking mighty fine doing it! :thumbsup:
KC
My Build: The Poet Creek Express Hybrid Foamie

Poet Creek Or Bust
Engineering the TLAR way - "That Looks About Right"
TnTTT ORIGINAL 200A LANTERN CLUB = "The 200A Gang"
Green Lantern Corpsmen
User avatar
KCStudly
Donating Member
 
Posts: 9613
Images: 8169
Joined: Mon Feb 06, 2012 10:18 pm
Location: Southeastern CT, USA

Re: 2 Person Standy Build

Postby Fyddler » Tue Jun 18, 2013 10:50 pm

Sanding, sanding, and more sanding. Even with the top coat of glue there was a lot of fuzz that I didn't see, primer coat feels like sandpaper. Knocking all the roughness off with 220 grit by hand.

Before sanding:
ImageUploadedByTapatalk1371613619.130833.jpg
ImageUploadedByTapatalk1371613619.130833.jpg (75.4 KiB) Viewed 1693 times


After:
ImageUploadedByTapatalk1371613641.362528.jpg
ImageUploadedByTapatalk1371613641.362528.jpg (58.43 KiB) Viewed 1693 times


Wife is insisting on AC before we go to Eastern Washington on the 12 of July, so trying to decide how I want to install it. My thought is to put it in the tongue box (which I haven't built yet) and have it protrude thru the front bottom wall, and build a duct that extends to the front of the box with a hatch that I can close to protect it.
To err is human, to really foul up requires a computer

Build Log: http://www.tnttt.com/viewtopic.php?f=50&t=55017
User avatar
Fyddler
The 300 Club
 
Posts: 349
Joined: Sat Sep 01, 2012 9:52 am
Location: Port Orchard, WA
Top

Re: 2 Person Standy Build

Postby KCStudly » Wed Jun 19, 2013 3:01 pm

I have been toying with the idea of a cabinet that is deeper than my front wall extending into the back of the tongue box, but am concerned that any flex between the rigid cabin/frame assembly and the tongue might cause the tongue box to pry at the front wall like a can opener, eventually causing cracks and water intrusion.

I thought I might get around that issue by adding rubber isolators under the toungue box section, but the more I think about it the more I think that the box and cabin should stay separate. $0.02 to think about.
KC
My Build: The Poet Creek Express Hybrid Foamie

Poet Creek Or Bust
Engineering the TLAR way - "That Looks About Right"
TnTTT ORIGINAL 200A LANTERN CLUB = "The 200A Gang"
Green Lantern Corpsmen
User avatar
KCStudly
Donating Member
 
Posts: 9613
Images: 8169
Joined: Mon Feb 06, 2012 10:18 pm
Location: Southeastern CT, USA
Top

Re: 2 Person Standy Build

Postby Fyddler » Wed Jun 19, 2013 3:55 pm

Yea, Good point, I did have that thought in the back of my head. Ill have to give it more thought. Maybe a separate tongue box with some sort of flexible duct between the box and cabin.
To err is human, to really foul up requires a computer

Build Log: http://www.tnttt.com/viewtopic.php?f=50&t=55017
User avatar
Fyddler
The 300 Club
 
Posts: 349
Joined: Sat Sep 01, 2012 9:52 am
Location: Port Orchard, WA
Top

Re: 2 Person Standy Build

Postby Fyddler » Sat Jun 22, 2013 10:32 am

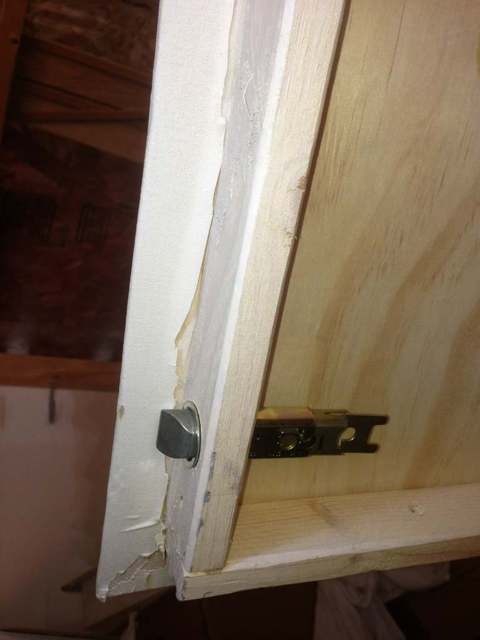
I have been thinking about how to latch the rear hatch for quite some time. I really want a single T handle but was not sure how to go from the T handle to the side walls. I considered using a round bar, but because of the lateral movement of the bars at the handle I would have had to route long cuts in my ribs.

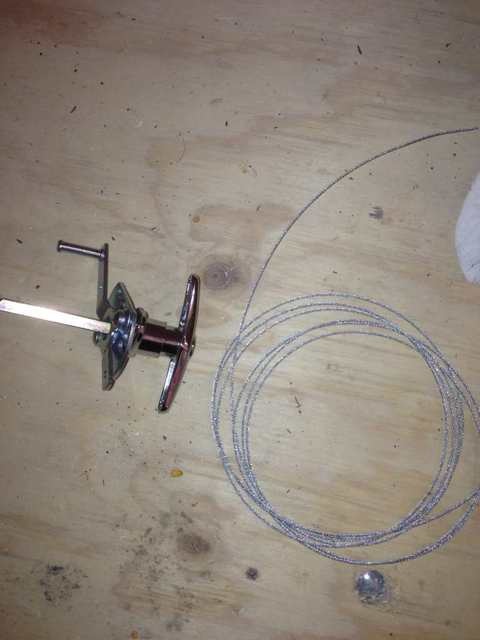
I was starring at door knobs yesterday and saw just the door latch mechanism for sale and a light bulb went off! I am going to use two door latches, one on each side, and connect using a cable to the T handle in the center. The only issue I see with this is the possibility of the cable breaking some day, but if that ever happens my rear lights are 6" away from each latch, all I would have to do is pull the light, and manually unlatch.
ImageUploadedByTapatalk1371915082.108637.jpg
ImageUploadedByTapatalk1371915082.108637.jpg (37.07 KiB) Viewed 1623 times


ImageUploadedByTapatalk1371915142.826056.jpg
ImageUploadedByTapatalk1371915142.826056.jpg (40.35 KiB) Viewed 1623 times
To err is human, to really foul up requires a computer

Build Log: http://www.tnttt.com/viewtopic.php?f=50&t=55017
User avatar
Fyddler
The 300 Club
 
Posts: 349
Joined: Sat Sep 01, 2012 9:52 am
Location: Port Orchard, WA
Top

Re: 2 Person Standy Build

Postby Junkboy999 » Sat Jun 22, 2013 11:03 am

Big Hatch. At least you and your wife will not hit your head going under it.

And here is one of the beast thinks about everyone making a build log and discussing their build. I have a few of those household door latches, and was planning on a cable as well. The same thought about one cable braking entered my head. I did not want to disassemble the handle to get access to the cables. My tail lights will be in the hatch as well. I’ll plan it so they are next to the latch for access. Thanks for the idea.
User avatar
Junkboy999
1000 Club
1000 Club
 
Posts: 1259
Images: 52
Joined: Fri Jul 06, 2012 9:18 pm
Location: Wichita, KS
Top

Re: 2 Person Standy Build

Postby Fyddler » Sat Jun 22, 2013 4:46 pm

As I get closer to finishing it up it has become apparent that my hatch is so big and flexes diagonally just enough that if one side broke, as long as one side opens if I lift from the opposite end the other side pulls out enough to unlatch from the wall, so I should be good. Depending on the size and flexibility of your hatch this may not work, but I am not to worried any more.
To err is human, to really foul up requires a computer

Build Log: http://www.tnttt.com/viewtopic.php?f=50&t=55017
User avatar
Fyddler
The 300 Club
 
Posts: 349
Joined: Sat Sep 01, 2012 9:52 am
Location: Port Orchard, WA
Top

Re: 2 Person Standy Build

Postby Fyddler » Sat Jun 22, 2013 8:20 pm

So far this is the most frustrating part of my build... Annealing and bending aluminum trim for my hatch. First attempt melted the aluminum in half. Second attempt a bit better, but look so so, pics later (if I can bear the embarrassment!
To err is human, to really foul up requires a computer

Build Log: http://www.tnttt.com/viewtopic.php?f=50&t=55017
User avatar
Fyddler
The 300 Club
 
Posts: 349
Joined: Sat Sep 01, 2012 9:52 am
Location: Port Orchard, WA
Top

Re: 2 Person Standy Build

Postby Fyddler » Sat Jun 22, 2013 8:46 pm

ImageUploadedByTapatalk1371951952.611647.jpg
ImageUploadedByTapatalk1371951952.611647.jpg (33.8 KiB) Viewed 1585 times
keep reminding myself looks great from 20' away!
To err is human, to really foul up requires a computer

Build Log: http://www.tnttt.com/viewtopic.php?f=50&t=55017
User avatar
Fyddler
The 300 Club
 
Posts: 349
Joined: Sat Sep 01, 2012 9:52 am
Location: Port Orchard, WA
Top

Re: 2 Person Standy Build

Postby mezmo » Sun Jun 23, 2013 12:10 am

I'm just curious as to how the latch portion works - does
it need the be turned [at the square hole] or does pulling
on the end retract it also ? I recall seeing someone do a
set-up like you are proposing, but unfortunately I can't recall
who/whom/the-'what'-of-it to provide a link for you. I did a fast
'Google Custom Search' of the forum [at the bottom of the
header] for "cable latch" and there are 134 posts. I only went
through a couple-few [I'm running out of time], but maybe
you could find it in there. Also, one post mentioned
repurposing an auto hood release cable set-up [get a
couple at a junk yard, maybe ?] for the TD/TTT hatch
latch set-up.

Cheers,
Norm/mezmo
If you have a house - you have a hobby.
User avatar
mezmo
1000 Club
1000 Club
 
Posts: 1817
Images: 194
Joined: Fri Jan 01, 2010 4:11 am
Location: Columbia, SC
Top

Re: 2 Person Standy Build

Postby Fyddler » Sun Jun 23, 2013 10:54 am

I used an interior door latch. No turning required, just a pull. I just looked at an exterior door latch and it looks a bit more complicated. I pulled on the mechanism and the latch didn't retract.

I also used a cut off wheel to remove the back end of the case around the l slide so I didn't have to fish the cable or have anything for the cable to rub on.
To err is human, to really foul up requires a computer

Build Log: http://www.tnttt.com/viewtopic.php?f=50&t=55017
User avatar
Fyddler
The 300 Club
 
Posts: 349
Joined: Sat Sep 01, 2012 9:52 am
Location: Port Orchard, WA
Top

Re: 2 Person Standy Build

Postby Fyddler » Sun Jun 23, 2013 11:01 am

My fingers are showing the portion I cut off. I haven't actually hooked up the cables yet. My handle is about 5" higher than the latches, I plan on putting an aluminum sleeve in one of my ribs where the cable will come thru at an angle to give it something to ride on besides wood. I'll post more pics when I get it finished. Also, now that I have the strike plates adjusted better (had to move them out from the wall a bit to get a good hold) they hold real well, and am glad that they will be accessible from my tail light holes if I ever have any issues.
ImageUploadedByTapatalk1372003310.312644.jpg
ImageUploadedByTapatalk1372003310.312644.jpg (47.19 KiB) Viewed 1606 times
To err is human, to really foul up requires a computer

Build Log: http://www.tnttt.com/viewtopic.php?f=50&t=55017
User avatar
Fyddler
The 300 Club
 
Posts: 349
Joined: Sat Sep 01, 2012 9:52 am
Location: Port Orchard, WA
Top

Re: 2 Person Standy Build

Postby Fyddler » Sun Jun 23, 2013 11:04 am

Had better luck with my second hatch trim. It helped to not try and anneal the aluminum in the sun! It was later in the evening and I could see the flame turning orange much easier. Still not perfect but way better than the first side!
ImageUploadedByTapatalk1372003441.964141.jpg
ImageUploadedByTapatalk1372003441.964141.jpg (48.52 KiB) Viewed 1603 times
To err is human, to really foul up requires a computer

Build Log: http://www.tnttt.com/viewtopic.php?f=50&t=55017
User avatar
Fyddler
The 300 Club
 
Posts: 349
Joined: Sat Sep 01, 2012 9:52 am
Location: Port Orchard, WA
Top

Re: 2 Person Standy Build

Postby Fyddler » Mon Jun 24, 2013 12:43 am

Today I installed my fenders, caulked my hatch hinge and hatch trim, and painted two coats of white paint with an HVLP sprayer. Luckily I invited a paint expert over that coached me thru it. Very happy with how well the product lays and covers. Cloverdale Eco Logic, it's a water based (low VOC) two part acrylic. Bottom half will be a light green, but i have to wait a couple days for it to dry enough so I can tape my line.

ImageUploadedByTapatalk1372052543.849753.jpg
ImageUploadedByTapatalk1372052543.849753.jpg (39.94 KiB) Viewed 1562 times

ImageUploadedByTapatalk1372052563.131624.jpg
ImageUploadedByTapatalk1372052563.131624.jpg (35.99 KiB) Viewed 1562 times

ImageUploadedByTapatalk1372052602.965406.jpg
ImageUploadedByTapatalk1372052602.965406.jpg (28.25 KiB) Viewed 1562 times
To err is human, to really foul up requires a computer

Build Log: http://www.tnttt.com/viewtopic.php?f=50&t=55017
User avatar
Fyddler
The 300 Club
 
Posts: 349
Joined: Sat Sep 01, 2012 9:52 am
Location: Port Orchard, WA
Top

PreviousNext

Return to Build Journals

Who is online

Users browsing this forum: No registered users and 27 guests