2 Person Standy Build

...ask your questions in the appropriate forums BUT document your build here...preferably in a single thread...dates for updates, are appreciated....

Re: 2 Person Standy Build

Postby desertmoose » Mon Jun 03, 2013 1:31 pm

"I'm glad I thinned the T2, I think it would have been to thick straight"

We found out while doing ours that thinned TB2 was WAY harder to work with. It was a lot easier using it full strength.

Sam
User avatar
desertmoose
The 300 Club
 
Posts: 419
Images: 98
Joined: Fri Aug 27, 2010 12:20 pm

Re: 2 Person Standy Build

Postby Fyddler » Fri Jun 07, 2013 10:54 am

So what exactly was your issue with thinned? I didn't try in-thinned, just curious.

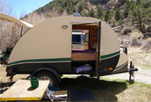
I do know that at least on a trailer this big the muslin was a pain in the butt though. It was very difficult to get it in place. If you grabbed it in the middle to pull tight you deformed the fabric and then had a heck of a time getting it smoothed out. Lots of cussing, but I did manage to get it flat mostly.
To err is human, to really foul up requires a computer

Build Log: http://www.tnttt.com/viewtopic.php?f=50&t=55017
User avatar
Fyddler
The 300 Club
 
Posts: 349
Joined: Sat Sep 01, 2012 9:52 am
Location: Port Orchard, WA

Re: 2 Person Standy Build

Postby Fyddler » Fri Jun 07, 2013 11:40 am

I am not real happy with my skin so far, not so much the process, but more the fact that I can now see every imperfection in the wood and joints. Good news is that muslin and TB2 seems quite sand-able with a fine grit sand paper. Actually leaves a quite smooth finish! My paint expert has recommended a primer product from Rodda called first coat, very thick, and sand-able. Think I will put on one coat, and sand then a second coat. There is hope yet!
To err is human, to really foul up requires a computer

Build Log: http://www.tnttt.com/viewtopic.php?f=50&t=55017
User avatar
Fyddler
The 300 Club
 
Posts: 349
Joined: Sat Sep 01, 2012 9:52 am
Location: Port Orchard, WA
Top

Re: 2 Person Standy Build

Postby KCStudly » Fri Jun 07, 2013 9:44 pm

I haven't done it yet, but my expectation is that, similar to paint, the canvas job is only as good as the prep work that has gone into the base. That's why I am spending a little (... okay a lot) of extra time fairing out my walls with light weight spackle.

Eagle has said that low spots (dents and depressions) allowed the canvas to stretch over leaving voids or bubbles under the canvas, and GPW has used camouflage paint themes to hide inconsistencies and seams.

I'm not sure how "good" or fair is "good enough" to achieve a "nice" finish, but I am willing to put in a little more time, even though I hate bodywork.

Hope things work out for you, and that you find a solution that makes you happy in the end.

BTW, the spackle IS NOT water proof and is every bit as fragile as the foam (if not more so), so it should only be used under the canvas, or other robust sealing methods. Over plywood, maybe Bondo, or some other wood filler would work better before applying the canvas.
KC
My Build: The Poet Creek Express Hybrid Foamie

Poet Creek Or Bust
Engineering the TLAR way - "That Looks About Right"
TnTTT ORIGINAL 200A LANTERN CLUB = "The 200A Gang"
Green Lantern Corpsmen
User avatar
KCStudly
Donating Member
 
Posts: 9613
Images: 8169
Joined: Mon Feb 06, 2012 10:18 pm
Location: Southeastern CT, USA
Top

Re: 2 Person Standy Build

Postby Fyddler » Sat Jun 08, 2013 1:41 am

I spent a fair amount of time prepping and sanding, but the muslin shows everything, and apparently I didn't do quite as good of a prep job as I thought. I used Bondo for all the filling. This was supposed to be a quick budget build, and I was never concerned about the finish, my wife says it looks fine, so I guess I shouldn't worry about it to much.
To err is human, to really foul up requires a computer

Build Log: http://www.tnttt.com/viewtopic.php?f=50&t=55017
User avatar
Fyddler
The 300 Club
 
Posts: 349
Joined: Sat Sep 01, 2012 9:52 am
Location: Port Orchard, WA
Top

Re: 2 Person Standy Build

Postby KCStudly » Sat Jun 08, 2013 8:19 am

Everyone of us has at least a little "perfectionist" in us, eh? ...and sometimes it is really hard to recognize when enough is enough.

I'm with you there.

If you were to do it again, or build another, would you spend more time making it nicer, or less time making it faster? I don't mean that to sound cheeky at all! If I were to ever do a second it would definitely be something simpler than my TPCE. Probably a Weekender.

Your picture makes it look very good, so you can put my vote in with your wife's. :thumbsup:
KC
My Build: The Poet Creek Express Hybrid Foamie

Poet Creek Or Bust
Engineering the TLAR way - "That Looks About Right"
TnTTT ORIGINAL 200A LANTERN CLUB = "The 200A Gang"
Green Lantern Corpsmen
User avatar
KCStudly
Donating Member
 
Posts: 9613
Images: 8169
Joined: Mon Feb 06, 2012 10:18 pm
Location: Southeastern CT, USA
Top

Re: 2 Person Standy Build

Postby Fyddler » Mon Jun 10, 2013 1:00 pm

Well my paint expert was over yesterday and laughed at me. After talking to me on the phone he was expecting way worse than what it actually is. He told me to stop messing with it that between the primer and paint it would be fine!
To err is human, to really foul up requires a computer

Build Log: http://www.tnttt.com/viewtopic.php?f=50&t=55017
User avatar
Fyddler
The 300 Club
 
Posts: 349
Joined: Sat Sep 01, 2012 9:52 am
Location: Port Orchard, WA
Top

Re: 2 Person Standy Build

Postby Fyddler » Thu Jun 13, 2013 11:31 pm

My original plan was to use a piano hinge for the hatch with a piece of decommissioned fire hose over the top, but the hose was so heavy I decided to try and use it as a "living hinge". It worked great! I now realize just how big the hatch is, OMG! I took a pic but it didn't do it justice, so I had my lovely assistant stand underneath for scale. She is 5'6 or so, but still. When input shocks on it I will need a pull rope to bring it down.
ImageUploadedByTapatalk1371184261.760336.jpg
ImageUploadedByTapatalk1371184261.760336.jpg (39.74 KiB) Viewed 2092 times

ImageUploadedByTapatalk1371184277.693018.jpg
ImageUploadedByTapatalk1371184277.693018.jpg (56.13 KiB) Viewed 2092 times
To err is human, to really foul up requires a computer

Build Log: http://www.tnttt.com/viewtopic.php?f=50&t=55017
User avatar
Fyddler
The 300 Club
 
Posts: 349
Joined: Sat Sep 01, 2012 9:52 am
Location: Port Orchard, WA
Top

Re: 2 Person Standy Build

Postby Fyddler » Thu Jun 13, 2013 11:33 pm

Misses a pic...
ImageUploadedByTapatalk1371184380.543394.jpg
ImageUploadedByTapatalk1371184380.543394.jpg (63.92 KiB) Viewed 2091 times
To err is human, to really foul up requires a computer

Build Log: http://www.tnttt.com/viewtopic.php?f=50&t=55017
User avatar
Fyddler
The 300 Club
 
Posts: 349
Joined: Sat Sep 01, 2012 9:52 am
Location: Port Orchard, WA
Top

Re: 2 Person Standy Build

Postby bdosborn » Fri Jun 14, 2013 11:28 am

Now you have a name for your trailer: Standy HH. ( Humungous Harch!) :lol:

Seriously though, It's looking good.. :thumbsup:

Bruce
2009 6.5'X11' TTT - Boxcar
All it takes is a speck of faith and a few kilowatts of sweat and grace.
Image
Boxcar Build
aVANger Build
User avatar
bdosborn
Donating Member
 
Posts: 5494
Images: 772
Joined: Wed May 05, 2004 11:10 pm
Location: CO, Littleton
Top

Re: 2 Person Standy Build

Postby KCStudly » Fri Jun 14, 2013 2:45 pm

No need to raise the hatch so high if you don't want to.

Your build is looking mighty fine. :thumbsup:

Did you use any flat bar reinforcement backing the fire hose hinge up, or just glue?

Keep us posted on how it holds up to wear and tear, please.
KC
My Build: The Poet Creek Express Hybrid Foamie

Poet Creek Or Bust
Engineering the TLAR way - "That Looks About Right"
TnTTT ORIGINAL 200A LANTERN CLUB = "The 200A Gang"
Green Lantern Corpsmen
User avatar
KCStudly
Donating Member
 
Posts: 9613
Images: 8169
Joined: Mon Feb 06, 2012 10:18 pm
Location: Southeastern CT, USA
Top

Re: 2 Person Standy Build

Postby Fyddler » Fri Jun 14, 2013 4:32 pm

It's just temporary for now to see how it would work. I wasn't planing on using aluminum as the 5" fire hose is real thick. I plan on using caulking under it, and along the edge, and screwing it down with lots of SS screws, although the rubber does have a habit of buckling a bit when it is raised, maybe aluminum strip would help hold it down. I'll have to think about that. I'm pretty confident that the hose will hold up for a very long time, even though it has already seen years of use, I can't imagine it failing.
To err is human, to really foul up requires a computer

Build Log: http://www.tnttt.com/viewtopic.php?f=50&t=55017
User avatar
Fyddler
The 300 Club
 
Posts: 349
Joined: Sat Sep 01, 2012 9:52 am
Location: Port Orchard, WA
Top

Re: 2 Person Standy Build

Postby KCStudly » Fri Jun 14, 2013 9:13 pm

Fyddler wrote:I can't imagine it failing.


Agreed. I was more interested in how you had (or planned to) stabilize the connection to the cabin and hatch. Surely glue alone would not stand up to long term use. :thinking:

Are you going to use washers under the screw heads? I would think that, no matter how robust the hose is, because it is flexible it must give some under a screw.

Of course you have first person perspective, so your judgement is the most valid here. I definitely like the look of it in your test and am curious to hear what your impression is of it after cycling it and bumping down the road a bit.

It looks really good. :thumbsup:
KC
My Build: The Poet Creek Express Hybrid Foamie

Poet Creek Or Bust
Engineering the TLAR way - "That Looks About Right"
TnTTT ORIGINAL 200A LANTERN CLUB = "The 200A Gang"
Green Lantern Corpsmen
User avatar
KCStudly
Donating Member
 
Posts: 9613
Images: 8169
Joined: Mon Feb 06, 2012 10:18 pm
Location: Southeastern CT, USA
Top

Re: 2 Person Standy Build

Postby Fyddler » Sun Jun 16, 2013 12:33 am

Busy day. Built my door, and door jam. Since I am using the 3/4" plywood cutout for the door and a standard door knob I had to add a piece of plywood where the knob goes, and then build the door jam to fit around it. No T molding to be found anywhere, so I will have to order it on the Internet and add later.

I also pulled the hatch and sealed it and the door same as the rest of the trailer with TB2 and muslin. Got my primer and paint, borrowed a HVLP sprayer, hope to get it at least primer on tomorrow.

Lastly we finally sold our 26' travel trailer.

To dark to take pics, but will post some tomorrow.
To err is human, to really foul up requires a computer

Build Log: http://www.tnttt.com/viewtopic.php?f=50&t=55017
User avatar
Fyddler
The 300 Club
 
Posts: 349
Joined: Sat Sep 01, 2012 9:52 am
Location: Port Orchard, WA
Top

Re: 2 Person Standy Build

Postby Fyddler » Sun Jun 16, 2013 2:28 pm

Happy Fathers Day to everyone who fits the shoes!

Here are the pics of my door jamb and door knob detail. Originally it was a rectangular piece of plywood, but the wife cringed and said are you going to leave it like that?
ImageUploadedByTapatalk1371410801.972672.jpg
ImageUploadedByTapatalk1371410801.972672.jpg (25.36 KiB) Viewed 1952 times

ImageUploadedByTapatalk1371410866.173551.jpg
ImageUploadedByTapatalk1371410866.173551.jpg (49.92 KiB) Viewed 1952 times

ImageUploadedByTapatalk1371410886.639797.jpg
ImageUploadedByTapatalk1371410886.639797.jpg (39.14 KiB) Viewed 1952 times
To err is human, to really foul up requires a computer

Build Log: http://www.tnttt.com/viewtopic.php?f=50&t=55017
User avatar
Fyddler
The 300 Club
 
Posts: 349
Joined: Sat Sep 01, 2012 9:52 am
Location: Port Orchard, WA
Top

PreviousNext

Return to Build Journals

Who is online

Users browsing this forum: No registered users and 22 guests