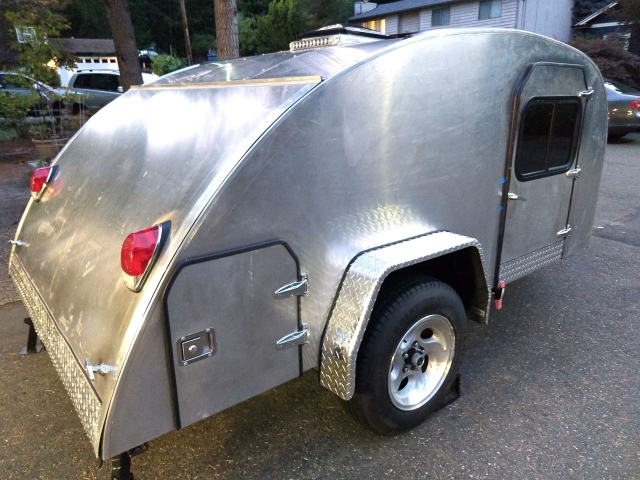
Re: Wandering First Build - Finally Going Again

...ask your questions in the appropriate forums BUT document your build here...preferably in a single thread...dates for updates, are appreciated....

Re: Wandering First Build - Finally Going Again

Postby Prototear » Wed Nov 13, 2019 2:25 am

In 2016 I selected a pair of LED tail lights that were replacement fixtures for a 1968 Beetle. I wanted something with a retro car theme that had lines suitable for a teardrop trailer with LEDs for durability, that would also present a face that would face rearward rather than upward or downward. The main obstacle to installing these, however, is that the hatch is a curved surface and the light fixture is flat on the backside. Here is a picture from the website I ordered it long ago.

Image

Here is the actual fixture, from the side, rear and a trim ring that comes with it.

Image

Image

Image

In 2016 I also ordered a pair of fairings from a '68 Beetle from ebay with the intention of cutting them down to fit the curve and using them to mount the lights. These also had a nice red painted finish that I didn't need. Fortunately, they didn't cost much.

Image

Image

These would need much depth reduced and would need to be made symmetric as they were originally shaped to fit angled Beetle fenders. I began to realize these would be difficult to cut down to size and get a nice contour to fit the curved hatch so I began to consider options.
Steve
First Build: viewtopic.php?f=50&t=57021
User avatar
Prototear
Silver Donating Member
 
Posts: 161
Images: 412
Joined: Wed May 15, 2013 3:13 pm
Location: Lake Forest Park, Washington

Re: Wandering First Build - Finally Going Again

Postby Prototear » Wed Nov 13, 2019 2:56 am

In reconsidering the tail light mounting, I decided to make a lower profile faring out of other materials. At the end of 2017 I figured I needed to get a 3D printer large enough to make them and also learn how to create solid models that I could print. :shock:

After many distractions I finally got to create models and make some trial prints around April 2019. I used a photo of the back of the light fixture and traced it in the program to make a template, created a separate taller version of it and used one as a front and the other as a rear surface of the faring, then cut a curve into the back side with a 4' radius to approximate the hatch curvature. My first print was just a slice to see if the holes were going to line up. These were printed with PLA filament.

Image

I then printed a thicker one with a low print density to check it more fully.

Image

It looked pretty good stacked up, but seemed too thick and the mounting holes didn't quite line up yet.

Image

Image

I then fussed with it to refine the shape, cutout the interior and leave areas for mounting holes. 3 holes were for mounting to the hatch and 3 were to align with the screw holes in the light fixture and needed to hold nuts withing them for the screws.

Image

Image

Image

I would have liked to have a aluminum or chrome finish on the fairing and tried different materials. I tried printing with a supposedly metallic looking ABS filament which prints at a higher temperature. Since it takes so long it deformed while sitting on the heated print bed. I tried a few different temperature settings but even if it improved I always got horizontal cracks in it somewhere so I gave up on the ABS.

Image

I ended up trying and staying with a black PETG filament since this is weather resistant while the PLA is not and would eventually breakdown. The PETG is nearly the same as the PET plastic used in soda bottles except it has glycol in it for helping the print process (there's probably more to the chemistry than that but that is what I remembered). Here is either the last or second-from-last version I actually used to install the lights showing the mounting nuts within it.

Image

Here are the lights finally installed! I used the 5th and 6th prints of the fairing to install them.
Image

Image

I made the final fairings on the July 4th weekend and finally installed them about July 20th.
Steve
First Build: viewtopic.php?f=50&t=57021
User avatar
Prototear
Silver Donating Member
 
Posts: 161
Images: 412
Joined: Wed May 15, 2013 3:13 pm
Location: Lake Forest Park, Washington

Re: Wandering First Build - Finally Going Again

Postby pchast » Wed Nov 13, 2019 11:08 pm

Looks good.
:D
pchast
Platinum Donating Member
 
Posts: 2025
Images: 97
Joined: Mon Jan 28, 2013 5:47 pm
Location: Athens, NY
Top

Re: Wandering First Build - Finally Going Again

Postby Prototear » Sat Nov 23, 2019 2:58 am

While working the hatch, my next thing I needed to do was install the hatch latches, particularly looking ahead to later months when this sits out in the rain I'd want to pull the hatch closed tight. I added some 1" deep foam with an adhesive backing on the back side of the metal trim (diamond plate) at the bottom of the hatch that would crush slightly when the hatch is closed tightly. It presses against the 1" steel frame of the trailer.

I had purchased a pair of T handles and slam latches from Vintage Technologies long ago https://www.teardroptrailerparts.com/door-handles---latch-kits.html but figured the I would not be able to get the slam latches to align on either the floor or the side walls so looked for another kind of latch. I ended up selecting a garage door latch that fits the same shaft size similar to this one https://www.amazon.com/National-Hardware-N280-743-V7647-Locks/dp/B000AYGFA0/ref=sr_1_4?keywords=garage+door+latch&qid=1574497110&sr=8-4. I needed to glue/screw an extra block of plywood inside the hatch to have a base for this bigger latch mechanism. I also riveted a small steel plates on the sidewall frame to have a flat surface for the latch bars to press against. I painted the plates black but due to the color and the blue tape I used to hold them while mounting they are difficult to see in the picture below. I had to disassemble and flip around one of the latch handles to make it rotate the opposite way. Fortunately they had provisions to be mounted either direction.

Image

Here is the outside of the hatch with a pair of T-handles in the lower corners. The hatch aluminum skin didn't have a protective plastic film so it has become tarnished (oxidized) in the years I've had the material (plus the time they sat unprotected at the metal shop where I bought them long ago) so I polished the skin before mounting the handles in that area with Mothers Polish.You can see this around the T-handles and the tail lights.

Image

I completed these on July 28.

With these installed and using them a few times I can see that with a 6' wide trailer, these are a long ways apart from one another so it takes 2 steps to close or open the hatch as my arms aren't really long enough to operate both at once (maybe I can touch both with my fingertips but can't get a strong grip to rotate them). They old the hatch tight and it helps to press a knee into the hatch before turning the handles to move the latch bolts into the locked position.
Steve
First Build: viewtopic.php?f=50&t=57021
User avatar
Prototear
Silver Donating Member
 
Posts: 161
Images: 412
Joined: Wed May 15, 2013 3:13 pm
Location: Lake Forest Park, Washington
Top

Re: Wandering First Build - Finally Going Again

Postby Prototear » Mon Dec 16, 2019 1:52 am

My next task (at the end of July) was to install gas struts for the hatch lid. I figured the downward force at the center of the hatch (about 2' from the hinge) was about 70 pounds but since the strut attach points would be much closer to the hinge the force needed to lift it with the shorter moment arm would be much higher, and I also wanted to have margin to ensure it would move upward once about half open and stay up but would not take too much force for someone to pull it down to close it. I used the strut calculation spreadsheet to estimate what size to get. I got a pair of 20" 100lb struts with the standard ball and socket connectors.

It was easy to identify a place to mount the brackets on the hatch frame but needed a good place to mount them on the sidewall. Since the wall is made of 1" square steel tube and 1" foam, I needed to connect to the frame but further inside than on the frame so the hatch would close. I made some brackets out of 1" x 3/4" steel channel and welded it to the steel tube frame on each side. I made them long enough to accommodate some range because of my uncertainty in exactly where I'd place them. I used small steel ball mounts with 3 holes then drilled and tapped holes for machine screws. Aligning 3 holes exactly right in this steel proved quite difficult as one would be off my a millimeter and not let me get screws in all 3. I ended up making Swiss cheese in trying new sets of holes to mount them a few times.

I got my 20" struts installed and they worked really well except in finding the locations for the struts to both extend and compress and fit well led to a situation of the hatch not extending up quite high enough. I am 6 feet tall and the bottom edge of the hatch would come to the top of my forehead! :?

Image

The obvious thing to do is get longer struts so I got a pair of 26" 100 lb struts and tried again. I'm glad I went this long since I needed to adjust the location of the mounting balls slightly too, moving the mounts on the hatch frame a couple inches and going further down my new side wall brackets. The 2-hole brackets were getting very frustrating to fit so I went to studs with a 3/8" screw thread. They come with a nut to use on the thread but I would have no way to reach the nuts inside the wall once I put the plywood wall skin up so I drilled and tapped holes for the studs and it all fit well.

With these longer struts the hatch clears my head comfortably and I can step up to the back edge of the trailer but I may need to add a short lanyard at the center rear edge of the hatch so that shorter folks can reach the hatch to close it. (It ended up looking a little like this but looking closer I can see that it is actually the 20" struts here. I don't have a handy picture of the 26" struts but they will show up again in another picture someday when I make more progress in the galley.)

Image

Anyone need a pair of 20" 100 lb gas struts in the Seattle area? You can have them for some IPA! :beer:
Steve
First Build: viewtopic.php?f=50&t=57021
User avatar
Prototear
Silver Donating Member
 
Posts: 161
Images: 412
Joined: Wed May 15, 2013 3:13 pm
Location: Lake Forest Park, Washington
Top

Re: Wandering First Build - Finally Going Again

Postby Prototear » Mon Dec 30, 2019 3:36 am

After getting my hatch struts and latches in place I found that a couple of the rivets holding the hurricane hinge at the top of the hatch had sheared off and the hinge was lifting off the roof by a bit! :x
Image

It was a long time ago that I installed this hinge (it was the second as I had cut the first one incorrectly and this was an upgrade from the offset hinge to using a spacer recommended by Frank Bear). This was riveted into a 1x2" square steel tube that runs laterally between the walls but the welder had mounted it slightly off-square so I think the purchase of the rivet into the tube was compromised a little by being so close to the edge of the tube. Nonetheless, this needs to be refastened and pulled in tight. In watching the hinge dynamics it also appeared that there was more strain at the ends of the hinge compared to the middle.

I drilled out the suspect rivets and fortunately had a few more of the watertight ones with a slightly longer body to be sure to get deep enough through the layers and into the square tube underneath.
Image

I cleaned out the holes and even drilled a couple extra for 2 more rivets and cleaned then replaced the sealant under the hinge. I used my longer adjustable depth clecos to pull the hinge in tight and installed one rivet at a time while removing the clecos.
Image

I also added a couple extra rivets at the other end of the hinge mount to ensure it stays in place.
Last edited by Prototear on Mon Dec 30, 2019 4:23 am, edited 1 time in total.
Steve
First Build: viewtopic.php?f=50&t=57021
User avatar
Prototear
Silver Donating Member
 
Posts: 161
Images: 412
Joined: Wed May 15, 2013 3:13 pm
Location: Lake Forest Park, Washington
Top

Re: Wandering First Build - Finally Going Again

Postby Prototear » Mon Dec 30, 2019 4:20 am

Another August installation was the door knobs/locks for the side doors. I am using the door latches from Frank Bear.
https://www.teardroptrailerparts.com/door-handles---latch-kits.html

Image

This handle has the standard shaft (5/16" I think) but the handle needs a larger diameter hole to on the outside than on the inside. I located the interior hole location by dry-fitting the interior side of the latch then drilled a pilot hole outward, then used a tapered step drill to cut a clean hole in the double layer aluminum skin inward. I had removed the rubber edge bulb seal to have it out of my way when drilling and to keep it clean (it is just jammed on without adhesive so with a good pull it can come off then be jammed back on).
Image

Image

I forgot to take a picture of the mounted handles but they will show up in future pictures of the side of the trailer.

Because of critical spacing between the wall frame and the door and the slightly over 1 inch thickness of the wall, the nylon strike plate that came with the latch kit wasn't going to work so I had to make something new to fit. I tried designing a wider latch plate based on the design of the nylon ones that came with the latches, including one version with a slight wraparound edge to go on the inside with a good edge to catch the latch bolt and another one with an outside wall edge and match the shape of the aluminum edging. Here are versions 2 and 7 that I designed for 3D printing and tested.
Image

Image

These turned out to be more difficult than I expected......stay tuned while I gather more pictures for another entry someday soon.
Steve
First Build: viewtopic.php?f=50&t=57021
User avatar
Prototear
Silver Donating Member
 
Posts: 161
Images: 412
Joined: Wed May 15, 2013 3:13 pm
Location: Lake Forest Park, Washington
Top

Re: Wandering First Build - Finally Going Again

Postby Prototear » Mon Feb 22, 2021 1:48 am

I haven't made an entry in this journal for over a year but kept on working while I could. Shortly before my last few entries I got wrapped up in an overwhelming project at work so stopped making entries for a while and didn't even get caught up with the build progress I had at that point. I pulled the trailer back into the garage and it sat for a couple months in the middle of winter then in March we were sent home from the office to work from home and have been at home since.

While stuck at home, even with an overwhelming project at work for most of 2020, I did manage to make significant progress and check many things off of the list, with probably 50 useful pictures to add here. I had the trailer in the driveway in the summer and fall then brought it back inside around Thanksgiving 2020. I'll pick up where I left off from the progress in late August 2019.....

In August I got the side door levers installed but didn't use any of the 3D printed latch catch ideas I had and simply used an angled piece of aluminum to make an edge of the right depth. I don't have a good picture of it now but will eventually when I do the trim work around the inside of the door jamb.

I had a gap at the top of the right side door - the hinges, latches and everything lined up so this must be a little unnoticed (or forgotten?) warpage in the broader aluminum exterior door skin. Even with this gap, no rain got into the trailer - it seems that any water that would trickle down the exterior skin falls into a channel between the 2 door seals. I removed the outer seal and sandwiched the skin between a couple boards and clamps and bent the skin back inward to reduce it but there is a little remaining and will probably need to do it again later.
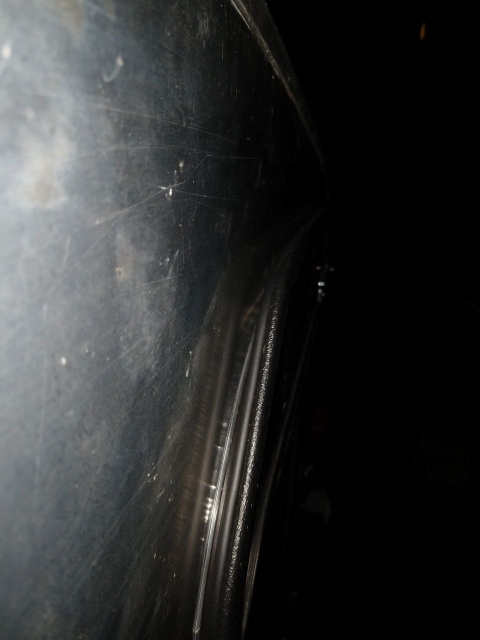
Image

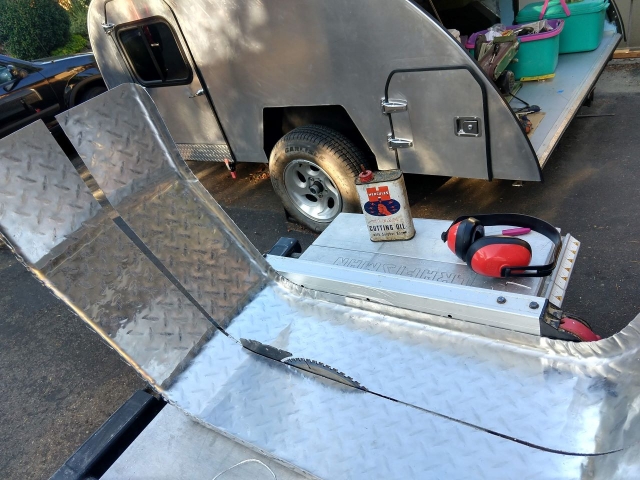
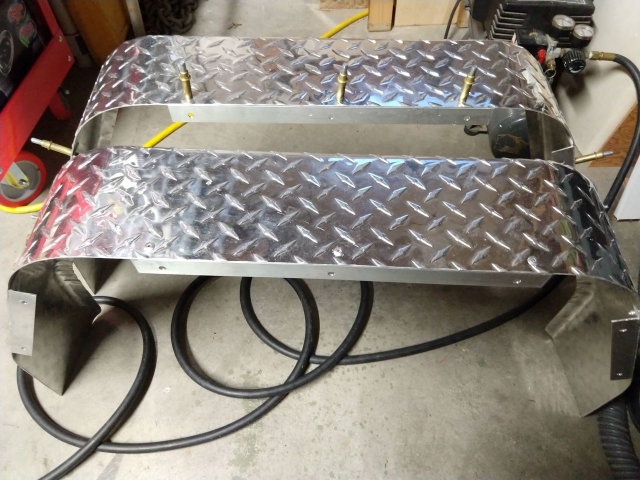
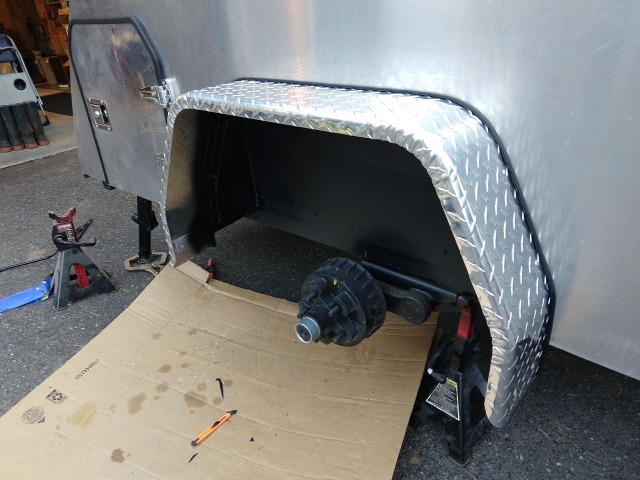
Next I prepared the fenders and installed them. Since the wheels stick only half way out beyond the exterior walls I only needed a half-fender on each side. A few years ago I had a single fender with a Jeep-style shape to it made and it sat here for a long time - you can see it a few entries back sitting on the tongue. I cut it in half down the center and riveted angled aluminum brackets to mount them. These line right up with the 1" square tube frame around the wheel well and I fastened them with self-tapping screws and included fender welting for a finished look.

I simply cut the fender down the center on the table saw (this picture was posed after cutting it, I wouldn't want to let go of it while cutting just to snap a picture).
Image

Here are the brackets being added (with clecos to hold it in place for riveting).
Image

Right side installed with fender welting
Image

Right side with wheel back on:
Image

I also made some brackets to affix the bottom edges and leave a vertical surface under the trailer frame if I want to add a mud flap later to protect the whole width of the tire. The brackets are hard to see installed because that joint is now covered with undercoating. The flat top of the fender gives a surface to set a beverage or tools and I can clamp on an extension table there too.
Steve
First Build: viewtopic.php?f=50&t=57021
User avatar
Prototear
Silver Donating Member
 
Posts: 161
Images: 412
Joined: Wed May 15, 2013 3:13 pm
Location: Lake Forest Park, Washington
Top

Re: Wandering First Build - Finally Going Again

Postby Bezoar » Mon Feb 22, 2021 5:50 am

Looking sharp! I like the look of the taillights. :beer:
User avatar
Bezoar
Teardrop Master
 
Posts: 155
Images: 37
Joined: Mon Mar 10, 2008 9:01 pm
Location: Southern Wisconsin
Top

Re: Wandering First Build - Finally Going Again

Postby western traveler » Mon Feb 22, 2021 11:57 am

I was going to say the same thing. Taillights noted! They look good on your build...
western traveler
Donating Member
 
Posts: 396
Images: 264
Joined: Wed Dec 28, 2016 6:59 am
Location: The Front Montana
Top

Re: Wandering First Build - Finally Going Again

Postby Prototear » Thu Feb 25, 2021 12:49 am

I manged to find some pictures of the right door gap and the partial fix I did that next day. I peeled off the edge molding and clamped 2 boards onto the top and bent it inward slightly. One shot shows the clamping setup and the other shows the inner door seal and the channel between it and the outer skin where I figure any rain water that may have gotten inside the gap was routed away to prevent water getting inside.

Image

Image

Finally, here is the simple door catch made from aluminum rather than the over-thought-out 3D-printed ideas.

Image
Steve
First Build: viewtopic.php?f=50&t=57021
User avatar
Prototear
Silver Donating Member
 
Posts: 161
Images: 412
Joined: Wed May 15, 2013 3:13 pm
Location: Lake Forest Park, Washington
Top

Re: Wandering First Build - Finally Going Again

Postby Prototear » Thu Feb 25, 2021 1:16 am

One of the next things I worked was the installation of the rear license plate. I was looking for a bracket that could hold the plate so that it faced straight rearward rather than angled upward laying right on the skin that could also hold 1 or 2 lamps to illuminate it, a backup camera and also look good and not like a contraption. I searched and could find some hot-rod style plate brackets that didn't quite fit my needs and thought of trying to design one and 3D-printing it but I just wanted to get on with the assembly and not overthink it like I did on the door catch above.

I got a simple black metal frame and an old license plate I had saved years ago and figured I could bend it slightly to lay right on the surface. I taped the plate on many locations to see what looked the best. I figured low centered was probably the best look but since I would sometimes have a bike rack hanging in the way it may be best to have it offset so the rack doesn't block it. About 8 or 10 years ago I was pulled over for speeding on Whidbey Island going camping with bikes hanging on the back of my SUV. The officer let me off with a warning and also noted that the center post of the rack and bike cranks completely blocked the SUVs plates so he was unable to read it when following me and made it clear I need to do something about it. I never did solve that problem but figured it would be better to offset the license plate on the trailer in an attempt to avoid this. Here are 4 different possible locations I tried.

Image

In the end I mounted the plate to the left about half way between the 2 left options in the picture but didn't get around to that for a few months. To illuminate the plates I figured I'd use bolts with LEDs in them above the plate to mount it.

I also mounted a backup camera separately rather than in a license plate frame. I found one that would allow me to mount it through the skin and clip logic wires behind it to change the orientation. The main purpose of it would be to avoid hitting something in tight quarters backing into a campsite and maybe also use it for monitoring what is behind the trailer while inside at night. Before drilling a hole for it I placed it up and down the edge of the hatch to get the vertical positioning correct then mounted it in the center. Of course, being in the center may have the view blocked if there is a vertical bike rack post there, but the angle of it is very wide so I could still see around it enough to be sure to not hit a picnic table or tree. I tested the video by plugging it into a computer monitor with a composite video input. Unfortunately with the contrast at night there is not much to see show on the screen.

Image

The camera is the small black thing in the center of the hatch skin. You'll also see the area on the left where I started to clean off the tarnish where the license plate will eventually go.
Steve
First Build: viewtopic.php?f=50&t=57021
User avatar
Prototear
Silver Donating Member
 
Posts: 161
Images: 412
Joined: Wed May 15, 2013 3:13 pm
Location: Lake Forest Park, Washington
Top

Re: Wandering First Build - Finally Going Again

Postby Prototear » Wed Mar 03, 2021 12:20 am

The prior entry for the installation of the backup camera was for work about Labor Day 2019 then my day-job became very time consuming and not much happened for about 5 months. The trailer sat in the driveway uncovered for part of that then I finally got the garage cleaned up to be able to push it back inside. While outside in the cool damp weather I again had some mildew start but fortunately only on the porous (wood) surfaces - since most of the trailer is steel, aluminum, plastic or glass it wasn't hard to clean up and treat with mildew killer. Here it is back in the garage with just enough room to get around the rear, left, front and about half of the right side. I also had to push it in with the side doors open since there isn't enough room to swing the doors being so close to the walls

Image

I especially needed to be in a dry warmer area because the wiring work would come next and it is hard to do the fine detail work with cold hands.

After I got in it inside and cleaned up I sprayed all the wood surface with urethane so that it would be harder for mildew to take hold in the wood again, either during the long construction of in the years ahead while in use.
Last edited by Prototear on Wed Mar 03, 2021 12:39 am, edited 1 time in total.
Steve
First Build: viewtopic.php?f=50&t=57021
User avatar
Prototear
Silver Donating Member
 
Posts: 161
Images: 412
Joined: Wed May 15, 2013 3:13 pm
Location: Lake Forest Park, Washington
Top

Re: Wandering First Build - Finally Going Again

Postby Prototear » Wed Mar 03, 2021 12:36 am

In February 2020 I continued the wiring in the hatch and would work my way forward to where the PD4045 power panel would be eventually. The hatch has wiring for the usual tail lights and license plate lights, but also speakers, the backup camera, an overhead galley light and accent lighting. As I got more wiring installed I added 1/2" bendable polystyrene panels with a skin on each side up against the inside of the hatch skin held in by friction between the ribs and a little tape. My plan was originally to have connectors to mate pigtails to the inside of the cabin but I abandoned that idea since I figured I'd probably never need to use them as I would unlikely never need to remove the hatch - if that has to happen I'd just have to manually disconnect the individual wires in a junction box inside.

I had started some of the wiring in 2019 but didn't label much of the wiring and I had to figure out what I had installed so once I did that I labeled all of them and continued labeling them as I built it up. This is the lower left corner of the inside of the hatch where a majority of the wiring would come together to go into a wrapped bundle toward the inside of the cabin.
Image
Steve
First Build: viewtopic.php?f=50&t=57021
User avatar
Prototear
Silver Donating Member
 
Posts: 161
Images: 412
Joined: Wed May 15, 2013 3:13 pm
Location: Lake Forest Park, Washington
Top

Re: Wandering First Build - Finally Going Again

Postby Prototear » Wed Mar 03, 2021 1:04 am

Continuing the wiring near the rear, I next routed wiring for the left rear side running light and a courtesy light above the side storage doors. I also include a switch just inside the doorway at the top to operate the courtesy light. I tested the lights with a separate 12v supply as I installed the wiring. Here the courtesy light and right rear running light are on but the running light on the back of the right fender was not wired yet (and wouldn't be until months later when I could pull the trailer out and work underneath it).
Image

Here's the toggle switch just inside the door. in the upper forward corner.
Image
Steve
First Build: viewtopic.php?f=50&t=57021
User avatar
Prototear
Silver Donating Member
 
Posts: 161
Images: 412
Joined: Wed May 15, 2013 3:13 pm
Location: Lake Forest Park, Washington
Top

PreviousNext

Return to Build Journals

Who is online

Users browsing this forum: No registered users and 23 guests

cron