Re: Wandering First Build - Finally Going Again

...ask your questions in the appropriate forums BUT document your build here...preferably in a single thread...dates for updates, are appreciated....

Re: Wandering First Build - Getting back to work!

Postby Prototear » Sun May 31, 2015 4:27 am

While wrestling with the build sequence (wiring, foam, skin, etc.) I decided to make some raceways in the upper left and upper right edges of the cabin to get wired from front to back. I thought about going under the floor or inside the walls but that seems that it may be more complicated and harder to make changes or maintain in the long run. I will have some cabinets next to and above the headboard with the PD 4045 in the left one and a stereo in the right one. Some wires can go within the headboard cabinets, but I'll need to get AC power, DC power, speaker wire and lights to the rear area.

I can put triangular brackets along the upper corners of the side walls then cover them with some birch plywood to match the flat walls. Here is a simple mockup.

132339 132340

I used just a scrap of 1/4" plywood to show how it would be placed but I'll need to cut a wider strip. Since the roofline curves (it is a teardrop shape!), I'll have to cut a curved flat strip to cover this. I also continue looking for other corner raceway, but would rather not use flat raceway (although that would be simpler). I also cut tracks in the foam insulation for low voltage wiring so that they don't leave bulges behind the interior wall skin. I used the broad side of the HF hot knife - it left a blackish skin in the channel but this will be hidden.

132341

I'll figure out the installation details later since I'm more interested in getting the skin installed.
Steve
First Build: viewtopic.php?f=50&t=57021
User avatar
Prototear
Silver Donating Member
 
Posts: 161
Images: 412
Joined: Wed May 15, 2013 3:13 pm
Location: Lake Forest Park, Washington

Re: Wandering First Build - Getting back to work!

Postby Prototear » Sun May 31, 2015 4:58 am

I got the skin installed today (Saturday)! :thumbsup:

I had to trim back the foam sealing tape on the right side and a little of the left side and carefully taped areas not yet taped so I could leave at least 1/2" of exposed steel frame for the 3M 4950 VHB tape. I also roughed out the aluminum skin leaving up to an inch of overhang that is short enough I can get a clamp over it but comfortable enough to not have to cut too precisely. I cleaned the steel frame and the backside of the aluminum skin, installed the tape on the steel frame, then carefully placed the skin along the sides using a few clamps. I didn't remove the backing from the VHB tape so I could align the skin first, then slipped a hand in gaps working from the center outward to remove the backing. Once I had enough areas holding with the tape, I rolled a laminate roller over the skin to compress the VHB tape further to improve the bond. I got the left skin installed about 7PM, and the right skin just before midnight.

I used about 2/3 of the 36 yard VHB tape roll covering both sides. Not every steel frame member got the VHB tape but I covered the entire perimeter, the door openings, and a couple internal vertical lines so that there was no span over 23" without VHB tape. This was my first time using the really good VHB tape like this and its power is impressive, and I'd guess it will get stronger as it cures further. I expected to need rivets but this stuff might keep me from having to. I think I can add them later in select areas.

I scrounged up 43 clamps of many types.

Image

The lighting looks bad in this midnight shot but it shows that the skin will need some polishing! I got a great deal on the 4' x 10' skins but they had no plastic on them to protect their surfaces. I found even more clamps in the shed, including pipe clamps and put them all to use.

Image

Since it gets chilly here at night I moved it all back into the garage and put a small heater in with it thinking that the tape will cure better if at least warm. In the coming days I'll trim the outside edges with a laminate router bit, then I will move to planning the detailed door trim and finish before I trim the those areas of the side skins.

Its finally looking more like a teardrop with the skin on the sides! :D
Steve
First Build: viewtopic.php?f=50&t=57021
User avatar
Prototear
Silver Donating Member
 
Posts: 161
Images: 412
Joined: Wed May 15, 2013 3:13 pm
Location: Lake Forest Park, Washington

Re: Wandering First Build - Getting back to work!

Postby flbikejunkie » Sun May 31, 2015 12:35 pm

Nice job
User avatar
flbikejunkie
Teardrop Advisor
 
Posts: 77
Images: 134
Joined: Tue May 07, 2013 3:56 am
Top

Re: Wandering First Build - Getting back to work!

Postby Prototear » Tue Jun 09, 2015 1:34 am

Thanks flbikejunkie! :)

I worked on the trailer both afternoons into the evening this past weekend. My first task was to trim the edge of the aluminum skin with a router. I had 2 flush edge trim bits, a small old one , and one larger better one. I tried the dull one first and it it just got clogged with globs of aluminum after a pass of less than a foot along the edge! I cleaned it off and it just kept getting worse each try. It finally would not cut any longer and I became afraid of damaging the skin. I tried the better bigger bit and made much more progress but it suffered similar problems just not as quickly. :x

Image Image

I called my friend who owns an aluminum machine shop (http://twintecinc.com/) for help and got some really good advice. His points were:
* Use the router just to trim the edge rather than to cut away the bulk of the material - the backside of the bit just generates more heat while not doing useful cutting.
* Push the router to go faster until the router starts to get loaded down somewhat - this gives bigger chips in the cut and generates less heat
* Apply some oil along the area to be trimmed. My skin is already vertical but he said just a film of oil is all it takes.
* No need to buy a solid carbide bit - a regular woodworkers bit should be fine so long as it is not too skinny.

I used my new HF electric shears to trim the edge closer (to less than the bit diameter) and made much better progress with the router until the bearing bit failed when I got it mostly done. I got a new bit the next day to finish and cut more aluminum (stay tuned for my next entry).

Next I worked on the top skin, but first I had to make sure the sunroof frame would fit within the wood frame I had started last summer. I had to trim it back a little more then sand it to shape it a little more. Next I cut one of my 4x10 sheets of aluminum skin for the roof. Since I have only 4x10 sheets and my trailer is 6' wide I planned to lay it out to minimize seams but also use them to my advantage for the sunroof contour. The sunroof is a CR Laurence 22" x 38" and has a curvature left to right with the center being about 3/8" higher than the far left and right; there is no curvature of the sunroof fore/aft. Meanwhile, my roof has no curvature left/right, but about 1/2" fore/aft since it right where the front curve of the body starts to descend. My plan uses one 4x10 sheet cut lengthwise to go on the left and right of the top, with smaller 26" wide pieces in the center to have an inch overlap. This way the seams intersect the sunroof where I can shift them slightly to get the best fit over the odd contours. The sunroof installs by pinching the roof skin so I'll get it all set into the sunroof frame before actually attaching the skin to the trailer frame. These pictures shows a dry fit check held only with clamps.

Image
Image
Image

Here are some views looking up from inside toward the left and right. The sunroof frame is black and floats within the cutout but is held in place by clamps for now. I need to carefully mark the cutout for each side and cut it. I could either pull it down to cut it or cut it in place with some scrap wood of the right thickness wrapped around the inside so I get the right overhang for the sunroof to pinch, but I'd be worried about the skin shifting on me while cutting.

Image
Image

Before installing the sunroof and roof skin, I'll need to finish cutting the foam insulation and any last provisions for wire routing in the ceiling.
Steve
First Build: viewtopic.php?f=50&t=57021
User avatar
Prototear
Silver Donating Member
 
Posts: 161
Images: 412
Joined: Wed May 15, 2013 3:13 pm
Location: Lake Forest Park, Washington
Top

Re: Wandering First Build - Getting back to work!

Postby Prototear » Tue Jun 09, 2015 2:13 am

I'll need to get my doors finished so I can trim the side skins around the door openings and know exactly where to trim.

The doors I started are made from the aluminum honeycomb that is super strong and stiff! The only problem is that I realized that one side (the non-Kevlar side is anodized in a silvery color. This is why I couldn't get it to shine so I looked into removing the anodizing finish. My research lead me to using oven cleaner which is basically spray lye. I used my sacrificial scrap I've used for testing to see if it works. It actually does work but makes a mess. I left some on the end of this piece overnight and rinsed/wiped it off an it left a blackish crud that would rub off with polish. Even this treatment left lots of anodize residue that needs to be redone to get the rest in this small area.
Image

The darkish spot in the middle of the kinda shiny area is actually a blurry reflection of my phone and my head (tilt your head to the left to see it). This is progress but I could imagine this taking a whole day of hard labor on each door to get a moderate quality finish so I looked for other ideas. I also need to get an overhang on the outside for to make an overlapping seal against the side of the trailer and I've found my top curves to have too tight of a radius to wrap T-molding around it easily.

The other idea for a door skin that I've been considering is to simply overlay another layer of the same trailer skin on the door with an overhang for the weatherseal I got last summer from Zoro http://www.zoro.com/trim-lok-inc-trim-seal-side-bulb-w-vinyl-grip-25/g/00117006/. I don't have much extra skin to spare so I checked Craigslist and found a couple sheets of the same alloy (6061) 1/16" thick (a full 0.0625, thicker than my 0.050 skin). I picked it up, made a template for the overhanging size I'd need from OSB, then cut out 2 door skins. The rubber seal fits it nicely!

This is the new door skin template behind the honeycomb door panel.
Image

Here are the new door skins along with the original door template (to get the window cutout) a honeycomb door panel and the outer skin template.
Image

To trim the new skins I used a new router bit http://www.homedepot.com/p/Diablo-1-2-in-3-Flute-Flush-Trim-Bit-DR44100/202585369 as advised the day before. It was a half-inch diameter and cut very easily, and the bit was even aggressive in pulling me along.

The new skins are pretty stiff and a little heavier than you might expect so I've been thinking about not even using the original honeycomb door panels I made last summer since they will be entirely buried inside the door and not visible. I could use plywood in its place with cutouts to reduce weight and add more insulation but wood weighs more than the honeycomb and has the potential to hold moisture. I could also make another cutout in the lower half of the honeycomb panel to further reduce its weight since it is so stiff it won't notice it. I'm leaning toward still using the honeycomb panels since they are too weird of a shape to use elsewhere and already made. The honeycomb weighs about 2/3 of an equivalent size of dry plywood. I'd use an appropriate adhesive to hold the new skin to its surface to avoid adding visible fasteners. :thinking:

This could be an over-designed door with 3 layers of aluminum skin, one layer of Kevlar and a plywood skin on the inside! :R
Steve
First Build: viewtopic.php?f=50&t=57021
User avatar
Prototear
Silver Donating Member
 
Posts: 161
Images: 412
Joined: Wed May 15, 2013 3:13 pm
Location: Lake Forest Park, Washington
Top

Re: Wandering First Build - Getting back to work!

Postby Prototear » Thu Aug 06, 2015 3:06 am

I've had many distractions but have found some time to make more progress from time to time but not much time for progress entries in this build journal. Today I loaded many more pictures and see that I now have about 30 pictures in my gallery that I want to move here and describe. When I've had to pick between working on the trailer or writing in this journal, it has been to actually work on the trailer. Its been almost 2 months since I made an entry here. :shock:

In late June I trimmed off the excess below the first horizontal crossbar on the side sheets and added the middle section of the front of the roof skin to join into the sunroof frame. The skin is held in place with VHB tape (and clamps temporarily). This skin was from the rough door cutout of the 0.05 side skin so it has a weird shape at the end. You can see that I ran out of daylight and continued into the night.

Image

The next day (or maybe the day after that), I trimmed off the longer middle skin piece to be even with the 2 on either side of it.

Image

After doing so, I found that the top of this piece had slipped out of the sunroof frame (probably while clamping it at night a day or two earlier) so I had to pop off the VHB tape and remove screws and sealant already installed. I had VHB tape on the horizontal edges but butyl tape when it overlaps on adjacent skin. I could get the VHB tape to pop with enough force to break its middle foam layer then clean/scrape off the adhesive portion before reapplying some of the little bit of the VHB tape I had left. I must not have noticed it because of the excess butyl tape I put there. :x

Image

I had to pull the middle skin upward about 1/4" to get it to sit better in the sunroof frame but was able to reuse the visible screw holes except in one place where the holes ended up over a 1x2" steel tube crossbar. My MO for skin fastening has turned into using screws into wood and rivets into steel tubes, depending on what is underneath the skin. You'll notice one pair of holes needing rivets yet. This left the bottom of the newly cut skin about 3/8" short of where I ideally wanted it but I have just enough for a solid connection to the 1" square tube crossbar behind it. This will later be covered with sealant and held in place by rivets when I install the front tread plate skin for the lower half of the front.

Image

When I got this mistake fixed the sunroof came together well from the inside (the inside has no interior skin yet).

Image
Steve
First Build: viewtopic.php?f=50&t=57021
User avatar
Prototear
Silver Donating Member
 
Posts: 161
Images: 412
Joined: Wed May 15, 2013 3:13 pm
Location: Lake Forest Park, Washington
Top

Re: Wandering First Build - Getting back to work!

Postby Prototear » Thu Aug 06, 2015 4:12 am

Next I arranged the aluminum tread plate for the front. I had earlier placed some expanded steel sheet on the tongue but it was very difficult to weld its thin pieces to the thicker steel tube frame. I've since had a welding class and gotten better, but it was still difficult to attach the edges and not burn through it while trying to get it to attach. My neighbor (the one who used to say my "welds look like rabbit turds") convinced me to try a different material.

I decided to use tread plate on the tongue to match the front skin so I welded a few more tabs under the front of the cabin frame and got some 0.063 tread plate sheared to size at Metal Supermarkets in Everett. This is fitting it to align it to get ready for attaching it. I used clecos on the tongue for a while knowing that the horizontal skin would likely get in my way when trying to attach the vertical skin.

Image

The vertical tread plate needed a slight bend of about 3/4" about 3-4" inches below the top to fit the contour of the trailer as it starts to slant back. I tried clamping it and bending with clamped steel stiffeners along it but this did not work. Next I laid it flat and clamped a stiffener and rotated it against a flat surface using pipe clamps for leverage. Here is my son helping me set it up.
Image

Image

I used lots of Loctite PL S30 sealant and clecos to hold it in place while drilling more holes then riveting it with watertight 3/16" rivets.
Image

Image

Here it is installed and I had to add a stick to the tongue jack so I could see where the center of the front of the trailer is looking over the top from the back when I push it back into the garage since I can no longer see through the trailer to the tongue so I can steer it :thinking: .
Image

The tongue surface has enough tension between its many rivets so that it flexes only a little bit when I stand on it between the frame members. The sheared edge of the tread plate leaves a better finished edge than I could have made so no one will get their clothes snagged on it if they sit on the edge.
Steve
First Build: viewtopic.php?f=50&t=57021
User avatar
Prototear
Silver Donating Member
 
Posts: 161
Images: 412
Joined: Wed May 15, 2013 3:13 pm
Location: Lake Forest Park, Washington
Top

Re: Wandering First Build - Getting back to work!

Postby Prototear » Sat Aug 08, 2015 3:10 am

Once I got the front treadplate done, I moved to the edge molding. Each side is a single piece of about 15'. I had tried to buy this online and I had even ordered 2 16' sticks of it only to have it arrive in a 8' long cardboard tube. Fortunately I was home so I rejected the shipment since it was either cut or folded in half. I ended up buying it for a slightly higher price at a local RV supply store just north of Seattle.

I decided to use rivets rather than screws since it is being anchored into the 1" square steel tube frame underneath, and had to drill slightly larger holes for my 3/16" closed end rivets. I used clecos to hold it in place and hold the curve tightly on alternating holes (or more holes in some places). The top skin had not been pulled down tightly enough when I first installed it as it had a 3' span between the 2 aft crossbars with the VHB tape. I had to pop off the rear of the skin, clean off the VHB tape and re-attach the skin as I brought the edge over the top and fastened it first with the clecos then used the permanent rivets then reattached the skin with new VHB tape as I got the top skin tight.

Image

After a week break to spend time with visiting relatives, I added the edge on the other side with the same issue on the slack skin) and using the last 2' of my 36 yard spool of VHB tape:

Image

With the left and right top skins set, I added the last piece in the center. The center piece is actually 3 separate pieces, one ahead of the sunroof, one between the sunroof and Fantastic Fan then one aft of the fan. The middle middle piece is a squared-off C-shape to fit around the fan, then there is a lap joint even with the back edge of the fan. With some spots having 3 layers of aluminum skin, the adjustable clecos were handy to be able to tighten them down as I moved from front to rear. Since these go through the shaped plywood ribs I made last year, I need washers on the backside of the rivets (clecos or permanent) so they hold firmly.

Image

I was working into the night and stopped with the clecos and clamps so I wouldn't be running my compressor for the rivet gun at night. My plan for tomorrow is to use the Magna-Tite sealed rivets I tried to use on the honeycomb floor long ago that was incompatible with the honeycomb. Since most of this is through wood it will need a washer behind the rivets. This last view is from above looking aft standing in the sunroof opening.

Image
Steve
First Build: viewtopic.php?f=50&t=57021
User avatar
Prototear
Silver Donating Member
 
Posts: 161
Images: 412
Joined: Wed May 15, 2013 3:13 pm
Location: Lake Forest Park, Washington
Top

Re: Wandering First Build - Getting back to work!

Postby Prototear » Sat Aug 08, 2015 3:20 am

I've been thinking about the many tasks ahead to finish the skin, then the doors, hatch, electrical, cabinets and more; also been considering what items can be deferred to later or after the eventual State Patrol inspection. Some of the parts are in hand now, and I still need to get a few more parts like light fixtures.

Image

Even though I've already missed camping in this for July 4th (both this year and last year), I really hope to camp in this once before the season is over. 8)
Steve
First Build: viewtopic.php?f=50&t=57021
User avatar
Prototear
Silver Donating Member
 
Posts: 161
Images: 412
Joined: Wed May 15, 2013 3:13 pm
Location: Lake Forest Park, Washington
Top

Re: Wandering First Build - Getting back to work!

Postby noseoil » Sat Aug 08, 2015 7:58 am

Steve, looking nice now. I like it that you've been able to stay with the build over time, continue to do a good job & have set high standards for workmanship. In the long run, an extra month or two on the build isn't as important as a job well done and properly executed. Really enjoying the build process on your tear, your approach to problem solving & the finished results, which look to be first class! Make haste carefully!
Build log: viewtopic.php?f=50&t=60248
The time you spend planning is more important than the time you spend building.........

137905
User avatar
noseoil
1000 Club
1000 Club
 
Posts: 1820
Images: 669
Joined: Sun Apr 27, 2014 8:46 am
Location: Raton, New Mexico, living the good life!
Top

Re: Wandering First Build - Getting back to work!

Postby KCStudly » Sat Aug 08, 2015 1:01 pm

+1 to all of that. ^
KC
My Build: The Poet Creek Express Hybrid Foamie

Poet Creek Or Bust
Engineering the TLAR way - "That Looks About Right"
TnTTT ORIGINAL 200A LANTERN CLUB = "The 200A Gang"
Green Lantern Corpsmen
User avatar
KCStudly
Donating Member
 
Posts: 9611
Images: 8169
Joined: Mon Feb 06, 2012 10:18 pm
Location: Southeastern CT, USA
Top

Re: Wandering First Build - Getting back to work!

Postby Prototear » Wed Aug 12, 2015 2:11 am

Noseoil and KC, Thanks for your good words! :thumbsup: The encouragement from you guys with your attention to detail I see in your build journals shows the appreciation for patience. We've all had builds running for quite a while.

I've continued with the roof to mount the vent fan with a piece of 1.5" aluminum angle because of the sloped roof and to add a vertical surface for mounting the center brake light. This shows a preliminary fit of the vent with the upper edge of the center rear roof skin creased upward like flashing to rivet to the back of the aluminum angle. The roof has lots of dust, shavings, and markings to clean up and the whole thing will eventually get a good polish. I added blue painters tape to the sides of the vent housing to trace the roof contour then transfer it to make a template to mark and cut the side angle pieces that will be mitered to meet the rearmost one.

Image

This shows how the center brake light with 11 LEDs can fit to the vertical face. One picture shows the light with the clear lens, and the other shows the chrome trim piece that encircles it. I don't have to decide yet on whether to use the trim piece. This combines the method Danny described for his center brake lights into the frame for the vent described here http://www.tnttt.com/viewtopic.php?f=30&t=59328#p1071763. :beer:

Image

Image

The light is the same height as the aluminum angle (maybe a few thousandths more) but the chrome trim ring is about 3/8 higher. I might be able to use the trim ring anyway because it stands flush with the white frame of the vent on top of aluminum angle, but I don't have to decide until the day I install it. The next step is to cut the aluminum frame pieces and have them welded. I'll add some brackets to hold the frame down firmly and use sealant and rubber fender flare trim like this
http://www.trimlok.com/prod/Fender-Flare-Trim/Edge-Trims/All-Product-Categories_123/X1663BT_164.aspx but I found a place that sells it by the foot so I won't have to buy a 500' spool! :R
Steve
First Build: viewtopic.php?f=50&t=57021
User avatar
Prototear
Silver Donating Member
 
Posts: 161
Images: 412
Joined: Wed May 15, 2013 3:13 pm
Location: Lake Forest Park, Washington
Top

Re: Wandering First Build - Getting back to work!

Postby Prototear » Tue Aug 18, 2015 1:19 am

I have cut and trimmed the pieces for the aluminum frame to hold the Fantastic Fan on the top. My blue templates got tossed by someone cleaning the garage so i had to make new templates - the good thing is that the new cardboard ones were probably better than the original ones that got tossed out.

I transferred the contour to the aluminum angle and trimmed it with a bandsaw and refined it with a bench grinder. Here is the dry fit.

Image

Image

Now it is clamped and ready for welding.

Image

The Trim-Loc fender trim arrived in just couple days. It looks like it will be a good fit, although a little stiffer than I expected but that's OK. I may run a bead of sealant underneath it from inside the frame when installing it. I'll also include 1 or 2 small brackets within it to hold it down to the roof solidly.
Steve
First Build: viewtopic.php?f=50&t=57021
User avatar
Prototear
Silver Donating Member
 
Posts: 161
Images: 412
Joined: Wed May 15, 2013 3:13 pm
Location: Lake Forest Park, Washington
Top

Re: Wandering First Build - Doors!

Postby Prototear » Fri Sep 11, 2015 1:10 am

I started constructing the doors, first working the small rear doors then I'll move to the main bedroom doors once I know it is working well. The core of the doors is the same aluminum honeycomb panel as I used for the floorboards for light weight and stiffness (don't want a warped door that won't seal). The buildup of the door layers are:
* 0.063" 6061 skin
* 0.48" aluminum honeycomb
* 0.56" foam insulation (not for small rear doors)
* 0.18" birch plywood (not for small rear doors)

1.28" total (0.54" for small rear doors if I don't include insulation and plywood)

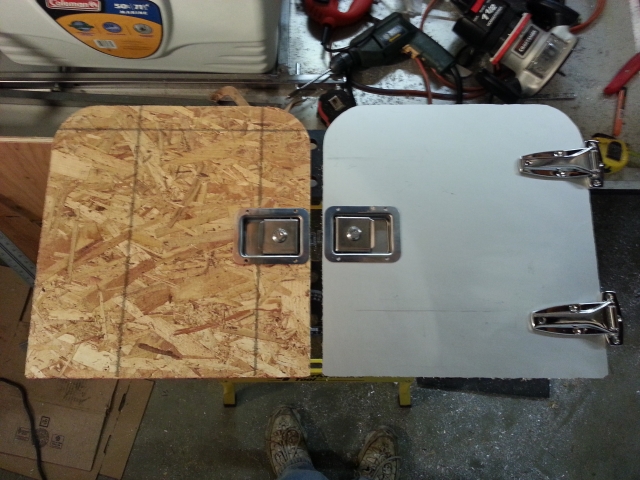
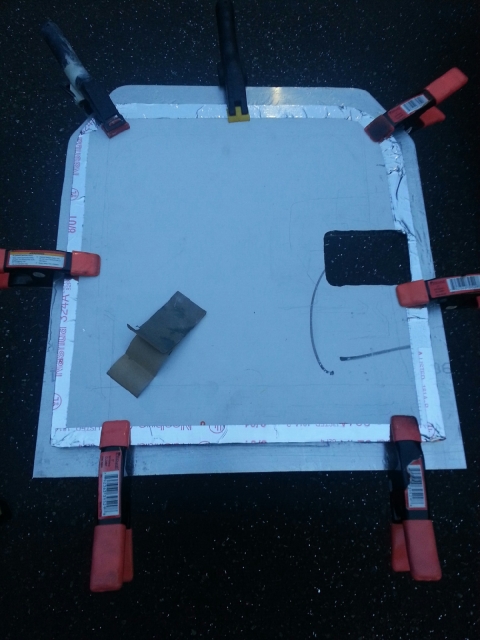
Last year I had first planned to use the bare aluminum honeycomb panel for the external face of the door but decided to add an extra skin over it because the honeycomb panel would not match the exterior skin since it is anodized. Here's the layout of the door with hardware sitting on it as I cut it last spring along with the template I used to cut it (yes, over a year ago!) :shock:

Image

The honeycomb panel will now sit flush with the trailer exterior skin and the aluminum door skin will overlay the door opening with a Trim-Loc seal. I made a door jamb for the top to account for the curved top then trimmed the exterior skin to be slightly bigger than the honeycomb panel core:

Image

Image

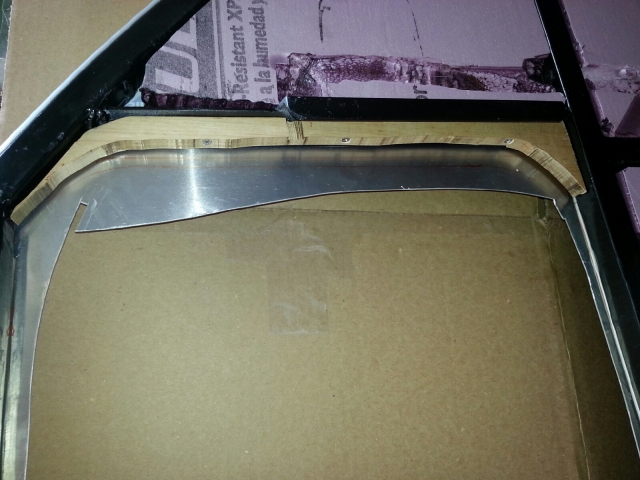
I didn't think about my pictures when I took them but you may that some are of the left door and some are of the right (no one is not backwards, and there is a mix of pick and blue insulation). Next I clamped the door skin over the door opening to see how it fits. I had planned on a plain corner with a radius sightly larger than the core for the seal overlay but it would interfere with the trailer skin top trim so I had to find a different shape. I settled on shape to mimic the eventual jeep-style fenders that will be next to it. Here it is with the latch but no seal or hinges yet. to test the fit. :thinking:

Image

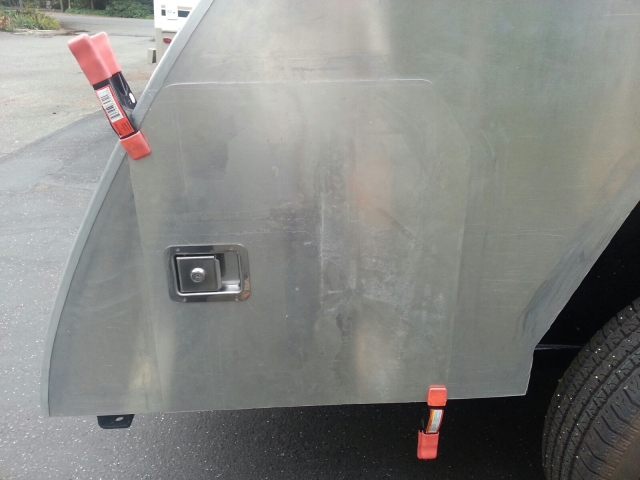
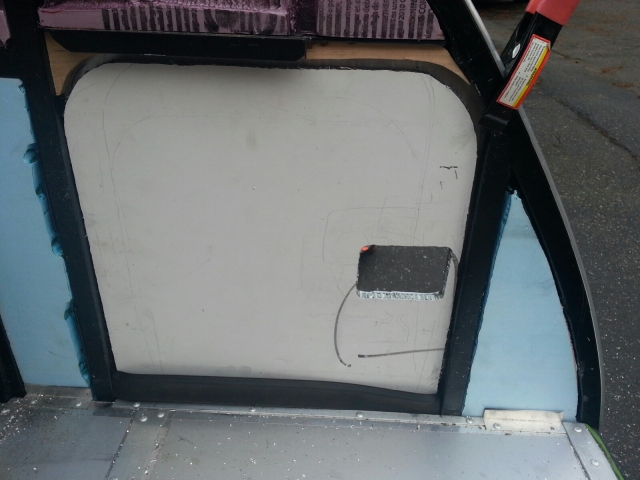
Once I confirmed the fit, I traced the outline of the honeycomb core on the inside of the door skin so I could align it and epoxy the skin on the core.

Image

I did that work on parts of Sunday and Monday then went to work Tuesday and Wednesday. Last night I checked on one of the panels thinking I might show it to a friend but noticed that the outer door skin no longer sat flush against the trailer skin! I pushed on it a bit then saw that the epoxy between the layers was failing and after a few knocks with my bare hands it came off! :x Based on my research I thought the epoxy would work but apparently not. :? I had roughed up (sanded) and wiped down both surfaces before applying the epoxy, but maybe it would have helped to use a solvent to condition it before the epoxy was applied. I wonder also how much the anodized surface may have interfered with the bonding.

Next I will have to clean up the surfaces and try another method. I will try other adhesives first, plus it will eventually have 10 fasteners (3 for each of 2 hinges and 4 for the latch) to hold it, but I might have to resort to a few rivets too as a last resort. I will try Sika on a sample or consider 3M 8115 panel adhesive (but its $50 per tube plus $60 for a tool). Good thing I'm refining this on the small doors before the big bedroom doors. I have enough extra material to make one or maybe 2 new small doors if it goes badly, but I don't have enough extra materials to redo the big doors.
Steve
First Build: viewtopic.php?f=50&t=57021
User avatar
Prototear
Silver Donating Member
 
Posts: 161
Images: 412
Joined: Wed May 15, 2013 3:13 pm
Location: Lake Forest Park, Washington
Top

Re: Wandering First Build - Doors!

Postby KCStudly » Fri Sep 11, 2015 6:33 am

Glad to see you are making progress.

Small concern. Do you have the trim seal in hand yet and have you looked at the minimum bend radius for it? Your access hatch corner radii look a little small to me for the seal style I am envisioning.

Also, how do you plan to treat the bottom edge where the access door raw edge overlaps the wall bottom raw edge? Won't you have a trim conflict there, too?

I hope not, ...probably all part of your working plan... but if not, I hope the epoxy failure gives you some time to work it out.
KC
My Build: The Poet Creek Express Hybrid Foamie

Poet Creek Or Bust
Engineering the TLAR way - "That Looks About Right"
TnTTT ORIGINAL 200A LANTERN CLUB = "The 200A Gang"
Green Lantern Corpsmen
User avatar
KCStudly
Donating Member
 
Posts: 9611
Images: 8169
Joined: Mon Feb 06, 2012 10:18 pm
Location: Southeastern CT, USA
Top

PreviousNext

Return to Build Journals

Who is online

Users browsing this forum: No registered users and 51 guests