Colorado Teardrop Build Journal (Build Complete) (kayakdlk)

...ask your questions in the appropriate forums BUT document your build here...preferably in a single thread...dates for updates, are appreciated....

Re: Colorado Teardrop Build Journal (kayakdlk)

Postby KCStudly » Tue Oct 01, 2013 10:45 pm

Very nice indeed! :thumbsup: :applause:
KC
My Build: The Poet Creek Express Hybrid Foamie

Poet Creek Or Bust
Engineering the TLAR way - "That Looks About Right"
TnTTT ORIGINAL 200A LANTERN CLUB = "The 200A Gang"
Green Lantern Corpsmen
User avatar
KCStudly
Donating Member
 
Posts: 9611
Images: 8169
Joined: Mon Feb 06, 2012 10:18 pm
Location: Southeastern CT, USA

Re: Colorado Teardrop Build Journal (kayakdlk)

Postby aggie79 » Wed Oct 02, 2013 10:31 am

KCStudly wrote:Very nice indeed! :thumbsup: :applause:


I agree with KC and Becky! Your build is stunning!
Tom (& Linda)
For build info on our former Silver Beatle teardrop:
Build Thread

93503
User avatar
aggie79
Super Duper Lifetime Member
 
Posts: 5405
Images: 686
Joined: Tue Aug 07, 2007 5:42 pm
Location: Watauga, Texas

Re: Colorado Teardrop Build Journal (kayakdlk)

Postby drewh1 » Wed Oct 02, 2013 12:06 pm

Nice work! Your project is an inspiration for me!

drew.
"If only I knew what I know now when I started . . ."

My Build Journal http://www.tnttt.com/viewtopic.php?f=50&t=56916
User avatar
drewh1
Donating Member
 
Posts: 245
Images: 7
Joined: Sat Aug 03, 2013 3:01 pm
Location: El Cerrito, CA
Top

Re: Colorado Teardrop Build Journal (kayakdlk)

Postby kayakdlk » Mon Oct 14, 2013 8:44 pm

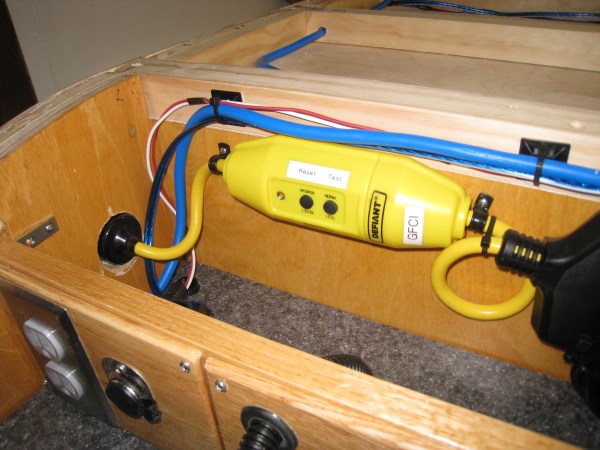
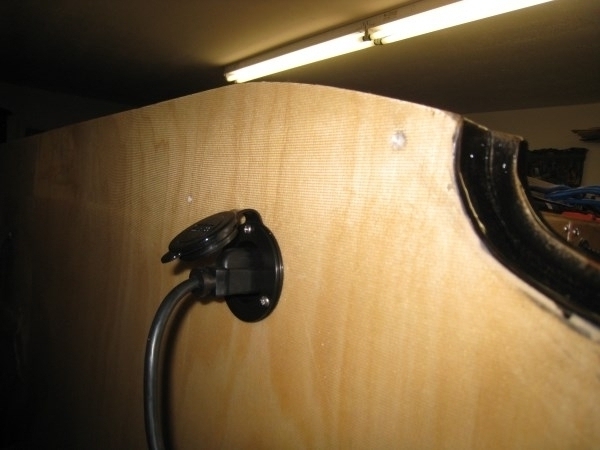
I have been busy over the last few weeks and got all of the AC and DC electrical installed, wired and tested out. For my AC wiring I used a Marinco inlet and I bought a 2 foot GFI extension cord, cut the end off and hard wired to the Marinco inlet. The Marinco inlet is mounted up high and comes directly into the electrical panel area to avoid cable routing clearance issues in the lower galley.
Image

Image

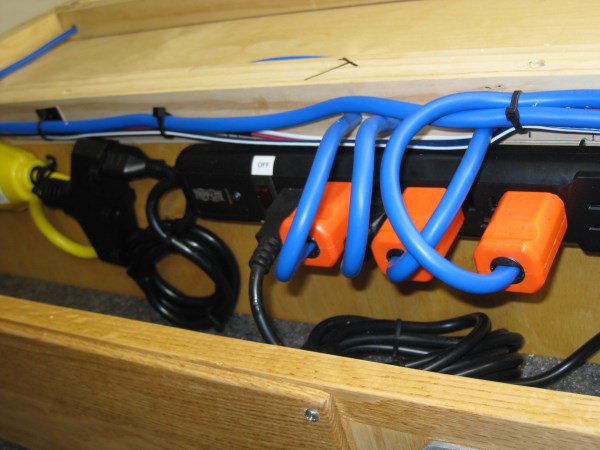
I then plugged into the GFI cord an outlet strip with a built in 15 Amp circuit breaker. I used this simple AC setup instead of an AC breaker box. I bought a 14 gauge blue extension cord and used it for my AC wire to my AC Outlets. I cut the wire to length, tinned the wires for the AC outlet connections and on the other end put on a 3 Way plug connector so I could plug each one into the outlet strip. I have a total of 6 AC outlets, one in each corner of the cabin and one on each side of the galley. I daisy chained the galley outlets to save one open connection on the outlet strip for future needs, Since I didn’t know what I may want in the future I decided it was easier, cheaper and better to wire them up now than regret at later time that I didn’t do enough.
Image

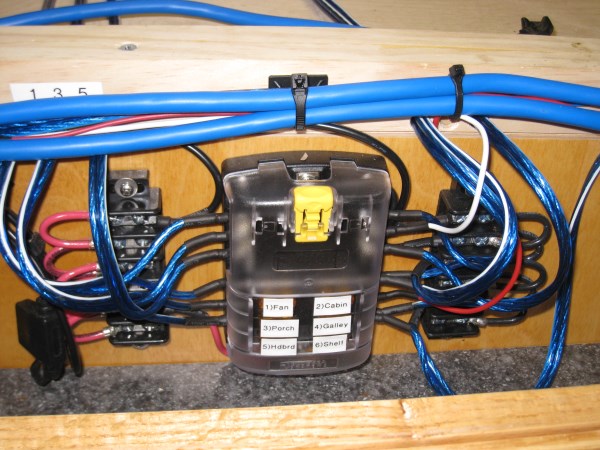
For my DC I used a Fuse panel and two terminal strips. I used the terminals strips. One for additional grounds and one for the positive side where I connected the terminal strip to the fuse inlet with 10 gauge wire and then ran the battery and battery tender to the terminal strip. I ran the 12 gauge speaker wire from each fuse connection to the 12 volt outlets, and lights. I have a total of six 12 Volt DC outlet one in each corner of the cabin and one on each side of the galley. Again I decided it was easier, cheaper and better to wire them up now than regret at later time that I didn’t do enough. My thoughts were we would use the front headboard shelf AC and DC outlets to charge phones, ipods, etc. The cabin gear storage shelf AC and DC outlets for future heating blankets or portable electric heater, and the galley AC and DC outlets for whatever we think of in the future such as fan, juicer, blender, radio, etc.
Image

I also had to wire the Maxxair fan, interior overhead light (on a 3 way switch), reading lights and galley hatch lights and switch. They were all bought as LED or I converted to LEDs.
My thoughts are that if I go to a camp ground where I can plug in I can run everything DC off the battery tender which puts out 5 Amps I won’t need a battery right way.
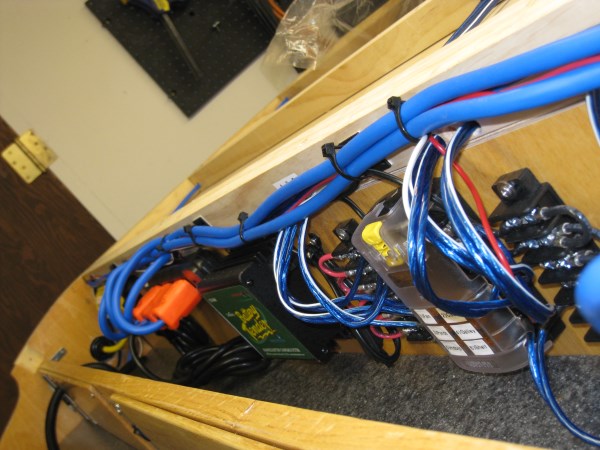
Here is a shot of the entire electrical panel area above the upper galley shelf that will be hidden behind the panel I built to house AC and DC outlets and switch for the galley hatch lights
Image

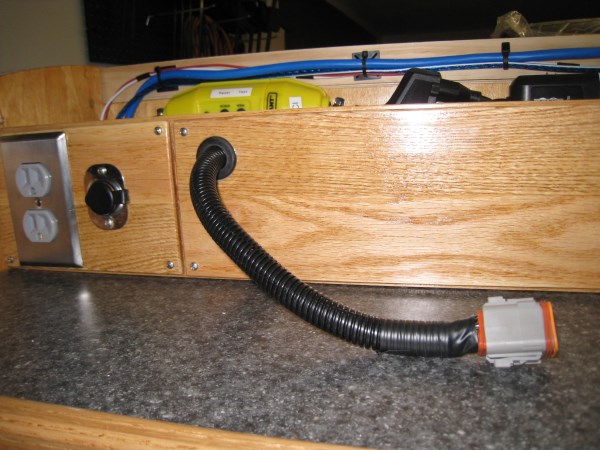
I used a grommet and passed my hatch wiring cable that will provide power and tail light wiring to the hatch lid
Image

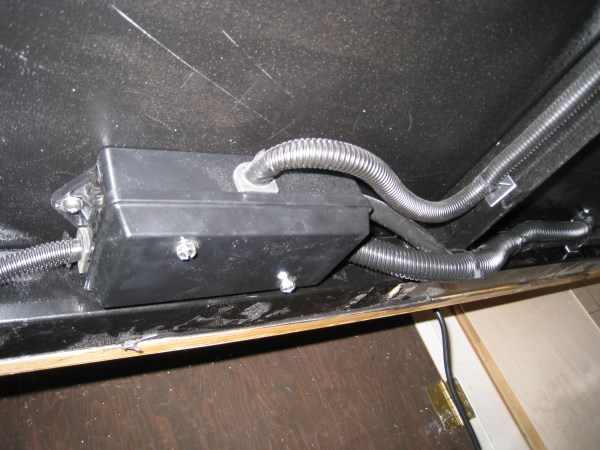
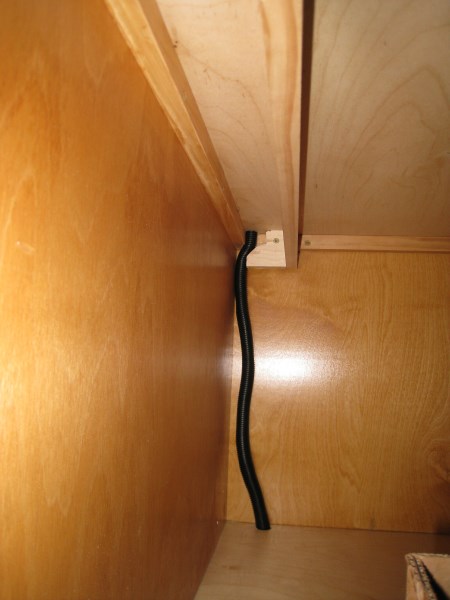
I ran the hatch wires for the tail lights, 3rd brake, and backup lights and the 10 gauge wires for the battery through a corrugated cable cover down through the galley shelf and through the floor along the back corner of the galley to my junction box underneath the floor. I planned to store my side tables along the left side of the lower galley wall and needed to build a stop so they wouldn’t squash the corrugated cable tube. Here is a view of the side table stop with cable beside it. The table stop also keeps the two side tables from falling over sideways
Image

Image

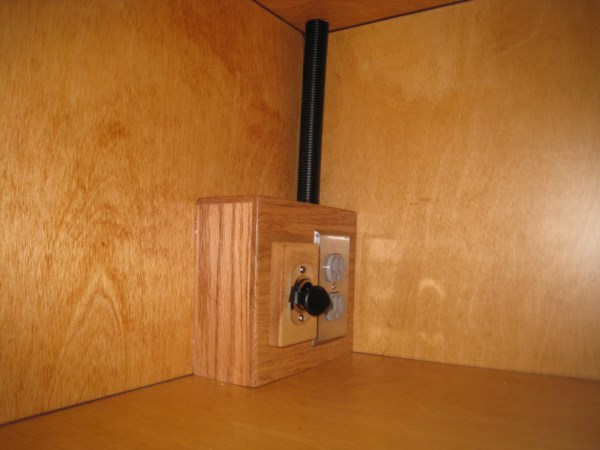
To get AC and DC power to my cabin rear shelf power boxes I used ¾” plastic water pipe and covered with corrugated wire loom. I glued the power panel box and pipe in place with PL premium glue and ran the wire from the power panel across the roof and down to the boxes and outlets. I can access the wiring by removing the AC outlet and DC socket
Image

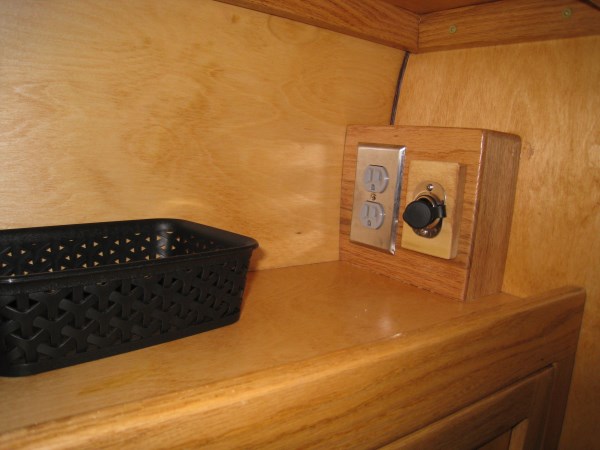
For my front shelf power boxes I ran the AC and DC cords cross the roof and into a hole in the front headliner right into the power box
Image

Image

The other front shelf power panel isn’t mounted yet as I determined if I glued it in place I cannot access my battery meter wiring in case of future issues. I am looking at ways to make the power box removable
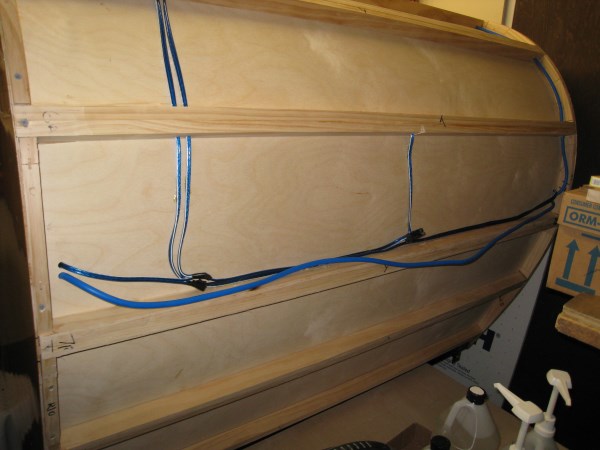
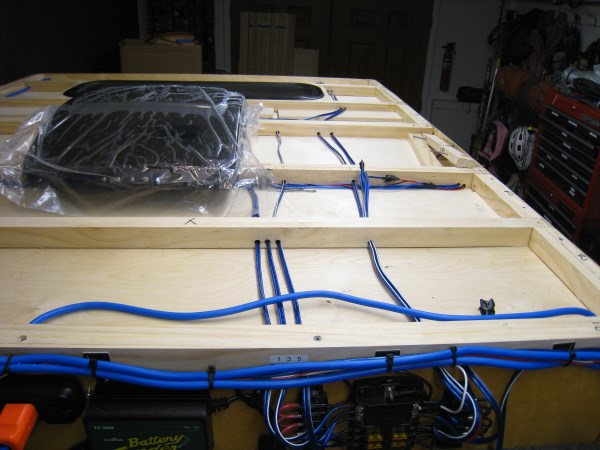
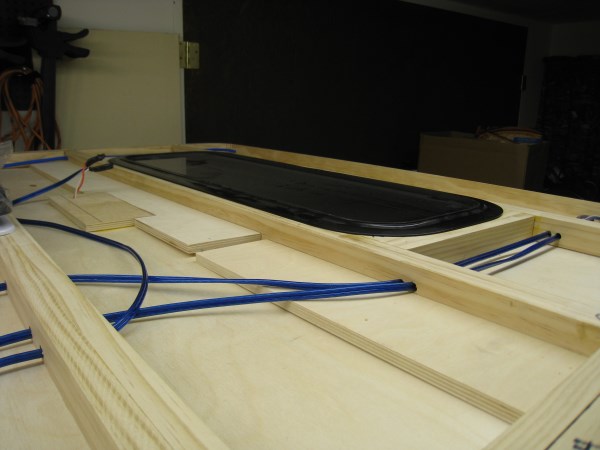
Here are some pictures of the wiring across the roof.
Image

Image

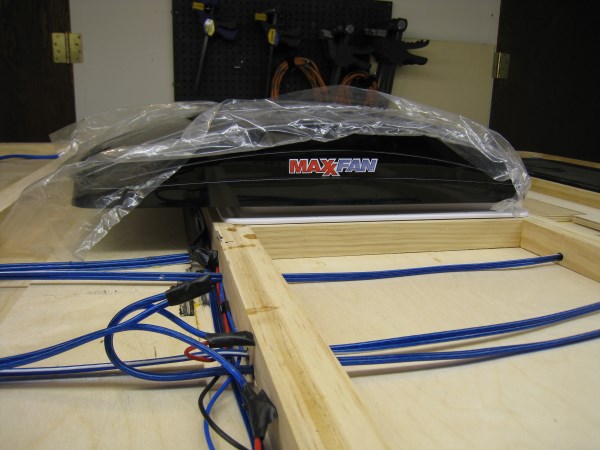
I also routered out my fan and sun roof openings and test fit the fan and sun roof window. I wired up the fan and tested it out. I am using a Max Air 6200K with a smoked top, manual open, without remote. The Maxxairr is over kill but I decided it was not much more money than a fantastic fan and rain cover. The Maxxair has the rain cover built in and you can leave it open in the rain. It has 10 speeds and is reversible and acts as a fan inside if the rain cover is closed.
Image

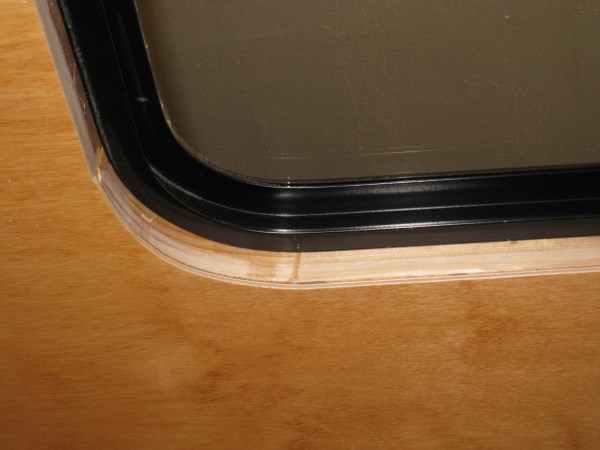
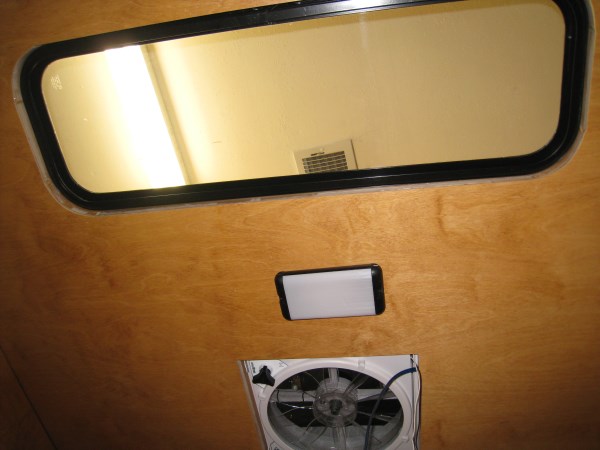
As far as my fixed sun roof goes the trim ring I have doesn't really fit it is for a thinner wall and I got the windows off ebay so I am thinking of just screwing the window from the top through the aluminum windows ring and painting the opening in the roof black so it will not show as much from the inside (2nd picture). Any other suggestions?
Image

Image

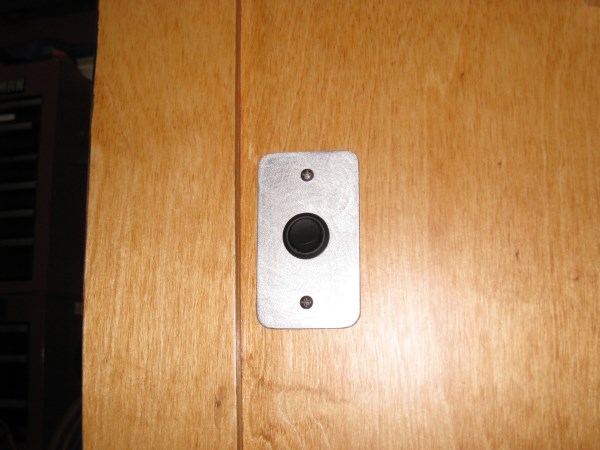
Here is my three way switch panel for the cabin over head light.
Image

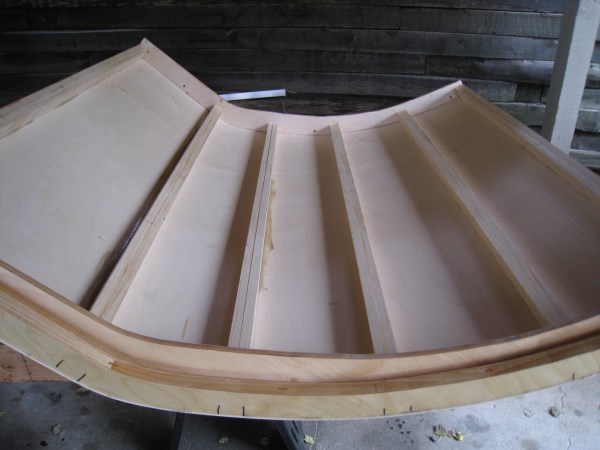
I skinned my galley hatch outside and temporarily installed the hurricane hinge to test the fit and clearances.
Image

Image

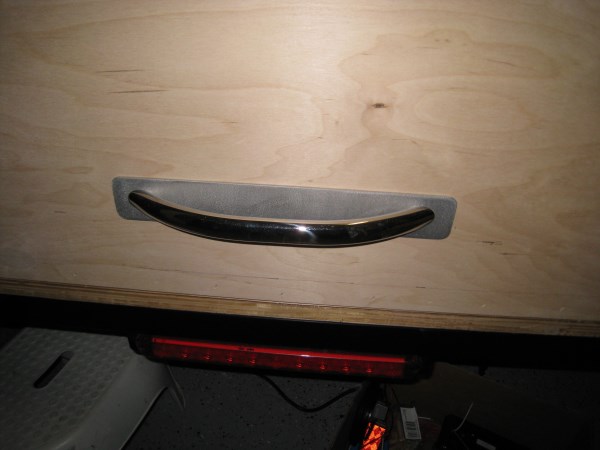
For the hatch handle I am using a 12" stainless steel boat hand rail. It has an nice grip and is big and easy to grab a hold of. I made some aluminum plates for each side to help even out the stress load. There will be a 4" diamond plate panel along the bottom of the hatch after I paint it
Image

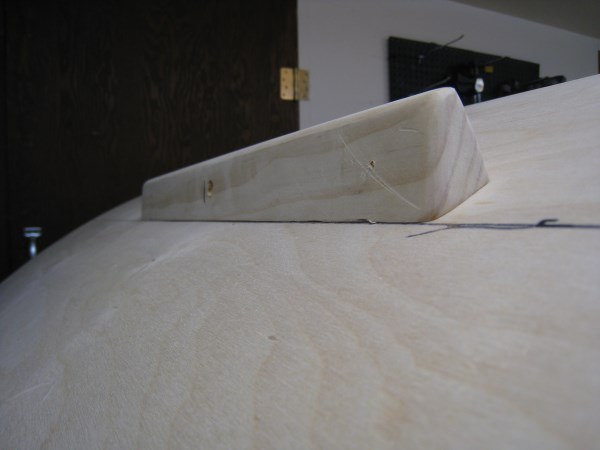
Based on a suggestion from drewh1 I made a bracket to move the third brake light up higher and test fitted it in place
Image

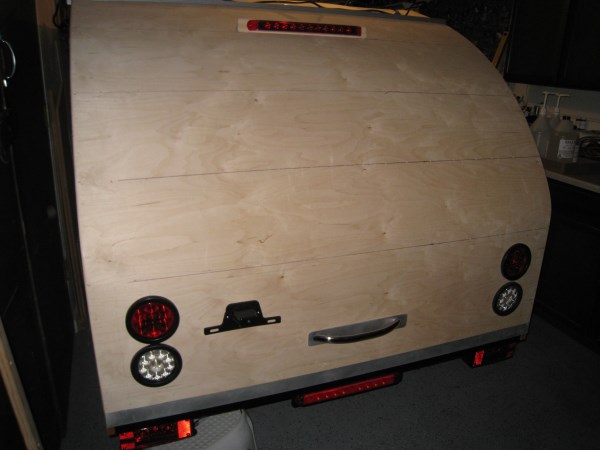
I glued in blocking for the tail lights. handle, etc. and cut all of the holes and started wiring the hatch
Image

Here is the hatch partially wired. I ran out of heat shrink so I didn't get it finished
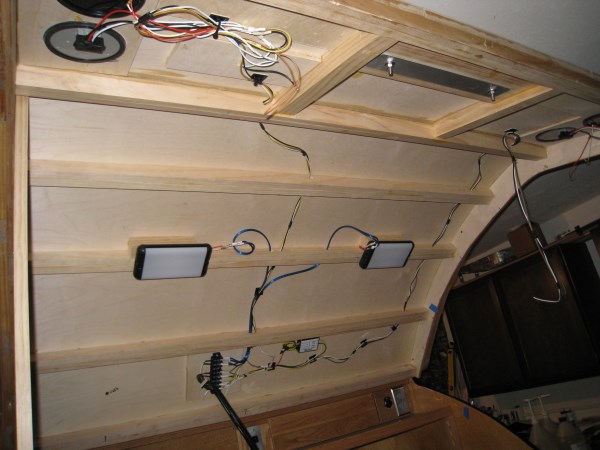
Image

Here is the hatch lights powered on during my testing of the hatch wiring
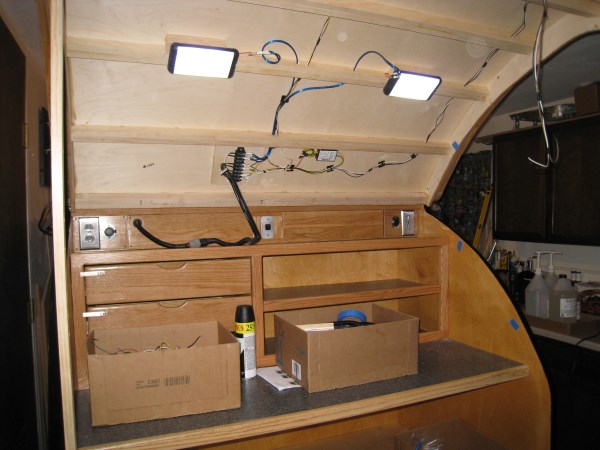
Image

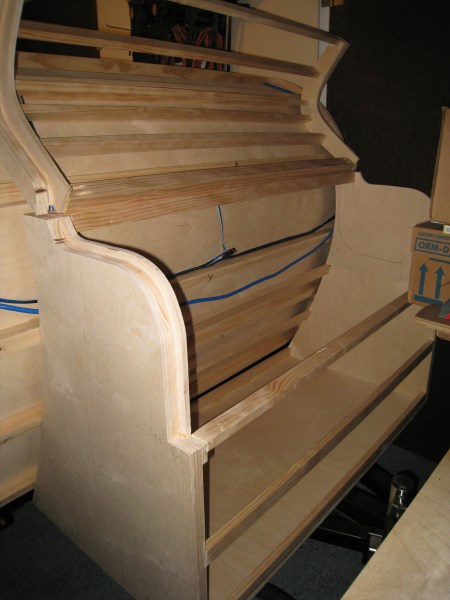
I also decided on my front storage box design. I cut the bottom from some scrap 1/2" Baltic Birch (BB) and the sides from some left over 1/4 Baltic Birch. I framed and skinned the sides like I did my galley using Steve Fredericks method and then cut out the lid and made my spacer and gussets.
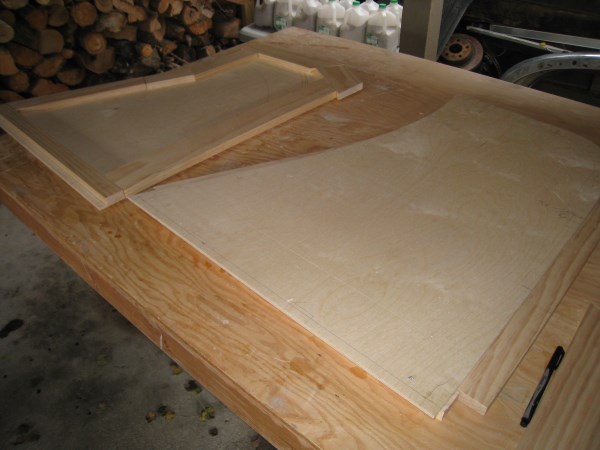
Image

I am going to us a hurricane hinge like I did for my galley hatch. I assembled the storage box together with 1x2 spars.
Here is a side shot with open and closed lid
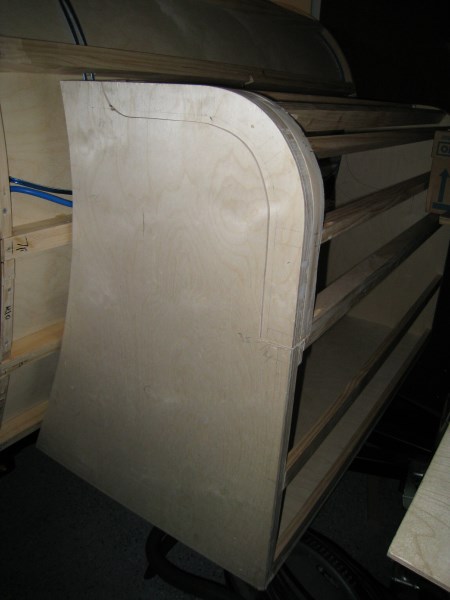
Image

Image

Image

The biggest road block I have now is I went to my Baltic Birch supplier to pick up 5 sheets 1/8” BB to finish enclosing the roof, tongue box and hatch and they said they were out. I asked when they would be getting more in (thinking it was a few days or week) and their response was sometime maybe in December. I was planning to take Thanksgiving week and two weeks at Christmas to finish the build and be ready for paint so I am currently looking for alternative suppliers to decide if I pay more and have some BB shipped or wait.
User avatar
kayakdlk
Platinum Donating Member
 
Posts: 310
Images: 392
Joined: Wed Jun 27, 2012 9:02 pm
Location: Foothills of Colorado
Top

Re: Colorado Teardrop Build Journal (kayakdlk)

Postby bdosborn » Mon Oct 14, 2013 9:34 pm

I got my 1/8" BB from Austin Hardwoods:
975 W Mississippi Ave.
Denver, Co 80223
303-733-1292

Bruce
2009 6.5'X11' TTT - Boxcar
All it takes is a speck of faith and a few kilowatts of sweat and grace.
Image
Boxcar Build
aVANger Build
User avatar
bdosborn
Donating Member
 
Posts: 5493
Images: 772
Joined: Wed May 05, 2004 11:10 pm
Location: CO, Littleton
Top

Re: Colorado Teardrop Build Journal (kayakdlk)

Postby rebapuck » Mon Oct 14, 2013 10:36 pm

Love your work. Doesn't seem you are running into to many snags so you must have planned well.

I've become a big fan of the 3M Command products. You could use their Velcro stick ons (picture hangers?) to mount the switch block.
Judy
1966 VW camper
1967 VW singlecab
Image
User avatar
rebapuck
.
 
Posts: 2243
Images: 1
Joined: Thu May 14, 2009 1:55 pm
Location: Chapel Hill NC
Top

Re: Colorado Teardrop Build Journal (kayakdlk)

Postby drewh1 » Tue Oct 15, 2013 12:35 am

Loved all the pictures of the wiring. Great job and the details are very helpful to me.

I do have a question. The hitch wiring harness I got for my car converts 5 wires to 4 wires. This means the turn signals and brake light are on the same wires.

how did you get a separate connection for the third brake light? do I need a different wiring harness or adaptor?

drew.
"If only I knew what I know now when I started . . ."

My Build Journal http://www.tnttt.com/viewtopic.php?f=50&t=56916
User avatar
drewh1
Donating Member
 
Posts: 245
Images: 7
Joined: Sat Aug 03, 2013 3:01 pm
Location: El Cerrito, CA
Top

Re: Colorado Teardrop Build Journal (kayakdlk)

Postby kayakdlk » Tue Oct 15, 2013 6:10 am

Thanks all for the compliments, my build is going pretty smooth as I did a lot of planning before I started and work through most issues. I have found the answers to almost all of my questions right here on the forum with just a little bit of searching and reading and looking at the pictures everyone else posted, therefore I have not had to ask many of the same questions over again.

Bruce - Austins Hardwoods on Mississippi is where I was getting my 1/8" BB and they are out, so I will keep looking.

Judy - Thanks for the info I will checkout the 3M products and see if they will work. The edges of the box are only 1/4" so I may need to modify to make it work

Drew - I used an adapter from etrailer for my third brake light connections. Check them out mine has 118158 part number on it. it is about a 2" square box with input and output wires, they may have others that fit your needs.

Dan
User avatar
kayakdlk
Platinum Donating Member
 
Posts: 310
Images: 392
Joined: Wed Jun 27, 2012 9:02 pm
Location: Foothills of Colorado
Top

Re: Colorado Teardrop Build Journal (kayakdlk)

Postby drewh1 » Tue Oct 15, 2013 11:42 am

Found the part - that is exactly what I need - gotta love this forum :thumbsup:

thanks Dan!
"If only I knew what I know now when I started . . ."

My Build Journal http://www.tnttt.com/viewtopic.php?f=50&t=56916
User avatar
drewh1
Donating Member
 
Posts: 245
Images: 7
Joined: Sat Aug 03, 2013 3:01 pm
Location: El Cerrito, CA
Top

Re: Colorado Teardrop Build Journal (kayakdlk)

Postby pchast » Tue Oct 15, 2013 9:34 pm

In our area all such 'exotic' sheet goods are provided by a wholesaler. Ask around.
If you can find the supplier you may be able to purchase it directly.

We had just such a wholesaler give a lecture to our Woodworking Club a couple
of months ago. I never knew he was located in Albany, with a large warehouse,
for many years.

I should have used him several times in the past.
:roll:
pchast
Platinum Donating Member
 
Posts: 2025
Images: 97
Joined: Mon Jan 28, 2013 5:47 pm
Location: Athens, NY
Top

Re: Colorado Teardrop Build Journal (kayakdlk)

Postby AlgoDan » Wed Oct 16, 2013 4:29 am

I got to say WOW double WOW, a beautiful build. You have thought and planned with great detail as to what you want. It show's that this build will last you and be around for years to come. You like myself, have used this forum for inspiration to build our trailer and thank all who have contributed here. Again great craftsmanship on the build it shows.
:thumbsup: :beer:
Here now but Camping later.............Dan

Build Journal
http://www.tnttt.com/viewtopic.php?f=50&t=54681
102535 103199 105576
From .................Paper...........................To.......................... Pavement............................
User avatar
AlgoDan
The 300 Club
 
Posts: 449
Images: 238
Joined: Mon Feb 25, 2013 4:08 am
Location: Ontario, Canada
Top

Re: Colorado Teardrop Build Journal (kayakdlk)

Postby PubUltraStar » Thu Oct 17, 2013 10:23 pm

I know how much effort if takes to plan and implement the wiring configuration like you did, and wanted to congratulate you on a terrific job. It looks neat and organized. The build is coming along nicely. I hope you find some of that birch so you can finish up this year.
Image
There is always risk in being awesome!
http://www.diy-teardrop.com/
http://www.m2-photo.com
User avatar
PubUltraStar
Gold Donating Member
 
Posts: 184
Joined: Thu Jul 26, 2012 8:11 pm
Top

Re: Colorado Teardrop Build Journal (kayakdlk)

Postby oakinteriors1 » Fri Oct 18, 2013 3:51 am

How does your galley hatch seal along the bottom edge against the floor.. I take it the outside skin extends down past the floor?
User avatar
oakinteriors1
Silver Donating Member
 
Posts: 297
Images: 1
Joined: Tue Sep 03, 2013 4:47 pm
Location: Bates City Mo.
Top

Re: Colorado Teardrop Build Journal (kayakdlk)

Postby kayakdlk » Fri Oct 18, 2013 9:00 pm

Thanks again for all of the looks and compliments . I spent about a year looking and planning what I wanted and it had paid off. I am planning to only build one teardrop and use it for many years. I have made very few changes from my original plan. Most of the issues are small ones that just needed figuring out once I reached that stage of the build.

As far as the electrical work goes after I got all of my electrical parts last spring l laid them out on my work bench and used alligator clips and tested everything out, built a few small wiring harnesses and documented it all. I even built my harness to the tow vehicle and backed it up to the work bench to test with both of my tow vehicles. Now when I was wiring the teardrop I didn't have to figure anything out except how to route the wires and where to mount the fuse panels etc. I already knew what wires (sizes and colors, etc.) to run where and that it would work. When I plugged my teardrop in for the first time everything worked.

oakinteriors1 - For the galley seal along the bottom the outside skin is flush with the bottom. It does not overhang. I plan to put a 4" strip of diamond plate along the bottom and have it overhang 1/2" I will put the same seal as I plan to use on the side along the bottom and it should squeeze along the aluminum angle I am installing. Since I am not done I do not have pictures yet but if you check out planovet Little Swiss build pictures. He also used Steve Fredericks build method and has some good pictures of the seals.

That is what is great about this site you do not have to reinvent unless you want to. Usually someone else has already done it, took pictures of it and solved any problems.

Dan
User avatar
kayakdlk
Platinum Donating Member
 
Posts: 310
Images: 392
Joined: Wed Jun 27, 2012 9:02 pm
Location: Foothills of Colorado
Top

Re: Colorado Teardrop Build Journal (kayakdlk)

Postby oakinteriors1 » Sat Oct 19, 2013 9:38 pm

This is the part I'm concerned about...The inner 1/2'' ply that makes contact with the seal is back about 2'' from the outside edge of the floor.... I'm working this out on my own build..
tn_100_3838.JPG
tn_100_3838.JPG (45.25 KiB) Viewed 4357 times

tn_100_3841.JPG
tn_100_3841.JPG (41.09 KiB) Viewed 4357 times


This is the alternative I am working on....
tn_100_3843.JPG
tn_100_3843.JPG (52.36 KiB) Viewed 4357 times
User avatar
oakinteriors1
Silver Donating Member
 
Posts: 297
Images: 1
Joined: Tue Sep 03, 2013 4:47 pm
Location: Bates City Mo.
Top

PreviousNext

Return to Build Journals

Who is online

Users browsing this forum: No registered users and 13 guests