Colorado Teardrop Build Journal (Build Complete) (kayakdlk)

...ask your questions in the appropriate forums BUT document your build here...preferably in a single thread...dates for updates, are appreciated....

Re: Colorado Teardrop Build Journal (kayakdlk)

Postby KCStudly » Sun Oct 20, 2013 4:25 pm

The last pic is a variation on how I am planning to do mine, with the drip channel flaring out at the bottom. :thumbsup:
Last edited by KCStudly on Tue Nov 05, 2013 3:43 pm, edited 2 times in total.
KC
My Build: The Poet Creek Express Hybrid Foamie

Poet Creek Or Bust
Engineering the TLAR way - "That Looks About Right"
TnTTT ORIGINAL 200A LANTERN CLUB = "The 200A Gang"
Green Lantern Corpsmen
User avatar
KCStudly
Donating Member
 
Posts: 9611
Images: 8169
Joined: Mon Feb 06, 2012 10:18 pm
Location: Southeastern CT, USA

Re: Colorado Teardrop Build Journal (kayakdlk)

Postby kayakdlk » Sun Oct 20, 2013 5:44 pm

oakinteriors1 - I guess I do not understand the concern or issue . Your first and second pictures are correct and just like mine. Here is a modified one of your pictures with where the seals should go. Once you use your latches to pull it down the galley is sealed against the side 1/2 plywood side seal and against the top of the floor bottom seal. At best there would be a very small gap in the corners that may get a few drop of water or dust. It would all depend on how even the seal gaps are and how thick the seal is

Image

On your last picture will you be putting seal along the end rather than the bottom?
User avatar
kayakdlk
Platinum Donating Member
 
Posts: 310
Images: 392
Joined: Wed Jun 27, 2012 9:02 pm
Location: Foothills of Colorado

Re: Colorado Teardrop Build Journal (kayakdlk)

Postby oakinteriors1 » Mon Oct 21, 2013 6:14 am

The water is channeled to the corner of the floor.....
Hatch seals.jpg
Hatch seals.jpg (35.12 KiB) Viewed 4365 times
User avatar
oakinteriors1
Silver Donating Member
 
Posts: 297
Images: 1
Joined: Tue Sep 03, 2013 4:47 pm
Location: Bates City Mo.
Top

Re: Colorado Teardrop Build Journal (kayakdlk)

Postby KCStudly » Mon Oct 21, 2013 6:33 am

My theory is that the "scoop" version will use gravity to guide any water out the back preventing it from settling and being able to find its way in.
KC
My Build: The Poet Creek Express Hybrid Foamie

Poet Creek Or Bust
Engineering the TLAR way - "That Looks About Right"
TnTTT ORIGINAL 200A LANTERN CLUB = "The 200A Gang"
Green Lantern Corpsmen
User avatar
KCStudly
Donating Member
 
Posts: 9611
Images: 8169
Joined: Mon Feb 06, 2012 10:18 pm
Location: Southeastern CT, USA
Top

Re: Colorado Teardrop Build Journal (kayakdlk)

Postby kayakdlk » Sun Oct 27, 2013 1:42 pm

Well after some searching on the internet and getting quotes of $160 shipping cost plus material for five sheets 1/8" Baltic Birch I had almost given up and was going to wait until December. I then one day I came across Wolstenholme an importer of Baltic Birch plywood located in Boulder, CO and contacted them for 5 sheets 1/8" plywood. They emailed me back and said they were just the importer but gave me three of their resellers (Austin Hardwoods who I was using but they were out of stock, Paxton Lumber and National Wood Products). I looked Paxton Lumber and National Wood up and both were fairly close to each other. I called Paxton first and they had 400 sheets in stock and $1 cheap than I had been paying. I picked up the five sheets I needed to finish my build.
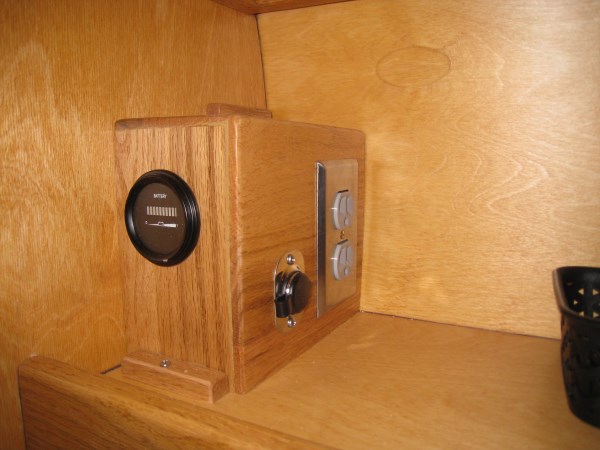
While I was searching for BB I figured out how to make my power box with battery meter removable. I glued on a couple small pieces of wood and used them to screw into the wall and shelf.
Image

I also did some searching for fabric for the curtains. I was looking for something Jeep, mountains or fly fishing theme related but didn't find anything I really liked. I came across some bright Route 66 material that I liked but didn't want the Route 66 theme so I kept looking and then came across this road trip theme fabric that I liked.
Image

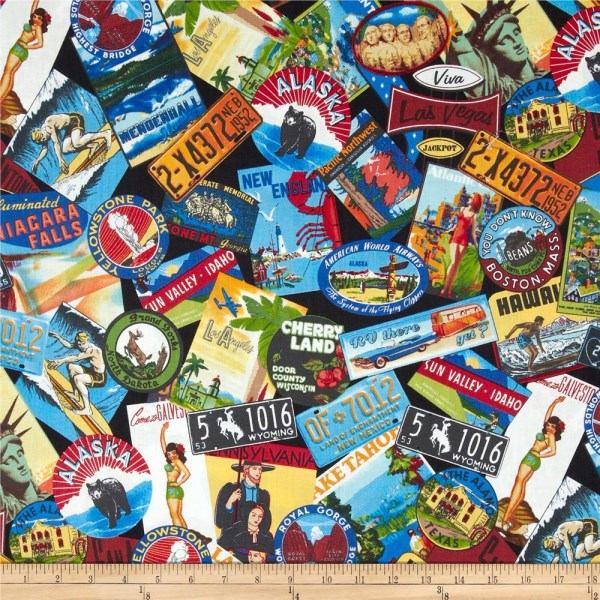
It is bright and colorful, has many of the places I have been or want to go and applicable to what I plan to do with my tear drop. I order several yards and asked my wife to make 2 door window curtains, curtains for the sky light and two pillow covers before spring.

Winter is coming and I had moved my teardrop inside my utility room. It is a little tight but I can walk around it and work on it, but not enough room for a work bench to put the hatch on to epoxy and cloth. We have had a few days of snow and the days highs are usually into the 40s but this past weekend the weather was going to be real nice (close to 60's for 3-4 days) and I figured it would be our last 60 degree weather (60s in Colorado with the sun feels a lot warmer) for while so I decided to move my teardrop back outside so I had more room to work inside to epoxy and cloth the hatch etc.

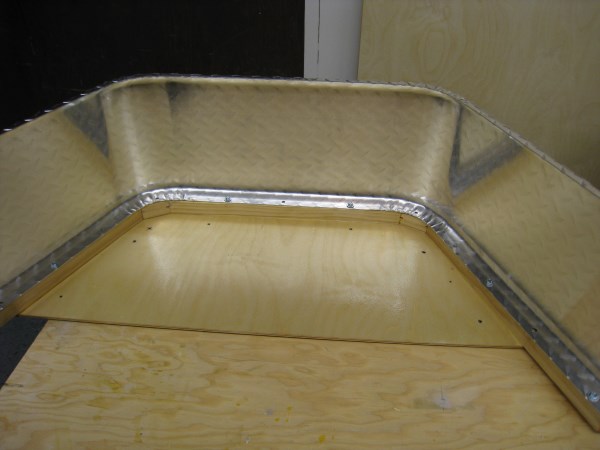
I put the axle on and decided I needed to figure out how to mount the fenders. My fenders are 10" wide but with the jeep wheels and axle location they needed to be a little wider to cover the tread so I decided to make some spacers and use them to mount to the body. I glued up a 1.5 x1.5 frame, belt sanded it semi round and then backed it with 1/4" plywood.

Here is picture of the spacers being glued up
Image

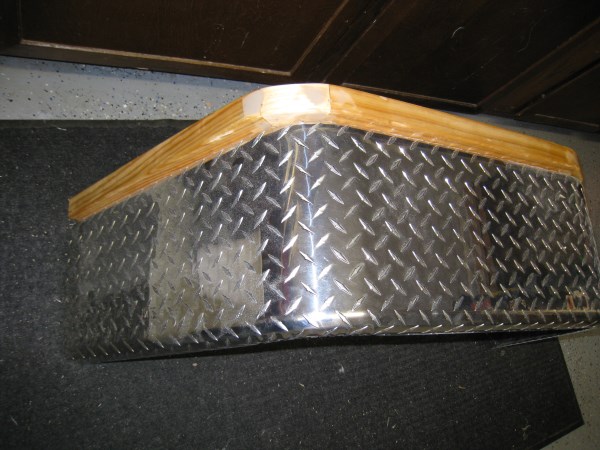
Here is the fender mounted onto the spacer and a view of the plywood backing
Image

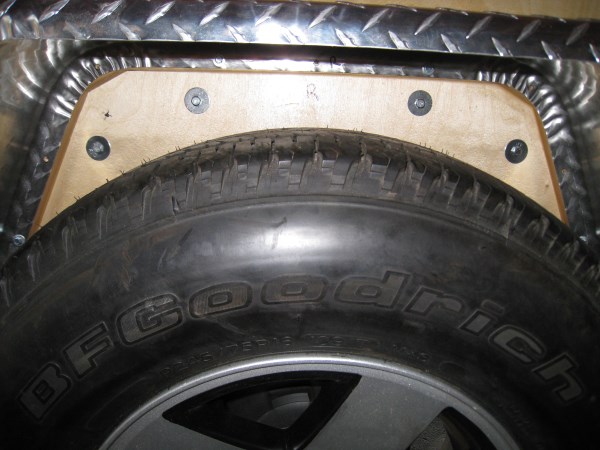
Here is an outside view of the fender mounted onto the spacer
Image

I screwed the fenders to the spacer and screwed the whole assembly with 6 bolts to the side of the teardrop.
Image

Here is a picture of the fenders mounted to the body
Image

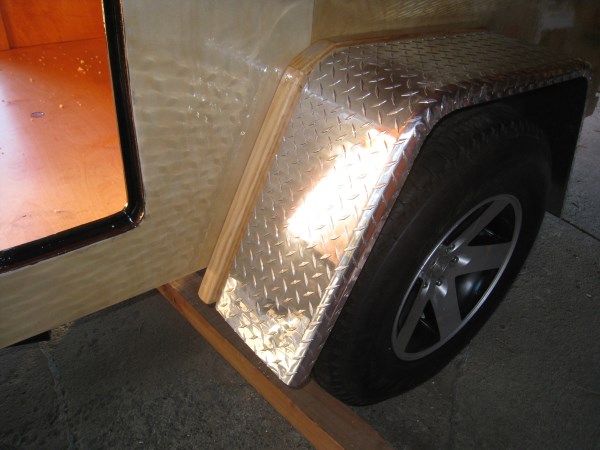
Here is side and side rear view. I think they look pretty good
Image

Image

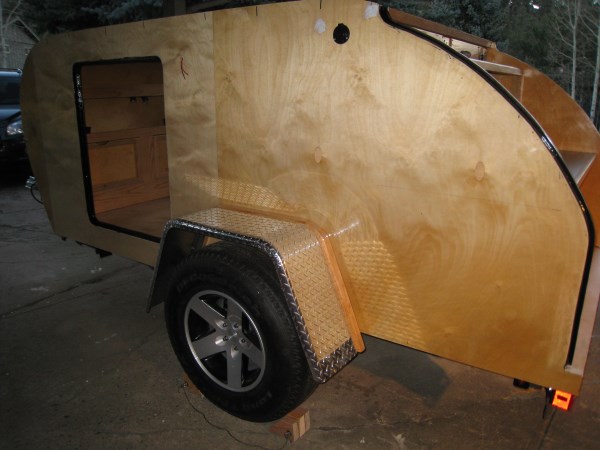
I plan to paint the spacer the same color as the body so it will blend in and use black fender welting between the aluminum fender and the spacer.

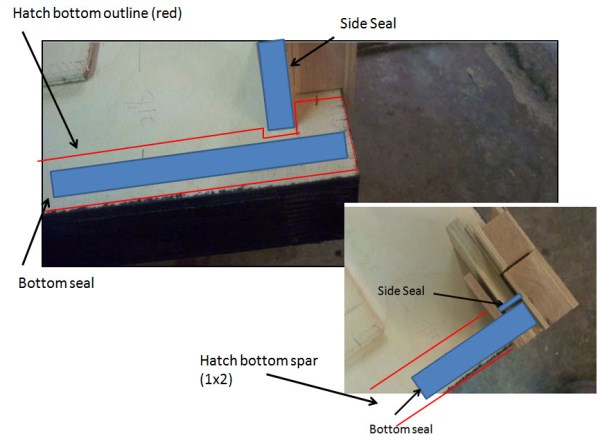
While I was working outside I was also inside epoxying the hatch
Image

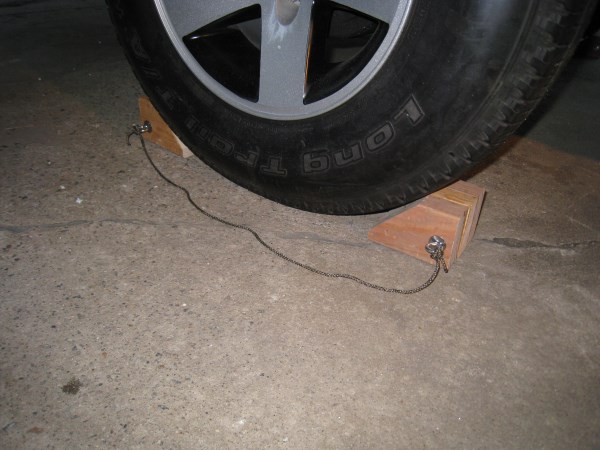
I worked outside on closing up the roof and putting in the insulation. I had used a couple 4x4 pieces of wood to keep the tear from moving while I worked on the top but they were too long and got in the way so I made a two sets of wheel chocks. I got the idea off of this web site but I don't remember who posted it.
Image

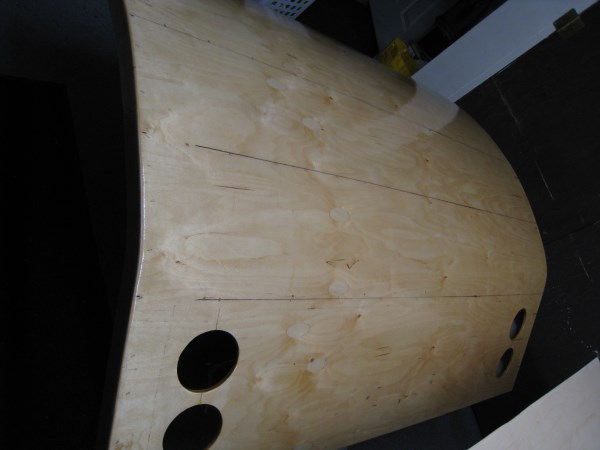
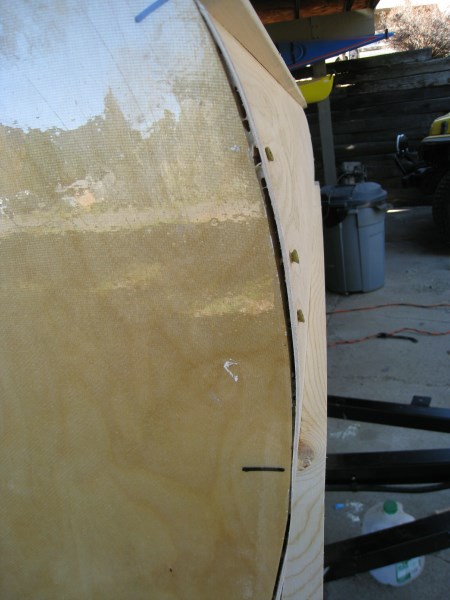
While I worked outside I skinned my tongue box. It is skinned in 1/8" Baltic Birch and I will fiberglass cloth and epoxy the outside to seal it up.
Image

Here I am skinning the lid and had to screw and clamp to keep the skin tight.
Image

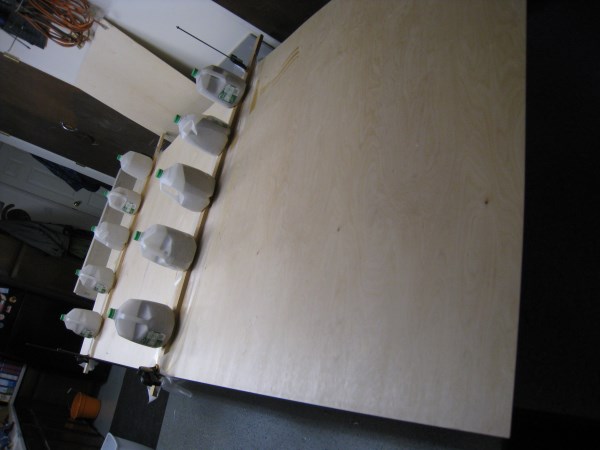
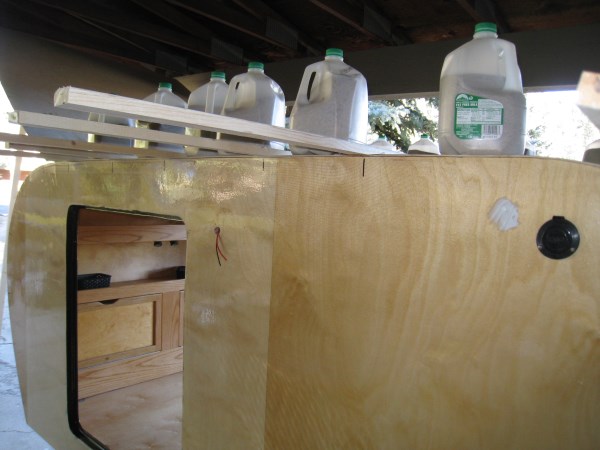
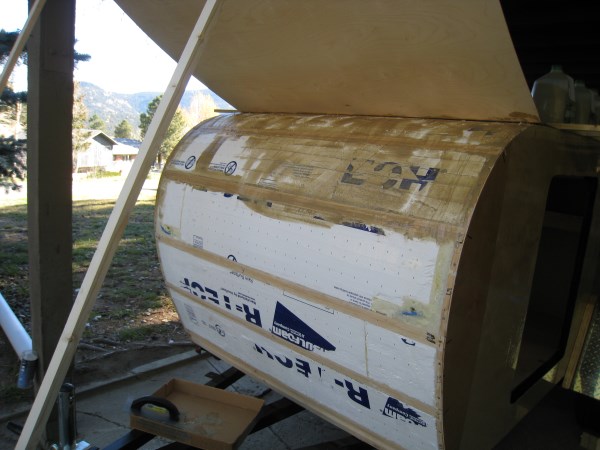
I cut the 3/4 insulation for the roof glued it in place. I used two layers and scored where it needed to curve. I then decide to use expanding foam to fill any gaps. I used milk jugs full of sand to weigh it down until dry.
Image

I then used a hack saw blade to cut off excess expanding foam and a belt sander to level the foam out even with the roof spars. What a mess it made
Image

Another picture of the front being clamped until dry.
Image

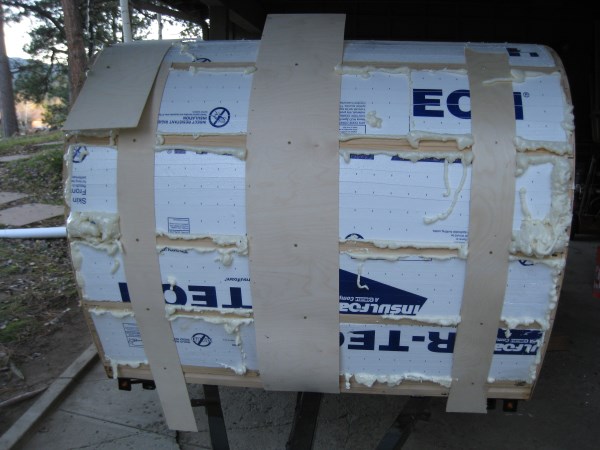
Twice I bumped into the wet expanding foam and got in all over my work clothes. Glad I was wearing old clothes that stuff is sticky

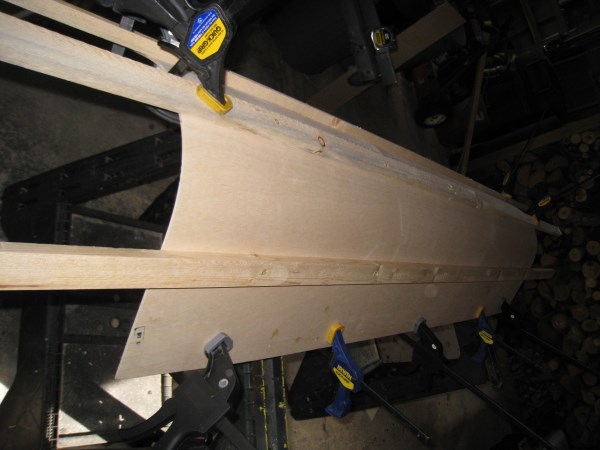
Inside my utility room on my worktable I joined two and half sheets Baltic Birch with 4" fiberglass cloth and epoxy to make one continuous roof panel.
Image

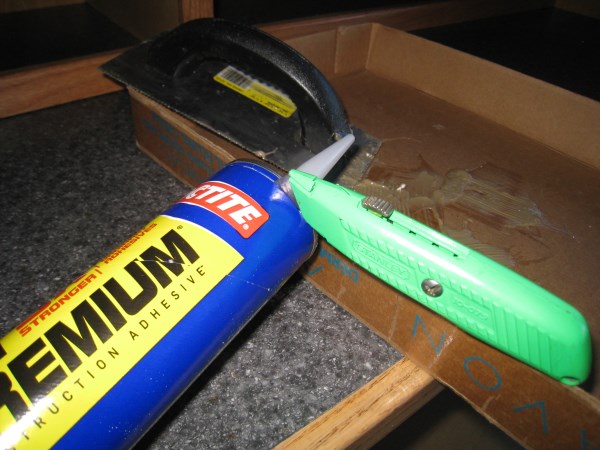
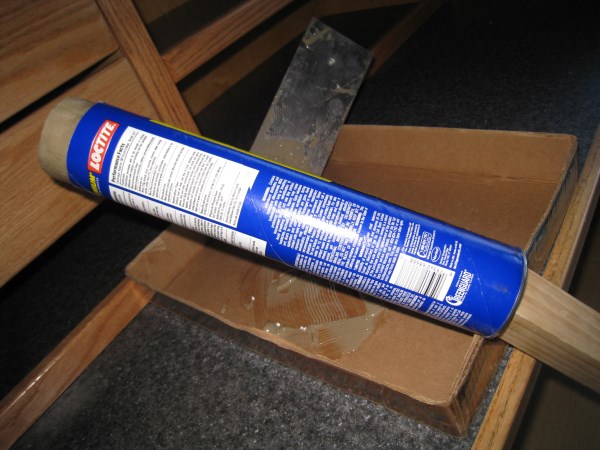
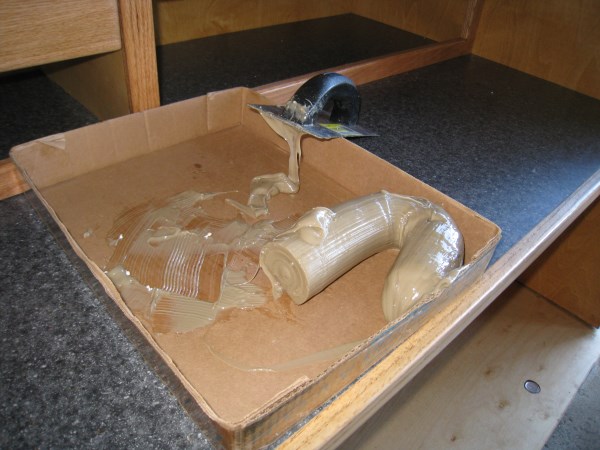
The next day I skinned my roof. All along I have been using PL premium glue in the large tubes (cheaper than many smaller ones, and I couldn't find it in a can) to laminate my walls, glue the insulation down, etc. I have struggled with enough pressure and got cramped hands when applying the glue with the caulk gun. Today I knew I would needed a couple large tubes to trowel onto the roof before skinning and needed to work quickly so I could get the entire roof glued and then covered. I decided to cut off the end of the PL premium tube, used a 2x2 to push the glue out of the tube into a cardboard lid. From there it was easy to apply with a trowel. I wish I had figured this out a lot earlier.

Image

Image

Image

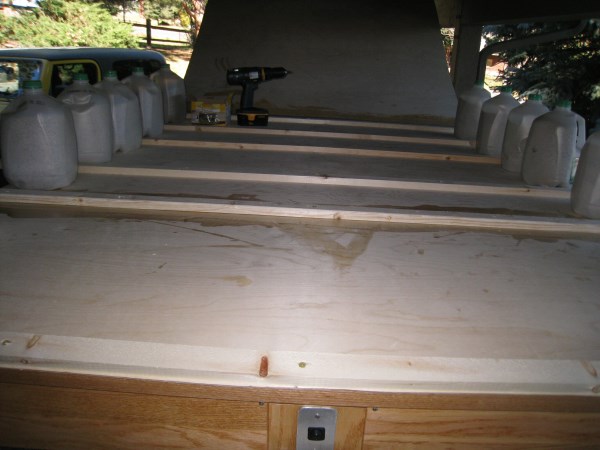
Since I am not making a woody (I am painting) I used some cheap 1x2 to screw across the spars to hold the roof tight. I used milk jugs filled with sand to hold down edges, and some staples.
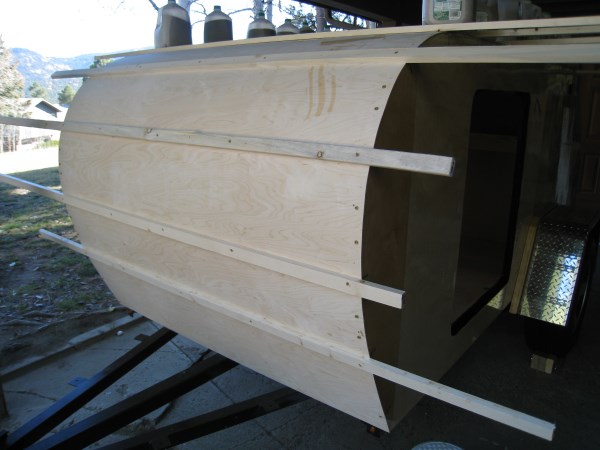
Here is a view of the top from the back showing the 1x2 screwed down and milk jug weights
Image

Here is a side view
Image

Here I peeled back the front and finish troweling on the glue before clamping the roof down.
Image

Here the front is all done
Image

I had a few small gaps that I couldn't seem to get out so I screwed them down some but kept the smooth arc and will fill the gaps before skinning the roof with epoxy and cloth. Hopefully after paint no one will ever know the gaps existed.
Image

Now I need to clean up and wait for everything to dry before I can router out the sunroof, fan and roof edges and then move then teardrop back inside for the winter.

Detailed finish work is all that is left and my build should be done well before Memorial Day weekend next year which was my original goal. I may have to do an early spring campout just to test it out, and of course my daughter plans to test it out this winter in the utility room with some of her friends

Happy building
Dan
User avatar
kayakdlk
Platinum Donating Member
 
Posts: 310
Images: 392
Joined: Wed Jun 27, 2012 9:02 pm
Location: Foothills of Colorado
Top

Re: Colorado Teardrop Build Journal (kayakdlk)

Postby KCStudly » Sun Oct 27, 2013 8:36 pm

Nice progress. Thanks for the post. :thumbsup:
KC
My Build: The Poet Creek Express Hybrid Foamie

Poet Creek Or Bust
Engineering the TLAR way - "That Looks About Right"
TnTTT ORIGINAL 200A LANTERN CLUB = "The 200A Gang"
Green Lantern Corpsmen
User avatar
KCStudly
Donating Member
 
Posts: 9611
Images: 8169
Joined: Mon Feb 06, 2012 10:18 pm
Location: Southeastern CT, USA
Top

Re: Colorado Teardrop Build Journal (kayakdlk)

Postby drewh1 » Sun Oct 27, 2013 10:35 pm

Your fenders and wheels look great. Nice job on the spacers.

drew.
"If only I knew what I know now when I started . . ."

My Build Journal http://www.tnttt.com/viewtopic.php?f=50&t=56916
User avatar
drewh1
Donating Member
 
Posts: 245
Images: 7
Joined: Sat Aug 03, 2013 3:01 pm
Location: El Cerrito, CA
Top

Re: Colorado Teardrop Build Journal (kayakdlk)

Postby PubUltraStar » Sun Oct 27, 2013 10:48 pm

I like the battery meter. I was going to go with an LED model, but like the simplicity of this. Great progress too.
Image
There is always risk in being awesome!
http://www.diy-teardrop.com/
http://www.m2-photo.com
User avatar
PubUltraStar
Gold Donating Member
 
Posts: 184
Joined: Thu Jul 26, 2012 8:11 pm
Top

Re: Colorado Teardrop Build Journal (kayakdlk)

Postby kayakdlk » Mon Nov 04, 2013 8:46 pm

The weekend weather was good in Colorado and I decided I didn't have enough epoxy to do the roof so I order more and kept my teardrop outside for another week. That allowed me to finish up epoxy on the tongue box, tongue box lid, fender spacers and hatch on my work bench inside.

I sand everything outside and then coated with epoxy inside.

I was able to fill in the gaps on my roof, fill all staple and screw holes, router the edges and sand it all ready for fiberglass cloth and epoxy on the roof.
I also decide I wanted to put the tongue box and hatch lid on and see what the tongue weight was with all my camping gear. I wanted to know if putting the battery in the tongue box added too much weight.

I pulled out my camping gear (enough for 4) and placed it either in the galley, tongue box or inside the cabin and used weights to simulate food and water, etc. I ended up with about 225 lbs on the tongue. The trailer-balance work sheet had said about 210 lbs with the axle at 50". I will need to get the entire thing weighed some time to see what percent that is. But it is less than the 300 lbs Jeep limit. The tongue box is rather large but made of 1/8" Baltic Birch and I put bulky things like towels, chairs, blankets, tents, etc that didn't weight too much. Based on this exercise I think I am going to mount my battery over the axle on the fender in an aluminum box., or practice packing (to make room) and maybe put in the lower rear galley. I could with some effort move the axle forward 2" and get it down 20-30 lbs but may just rely on packing lighter things up front.

I then decide to hook the trailer to the Jeep and tested all of the lights in the hatch (they all worked) and took it for a ride around the block. The tongue weight wasn't noticeable on the Jeep, no sagging. Pulled easy. We will see what it does on mountain roads next spring.

Next I sanded everything (lots of white dust), clean it off, cleaned my shop and got everything ready for roof cloth and epoxy and then paint. I plan to move it back inside this weekend to finish up the roof and the small details readying for paint.

Here is a side view. The angle make the tongue box look bigger than it really is

Image

Here is the read view with running lights and brake lights on. Hopefully there is enough lights to keep from getting rear ended.

Image

Here is the side profile and rear angle view
Image

Image

I plan to paint it yellow to match my Jeep with possibly a yellow or white roof (undecided)

Happy building
Dan
Last edited by kayakdlk on Sun Mar 30, 2014 8:51 am, edited 2 times in total.
User avatar
kayakdlk
Platinum Donating Member
 
Posts: 310
Images: 392
Joined: Wed Jun 27, 2012 9:02 pm
Location: Foothills of Colorado
Top

Re: Colorado Teardrop Build Journal (kayakdlk)

Postby AlgoDan » Tue Nov 05, 2013 5:43 am

Looking good, well done. Will look good painted yellow....
Here now but Camping later.............Dan

Build Journal
http://www.tnttt.com/viewtopic.php?f=50&t=54681
102535 103199 105576
From .................Paper...........................To.......................... Pavement............................
User avatar
AlgoDan
The 300 Club
 
Posts: 449
Images: 238
Joined: Mon Feb 25, 2013 4:08 am
Location: Ontario, Canada
Top

Re: Colorado Teardrop Build Journal (kayakdlk)

Postby drewh1 » Tue Nov 05, 2013 3:28 pm

It looks great! I like all the lights. I don't think you can go wrong with them. Can't wait to see it painted.

drew.
"If only I knew what I know now when I started . . ."

My Build Journal http://www.tnttt.com/viewtopic.php?f=50&t=56916
User avatar
drewh1
Donating Member
 
Posts: 245
Images: 7
Joined: Sat Aug 03, 2013 3:01 pm
Location: El Cerrito, CA
Top

Re: Colorado Teardrop Build Journal (kayakdlk)

Postby kayakdlk » Fri Nov 15, 2013 7:57 pm

With the weather still fairly nice (no snow or rain) this past two weeks I am working on the finish prep work on my teardrop build.

My build uses epoxy and cloth to protect (plywood from checking), strengthen and and seal the plywood from water. The bedliner paint will provide addtional water protection and protect the epoxy from the sun and provide long lasting protection from scratches, tree branches, etc. that I may find while out camping. Lots of finish steps but should be good for many many years to come.

I wet sanded all of the door seals, door edges, galley seals and hatch seal areas and used spot putty primer to fill in the little spots ready for paint. They already had several coats epoxy on them. I tried the black tinted epoxy on the seal areas but didn’t like the finish so I decided I was going to paint the seal areas either silver or black.

I found at Big R some Van Sickle enamel tractor paint that you can add a hardener with. It is fairly cheap compared to auto paint ($12/quart).
Image

I wanted to use it in only in a few areas such as door edges, seal areas, and inside tongue box. I wanted durable finish, therefore I am using the hardener additive, but didn’t want to spend the effort getting smooth enough for expensive auto paint, and I didn’t really want a shiny finish that would show all future scratches from use.

It was probably low 60 degrees outside so I sat a fan in the door and blew out the utility room with the air compressor to get rid of as much dust as possible from the overhead lights, shelves, floor, etc.

I then setup saw horses and put the tongue box, tongue box lid, galley hatch and doors and readied them for paint. I wanted a silver/grey but the one they had after I tried it looked more greenish tint so I went with satin black. I mixed it up and rolled it on with a foam roller. Two coats and it looked pretty good.

Tongue box lid seal areas painted
Image

Galley Hatch seal areas painted
Image

Tongue Box seal area and inside painted
Image

Door and windows edges painted
Image

I had ordered one quart of Monstaliner and yellow tint to try. I mixed some of it up and tried different application methods. The tint when placed next to the Jeep is wrong (too bright and clashes) and I ordered another one that is very close to my Jeep. I used the wrong tint on a test panel and tried applying it with a foam roller, bristle brush, foam brush, deck texture roller, full strength and thinned. The foam roller works well to get the color on the edges but the textured roller looks best and applies the bed liner thicker for more protection. Just a slight thinning with MEK reduces the texture just a little bit and I think will be durable and looks pretty good.

Here is the test panel with the different areas. I also tested masking tape release for sharp edge. I used green Frog tape and it removed cleanly either by removing after tack dry (couple hours) or even waiting until the next day I still got a clean edge.

Image

Sample texture of what the body will look like
Image

I only had one quart of bed liner with correct color tint, and I wanted to get the tongue box painted so I can put it away and make room to move the teardrop back inside.

Here is the tongue box painted with the correct tint to match my Jeep.
Image

and here is the lid for the tongue box painted
Image

Here are the fender spacers that I painted the edges with yellow bedliner
Image

Here is the transition from satin black to bed liner paint on the tongue box . I used frog tape and got clean edges
Image

Next up is to move the teadrop body back inside this weekend so I can epoxy and cloth the roof and get the body ready for paint. I plan to order more paint and paint the body over the Christmas to New Year holiday break.

Enjoy building and thanks for watching my build.
Dan
User avatar
kayakdlk
Platinum Donating Member
 
Posts: 310
Images: 392
Joined: Wed Jun 27, 2012 9:02 pm
Location: Foothills of Colorado
Top

Re: Colorado Teardrop Build Journal (kayakdlk)

Postby KCStudly » Fri Nov 15, 2013 8:59 pm

That's going to look really sharp when you put it all together. :thumbsup:

I, too, am planning to black out the door jambs and hatch seal areas on TPCE. I tied this theme into the inside, too, by blacking out the exposed outer (inside cabin) edges of my door seal flange and tops of my toe kick trim. It is reassuring to see yours coming out looking so good.
KC
My Build: The Poet Creek Express Hybrid Foamie

Poet Creek Or Bust
Engineering the TLAR way - "That Looks About Right"
TnTTT ORIGINAL 200A LANTERN CLUB = "The 200A Gang"
Green Lantern Corpsmen
User avatar
KCStudly
Donating Member
 
Posts: 9611
Images: 8169
Joined: Mon Feb 06, 2012 10:18 pm
Location: Southeastern CT, USA
Top

Re: Colorado Teardrop Build Journal (kayakdlk)

Postby Ned B » Sat Nov 16, 2013 1:16 pm

Man oh Man what a build! Great job, and that bedliner sure should do the trick!
User avatar
Ned B
1000 Club
1000 Club
 
Posts: 1036
Joined: Sat Apr 16, 2011 10:25 am
Location: Syracuse NY (ish)
Top

Re: Colorado Teardrop Build Journal (kayakdlk)

Postby kayakdlk » Mon Nov 18, 2013 10:21 pm

Thanks everyone for checking out my build and all of the nice compliments

Over the weekend I worked on fiberglass cloth and epoxy on the roof. I am using Raka 350 non blushing hardener with Raka 127 thin epoxy resin. I get about 40-60 minute working time. Shop temp of 65-67 degrees with small electric heater running. More working time than I have ever needed to apply on a whole side or roof. It then stays sticky (Finger prints will show) for about 5-6 hours and then at about 9-12 hours you can touch it. I can sand it with a block and 80 grit after 12 hours to get any raised ribs, drips etc. off before recoating. Some suggest a wood scraper but I didn't have one. It sands best after 24 hours to smooth down.

For the roof I started with cutting my fiberglass cloth (originally bought 21 yards, 60" wide 7 oz fiberglass cloth, discounted on Raka's web site) to rough size with 2-3 inches overlap on the side. Since my teardrop is 60' wide and I needed 64-66" wide for a 2-3 in overlap on the sides I needed to piece the top into three strips to get full coverage. I ended up 2' short on the very front end. I got pretty close with my original estimate but probably didn't account for some 6" strips to piece together the sides panels, roof and floor bottom.

After my cloth is cut I roll it onto a stick and sit is aside for a while. I then use a 6" plastic spatula ( I found it to be less messy than a credit card) spread around an even coat of epoxy and let it soak in for 20-40 minutes. I then roll the cloth onto the area I covered with epoxy and press it down. I know some folks say never do this but it worked very well for me. It sticks and stay put. I use a clean plastic spatula and even out the cloth ripples etc. I then apply more mixed epoxy to the cloth and use the spatula to scrape the epoxy into and evenly across the cloth until the cloth has saturated and the excess and been scraped off. For me I found the spatula doesn't pull up the cloth like a foam roller did. I let this dry 8-10 hours and then using the plastic spatula apply another coat of epoxy (getting a chemical bond).

After this second coat dries a day or two I sand with my electric DA sander and 80 grit paper to cut the gloss and smooth it out, being careful not to sand through the cloth readying it for more epoxy (using a Mechanical bond). I then use a foam roller (cheap $1.99 for qty 4 yellow 4" foam rollers from Harbor Freight) and roll on a coat of epoxy. Sometimes I tip with a 3" foam brush to get rid of small bubbles. Depending on what it looks like after 10-12 hours I decide If am done or roll on another coat (getting a chemical bond again). Sometimes I just coat the seams, or edges that were folded over again. I then wait a couple days and sand smooth with electric DA and 150 grit paper ready for paint. If needed like on a seam, or edges where plywood leaves a small edge gaps I fill the voids with epoxy putty or spot putty and sand smooth.

Here is a picture of the roof with the fiberglass cloth and first coat of epoxy on. If I scraped the excess epoxy out of the cloth it will have a flat look to it as shown in the picture.
Image

The following coats are usually very glossy as shown in this picture after the third coat. I also routered out the moonroof and fan openings. It is ready for final sanding with 150 grit and then paint.
Image

Here is a shot from the inside of the moonroof opening. I need to fill some of the voids between plywood layers for the inside skin to make smooth before painting the opening edges black. I do not have a trim ring for the moon roof so I want the opening to be smooth and black to blend in with the window from the inside.
Image

Here is a picture of the front where I ran out of cloth over the weekend. Today I ended up buy some cloth from O Reilly auto to finish the front .
Image

I also worked on my fenders. I had painted my spacer and now installed my fenders with stainless screw and used fender welting between fender and spacer.
Image

I also bought an aluminum battery box that I plan to mount on the fender/wall. I am working on a mounting bracket and locking bracket for the battery inside.
Image

This week I plan to finish covering the front with fiberglass cloth and epoxy. I will be off work all next week so I plan to move the teardrop back outside(hoping for some good weather, 40's+) to sand the body and then move back inside to paint the door jambs, galley hatch seals and moon roof opening satin black. I also ordered a 2 gallon kit of Monstaliner for the body and may even get it painted before going back to work.

Enjoy building, thanks for watching my build, and have a good Thanksgiving Holiday
Dan
Last edited by kayakdlk on Fri Nov 22, 2013 7:46 pm, edited 3 times in total.
User avatar
kayakdlk
Platinum Donating Member
 
Posts: 310
Images: 392
Joined: Wed Jun 27, 2012 9:02 pm
Location: Foothills of Colorado
Top

PreviousNext

Return to Build Journals

Who is online

Users browsing this forum: No registered users and 19 guests