Austin Texas Woody TD Build

...ask your questions in the appropriate forums BUT document your build here...preferably in a single thread...dates for updates, are appreciated....

Re: Austin Texas Woody TD Build

Postby Ned B » Sun Jan 05, 2014 12:55 am

KCStudly wrote:Why not remove the router from the table and use a ball bearing rabbeting bit for the tongue, and a guide with straight bit for the groove? Clamp the work to the bench.

Edit: The reason I mention it is that the pocket holes can be hard to "hide" and aren't the most architectural feature to my eye. If they will be well hidden, or your preference is different than mine, then go for it. They are a very good fastening method. I've used them a lot, but I try to make sure they are hidden.


Just a quick thought... There are plugs available for pocket screw holes.
User avatar
Ned B
1000 Club
1000 Club
 
Posts: 1036
Joined: Sat Apr 16, 2011 10:25 am
Location: Syracuse NY (ish)

Re: Austin Texas Woody TD Build

Postby KCStudly » Sun Jan 05, 2014 11:39 am

Ned B wrote:There are plugs available for pocket screw holes.

Just saying, compared to other methods, I do not prefer the look. The plugs seem like they would be a pain to fit, sand, and finish. The samples that came in my Kregg kit seem loose and sit proud, and they are not readily available in my wood species. You can use different species to "celebrate" the look, but for me, the long tapered ovals just aren't a "clean" look compared to, say, flush round dowel pins or other methods.

Don't get me wrong. I've used them a bunch, and they have their place, I just prefer not to see them. UMMV.
KC
My Build: The Poet Creek Express Hybrid Foamie

Poet Creek Or Bust
Engineering the TLAR way - "That Looks About Right"
TnTTT ORIGINAL 200A LANTERN CLUB = "The 200A Gang"
Green Lantern Corpsmen
User avatar
KCStudly
Donating Member
 
Posts: 9611
Images: 8169
Joined: Mon Feb 06, 2012 10:18 pm
Location: Southeastern CT, USA

Re: Austin Texas Woody TD Build

Postby WitsRUs » Thu Jun 26, 2014 6:32 pm

After a six-month hiatus for mentoring a US First High School Robotics team and buying a mountain retirement home I am finally back in control of my time. :applause:

It took me several hours to figure out where I had left off my work. It was building the back/galley cabinets. You can see that there will be both AC and DC outlets onboard. The power will be coming from a PD-4000 Power Distribution center. AC will be available if hooked up to a 30amp (or less) power outlet. The PD4000 has an onboard battery charger and DC converter. Also there is a 12V DVD/TV and a radio/CD/Sirius radio going in on the back cabinets. The galley will also have AC and DC outlets along with 4"x6" speakers for use with the TV when tailgating at Texas A&M football games!

I was also able to get the inside skins on the sides. I used the same technique outlined by Ryan in Wyoming Woody build. It used a rough cut, glue, and trim with a flush trim laminate bit. You can see the results in the pictures below.


Image

Image

Image

Image

Image

Image
User avatar
WitsRUs
Teardrop Builder
 
Posts: 29
Images: 164
Joined: Wed Aug 07, 2013 5:31 pm
Location: Austin, TX
Top

Re: Austin Texas Woody TD Build

Postby KCStudly » Thu Jun 26, 2014 7:41 pm

Nice to see you are back at it, and those other activities sound like they were well worth your time. :thumbsup:
KC
My Build: The Poet Creek Express Hybrid Foamie

Poet Creek Or Bust
Engineering the TLAR way - "That Looks About Right"
TnTTT ORIGINAL 200A LANTERN CLUB = "The 200A Gang"
Green Lantern Corpsmen
User avatar
KCStudly
Donating Member
 
Posts: 9611
Images: 8169
Joined: Mon Feb 06, 2012 10:18 pm
Location: Southeastern CT, USA
Top

Re: Austin Texas Woody TD Build

Postby capnTelescope » Thu Jun 26, 2014 8:35 pm

Hi, neighbor. Glad you're back. I just couldn't believe you got off to such a great start and then just quit. I'm glad it was something good. :thumbsup:
I'll burn that bridge when I come to it.

Brad
ImageImageImage

Building the Bed & Breakfast
User avatar
capnTelescope
Lifetime member
 
Posts: 1218
Images: 368
Joined: Sun Jun 27, 2004 3:44 pm
Location: Round Rock, TX
Top

Re: Austin Texas Woody TD Build

Postby WitsRUs » Tue Jul 01, 2014 5:12 pm

Here are some pictures of working on the cabinets and showing both sides clamped to the frame/base.

Image

The next two pictures show the sliding door channel. I had a really hard time finding these items.I looked all over locally and online. I ended up finding them at McMaster-Carr. Note that the top piece is deeper than the bottom piece so hat the doors can be put in or taken out.

Image

Image

Here are the cabinets with the pulls partially installed.

Image

Image

Here is the back inside cabinet getting ready for dry fit of the side walls.

Image

Pictures of the walls put up and clamped in place! I am pretty excited about how it is starting to come together! These pictures are taken though the side doors showing the interior cabinets.

Image

Image

Image

Nest step is to adjust the placement of the cabinets, trimming any place that is needed, and making sure everything is square! Onward!
User avatar
WitsRUs
Teardrop Builder
 
Posts: 29
Images: 164
Joined: Wed Aug 07, 2013 5:31 pm
Location: Austin, TX
Top

Re: Austin Texas Woody TD Build

Postby KCStudly » Tue Jul 01, 2014 9:21 pm

Awesome! We share your excitement, such a fun time in the build when you can really see a big reward for a bunch of your hard work. :thumbsup: :applause: :thumbsup:

Build on. 8)
KC
My Build: The Poet Creek Express Hybrid Foamie

Poet Creek Or Bust
Engineering the TLAR way - "That Looks About Right"
TnTTT ORIGINAL 200A LANTERN CLUB = "The 200A Gang"
Green Lantern Corpsmen
User avatar
KCStudly
Donating Member
 
Posts: 9611
Images: 8169
Joined: Mon Feb 06, 2012 10:18 pm
Location: Southeastern CT, USA
Top

Re: Austin Texas Woody TD Build

Postby WitsRUs » Sun Sep 14, 2014 9:19 pm

I spent a lot of time getting all of the cabinets placed square and then got the walls attached. I used PL Premium along with 2 1/2 inch screws to fasten the walls to the deck along with screws into the 3/4" plywood. I am really happy with how it went up so smooth! Ryan's detailed page for the Wyoming Woody are so easy to follow! Here are some pictures of the walls attached.

You can see the see the 2 1/2" screws into the deck as well as the locations of the screws I put into the 3/4" cabinet pieces. In addition to the screws I used PL Premium construction adhesive to attach the walls to the cabinets and decking.
Image

Here is the galley area with the walls on.
Image

Here is the headboard area attached to the walls.
Image

I needed to finish up a couple of details on the inside cabinets. I have two DC outlets, an AC outlet, and stereo speaker protruding into the far back of each cabinet from the galley. I did not want the wires for these exposed in the cabinet but I wanted to make sure I could access them for maintenance. I ended up putting in a removable shelf along with a false back in the upper compartment in each cabinet. This created an electrical chase for running my wires but allowed for easy access in case maintenance was needed.

Here are a couple of pictures showing the top view of the electrical chase.
Image

Image

This a view of the cabinets with the left door removed showing the removable shelve and false back. The picture after that is a close up of the upper part of the cabinet with the false back.

Image

Image

The next thing will be to sand the tops of the cabinet dividers so that they will fit flush with the headliner and then install the headliner! Slowly but surely this is coming together!
User avatar
WitsRUs
Teardrop Builder
 
Posts: 29
Images: 164
Joined: Wed Aug 07, 2013 5:31 pm
Location: Austin, TX
Top

Re: Austin Texas Woody TD Build

Postby pchast » Sun Sep 14, 2014 9:31 pm

Its a great time in the build when you actually see it
in 3d...
:thumbsup:
pchast
Platinum Donating Member
 
Posts: 2026
Images: 97
Joined: Mon Jan 28, 2013 5:47 pm
Location: Athens, NY
Top

Re: Austin Texas Woody TD Build

Postby WitsRUs » Sun Sep 21, 2014 8:19 pm

I started to get ready to dry fit the ceiling headline. I had to make sure the cabinet tops were all at the same height for a tight fit of the headliner to the cabinets. I used a belt sander and piece of straight wood to fix and verify the cabinet heights were the same all across the TD. Here is a pic of the cabinet edge sanded to the profile edge.

Image


Here are a couple if pictures in the process of sanding the cabinet tops and checking with the straight piece of wood.

Image

Image


The next thing was to use a piece of scrap 1/8 inch plywood to see how it looked across the back cabinets. It fit really well and I am getting excited to get it enclosed! I also put the TV in the mount to see how the clearance with the headliner looked as well.

Image

Image

Image

The next are to finish dry fitting the head liner. I also need to apply the spar polyurethane on the inside of the front cabinets and mount the doors prior to final placement of the head liner.
User avatar
WitsRUs
Teardrop Builder
 
Posts: 29
Images: 164
Joined: Wed Aug 07, 2013 5:31 pm
Location: Austin, TX
Top

Re: Austin Texas Woody TD Build

Postby WitsRUs » Sun Sep 28, 2014 7:40 pm

I worked this weekend on getting the headliner installed. Like Ryan did on the Wyoming Woody build, I also applied 3 coats of Helmsman spar urethane to the headboard storage area. This was because when the headliner is installed you can not easily access this area. For the same reason, I applied spar urethane to the TV cabinet as well. I sanded with 400 grit and tack clothed between coats. I was really happy with how clean and nice the Baltic birch looked with the coating!

I then moved on to working on dry fitting the headliner. Once I had the pieces cut I then spliced them together on the backside with a 2" wide piece of 1/4" birch and Titebond III. Here is the splice drying (my wife is on a business trip so I commandeered the kitchen table :thumbsup: ). I located my splice a little further forward than Ryan did. I had a couple of small tanin steaks on the plywood that I wanted to end up inside the cabinets. Also my skylight is a 9" versus Ryan's of 12". Being narrower allows me to move the window forward to a slightly more curved area on the profile but right along the splice so it is visually minimized.
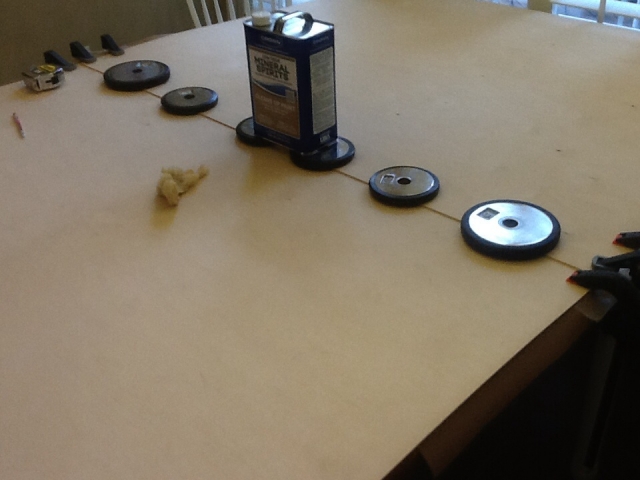
Image

After the splice was set up for 24 hours I brought it outside for sanding. I started with 220 and ended with 400 grit. I sanded before installing it. I reasoned that sanding later would be more difficult along with dust falling on me! I am not sure if others do it this way or not. :thinking:

Image

I then was able to dry fit the entire headliner using clamps to hold it in place. This was a little easier than I was anticipating but I am not complaining!
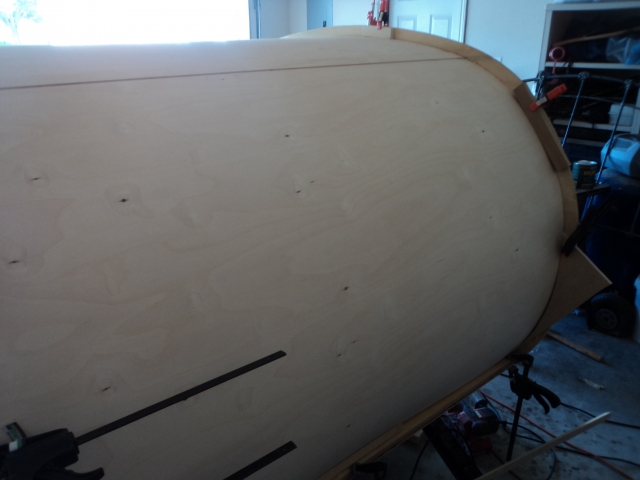
Image

After getting in place on the outside I then was nervous about checking the inside! I was so excited with what I saw I just sat inside for about 10 minutes! It is so much fun to see it coming together albeit a bit slower than I want.

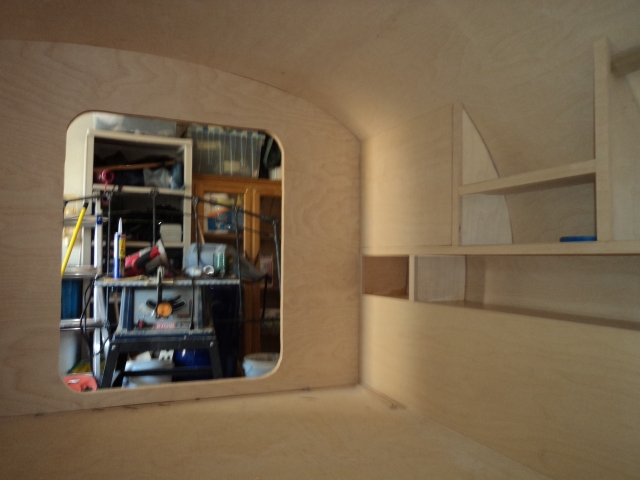
Here are four pictures two have the cabinet doors in place and two do not. Two are of the front headboard and two of the inside back cabinets. I think with brads and better pressure using come-along straps it should be very tight fitting!

Here is the headboard on the driver side with the cabinet door in place. You can see the splice about 10" from the cabinet face.
Image

Here is the back driver side cabinet with the door in place.
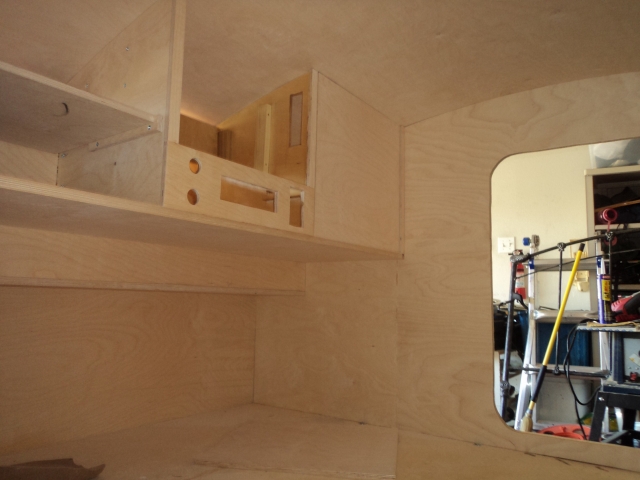
Image

Here is the front passenger side cabinet without the cabinet door in place. You can see the two tanin spots on the plywood that I ended up placing them inside the cabinet so they would not be visible when the door was closed. You can also see the headliner splice about 10" in front of the cabinet face.
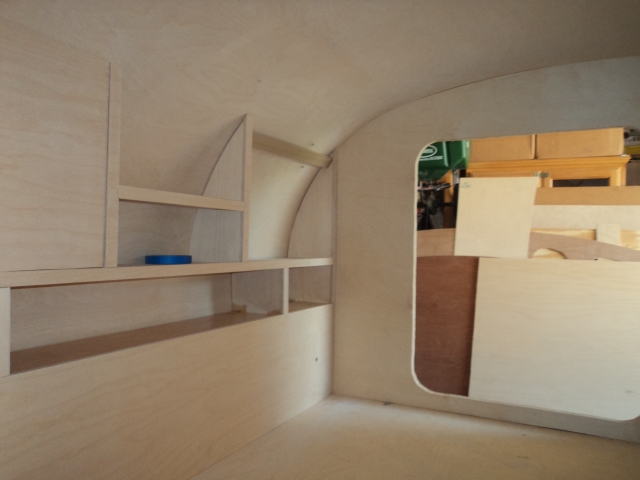
Image

Here is the back passenger side cabinet without the door in place.
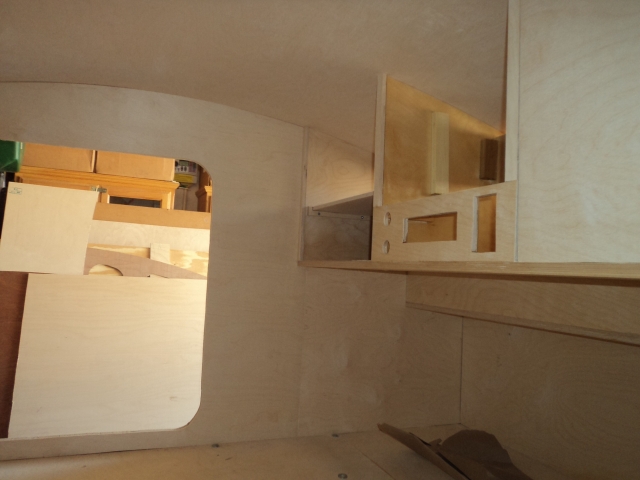
Image

Time for a brew! :beer:

Image

I hope to get the headliner installed early this week!
User avatar
WitsRUs
Teardrop Builder
 
Posts: 29
Images: 164
Joined: Wed Aug 07, 2013 5:31 pm
Location: Austin, TX
Top

Re: Austin Texas Woody TD Build

Postby KCStudly » Sun Sep 28, 2014 8:40 pm

Looking good! :thumbsup: :applause: :thumbsup: :applause:
KC
My Build: The Poet Creek Express Hybrid Foamie

Poet Creek Or Bust
Engineering the TLAR way - "That Looks About Right"
TnTTT ORIGINAL 200A LANTERN CLUB = "The 200A Gang"
Green Lantern Corpsmen
User avatar
KCStudly
Donating Member
 
Posts: 9611
Images: 8169
Joined: Mon Feb 06, 2012 10:18 pm
Location: Southeastern CT, USA
Top

Re: Austin Texas Woody TD Build

Postby bc toys » Mon Sep 29, 2014 7:46 am

that is a really great looking job you have done :thumbsup: :thumbsup: :thumbsup:
bc toys
2000 Club
2000 Club
 
Posts: 2217
Images: 42
Joined: Sun Jun 28, 2009 2:45 pm
Location: LAS VEGAS NV
Top

Re: Austin Texas Woody TD Build

Postby WhitneyK » Mon Sep 29, 2014 8:25 am

Are you building to the same specs as _Ryan_ did? I really, really like his design but need a bit longer mattress length of 80". Other than that, it appears to be practically perfect. :twisted:

Lookin' great. Nice fit on the headliner! :thumbsup: :applause:
Whitney & Tracie
Crothersville, IN

We never really grow up, we only learn how to act in public.

Do not confuse what you hear with what I mean.

My build: http://www.tnttt.com/viewtopic.php?t=41955

160061-------------------------------101114
States we've drug our
li'l camper through. (44 States + Vancouver Island and over 45,000 miles so far)
User avatar
WhitneyK
Gold Donating Member
 
Posts: 559
Images: 412
Joined: Sun Dec 12, 2010 10:28 pm
Location: IN, Crothersville (36mi N or Louisville)
Top

Re: Austin Texas Woody TD Build

Postby WitsRUs » Mon Sep 29, 2014 7:04 pm

Thank you very much KC and BC for the nice comments!

WhitneyK wrote:Are you building to the same specs as _Ryan_ did? I really, really like his design but need a bit longer mattress length of 80". Other than that, it appears to be practically perfect. :twisted:

Lookin' great. Nice fit on the headliner! :thumbsup: :applause:


Whitney, I am using Ryan's design and build log for the Wyoming Woody. I made a few changes since I plan to use it to go to Texas A&M Aggies games hence some TV stuff and speakers. Here are the minor changes: the lower section of the front headboard is built a little different; the middle cabinet of the back inside has a tv/DVD player along with a Sirius radio, DC outlets and an AC outlet; the lower galley will have three sections with one having three drawers, one a cabinet, and the other a cabinet with a 7 gallon water storage and 2.1 gym pump. Also the galley area will have DC and AC outlets as well as stereo speakers. There will be a power distribution center in the tongue box. Otherwise I am following the plans. They are very useful and helpful in the build! I spend a lot of time looking at the plethora of pictures to get ideas on how things go together. He also has pictures and a profile at his website teardropbuilder.com .

Regards,
Bob
User avatar
WitsRUs
Teardrop Builder
 
Posts: 29
Images: 164
Joined: Wed Aug 07, 2013 5:31 pm
Location: Austin, TX
Top

PreviousNext

Return to Build Journals

Who is online

Users browsing this forum: No registered users and 16 guests