Compact family camper Build - Always something...

...ask your questions in the appropriate forums BUT document your build here...preferably in a single thread...dates for updates, are appreciated....

Re: Compact family camper Build - Roof!

Postby ryuandwings » Tue Apr 29, 2014 10:03 pm

Gunguy05 wrote:Looking great, we are doing a to tongue box with storage to the inside as well. Yours is looking really nice. The end is in sight.

Thank you. :)
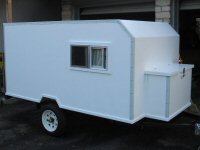
I went through many different versions of tongue box when I was designing. I knew I wanted AC to be mounted in there so I ended up making the tongue box part of the main body. I will break the aluminum sheet at the tongue box and it will be continuous till hinge of tongue box hatch. I think this way, it will be better sealed. :thumbsup:
User avatar
ryuandwings
Teardrop Master
 
Posts: 187
Images: 61
Joined: Wed Feb 13, 2013 5:22 am
Location: West Tennessee

Re: Compact family camper Build - Roof!

Postby ryuandwings » Tue Apr 29, 2014 11:48 pm

Small progress tonight.
Finished first layer of Baltic Birch on the front part of the roof. It was a bit complicated around and bottom of tongue box, but making a template out of paper made it simple and error free. :D
I finished covering storage area of tongue box also. The curve was a little tight, but 1/8" made it fairly easy to bend. :thumbsup:
Image
Image
Image

I should be able to work on second layer tomorrow. :twisted:
User avatar
ryuandwings
Teardrop Master
 
Posts: 187
Images: 61
Joined: Wed Feb 13, 2013 5:22 am
Location: West Tennessee

Re: Compact family camper Build - Roof!

Postby sumo » Wed Apr 30, 2014 11:33 am

The camper is looking great. WHere did you get the screw off flange for the 4" pvc pipe.
User avatar
sumo
Teardrop Master
 
Posts: 130
Images: 0
Joined: Thu Aug 23, 2012 8:05 am
Top

Re: Compact family camper Build - Roof!

Postby ryuandwings » Wed Apr 30, 2014 11:49 am

sumo wrote:The camper is looking great. WHere did you get the screw off flange for the 4" pvc pipe.

Thank you.
The screw off hatch cover I have is just regular hatch cover I found on ebay.
It does not fit 4" PVC pipe so I had to heat the pipe to enlarge the diameter of pipe to fit around the hatch cover.
I still don't have it fitting right though... :cry:
User avatar
ryuandwings
Teardrop Master
 
Posts: 187
Images: 61
Joined: Wed Feb 13, 2013 5:22 am
Location: West Tennessee
Top

Re: Compact family camper Build - Roof!

Postby SLUG36 » Wed Apr 30, 2014 3:36 pm

It's good to see someone else investing a large chunk of change on screws.

:rofl:
Making big pieces of wood into the wrong size..... for over 30 years....
User avatar
SLUG36
Teardrop Master
 
Posts: 212
Images: 137
Joined: Wed Mar 28, 2012 6:51 am
Location: Sabine/Neches river Delta
Top

Re: Compact family camper Build - Roof!

Postby ryuandwings » Wed Apr 30, 2014 4:03 pm

SLUG36 wrote:It's good to see someone else investing a large chunk of change on screws.

:rofl:


It feels like I'm going to Lowe's or HomeDepot everyday to buy screws, glue or some kind of adhesive... :cry:
I will remove all screws holding plywood skins, so I will end up with all kinds of screws at the end of my build. That should last me for a loooong time. :lol:
User avatar
ryuandwings
Teardrop Master
 
Posts: 187
Images: 61
Joined: Wed Feb 13, 2013 5:22 am
Location: West Tennessee
Top

Re: Compact family camper Build - Roof!

Postby 3nero » Wed Apr 30, 2014 4:48 pm

Looking really nice :applause:

I was going to mention the screws aswell. i lost count after 2000. :?

But i think it will be years before i have to by another screw :lol:
Measure once, cut twice....throw away and repeat.
Image Image

http://www.tnttt.com/viewtopic.php?t=55971
3nero
Teardrop Master
 
Posts: 129
Joined: Mon May 13, 2013 3:40 pm
Location: Co.Wicklow Ireland
Top

Re: Compact family camper Build - Roof!

Postby ryuandwings » Wed Apr 30, 2014 9:54 pm

3nero wrote:Looking really nice :applause:

I was going to mention the screws aswell. i lost count after 2000. :?

But i think it will be years before i have to by another screw :lol:


Thank you. :)

Well, I thought I had enough short screws I have been using to attach 1/8" plywood. When was working on second layer of Baltic Birch on the roof, I forgot I had used some at the front yesterday. I had to scrambled to find the right size screws.
Since I have collections of different screws, I had no problem. :thumbsup:

I did not take any photos tonight since it really does not look much different than yesterday. :R
User avatar
ryuandwings
Teardrop Master
 
Posts: 187
Images: 61
Joined: Wed Feb 13, 2013 5:22 am
Location: West Tennessee
Top

Re: Compact family camper Build - Roof!

Postby rowerwet » Thu May 01, 2014 4:30 am

I only left my screws in until the glue dried, I have two large boxes of screws that were reused many times, and continue to be reused on other projects.
User avatar
rowerwet
Gold Donating Member
 
Posts: 2075
Images: 521
Joined: Mon Apr 20, 2009 12:52 am
Location: Merrimack River Valley
Top

Re: Compact family camper Build - Roof!

Postby Starseeker » Thu May 01, 2014 7:32 am

With all of those screws, have you ever gotten the feeling that you just got screwed? :thinking:
Great build you got going there! :thumbsup:
Aaron
KF5VBV
User avatar
Starseeker
Teardrop Builder
 
Posts: 37
Images: 10
Joined: Wed Nov 07, 2012 2:53 pm
Location: Midwest City, Oklahoma
Top

Re: Compact family camper Build - Roof!

Postby ryuandwings » Thu May 01, 2014 7:55 am

rowerwet wrote:I only left my screws in until the glue dried, I have two large boxes of screws that were reused many times, and continue to be reused on other projects.


The most of times, that how I used my screws. Holding the piece until the glue dries. :)
I should have plenty woodworking or construction projects in the future to use all of these left over screws. :thumbsup:
Often times, I need to have some screws in hand to make many different jigs during woodwork project. :D
User avatar
ryuandwings
Teardrop Master
 
Posts: 187
Images: 61
Joined: Wed Feb 13, 2013 5:22 am
Location: West Tennessee
Top

Re: Compact family camper Build - Roof!

Postby ryuandwings » Thu May 01, 2014 7:58 am

Starseeker wrote:With all of those screws, have you ever gotten the feeling that you just got screwed? :thinking:
Great build you got going there! :thumbsup:


I really did not budgeted for these "miscellaneous" items when I was calculating the cost before the build started.
Screws and glues add up very fast... :cry:

So in that way, I do feel I got screwed. :oops: But it is part of it.
I don't want to go cheap and regret at later time. :thumbsup:
User avatar
ryuandwings
Teardrop Master
 
Posts: 187
Images: 61
Joined: Wed Feb 13, 2013 5:22 am
Location: West Tennessee
Top

Re: Compact family camper Build - Roof!

Postby Breytie » Fri May 02, 2014 3:32 am

Gluing and screwing, with a bit of banging inbetween :R.Thats why TD building is so much fun :lol:
Experience is learning from your own mistakes
Here I make mine in public: My build
Breytie
Teardrop Master
 
Posts: 209
Images: 36
Joined: Sun Sep 04, 2011 4:21 pm
Top

Re: Compact family camper Build - Roof!

Postby ryuandwings » Fri May 02, 2014 5:56 am

Breytie wrote:Gluing and screwing, with a bit of banging inbetween :R.Thats why TD building is so much fun :lol:

Speaking of screwing, gluing and banging, I ran into a situation than made do just that.

Plywood I applied on front section the tongue box came off when I removed screws. :DOH2:
I guess I removed screws too soon. :cry:
User avatar
ryuandwings
Teardrop Master
 
Posts: 187
Images: 61
Joined: Wed Feb 13, 2013 5:22 am
Location: West Tennessee
Top

Re: Compact family camper Build - Roof!

Postby Breytie » Fri May 02, 2014 1:06 pm

ryuandwings wrote:Plywood I applied on front section the tongue box came off when I removed screws. :DOH2:
I guess I removed screws too soon. :cry:

Ouch, I feel your pain, been there, done that :frightened: , got the self applied bruise to the behind :NC.
Sometimes it is a good thing when that happens :thinking:. Makes you think again about how you prep and fit up the join before gluen and screwen.
I now leave the clamping screws at least 2 full days if I can. I sometimes leave a few in high stress areas like corners or junctions - just countersink them properly and fill over the top.
Hope that's the last time that happens to you.

Breytie
Experience is learning from your own mistakes
Here I make mine in public: My build
Breytie
Teardrop Master
 
Posts: 209
Images: 36
Joined: Sun Sep 04, 2011 4:21 pm
Top

PreviousNext

Return to Build Journals

Who is online

Users browsing this forum: No registered users and 18 guests