Tucson tortoise: Edit for photos

...ask your questions in the appropriate forums BUT document your build here...preferably in a single thread...dates for updates, are appreciated....

Re: Tucson tortoise

Postby rebapuck » Thu Jul 23, 2015 12:36 am

Just so you know...today's duct tape isn't worth a damn. Except Gorilla tape.
Judy
1966 VW camper
1967 VW singlecab
Image
User avatar
rebapuck
.
 
Posts: 2243
Images: 1
Joined: Thu May 14, 2009 1:55 pm
Location: Chapel Hill NC

Re: Tucson tortoise

Postby noseoil » Sat Jul 25, 2015 5:17 pm

Worked on two different things today. First, The openings for the doors were cut last year and not done correctly. I should have bought the doors first, but didn't (didn't follow my own advice). There was a gap at the top corners which would be covered by the outer flange, but I was concerned about water getting behind the gasket on the doors. The bottom corners fit much better than the tops??? Here's what the gap looks like with the inner trim ring clamped in place. It's just too close for comfort. I decided to fix it with a couple of shims, once the 1/8" baltic birch & aluminum are in place, the gasket will have a better sealing area behind it on the door.


Small shims made out of 1/2" plywood. They were glued & just held in place with tape until the glue set up. The router will now have a good edge to follow & there should be enough meat behind the door edge for a complete seal. Used the band saw & sander to shape them to fit. Not a perfect fit, just "good enough" to work.

Next was the alarm system. I got a car alarm from a local stereo shop since I'm concerned about my neighborhood and also being out in remote areas. I know it won't really do anything, but the siren is very loud & it might just help someone to think before trying anything stupid. We'll have to see about that... Last weekend in the campground someone had a generator stolen from their campsite. It happened at night while everyone was asleep.

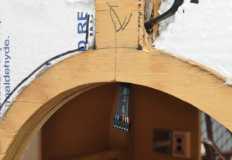
Here's the antenna wire for the controller. It runs from the galley bulkhead up through the electrical chase & to the roof, then into the top edge of the window opening. I'm also going to use one of the circuits to turn on the dome lights inside with the alarm's remote. Just playing, but having fun with it. Ran the wires & set two diodes in place so the alarm module is isolated from the dome lights while they're on with normal use from the switches. All joints are soldered, since they'll be covered up when the skins are in place for good.
160023

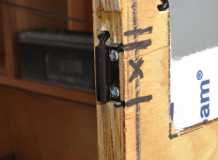
I'm using magnetic switches for the doors, hatch & tongue box. Here's one that's set into the jamb area where the cabin door fits. You can just see the lower corner of one of the plywood door shims from earlier this morning. Magnetic switches are easier to deal with, since once things are buttoned up, I won't have access to everything. They're much more simple to set than a mechanical switch for tolerances as well. I did a check & found that the magnets are strong enough to work through the aluminum door edges of the door frame. As usual, my little 12v test battery is helping me as I go. I'm still checking each circuit as it's installed.
160024

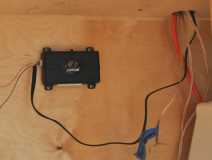
Finally, here's the "brain" for the alarm system mounted in the galley on the bulkhead. I still need to run the tongue box wiring & some other stuff, so it's nowhere near complete yet. It's getting hot again & 7 hours today is enough. Should be working again tomorrow morning.
160025
Last edited by noseoil on Mon Nov 04, 2019 7:52 am, edited 1 time in total.
Build log: viewtopic.php?f=50&t=60248
The time you spend planning is more important than the time you spend building.........

137905
User avatar
noseoil
1000 Club
1000 Club
 
Posts: 1820
Images: 669
Joined: Sun Apr 27, 2014 8:46 am
Location: Raton, New Mexico, living the good life!

Re: Tucson tortoise

Postby tony.latham » Sun Jul 26, 2015 10:48 am

Hey, NoseOil:

I just wanted to say, I've thoroughly enjoyed watching your craftsmanship on this project. Building a teardrop, isn't like banging a utility shed together. A tad bit more fun. Especially when you have the skills you possess.

It'll be good to see a photo of you in the desert boonies sitting in a chair and enjoying a fine meal beside your Tortoise.

Tony
User avatar
tony.latham
Gold Donating Member
 
Posts: 6900
Images: 17
Joined: Mon Jul 08, 2013 4:03 pm
Location: Middle of Idaho on the edge of nowhere
Top

Re: Tucson tortoise

Postby dales133 » Sun Jul 26, 2015 12:27 pm

Nice progress mate as tony said been a verry enjoyable build to follow
User avatar
dales133
4000 Club
4000 Club
 
Posts: 4605
Images: 1
Joined: Mon Oct 13, 2014 5:26 pm
Top

Re: Tucson tortoise

Postby noseoil » Sun Jul 26, 2015 10:25 pm

Thanks guys. None of this would be working out as well as it has without the help & input of the outstanding forum members whose build journals I've seen here, learned from & copied. Even with my mistakes it's fun & it's good to learn from other people & see how they do things. If I can avoid some of the pitfalls by looking at other builds, so much the better. What good is knowledge if it can't be passed on to help other people?

I wanted to work on the build again today, but got side-tracked this morning. Had to cut down a large cholla cactus & get it into the dumpster for removal. I've been neglecting some of the yard work (trailer stuff?) and I spent the morning cutting tree branches, raking and generally straightening up things a bit. By the time I was finished with the yard, it was just too hot to keep working & I was too pooped from the heat & activity. It was only 100 today, but the sun gets brutal after a few hours of moving around in it.....

Again, thanks for the kind words. It means a lot to me.
Build log: viewtopic.php?f=50&t=60248
The time you spend planning is more important than the time you spend building.........

137905
User avatar
noseoil
1000 Club
1000 Club
 
Posts: 1820
Images: 669
Joined: Sun Apr 27, 2014 8:46 am
Location: Raton, New Mexico, living the good life!
Top

Re: Tucson tortoise

Postby noseoil » Sat Aug 01, 2015 8:11 pm

Still working on the alarm wiring. Got a late start due to a visit from a friend & breakfast. Enjoyed the visit, but didn't like missing out on the best 4 hours of relative cool this morning to work. Had a bit of a rough end to the week, as I had to take the cat to the vet's to euthanize him after work on Thursday. He was a good old cat, lived a long life & made it to 20. I miss him. (Picture of him in my "off-topic" post)

Basically, I was concerned about locating the alarm siren on the build. Where can it go and have limited access from the outside, hide where it isn't seen, & still be able to make plenty of noise when the system trips? What I settled on was a location under the tongue box. I was thinking I would need to build a cage or something to protect the siren & wire harness from prying fingers & expanding foam. When I started crawling around under the tongue this morning, I realized the spare tire location had a recess under the tongue box which was "almost" big enough to hold the siren.

It took two tries to get it in the right place, a little cutting of the horn itself (just a plastic trim on the band saw), and some added work & time, but the siren now has a place which is pretty secure. It's fastened to the bottom of the tongue box (just to the left of center in the picture) and can't be seen. The spare tire & rim covers it completely where it's located. It's fastened to the sheet metal bottom, so it should make a good amount of racket when it starts up. The wires will be run in conduit from the galley bulkhead, under the deck, into the bottom of the tongue box, then they pass through a waterproof gland connection in the bottom of the box and out to the siren. The conduit will be next to the gas line under the frame. All the wiring is invisible & covered.

I know nothing is foolproof, but if anyone looks, they won't be able to see anything about the system but the small antenna in the porthole on the driver's side. All the switches are magnetic (hatch, cabin doors, tongue box), all the wires are tucked in and it would take the removal of the spare tire first, before cutting the wires to the siren. I guess I could also mount a switch on the spare itself, in case someone wants a tire & rim that isn't theirs. That's about as well as I can do it, so I'm hoping it won't be necessary at all & I'm just being paranoid about a theft or break-in. I did place an order for an iTraq this morning, after reading the latest thread about another stolen teardrop recently. Where I live, Mexico is just an hour away and that's a major concern with stolen vehicles.

Here's a picture from last year showing the spare tire location & the recess under the tongue box where the siren is mounted now. It barely fits inside the rim, but it's tucked in well enough now & should be out of harm's way from any damage, weather, mud, rocks or alligators & debris.
160026

More work tomorrow.
Last edited by noseoil on Mon Nov 04, 2019 7:54 am, edited 1 time in total.
Build log: viewtopic.php?f=50&t=60248
The time you spend planning is more important than the time you spend building.........

137905
User avatar
noseoil
1000 Club
1000 Club
 
Posts: 1820
Images: 669
Joined: Sun Apr 27, 2014 8:46 am
Location: Raton, New Mexico, living the good life!
Top

Re: Tucson tortoise

Postby KCStudly » Sat Aug 01, 2015 8:50 pm

Sorry to hear about the loss of your beloved pet. It is always so difficult to bear that. Let the good memories come thru and throw yourself into your work.

Sounds like the alarm system install is done right. Just because you're paranoid, it doesn't mean they aren't out to get cha'.
KC
My Build: The Poet Creek Express Hybrid Foamie

Poet Creek Or Bust
Engineering the TLAR way - "That Looks About Right"
TnTTT ORIGINAL 200A LANTERN CLUB = "The 200A Gang"
Green Lantern Corpsmen
User avatar
KCStudly
Donating Member
 
Posts: 9613
Images: 8169
Joined: Mon Feb 06, 2012 10:18 pm
Location: Southeastern CT, USA
Top

Re: Tucson tortoise

Postby rebapuck » Sun Aug 02, 2015 12:16 am

Will you have a warning decal or something about the alarm? If thieves know there is one on board they may leave it alone? Or know they need to disable?
Judy
1966 VW camper
1967 VW singlecab
Image
User avatar
rebapuck
.
 
Posts: 2243
Images: 1
Joined: Thu May 14, 2009 1:55 pm
Location: Chapel Hill NC
Top

Re: Tucson tortoise

Postby lfhoward » Sun Aug 02, 2015 6:17 pm

So sorry to hear of your cat's passing, but 20 is a phenomenal age for a kitty!

Your tear is the first and only one I have read about so far that has its own alarm system and magnetic locks. Very cool features. The average run of the mill theif will be scratching his head if he can pick the lock and still can't open the door.
My off-road camper build on an M116A3 military chassis:
http://www.tnttt.com/viewtopic.php?f=50&t=62581
Tow vehicle: 2008 Jeep Liberty with a 4 inch lift.
User avatar
lfhoward
1000 Club
1000 Club
 
Posts: 1370
Joined: Wed Jan 22, 2014 6:10 pm
Location: Philadelphia, PA
Top

Re: Tucson tortoise

Postby noseoil » Mon Aug 03, 2015 7:49 am

Thanks for the kind words about the old cat. Much appreciated.

The alarm system came with those funky decals (Python) but I'm not going to use them. I figure it's better to say nothing, I like surprises for bad guys whenever possible. If it's alarmed, what else might be lurking in the build that can't be seen? If someone tries to steal the spare tire, their head will be about a foot from the siren when it goes off. I also like the idea of a pet rattlesnake guarding the inside, but there must be limits to my paranoia. Perhaps just a fake snake coiled on the bed which can be seen during traveling?
160027

I didn't mean to give the impression that I would have magnetic locks. There are magnetic switches for all openings, but an electronic locking system isn't in the plans. It's possible to include one easily enough. If you're building hollow core doors, there's plenty of room for the system. The hatch would be no problem, as it's already hollow. The actuators are readily available & pretty easy to set up, but I don't like the idea of a lock which can fail due to a loss of power in the system. My doors have key locks, the hatch handle is the same & the tongue box is just a padlock.

If someone is interested in a keyless entry system, just look at a local car alarm company for the actuators, alarm system & internet parts stuff is available everywhere now. This technology already exists, it's just applying it to a new application which would take a bit of thought. I say why not?

Who will be the first to have a keyless entry system on their build? Make sure to have an external power point (mine would be the tongue box interior with the padlock as the 2nd entry point) in case the battery fails & you can't get in during a rain, hail storm or hurricane. Isn't that the most likely time for it to fail?
Last edited by noseoil on Mon Nov 04, 2019 7:55 am, edited 1 time in total.
Build log: viewtopic.php?f=50&t=60248
The time you spend planning is more important than the time you spend building.........

137905
User avatar
noseoil
1000 Club
1000 Club
 
Posts: 1820
Images: 669
Joined: Sun Apr 27, 2014 8:46 am
Location: Raton, New Mexico, living the good life!
Top

Re: Tucson tortoise

Postby noseoil » Sat Aug 08, 2015 2:48 pm

Did some skinnin' this morning. Unfortunately, I mistook a sheet of 1/4" to be 2 sheets of 1/8" so I had to stop after just one side. Need to get some more 1/8" BB for next weekend. Ah well, there's always more wiring to work on tomorrow. I was taking a beak from it, but it looks like I'll be doing more, just sooner than I had planned....
160028

Router cut for a port hole, with the 3/4" pilot hole for the start of the pass. I remembered to hold back the antenna wire with some tape, so I didn't "trim" it flush with the hole and have to tear things apart & buy another one...
160030

Cuts with the 1/2" flush-cut bit.
160031

2nd half in place & trimmed for shape & door. Need to slide the shell forward to finish the trim-out at the lower rear corner of the door. Will do this when I get the second side done next weekend. Right now it's sitting on some 2x4's, so there's enough room for the angle drill to fit between the tongue box & the lower edge of the cabin for drilling & fasteners. Sure wish I had waited to have my buddy install the tongue box until later......
160032
Last edited by noseoil on Mon Nov 04, 2019 8:04 am, edited 1 time in total.
Build log: viewtopic.php?f=50&t=60248
The time you spend planning is more important than the time you spend building.........

137905
User avatar
noseoil
1000 Club
1000 Club
 
Posts: 1820
Images: 669
Joined: Sun Apr 27, 2014 8:46 am
Location: Raton, New Mexico, living the good life!
Top

Re: Tucson tortoise

Postby KCStudly » Sat Aug 08, 2015 6:06 pm

Looking really nice. All of the same complementary statements you made recently on Prototear's Wandering build are applicable here, too.

Noseoil wrote, "...looking nice now. I like it that you've been able to stay with the build over time, continue to do a good job & have set high standards for workmanship. In the long run, an extra month or two on the build isn't as important as a job well done and properly executed. Really enjoying the build process on your tear, your approach to problem solving & the finished results, which look to be first class! Make haste carefully!"
KC
My Build: The Poet Creek Express Hybrid Foamie

Poet Creek Or Bust
Engineering the TLAR way - "That Looks About Right"
TnTTT ORIGINAL 200A LANTERN CLUB = "The 200A Gang"
Green Lantern Corpsmen
User avatar
KCStudly
Donating Member
 
Posts: 9613
Images: 8169
Joined: Mon Feb 06, 2012 10:18 pm
Location: Southeastern CT, USA
Top

Re: Tucson tortoise

Postby capnTelescope » Sun Aug 09, 2015 10:33 am

+1 what KC said, Tim. Your build is coming along very nicely. :thumbsup: :applause:

:beer:
I'll burn that bridge when I come to it.

Brad
ImageImageImage

Building the Bed & Breakfast
User avatar
capnTelescope
Lifetime member
 
Posts: 1218
Images: 368
Joined: Sun Jun 27, 2004 3:44 pm
Location: Round Rock, TX
Top

Re: Tucson tortoise

Postby noseoil » Sun Aug 09, 2015 3:16 pm

Thanks guys, nice to have feedback from people who have been there. Still plodding along. Another hot day again.

Here's the siren & pin switch for the spare tire. The tire is swung down & the pin switch is in the closed position this way. When the spare is back in place, the pin switch breaks its contact & is ready to go. Should make plenty of noise if it goes off. Hopefully it won't be needed.
160033

Worked on the hatch spar. Using red oak for it's strength & ability to hold fasteners better than poplar or alder. I glued 2 pieces of 4/4 together and pre-drilled the end grain for some 3" drywall screws. The back one (doubler) is cut on an angle to match the face panel with the vent holes which is above the upper galley cabinet, a vertical surface. The block needs to have some taper to fit snug. Here's a shot of the spar in place and lining up the gap, drill holes & dry-checking the fit prior to assembly.
160034

The buildup for the spar showing pilot holes. The oak is just too hard to run fasteners into without pre-drilling for the screws.
160035

Here's a shot of the end at the wall. Thinking this should hold a fairly heavy hatch if it turns out to be a bit on the porky side.
160036

The wiring chase for the hatch is a tubing bender, actually it's two, so I'm not trying to cram too many wires through the 3/8" sleeve. Sort of a PITA to do it this way, but it should be a nice clean installation when it's all put together. The spring is flexible enough to move freely when the hatch is opened & closed. I'll tape up the wires into a bundle so they can't chafe, but there will be back-up lights, a 3rd brake light, license plate light & speakers built into the hatch, so it's getting pretty busy & I haven't started yet.
160037

All for now. Thanks for looking!
Last edited by noseoil on Mon Nov 04, 2019 8:14 am, edited 1 time in total.
Build log: viewtopic.php?f=50&t=60248
The time you spend planning is more important than the time you spend building.........

137905
User avatar
noseoil
1000 Club
1000 Club
 
Posts: 1820
Images: 669
Joined: Sun Apr 27, 2014 8:46 am
Location: Raton, New Mexico, living the good life!
Top

Re: Tucson tortoise

Postby noseoil » Sat Aug 15, 2015 5:13 pm

Working on the skins now, did the passenger side this morning & glued up the headliner. No pictures except for this one. Seems like this thing is taking forever this summer! Will post a couple with the skins in place tomorrow (if I remember). It's only 107 now, but under the steel roof & in the shade, it's a bit warmer. Can't wait until next summer to get out of this heat for a while. I may have to rename it the "Masochism Sweat-drop" or something like it.
159980
Last edited by noseoil on Mon Nov 04, 2019 8:17 am, edited 1 time in total.
Build log: viewtopic.php?f=50&t=60248
The time you spend planning is more important than the time you spend building.........

137905
User avatar
noseoil
1000 Club
1000 Club
 
Posts: 1820
Images: 669
Joined: Sun Apr 27, 2014 8:46 am
Location: Raton, New Mexico, living the good life!
Top

PreviousNext

Return to Build Journals

Who is online

Users browsing this forum: No registered users and 19 guests