Tucson tortoise: Edit for photos

...ask your questions in the appropriate forums BUT document your build here...preferably in a single thread...dates for updates, are appreciated....

Re: Tucson tortoise

Postby azgreg » Wed Jul 01, 2015 4:00 pm

Question if you don't mind. How are you attaching your walls to the floor?
User avatar
azgreg
Donating Member
 
Posts: 135
Joined: Mon Jan 21, 2008 10:30 pm

Re: Tucson tortoise

Postby noseoil » Wed Jul 01, 2015 4:51 pm

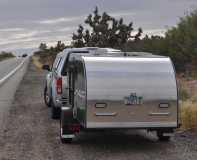
I used 2 1/2" drywall screws run up from the bottom, titebond glue & pre-drilled all the holes so the plywood wouldn't split as I went. This worked out pretty well & made a good, strong joint & bond. In a couple of places I did angle some screws in from the side (on an angle so they didn't poke through the deck) to get the sides to pull up better. The plywood panels weren't perfectly flat. Once the glue was set, I backed out these screws because I was in a hurry with the glue drying fast and didn't counter-sink the holes. With the rabbet joint in the deck, it's really solid now that the rest of the stuff is going together. I did have a buddy help with this part of the assembly, because I ran out of hands & the glue sets up too fast in our heat to have enough time on everything.
Last edited by noseoil on Sun Nov 03, 2019 8:06 am, edited 1 time in total.
Build log: viewtopic.php?f=50&t=60248
The time you spend planning is more important than the time you spend building.........

137905
User avatar
noseoil
1000 Club
1000 Club
 
Posts: 1820
Images: 669
Joined: Sun Apr 27, 2014 8:46 am
Location: Raton, New Mexico, living the good life!

Re: Tucson tortoise

Postby noseoil » Fri Jul 03, 2015 8:13 am

Starting on this stuff. Let's see where I end up after a 3 day weekend. Lots of little things to do to put things together still, but I'm getting there! Here's a pile of stuff which will go in place in the next few days. Have to drill out a few holes, lay in the first layer of insulation & add a few backing & blocking pieces first. Then I'll start with the conduit & wire itself. So thankful not to be working today.
160001
Last edited by noseoil on Sun Nov 03, 2019 8:08 am, edited 1 time in total.
Build log: viewtopic.php?f=50&t=60248
The time you spend planning is more important than the time you spend building.........

137905
User avatar
noseoil
1000 Club
1000 Club
 
Posts: 1820
Images: 669
Joined: Sun Apr 27, 2014 8:46 am
Location: Raton, New Mexico, living the good life!
Top

Re: Tucson tortoise

Postby noseoil » Fri Jul 03, 2015 3:55 pm

Guess I was a bit too optimistic with my plans for doing the wiring today. My last picture should have been of a sheet of foam insulation. I've put in some of the insulation earlier this morning, but it's warming up again now, so that's it for the day. Here's the top section in place, the 1st layer is R-max with wire runs cut into the foam. Cinder blocks are holding things down while the glue sets. It was a little windy this morning, but also cloudy, so that was a fair trade.
160002

The front area with some more cuts for the wires. As the sun came out & burned off the clouds, the glare off of the aluminum side was intense when I was cutting it!
160003

Finally, here's the passenger side front corner with the top curved section having two layers of foam in place, the rest is just one layer. I'm using the polystyrene foam for all the curves, because the R-Max panel I got is a bit on the "fat" side & I don't want too many bulges when I skin this thing. The foam has PL foam adhesive holding it in place, so the two 3/4" layers with adhesive set up pretty well. I'll use some expanding foam to lock the edges in place, once all the insulation & wiring is done (prior to the 1/8" panels being glued up). This should make for a nice snug fit & keep things in place over time.
160004

I'm glad I don't have a deadline or a schedule at this point (there's enough of that at work). I didn't think it would take so long to fit all of this stuff in place, but it takes what time it takes. Still using a straight-edge & Japanese one-sided veneer cutting blade to make the foam cuts. The last thing I need is a bunch of white stuff flying around the yard & getting everywhere I don't want it from a saw blade. I know it would have been quicker, but the knife is a much better tool for the job. I'm using the same system I did when I did the decking last year. Back at it again tomorrow. Who knows, perhaps I'll even get to do some wire runs & maybe even some fixtures this weekend! tim
Last edited by noseoil on Sun Nov 03, 2019 8:18 am, edited 1 time in total.
Build log: viewtopic.php?f=50&t=60248
The time you spend planning is more important than the time you spend building.........

137905
User avatar
noseoil
1000 Club
1000 Club
 
Posts: 1820
Images: 669
Joined: Sun Apr 27, 2014 8:46 am
Location: Raton, New Mexico, living the good life!
Top

Re: Tucson tortoise

Postby lrrowe » Fri Jul 03, 2015 4:29 pm

noseoil wrote:Starting on this stuff. Let's see where I end up after a 3 day weekend. Lots of little things to do to put things together still, but I'm getting there! Here's a pile of stuff which will go in place in the next few days. Have to drill out a few holes, lay in the first layer of insulation & add a few backing & blocking pieces first. Then I'll start with the conduit & wire itself. So thankful not to be working today.

Image


I love those switch and outlet boxes.
Bob

First Post on Purchase of Trailer: http://www.tnttt.com/viewtopic.php?f=42&t=60722
Hot water infloor and radiator heating project:[url]http://www.tnttt.com/posting.php?mode=reply&f=54&t=62327[/

Image Image
User avatar
lrrowe
Donating Member
 
Posts: 3285
Images: 439
Joined: Sun Feb 10, 2013 5:54 am
Location: SW Virigina
Top

Re: Tucson tortoise

Postby noseoil » Tue Jul 07, 2015 9:51 pm

I had wanted to add a couple more pictures of the actual wiring, but on Sunday afternoon I had to stop work very quickly and put things away in a hurry. It's our rainy season now & we finally had our first rain storm. I was working in the cabin doing the trim-out for a light switch when I poked my head out & looked up. There was a large, black, nasty looking cloud bearing down on me from the south and it was too close for comfort.

I stopped everything and started running around securing things, putting away tools & stashing materials in various places. As it started to rain my wife, Alice, opened the back door & asked if I needed a hand. "Yes, HELP!" It started to rain almost instantly. If you've never been in the desert, you don't know how fast a rain can begin & end. The weather service said it was gusting to 50 mph & we had between 1.25" & 1.6" in about the half hour it was raining.

After securing the tarps & getting the trailer ready (it was now coming down in buckets), I went into the front yard to un-plug the scuppers in our front wall. The 3" drains get plugged with bamboo leaves and I have to run a stick through & under the wall from time to time. Our yard was filling up from the run-off! There is so much water in a short time that the dry, baked, hot soil doesn't have time to soak much of it up. Our lot slopes from the back to the front, so everything has to get out through two holes in the footer. Since we have a gravel yard, I use a spade to make shallow trenches to direct the water to these drainage points. The street in front of our house floods regularly when this happens, but fortunately our house sits about 4' above street level. All's well the ends well. No damage to the house or build.

Last year I had a large pine tree cut down in the front yard. A couple of years ago, the one in the back yard came down & squashed my son's Xterra while he was deployed overseas. Same type of storm, just bad luck. Here's a shot from the rear, showing how nicely I had detailed & waxed it, just before the tree landed on the windshield & caved in the roof over the dash board. Totaled! I won't bother trying to relate the language I listened to from the middle east when I got the phone call from my son. He's in the infantry, so suffice it to say that the language he used was colorful & robust.
160005
160006

This coming weekend, I'll take a few more pictures of the progress. I have most of the wire runs "roughed in" now for the cabin. The inverter is located & in place on the galley bulkhead. The switch boxes are in and wired up, as are the dome lights on the headliner & charging boxes at the headboard. I still need to locate the reading lamps & put in some backing blocks, as well as the wires to them for 12v power.

I'm waiting to do the galley stuff until I have the hatch built and hung, so I can figure out blocking & the runs which go in the hatch framework. I'm trying something different for the feed into the hatch & hope it works out as planned. More about that later.
Last edited by noseoil on Sun Nov 03, 2019 8:25 am, edited 1 time in total.
Build log: viewtopic.php?f=50&t=60248
The time you spend planning is more important than the time you spend building.........

137905
User avatar
noseoil
1000 Club
1000 Club
 
Posts: 1820
Images: 669
Joined: Sun Apr 27, 2014 8:46 am
Location: Raton, New Mexico, living the good life!
Top

Re: Tucson tortoise

Postby noseoil » Sat Jul 11, 2015 6:15 pm

Nice thing about a skeletonized frame, it's easy to add blocking for fastenings. Here's the backing for a reading lamp above the headboard. Also did the coat hooks which are between the doors & port holes. Duct tape is covering wires to the switches. Most of the cabin stuff is in now as far as lighting, switches & charging ports. It's all burned in & working. Here's the reading lamp location, prior to the wall insulation & the outside skins. Switches do the outside porch lights & inside dome lights. You can see how the canvas is too short at the walls & will get some 3/4" wide flat molding at the edge, to trim things out. Drink holder is in as well.
160008
160007

Dome lights are in and wired now. The strange looking bracket above the radio is for the flat screen TV. It's folded out of the way for work. Behind the TV opening there are 4 PEX conduit runs, which will go to the PD4045. It faces aft & is accessed from the galley side for fuses & breakers, but wires can be accessed from behind the TV if it's folded out of the way. There's a small access door which fits into the opening. The PEX is inside the headliner & between the two layers of 3/4" insulation. The little hangy-down wire is for the Max Air fan, which is just sitting & waiting to be installed. I got the 10 speed version with the water sensor in case of rain. After reading about the noise some fans make & people trying to slow them down, I'm glad I got one which is very quiet and has a few more features. The three round vents are showing in this shot, to dump any excess heat from electrical stuff out the top and into the galley area if it's open.
160009

The kitchen counter with outlets for the shore power, inverter, 12v switches to charging port, volt meter, cigarette lighter 12v outlet & main battery switch. Opening is for the PD 4045, above the outlets.
160010
Last edited by noseoil on Sun Nov 03, 2019 8:32 am, edited 1 time in total.
Build log: viewtopic.php?f=50&t=60248
The time you spend planning is more important than the time you spend building.........

137905
User avatar
noseoil
1000 Club
1000 Club
 
Posts: 1820
Images: 669
Joined: Sun Apr 27, 2014 8:46 am
Location: Raton, New Mexico, living the good life!
Top

Re: Tucson tortoise

Postby Rlowell » Sat Jul 11, 2015 10:13 pm

:applause: Very nice. Looks like you had everything well planned out. I like what you have done so far. :)
Plan your work...work your plan...at least that's the plan. Oh, just do it anyway!
gallery/image_page.php?album_id=1425&image_id=76342
User avatar
Rlowell
2000 Club
2000 Club
 
Posts: 2004
Images: 42
Joined: Wed May 23, 2007 12:39 pm
Location: Orlando, Fl.
Top

Re: Tucson tortoise

Postby noseoil » Sun Jul 12, 2015 3:31 pm

Finished for the weekend now, too hot again (only 100 now, but that's enough heat for me today). Here's the top showing the conduit & the first layer of insulation in place. There are a couple of wires I'm going to run still, but most of the runs are roughed in at this point.
160018

Passenger side insulation in place and finished. I cut this stuff last year before skinning the skeletons. Easier to mark it first than try to measure it to fit. Messed up on the cuts. Passenger side has the aluminum side facing out, the other faces in toward the cabin. Ah well, it's an experiment to see which one blocks the heat best. Not too worried about the cold where I live, at this point a little cold would be nice for a change.
160020

Front insulation is done as well. A few more odds & ends, then it's time to start skinning. The front curves took 2 layers of 3/4" foam, glue & kerfs for the bends. They're about 2 1/2" apart on center, just score the foam & then pop it so it conforms to the curve without breaking it all the way through. Worked out well enough & the 1/8" skin will bend easily on the outer curved edges of the sides & roof.
160021

Getting there. Nap time & work again tomorrow.....
Last edited by noseoil on Mon Nov 04, 2019 7:34 am, edited 1 time in total.
Build log: viewtopic.php?f=50&t=60248
The time you spend planning is more important than the time you spend building.........

137905
User avatar
noseoil
1000 Club
1000 Club
 
Posts: 1820
Images: 669
Joined: Sun Apr 27, 2014 8:46 am
Location: Raton, New Mexico, living the good life!
Top

Re: Tucson tortoise

Postby KCStudly » Sun Jul 12, 2015 3:44 pm

Looks great! Nice work. :thumbsup: :applause:
KC
My Build: The Poet Creek Express Hybrid Foamie

Poet Creek Or Bust
Engineering the TLAR way - "That Looks About Right"
TnTTT ORIGINAL 200A LANTERN CLUB = "The 200A Gang"
Green Lantern Corpsmen
User avatar
KCStudly
Donating Member
 
Posts: 9611
Images: 8169
Joined: Mon Feb 06, 2012 10:18 pm
Location: Southeastern CT, USA
Top

Re: Tucson tortoise

Postby noseoil » Mon Jul 20, 2015 7:40 am

Changed this one, waste of bandwidth!
Last edited by noseoil on Mon Nov 04, 2019 7:38 am, edited 1 time in total.
Build log: viewtopic.php?f=50&t=60248
The time you spend planning is more important than the time you spend building.........

137905
User avatar
noseoil
1000 Club
1000 Club
 
Posts: 1820
Images: 669
Joined: Sun Apr 27, 2014 8:46 am
Location: Raton, New Mexico, living the good life!
Top

Re: Tucson tortoise

Postby Rlowell » Mon Jul 20, 2015 8:54 am

:thumbsup: Looks like a fun weekend.
Can we get some of that cooler weather here?
We might see some lower temps around October here in Fl..

Rod
Plan your work...work your plan...at least that's the plan. Oh, just do it anyway!
gallery/image_page.php?album_id=1425&image_id=76342
User avatar
Rlowell
2000 Club
2000 Club
 
Posts: 2004
Images: 42
Joined: Wed May 23, 2007 12:39 pm
Location: Orlando, Fl.
Top

Re: Tucson tortoise

Postby noseoil » Tue Jul 21, 2015 7:34 am

Just wanted to say thanks to Sheddie for his contribution to my build. I contacted him about the door stops and asked him about sending some for me. He was kind enough to track down a set of the "Kiwi" door stops for me for my build. I tried to locate some for my doors, but wasn't able to find them here in the states. He found a pair & mailed them here for me. They showed up in my mail box this weekend while I was out of town. Yes, it might have been cheaper to just settle on something else, but they are still the best I've seen for a small build.

Once again, the kindness & the helpfulness of the people on the forum is outstanding. A toast to Sheddie & his bride are in order! :wine:
Build log: viewtopic.php?f=50&t=60248
The time you spend planning is more important than the time you spend building.........

137905
User avatar
noseoil
1000 Club
1000 Club
 
Posts: 1820
Images: 669
Joined: Sun Apr 27, 2014 8:46 am
Location: Raton, New Mexico, living the good life!
Top

Re: Tucson tortoise

Postby dales133 » Tue Jul 21, 2015 10:22 am

Good onya Frank, nice work
User avatar
dales133
4000 Club
4000 Club
 
Posts: 4605
Images: 1
Joined: Mon Oct 13, 2014 5:26 pm
Top

Re: Tucson tortoise

Postby Sheddie » Tue Jul 21, 2015 2:30 pm

Thanks Tim, you are most welcome ;)
After all this forum is all about helping out or solving problems :wine:
User avatar
Sheddie
1000 Club
1000 Club
 
Posts: 1499
Images: 1129
Joined: Mon Jul 01, 2013 3:26 pm
Location: Whangarei, New Zealand
Top

PreviousNext

Return to Build Journals

Who is online

Users browsing this forum: No registered users and 54 guests